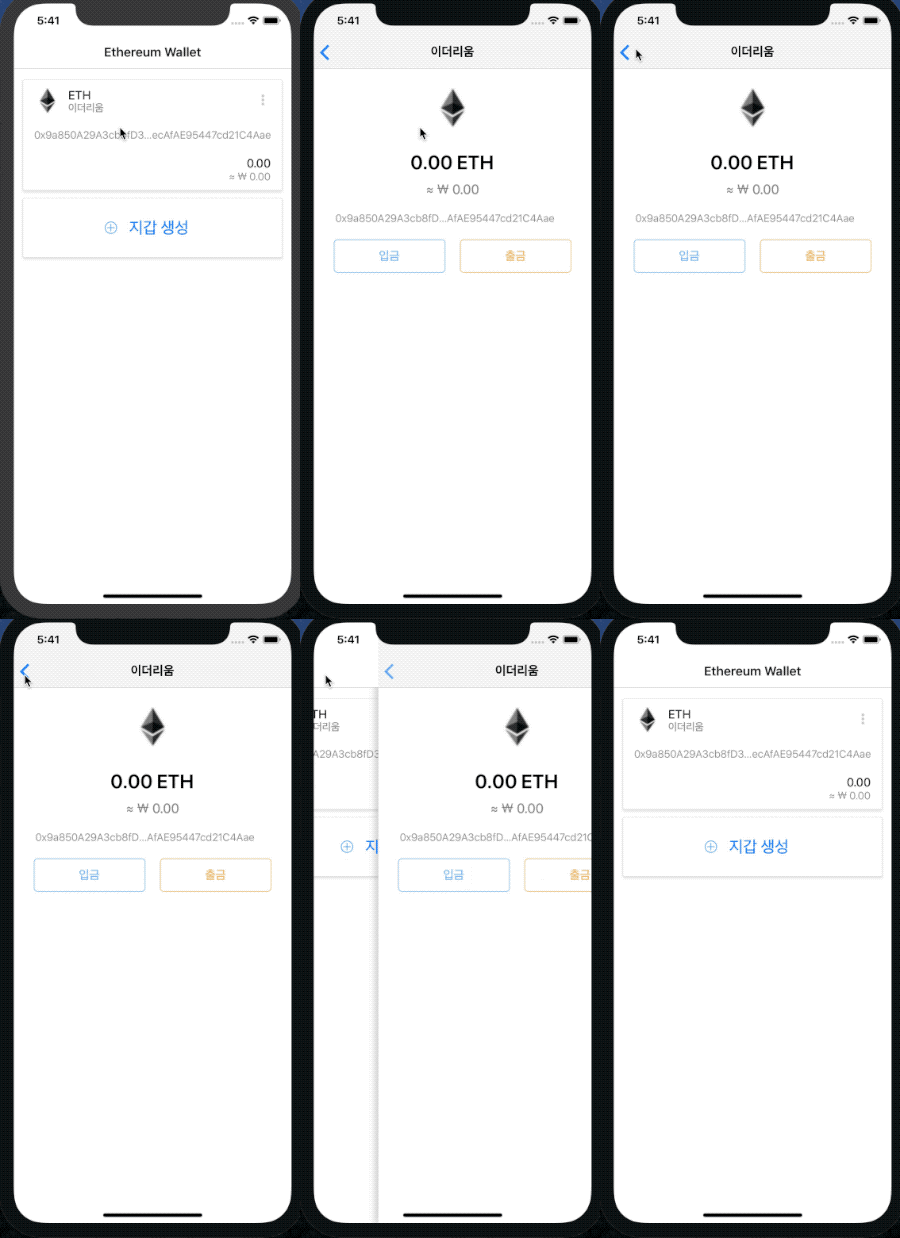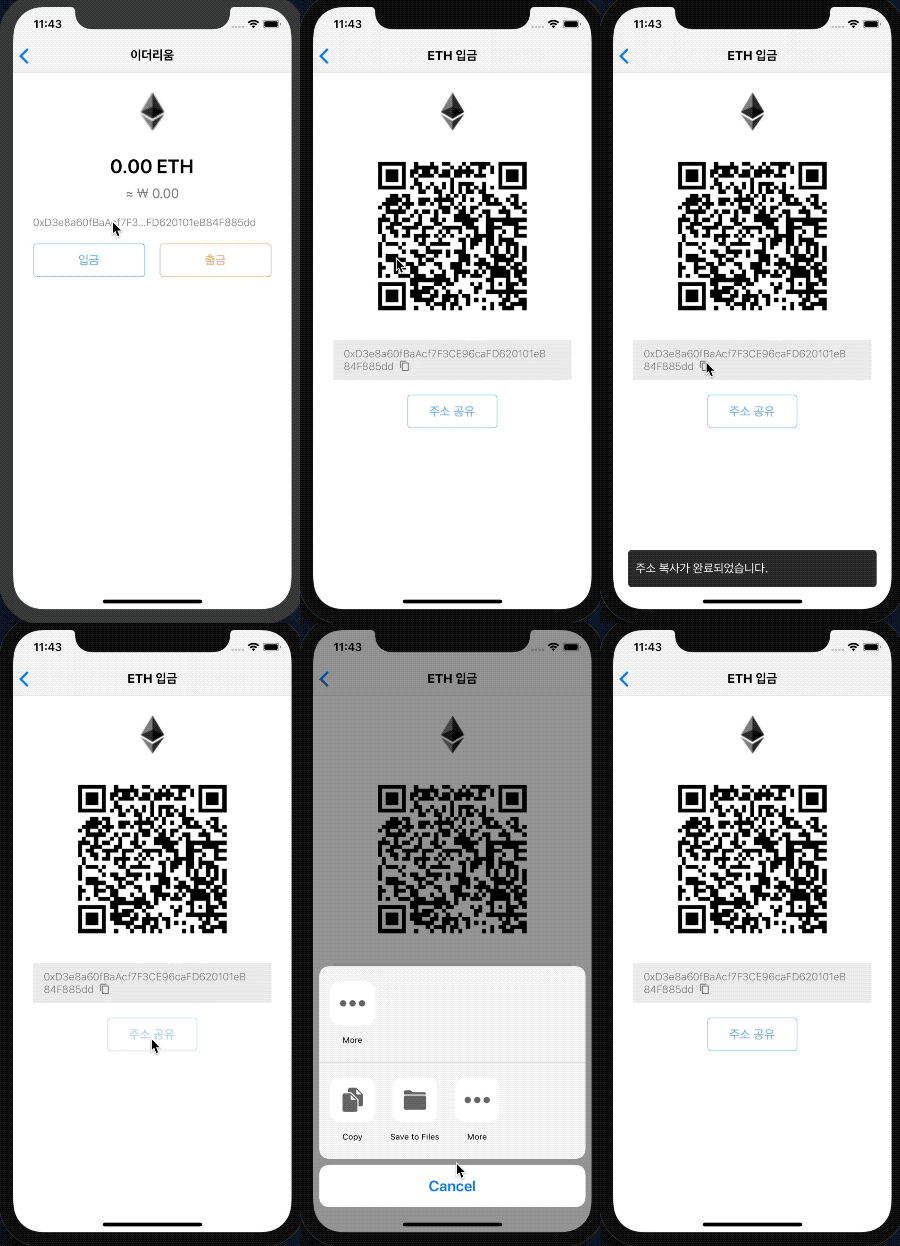
이번에는 이더리움 지갑 상세 화면과 입금 화면을 만들 것입니다.
지갑 상세 화면 만들기
지갑 상세 정보를 보여줄 화면을 만듭니다. 지갑 상세 화면에는 이더리움 잔액과 입금/출금 버튼을 보여 줄 것입니다. components/WalletInfoScreen.js 파일을 생성합니다.
import React, { Component } from 'react';
import { StyleSheet, View, AsyncStorage } from 'react-native';
import { Container, Content, Header, Card, CardItem, Body, Text, Icon, Button, Left, Right, Thumbnail, Title } from 'native-base';

export default class WalletInfoScreen extends Component {
  static navigationOptions = {
    header: null
  }

  render() {
    const wallet = this.props.navigation.state.params;
    return (
      <Content padder>
        <Card transparent>
          <CardItem>
            <Body style={ styles.center }>
              <Thumbnail source={{uri: 'https://s2.coinmarketcap.com/static/img/coins/64x64/1027.png'}} />
            </Body>
          </CardItem>
          <CardItem>
            <Body style={ styles.center }>
              <Text style={{fontSize: 26, fontWeight:'600', marginTop: 10}}>
                { wallet.balance || '0.00' } { wallet.symbol }
              </Text>
              <Text style={{fontSize: 18, marginTop: 10, color:'gray'}}>
                ≈ ₩ {wallet.convertPrice || '0.00'}
              </Text>
            </Body>
          </CardItem>
          <CardItem>
            <Body style={ styles.center }>
              <Text note ellipsizeMode="middle" numberOfLines={1}>
                {wallet.address}
              </Text>
            </Body>
          </CardItem>
          <CardItem>
            <Body style={{ flexDirection: 'row', justifyContent: 'space-around'}}>
              <Button bordered info style={{flex:1, justifyContent:'center', marginRight: 10}}><Text>입금</Text></Button>
              <Button bordered warning style={{flex:1, justifyContent:'center', marginLeft: 10}}><Text>출금</Text></Button>
            </Body>
          </CardItem>
        </Card>
      </Content>
      </Container>
    );
  }
}

const styles = StyleSheet.create({
  container: {
    flex: 1,
    backgroundColor: 'white'
  },
  center: {
    alignItems: 'center',
    justifyContent: 'center',
  }
});
navigation.state.params로 전달받은 지갑 정보 wallet를 출력합니다.- 아직 구체적인 기능을 구현하지는 않았습니다.
그다음 ./src/App.js 를 수정합니다. 네이게이터에 WalletInfoScreen을 추가합니다.
import WalletInfoScreen from './components/WalletInfoScreen';

const AppStackNavigator = createStackNavigator({
  Wallets: { screen: WalletsScreen },
  CreateWallet: { screen: CreateWalletScreen },
  WalletInfo: { screen: WalletInfoScreen }, // 추가된 코드
},
{
  // (…)
});
- AppStackNavigator에
WalletInfo: { screen: WalletInfoScreen }가 추가되었습니다.
components/WalletsScreen.js 파일을 수정합니다.
export default class WalletsScreen extends Component {
  static navigationOptions = {/* (…) */}
    constructor(props) {/* (…) */}
    _onWillFocus = payload => {/* (…) */}

  render() {
    return (
      <>
        <NavigationEvents
          onWillFocus={this._onWillFocus}
          />
        <Container style={styles.container}>
          <Content padder>
            {
              this.state.wallets.map((wallet) => {
                return (
                  <WalletComponent
                    key={wallet.address}
                    wallet={wallet}
                    onPress={() => {
                      this.props.navigation.navigate('WalletInfo', wallet)}
                    }/>
                )
              })
            }
            <Card>
              {/* (…) */}
            </Card>
          </Content>
        </Container>
      </>
    );
  }
}

const styles = StyleSheet.create({/* (…) */});
- WalletComponent 컴포넌트의
onPress속성에navigation.navigate('WalletInfo', wallet)를 입력합니다.- 이제 지갑 컴포넌트를 클릭하면, WalletInfo 화면으로 이동하면서 선택한 wallet를 전달합니다.
마지막으로 components/WalletComponent.js 파일을 수정합니다.
import { TouchableOpacity } from 'react-native';

export default function WalletComponent(props) {
  const wallet = props.wallet;
  return (
    <TouchableOpacity onPress={props.onPress}>
      <Card>
        {/* (…) */}
      </Card>
    </TouchableOpacity>
  );
}
- react-native 에서
TouchableOpacity를 import 합니다.<Card>컴포넌트를<TouchableOpacity>로 감쌉니다.<TouchableOpacity>의 onPress 속성에props.onPress를 입력합니다.props.onPress는 앞서 WalletsScreen에서 전달받은{() => this.props.navigation.navigate('WalletInfo', wallet)}입니다.
여기까지 작업하고 지갑 목록에서 지갑을 선택해 봅니다. 그럼 지갑 상세화면으로 이동하는 것을 볼 수 있습니다.

입금 화면 만들기
입금 화면에서는 QRCode 이미지와 이더리움 주소를 보여 줄 것입니다. 먼저 react-native-qrcode 모듈을 설치합니다.
$ npm install react-native-qrcode --save
그리고 components/ReceiveScreen.js 파일을 생성합니다.
import React, { Component } from 'react';
import { StyleSheet, View, Clipboard, Share } from 'react-native';
import { Container, Content, Header, Card, CardItem, Body, Text, Icon, Button, Left, Right, Thumbnail, Title, Toast } from 'native-base';
import QRCode from 'react-native-qrcode';
export default class ReceiveScreen extends Component {
static navigationOptions = {
header: null
}
render() {
const wallet = this.props.navigation.state.params;
return (
<Container style={styles.container}>
<Header>
<Left>
<Button
transparent
onPress={() => this.props.navigation.goBack()}>
<Icon name="arrow-back" />
</Button>
</Left>
<Body>
<Title>{ wallet.symbol } 입금</Title>
</Body>
<Right />
</Header>
<Content padder>
<Card transparent>
<CardItem>
<Body style={ styles.center }>
<Thumbnail
circle
source={{uri: 'https://s2.coinmarketcap.com/static/img/coins/64x64/1027.png'}} />
</Body>
</CardItem>
<CardItem>
<Body style={[styles.center, {marginVertical: 20}]}>
<QRCode
value={wallet.address}
bgColor='black'
fgColor='white'
size={200}
/>
</Body>
</CardItem>
<CardItem>
<Body style={[styles.center, {padding:10, backgroundColor:'#EFEFEF'}]}>
<Text
note
onPress={() => {
Clipboard.setString(wallet.address);
Toast.show({
text: "주소 복사가 완료되었습니다.",
position: "bottom",
duration: 1000
});
}}>
{wallet.address}
<Icon name='content-copy' type="MaterialCommunityIcons" style={{fontSize:15, color:'#777'}}/>
</Text>
</Body>
</CardItem>
<CardItem>
<Body>
<Button bordered info block
style={{marginHorizontal:100}}
onPress={() => {
Share.share({
message: wallet.address
});
}
}><Text>주소 공유</Text></Button>
</Body>
</CardItem>
</Card>
</Content>
</Container>
);
}
}
const styles = StyleSheet.create({
container: {
flex: 1,
backgroundColor: 'white'
},
center: {
alignItems: 'center',
justifyContent: 'center',
}
});
<QRCode>컴포넌트를 사용하여 주소를 QR코드로 보여줍니다.- 주소를 선택하면 Clipboard을 사용하여 클립보드에 복사합니다. 그리고 Toast 메세지를 출력합니다.
- 주소 공유 버튼을 누르면 공유하기 기능을 수행합니다.
마지막으로 ./src/App.js를 수정합니다.
import // (...)
import { Root } from "native-base"; // 추가된 코드
import ReceiveScreen from './components/ReceiveScreen'; // 추가된 코드

const AppStackNavigator = createStackNavigator({
  Wallets: { screen: WalletsScreen },
  CreateWallet: { screen: CreateWalletScreen },
  WalletInfo: { screen: WalletInfoScreen },
  ReceiveScreen: { screen: ReceiveScreen }, // Screen 추가
},
{
  defaultNavigationOptions: {
    headerBackTitle: null, // 뒤로가기 버튼 타이틀 없음.
  },
});

const AppContainer = createAppContainer(AppStackNavigator);

export default () => (
  <Root>
    <AppContainer />
  </Root>
);
- 네이게이터에
ReceiveScreen: { screen: ReceiveScreen }를 추가하였습니다.<AppContainer />를 native-base의<Root>로 감쌌습니다. 이것은 NativeBase Toast 컴포넌트를 사용하기 위함입니다.
지갑 상세화면의 입금 버튼에 ReceiveScreen 화면을 연결하고 앱을 실행해봅니다.

이더리움 모바일 지갑을 구현하다 보니 구현 범위가 생각보다 크네요. 그리고 코드 량이 많아지다 보니 설명이 부족할 수 있다는 생각이 들었습니다. 읽다가 잘 이해가 안되는 부분을 댓글로 질문하면 최대한 답변 드리겠습니다.
여기까지 작업한 코드는 모두 깃허브에 업로드되어있습니다.
여기까지 읽어주셔서 감사합니다.
짱짱맨 호출에 응답하여 보팅하였습니다.
이더 코인이 있으면 입금을 한번 해보고 싶네요. ^^
이더 코인 입금 받을수 있게
다음 포스팅에는 제 이더리움 지갑 주소도 넣어야겠어요. ㅎㅎ
Hi @anpigon!
Your UA account score is currently 2.919 which ranks you at #11450 across all Steem accounts.
Your rank has not changed in the last three days.Your post was upvoted by @steem-ua, new Steem dApp, using UserAuthority for algorithmic post curation!
In our last Algorithmic Curation Round, consisting of 209 contributions, your post is ranked at #91.
Evaluation of your UA score:
Feel free to join our @steem-ua Discord server