Why do I need to resize my images?
Well, most images are gotten online and come in a particular size - length and width. The size of a particular image may be too big or small. In this tutorial, I will focus on resizing a big image to a smaller size suitable for a blog post. You probably have seen a picture too big to be used in a post - some people use them like that anyway. For people with no graphics experience, we will see how to use a simple available tool to resize any image.
Who are the target audience for this tutorial?
While everyone can benefit from this write up, dummies are the main target. By dummies I mean people with no knowledge of graphics. I will use a very simple tool to demonstrate this presentation. Professionals use various tools like photoshop to edit their graphics. That is a bit beyond ordinary people.
The program I will use to demonstrate this tutotrial is called Microsoft Office Picture Manager. It is part of the Microsoft Office suite. So if you have installed Office, just search for this program from your start menu, run it and follow along.
How to resize an Image Office Picture Manager?
- Goto pixabay.com. Click on any image of choice to open it. Right-click on the image and select "copy image". (see image below)

- Open Microsoft Office Picture Manager and paste the copied image in the program. (Note: Am using version 2007 for this tutorial)

- Double-click the image to open it fully for editing. (see image below)

Click on "edit pictures" button on the menu bar. (see image above)
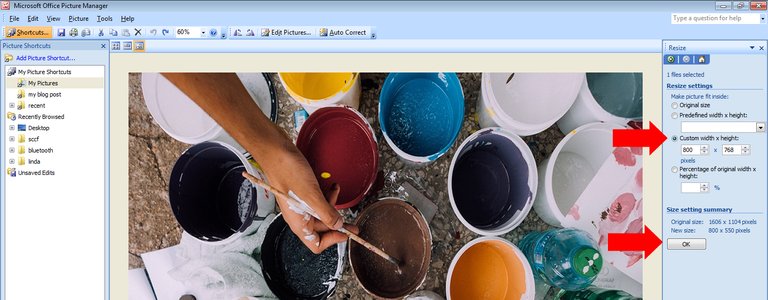
From the menu items on the right, click, "Resize"
Check the "custom width x height" button. This option lets you resize either the height or width. If you insert any figure for the new height, the program automatically adjusts the width and vice versa.
Note: For the image am working on, the original width and height (in pixels) is 1606 by 1104. I will resize it to 800 by 450.
So when I select "custom width x height" and type 800 for the width, Picture Manager automatically adjusts the height to 550.
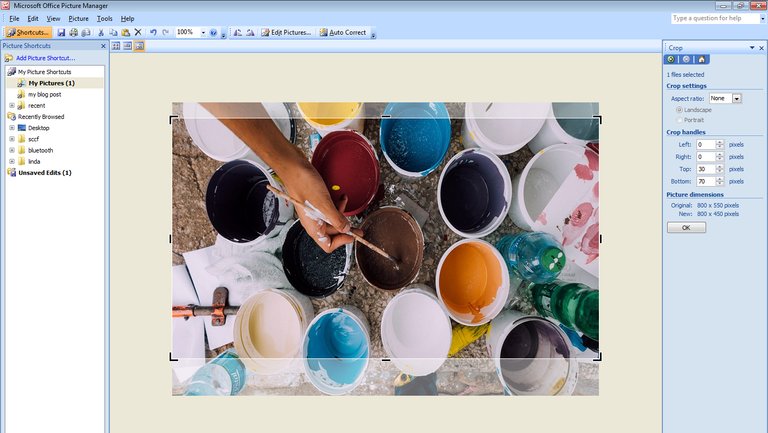
So now that I have gotten the desired width (800), I need to adjust the height too. Since the image has extra spaces, I will use the crop tool to adjust the height.

- Click on "edit pictures" again and select "crop". Four handles appear around the image. Now our target is to reduce the height to 450. So to do that, I need to click, hold and drag the handle from either the top or bottom side. As I do so, I need to watch the width of the new size to stop at 450. (check the image below). Once I arrive on the desired size, I click Ok.
With this method, I have arrived at the desired size size of 800 by 450.

Why 800 by 450?
The first picture on any post is the preview image. Most people fail to realize that there is a predefined size by steemit for the first image. The dimension is height 450 while the width is 800 pixels. So always ensure that your first image has this dimension. Otherwise, steemit default configuration of 800 by 450 may skew up your image.
Conclusion
This is an easy way to resize your images. If you have any questions or further assistance, I am willing to help.

Support @steemiteducation by posting education-related content using the tag #steemiteducation..
Hello! I find your post valuable for the wafrica community! Thanks for the great post! We encourage and support quality contents and projects from the West African region.
Do you have a suggestion, concern or want to appear as a guest author on WAfrica, join our discord server and discuss with a member of our curation team.
Don't forget to join us every Sunday by 20:30GMT for our Sunday WAFRO party on our discord channel. Thank you.
This post has received a 4.08 % upvote from @boomerang.
This was a really helpful post!!! I'm going to do more to pay attention to that when I post my podcasts.
Peace, Abundance, and Liberty Network (PALnet) Discord Channel. It's a completely public and open space to all members of the Steemit community who voluntarily choose to be there.Congratulations! This post has been upvoted from the communal account, @minnowsupport, by focusnow from the Minnow Support Project. It's a witness project run by aggroed, ausbitbank, teamsteem, someguy123, neoxian, followbtcnews, and netuoso. The goal is to help Steemit grow by supporting Minnows. Please find us at the
If you would like to delegate to the Minnow Support Project you can do so by clicking on the following links: 50SP, 100SP, 250SP, 500SP, 1000SP, 5000SP.
Be sure to leave at least 50SP undelegated on your account.
100SP 200SP 300SP 400SP 500SP 750SP 1000SP 2000SP 3000SP 4000SP 5000SP 10,000SP 25,000SP
My SP is still below 100. Once I get there, I will support @steemiteducation with it. Thanks for bringing teachers and instructors together using @steemiteducation.
The Creative Crypto is all about art on the blockchain and learning from creatives like you. Looking forward to crossing paths again soon. Steem on!Hello @focusnow, thank you for sharing this creative work! We just stopped by to say that you've been upvoted by the @creativecrypto magazine.