Well I’ve been working on tying up some of the loose ends of Phase I. While working on the left garage door control box, it dawned on me that I didn’t cover a couple of items as well as I should have. The first of these is the Whole Home Audio System. I believe I mentioned that I cannot actually control the system directly from my system, only monitor the status of the amplifiers via the “Speakers” tab. There were a few design motivations for this. First I didn’t want to use Arduino pins for this. Along with that, I wasn’t interested in spending time and money working out how to control things like volume. Besides why re-invent the wheel? Apple has a free iPhone/iPad app called Remote. Basically it lets you do everything in iTunes remotely, that you can do as if sitting in front of your computer. Finally, and most importantly, I didn’t want any potential hackers to wake me up in the middle of the night, by blasting my music. Let’s go through how I set the system up.
The starting point was easy. I wanted to use iTunes on my Mac as the source of the music. Then I identified the spaces I wanted to play music. There are six spaces, kinda. I live in a two story house with a basement. There is a bathroom on each level. Currently only the first floor bathroom is hooked up, but all three will have the music system in them. Who doesn’t like to singing in the shower? The master bedroom, kitchen/dinning room and patio are the other three. The kitchen and dinning room are open to one another, so I would never have different music playing in them, thus they share the same amplifier. I also send the music signal to the living room and the basement surround sound systems. This brings the total number of spaces that can play the music to nine. I chose not to include the kids bedrooms or the garage. I wanted a some flexibility, not just the same music everywhere , so I designed in Bluetooth receivers to the three bathrooms and patio. I will refer to the spaces as zones from now on. This picture shows two “Sterling” headphone amplifiers that take the audio output of the Mac, amplifying it a little and split it eight ways. 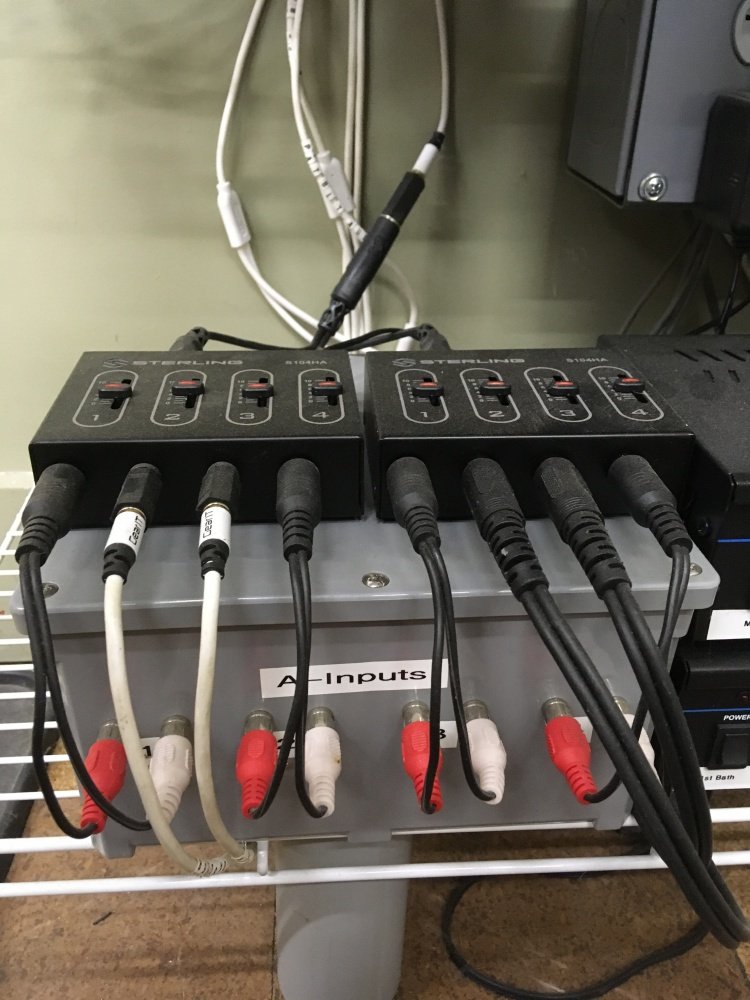
You can also see just behind the amps the white 3.5mm cable coming from the Mac, then being split to each “Sterling”. Those sit on a PVC junction box, more on that in a minute. Left to Right, 1 through 8, the first output of the headphone amp is “A input 1”. The second and third outputs go out to the two surround sound aux inputs. Fourth and fifth outputs are “A inputs 2 & 3”. The sixth and seventh outputs go directly into the master bedroom and kitchen/dinning amplifiers. The last output is “A input 4”. Not shown is the back of the PVC box which has the “B inputs” and the “outputs”. The “B inputs” are the output signals coming from the zone Bluetooth receivers. Then the outputs go to their respective zone amplifiers. Essentially the PVC box houses a glorified “A-B” switcher that’s remotely controlled. Here is a schematic I drew up using Fritzing. 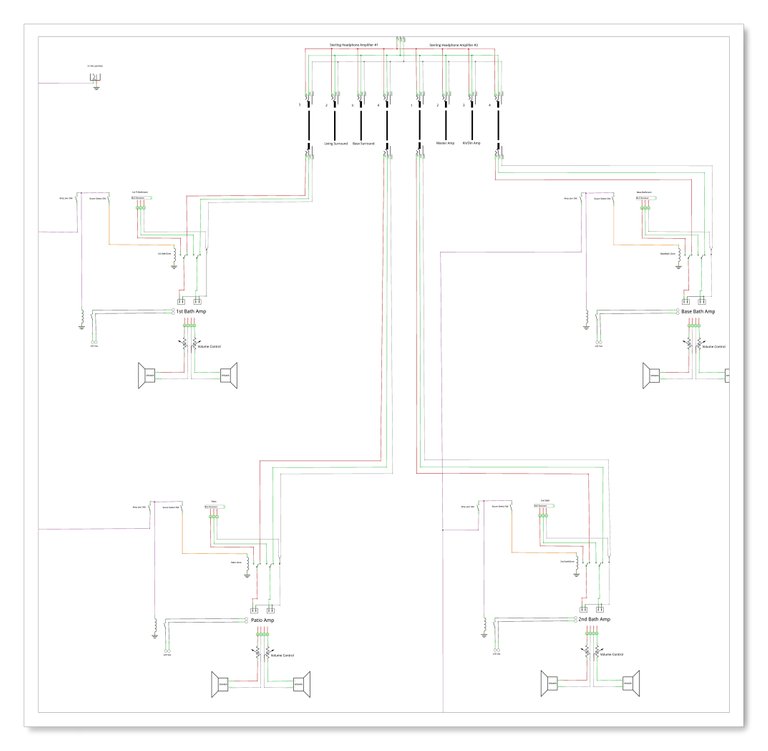
So each of the six zone amplifiers seen here, 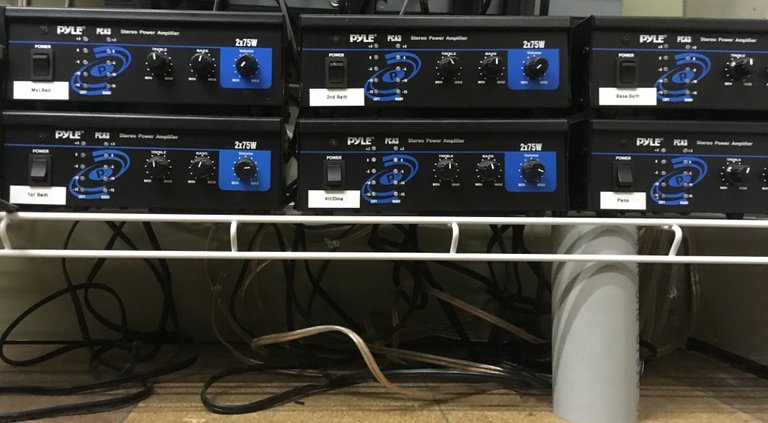 have speaker output wires going to the zone control boxes rotary volume control. The bathrooms and patio zone controls are the same. Each has a volume control, a power on/off switch and an audio source selector switch. The kitchen/dinning zone control box has the power on/off switch and two volume controls.
 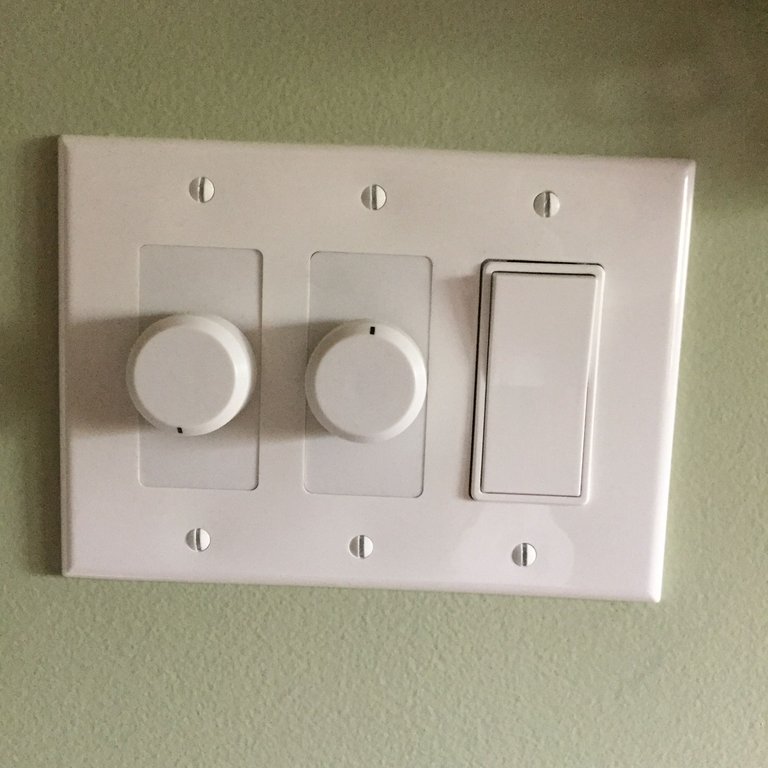 That way I can set the volume level differently for the kitchen and dining room. And the master bedroom has just the power switch and volume control.
If you’re still with me HODL, it gets a little messy from here. While designing how this system should work, I imagined as many scenarios as I could. First scenario is a whole house sound system to be used while entertaining a large number of guests, aka: off the hook party. Second scenario, whole house audio with trusted family and friends. Third scenario would be any number of zones less than all zones. Fourth scenario, individual zones playing different music at the same time. A few of the scenarios have some commonalities but the first scenario is in a class by itself. So let’s start there.
First it should be fool proof. By that I mean I wanted a system that could not be messed with by a curious guest. Well with zone controls in areas where guests could access them I needed a way to prevent tampering. Second, limit the amount of interaction a guest could have. My solution is to disable all the power and source select switches simply and securely. The security comes from the fact that all the equipment and the disable switch are located in the locked, basement, home hub closet. The limited access part means that only the volume control will still be active. This allows easy access to control volume with changing party atmosphere. The disable switch is shown here at the top right.  The switch is “normally on”, allowing 12Vdc out to the zone controls. Below that switch is the “all on bypass”, “normally off”. When switched on, all amplifiers power up, and the “A-B” switcher defaults to the “A input”, sending the same signal to all 9 zones. The rest of the photo shows, from the left, two power supplies for the Sterling’s and the USB Arduino input, then the six plugs for the zone amps with there respective USB inputs and Bluetooth power supplies. For the rest of the scenarios it’s not necessary to disable the zone controls. For the second and third scenarios simply turn on the “master” power switch next to the Mac that sources iTunes. I call it a master but it really only turns on the headphone amplifiers. Then depending on which room or rooms you want music, you need to go to the zone control box, turn on the power switch and set the volume. And/Or go to the surround systems power them on and set the volume. For the final scenario I can really only have five different music sources, the four Bluetooth receivers and the Mac. The Bluetooths can all be used at any time from the zone controls with out having to turn on the master. I’ve included this Fritzing schematic so you can follow along.
 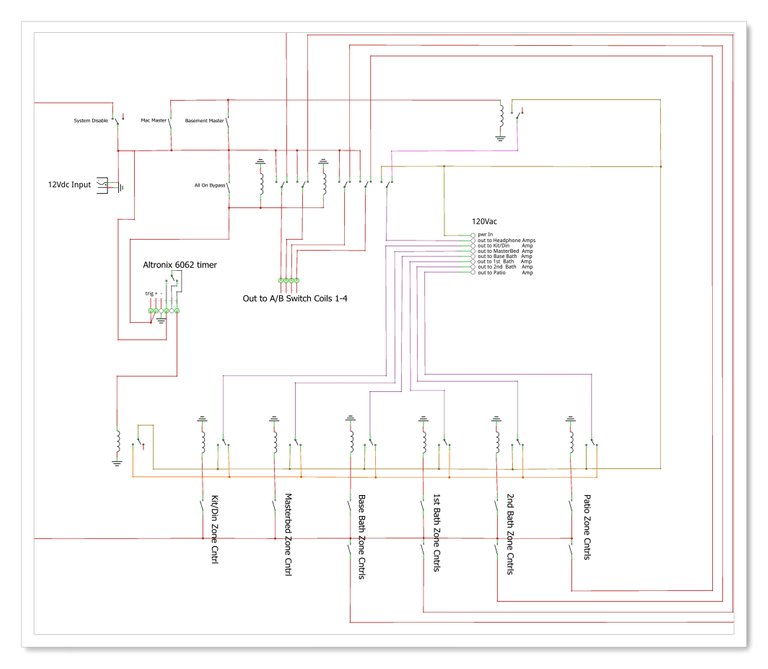 Some general notes on it: all the relays are 12Vdc coils and the drawing represents the system in the normal state with everything off.
The second item I didn’t cover is the right garage door exterior button enabling scheme. The reason I hadn’t brought it up is because it has absolutely nothing to do with the home automation system, other than physical location. You may have noticed the middle button in the garage door opener button panel and the LED mounted in the center of the garage LED panel and wondered what those are for? Well I live on a corner and the garage is only the length of a car away from the street. So I like to keep the doors closed when I’m not right there. The only way into the garage is via the door opener, bad during power outages. Anyway I got tired of going back into the house to open the door just to grab something out of the garage. It was especially bad when I was into something muddy. So I installed a button on the gate post that would operate the door. But I didn’t want to leave it operational all the time so I installed a switch inside the house that enables the outside button and turns on the center LED, which is blue, to remind me the outside button is enabled. 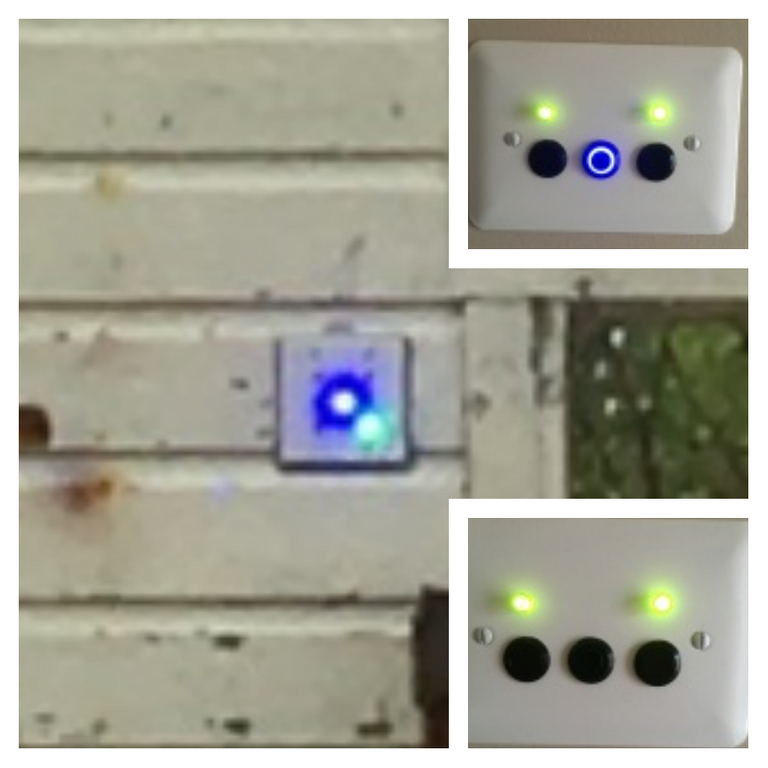
Not to go off track here, but I think the term Home Automation is pretty vague. To me it means any system or device that is installed in your domicile that improves the functionality and reduces human error. Key word, improves. I see things that people are building, and I wonder how that fits my definition. For example, hacking into a coffee maker and controlling it with a Pi seams a bit futile. Please don’t take this the wrong way. I’m not trying to bash anybody’s project. Now if you could get the Pi to remove, dispose of and replace the filter, put in coffee, add water and then start, I think you’d be on to something. Other than that, I just don’t see the point. Speaking of not seeing the point, why do we need Nest thermostat? As advertised, “you can set the temperature in your house before you leave the office”. Really? I wouldn’t buy one even if Bitcoin hit $100,000. After all, I can manage the same results with a programmable stat. Does anyone smell something fishy? I digress. Sorry about that rant. But if anyone can help me to understand why the Nest is worthwhile I’d love to hear from you. Clearly I’m missing something. And if anyone is wondering how my system improved my life, I will be happy to explain. Please ask a specific question and I’ll give a specific answer.
Finally I want to say thanks to all who follow and/or upvote me. I really aim to add value to Steemit and you all confirm that I’m on the right track.
It is a little fishy, but..
I personally think most people who get one either like how it looks, that they can monitor/control it via app, or have been sold on the idea that having the "Nest" installed will somehow save them money on their electricity bill.
Looks are subjective, but it does look kind of cool when compared to a traditional T-stat.
It is quite easy to set the temp/operate, plus the menu/interface is somewhat intuitive (for me as a Ref. & A/c Tech.) to do advanced system tests or set-up, without needing the manual.
I have never used the app so I couldn't tell you how well the monitoring/control works, but EVERY mfg of thermostats now offers some form of wifi/app control for a few of their products. The nest, used manually, offers no real benefits but could save "some" money "if" set-up/programmed properly. I don't own one, or really care to. When I get my own house I will most likely do some for of automation on my own.
Love the Audio/Control set-up by the way!
Very nice to read your perspective as an AC peson. Kinda confirms my suspicions and thoughts, especially the cool factor part.
Thanks for the final comment. :)
Luckily Z-Wave and Thread protocol based device are not available in my country 😄
Hey drsensor, I was wondering what country that is? because I saw this on youtube
and thought of your reply. Any insight?I guess no matter what, things could always be worse.