Introduction
The goal of this article is to assist those without software development experience in understanding how various endpoints in our API work together to complete tasks such as creating addresses, sending blockchain transactions, and other specific tangible goals.
Each goal in this guide builds upon the one before it. When using this guide we suggest creating a personal accompanying worksheet to mark down your results and keep track of your progress.
Getting started with Tatum and our API
To start using the Tatum API we’ll first need to create our accounts and generate our API keys. First, visit the Tatum - 'Get Started For Free' page and create a free account. For ease of use this can be done with an email address, LinkedIn account, or Facebook profile.
Once you’ve created an account, you’ll be able to log into the Tatum Dashboard to create your API keys. Your API key represents your Tatum account and defines how many API calls you can make per second and what the total number of API calls per month is available for you. Our free plan will provide everything you need to start learning and complete this worksheet series.
Once logged in, simply click the “Create API Key” button in the upper right-hand side of the screen. You’ll be able to find and collect your API key for use on this same page by clicking the “Show” button in the API KEYS area.
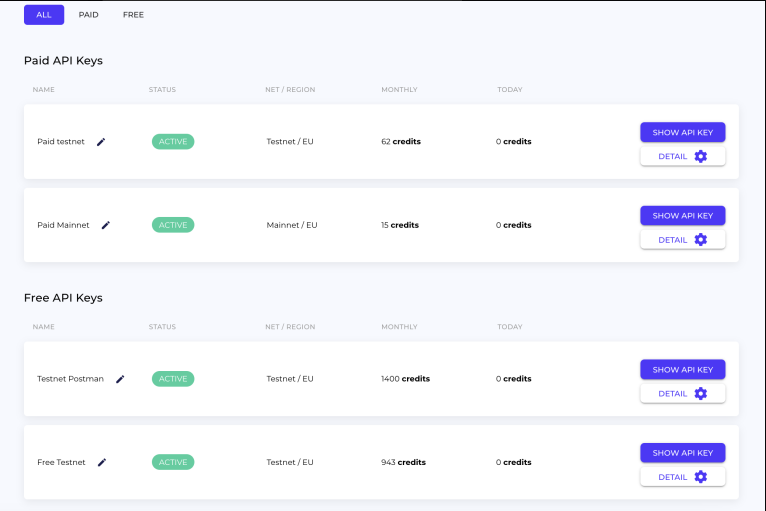
Collect your Testnet API key and add that to your notes.
You’ll notice there are both a Testnet and a Mainnety listed here. You’ll want to be using the Testnet for now. For more information on Testnets vs Mainnets you may review the this documentation:
Using Tatum to create a functioning blockchain wallet (from the docs)
Now that we’ve created Tatum accounts and collected our API keys, let's test some API calls from inside the Tatum API Docs. This is the simplest way to interface with our Testnet API so it’s the perfect place for beginners to start.
Our goal here is to create a fully functional testnet wallet on the Bitcoin blockchain testnet. The creation process here is a simple three step process using the same number of API calls to create each aspect of the wallet. First, we’ll need to generate a BTC wallet, then create an address, and we’ll end with generating a private key for the address. These three things together create a functioning blockchain wallet we are in control of that is capable of sending transactions. Let’s get started!
Creating a BTC wallet
Tatum has an extremely simple endpoint for the generation of BTC wallets. Once you’ve reviewed the documentation scroll down until you see the testing area and click “Try It”.

This will open the testing area where you can use the API without additional facilitation from a program like Postman or StopLight. First, enter your Testnet API key we collected in step 1. You should have this listed in your Worksheet. Enter this information and then click “Send”.
Congratulations! You’ve just sent your first API call! A successful call will produce what’s called a response. Each response is made up of fields of information called “Headers” and “Body”. For now, we’re interested in “Body”. The body of the ‘generate a BTC wallet’ call will The output will look like this:

Click copy and add this information to your worksheet. You’ll need this information again later.
By creating a BTC wallet we’ve created a theoretical space for BTC blockchain compatible coins and tokens to be stored. For us to send this wallet coins or tokens in this wallet it will need an associated address.
Generating a BTC address
Next, we’ll generate a BTC address for the wallet we created in 2.a. We’ll be using the “Generate Bitcoin deposit address from extended public key” endpoint to accomplish this. Once you’ve reviewed the linked documentation you can scroll down to the testing area and click “Try It”.
You’ll again need to enter your Testnet API key under security. You should have this listed in your Worksheet. Enter this information and then click “Parameters”. Your screen will look like this:
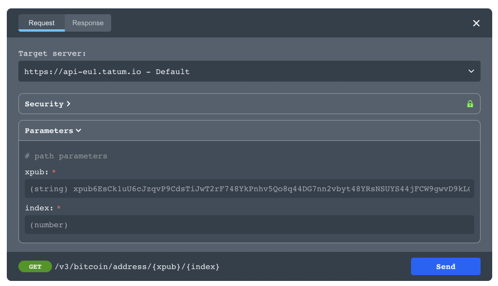
This API call has parameters that are required for it to run successfully. To generate a BTC address we’ll need a xpub and an index. The xpub was created when we created a BTC wallet in step 2.a and should be listed in your worksheet. Paste that into the xpub field. As for the index, this can be (nearly) any number for now pick any whole number between 1 and 9 and enter that in both the index field and in your Worksheet. You’ll need that index number again later, trust me.
Now, click Send! Your response will look something like this:

Click “Copy” and add this address to your worksheet.
Generating a BTC private key
Now that we have a BTC wallet with an associated address and index key all we need is to generate a private key so we can control it fully. We’ll be doing this with the ‘https://apidoc.tatum.io/tag/Bitcoin#operation/BtcGenerateAddressPrivateKey’ endpoint. Once you’ve reviewed the linked documentation you can scroll down to the testing area and click “Try It”.
Once again, this endpoint has requirements, this time two fields in the body. Thankfully, you’ll find both the index and mnemonic listed in your worksheet. Paste those in the required field and you’ll be met with your response. It should look something like this. Click the ‘Copy’ button and add this information to your worksheet.

Congratulations! You’ve created a fully usable BTC blockchain address and completed your first exercise! Keep your worksheet from this exercise as other following areas will require the information listed.
Using Tatum to create a functioning blockchain wallet (via Postman)
Postman describes itself as “an API platform for developers to design, build, test and iterate their APIs.” Now that you’ve had an opportunity to test the Tatum API through our documentation hub the next step is to access our API how most users do: through an intermediary program like Postman.
Getting started with Postman
Postman can be used by creating a free account and can be downloaded from the official website.
Once you’ve downloaded and installed Postman and logged in you’ll need to create your own collection to create custom API calls. We’ll talk more about that later but, for now, simply create a collection, set the ‘Authorization” type to “API Key”, and enter your Testnet API key in the provided field.
This should look something like:
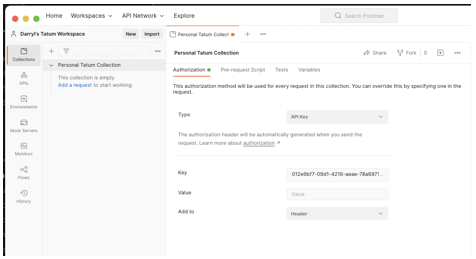
Next we’ll be importing the official OpenAPI specification. You can find the link to download the file at the very top of the Tatum API documentation page. The link will look like this:

The file this leads you to is called “swagger.json” and can be uploaded in the “Import” area of Postman. That should look something like this:
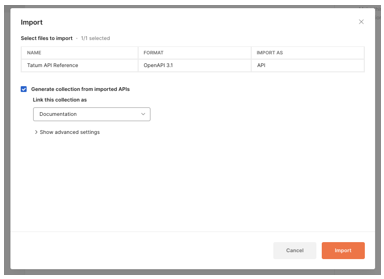
Once successfully imported you will see an area in your Postman collections titled “Tatum API reference” that will be filled with a variety of the Tatum API calls as described in the Tatum API documentation.
PLEASE NOTE: This list of endpoints is INCOMPLETE and, if you want to accomplish everything Tatum is capable of, you will also need to create a personal collection in Postman where you can create the items that have not yet been added to the collection from scratch.
Creating a BTC wallet
To create a BTC wallet we’ll be using the same endpoint we used in 2.a but this time we’ll be accessing it through Postman. You can find this endpoint in the v3 API collection in the ‘Bitcoin’ folder under the name ‘Generate a Bitcoin Wallet’. Once again, enter your Testnet API key in the field under “Authorization” and then simply press “Send”. If you’ve done everything correctly you will be met with the following screen.
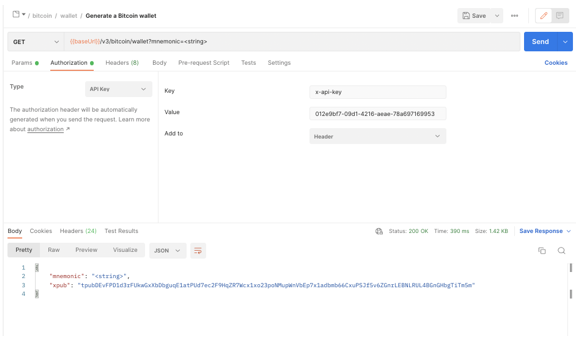
Once complete, collect the information from the body of this call and add it into your worksheet.
Generating a BTC address
Just as before we’ll be using the “Generate Bitcoin deposit address from Extended public key” to generate an address associated with the wallet we just created. This time you’ll need to add your Testnet API key in the ‘Authorization’ area and both an ‘xpub’ and ‘index’ under params. Once you’ve entered these three fields click ‘Send’ and, if your call is successful, you’ll be granted an address in the Body of the call. Please paste that address into the associated area in the worksheet.
Generating a BTC private key
To generate a BTC private key we’ll again be using the “Generate the private key for a Bitcoin address” call we utilized in 2.c. You can find this call in the Bitcoin Postman collection listed under “Generate the private key for a Bitcoin address” heading. Just like last time you’ll need to enter the mnemonic key and the accompanying index for the address in question. You ccan find this information in the Worksheet.
With that done you’ve completed the next section of this guide. Congratulations.
Using Tatum to send BTC blockchain transactions
Now that you’ve created a pair of addresses our next goal will be sending a transaction on the Bitcoin blockchain using only the Tatum API.
Funding your addresses
First we’ll need some test funds to send from one address to the other. Test funds are cryptocurrency or tokens that exist on testnet for people to use as needed. While these funds are cryptocurrency it is important to not testnet funds have no monetary value.
We’re looking for BTC testnet funds so we’ll be using the following website: https://bitcoinfaucet.uo1.net/

Simply follow the directions presented.
Send Bitcoin from main address to secondary address
Now that your first address (from here on referred to as MAIN address) has some funds in it we can use the Tatum API to send them. For that we’ll be using the “Send BTC to Bitcoin addresses” endpoint. Just as before we have a series of fields in the body of this call that we need to fill in before pressing “Send”. These fields are:
- Fromaddress > address
- Fromaddress > privatekey
- to(address) > address
- to(address) > value
You can find the first three pieces of information we need here in your worksheet. Please locate and enter them now.
Once you created your transaction you can look it up on a block explorer for the Bitcoin Testnet. We suggest you use Blockstream.
Simply give your transaction a little time to be confirmed and you'll see you've now been able to use the Tatum API to complete this series of short tasks. Great job!

In conclusion, the Tatum API for blockchain provides developers with a simple and efficient way to create cryptocurrency addresses, wallets, and send transactions securely.
By leveraging Tatum's powerful tools, developers can focus on building great products instead of worrying about the underlying blockchain infrastructure. This article has demonstrated how to use the Tatum API to create cryptocurrency addresses, wallets, and send transactions.
We hope that this guide has been informative and helpful, and that it has provided you with the knowledge you need to start building your own blockchain-based applications. If you have any questions or feedback, please don't hesitate to leave a comment below.