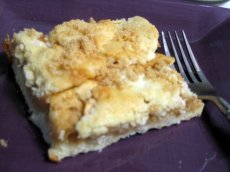
This dessert is a long-standing family tradition. Featuring an old-fashioned buttery crust and fresh apples, this dessert is really a flattened apple pie. Family and friends always requested that my mom make this dessert for special occasions, and now I have inherited this recipe heirloom to prepare in my own kitchen!
Crust
- 3 cups all-purpose flour
- 1 cup (2 sticks) butter
- 3 tablespoons sugar
- ½ teaspoon salt
- 1 teaspoon baking powder
- 2 egg yolks
- 8 tablespoons water
Apple filling
- 6 to 10 apples, peeled and thinly sliced
- 1/3 cup sugar
- 1 teaspoon cinnamon
- 1 tablespoon flour
Vanilla glaze
- 1 cup confectioner’s sugar
- 1 teaspoon hot water
- ¼ teaspoon vanilla OR ½ cup brown sugar
Preheat oven to 375 degrees.
To prepare crust, sift together flour, sugar, salt, and baking powder. Cut in butter in small pieces. Add egg yolks and water, stirring in one tablespoon at a time. Use hands to turn dough until all flour is absorbed and dough is a soft yellow. Form into a ball then divide into two smaller balls.
Between two sheets of wax paper, or on a lightly floured surface, use a rolling pin to roll each ball to the size of a 15 x 10 inch sheet pan. Place bottom crust on pan. Set other aside.
Combine apples with sugar, cinnamon, and flour. Layer apples on bottom crust. Add top crust, and using a butter knife, cut several large slits across top crust to allow ventilation.
Bake for 35 to 40 minutes, until top crust is golden brown and apple filling is bubbling.
Meanwhile, combine ingredients for vanilla glaze. Drizzle glaze over top crust. Alternatively, sprinkle brown sugar over top crust. Serve warm!
Tips …
My mom suggested using up to 10 apples in this recipe. I ended up using only six, and they still turned out plenty delicious. It depends I suppose on the size of your apples, and how much apple filling you want. Another tip is to sprinkle the sliced apples with lemon juice to keep them from browning, but don’t worry, even if they do turn a little bit brown by the time you put them in the oven, you will never know after they are baked!
In making the crust, I cut the butter in pieces before adding into the flour. I was a little nervous after adding my eighth teaspoon of water to the flour because my ingredients were still very dry. After several minutes of turning the dough, however, it turned from flour white to butter yellow, as promised.
I was excited to get to the rolling part because I was recently gifted a rolling pin. (In my time before such luxurious kitchen gadgets, I have been known to use the side of a cup.) However, I did not have wax paper, which is a suggestion from my mom because the dough is so soft. My strategy to avoid tearing apart the crust was to press down only lightly and continually rotate the direction of the rolling. I was able to get my bottom crust to just about the right size, but my top crust kept tearing. I ended up just putting the top crust on in sections and forwent cutting slits in the top because there were already holes.
Dusting the top crust with brown sugar was my solution to not have confectioner’s sugar, though traditionally, I would always help my mom drizzle (in my case, pour) the vanilla glaze over the top. You can always leave the top crust plain, as well, but I think it is nice to add a little something so that the slices don’t taste so crusty.
The best tip of all is to definitely serve these apple pie slices warm!
