Hey everyone,
I just finished building a mining rig, and I wanted to share my experience with you to provide some ideas and to prevent anyone from getting stuck in the same ways that I did. Hopefully this will save you a decent amount of hours of troubleshooting and if not, can give you a skeleton on how to start your investment.
Building the frame while waiting for the six EVGA superclocked gtx 1070's and powered risers that I found on sale on amazon prime >:) was a straight forward and pleasant experience. Assembling the components (Pre-GPU) was also problem free, as I have built a decent amount of PC's for friends and family.
However once it came time to attach my GPU's with the powered risers, I started encountering some problems.
Lets go in order shall we...
1. The Build:
- Motherboard: ASUS PRIME Z270 - $220 CAD
This motherboard comes with seven PCIE slots where you can plug in your risers. It also has some nifty features, like on board 3D printing mounts and some nice led lights on the back.
- RAM: Corsair vengeance 8 GB- $80 CAD
Pretty straight forward, nothing crazy - probably could have gotten away with 4GB
- CPU: Intel Pentium - $80 CAD
With the amount of troubleshooting I did, I regret not getting a quicker CPU, but this one was cheap and it does the trick.
- GPU: 6x EVGA GTX 1070 Superclocked - $3000 CAD
These GPU's are great miners, statistically they offer the best per watt efficiency, (~5W/MH) and can mine Ether with a Hashrate of 32 MH/s (More on this later) and I found them on sale, so it was a no brainer for me.
- PSU: 2x EVGA 750W Gold - $350 CAD
Would have liked to get one 1200 W supply but memory express was sold out. This cost me way more than I would have liked. I was itching to get going so I just went the more expensive route. They did the trick, I will post a diagram of how to connect your second PSU to the GPU's without needing to connect it to your motherboard in case anyone is having trouble.
- Hard drive: Seagate Barracuda 1TB - $70 CAD
An SSD would have been nice, given how many times I shut down and booted up my PC, but alas, I made it with the baracuda. Cheap and reliable.
- Risers - 6-Pack PCI-E 16x to 1x Powered Riser Adapter Card
I found these on Amazon, they all worked like a charm
Now that we have that out of the way, lets get started with the frame.
2.The Frame
To build this version, you will need:
- 16 feet of aluminum L shaped bar.
- A metal hacksaw or jigsaw if you have one handy.
- A drill, with a drill bit wide enough to allow clearance for your bolts.
- Some nuts and bolts, 16 of each to be exact.
Make sure the bolts are long enough to fit through both pieces of aluminum, but short enough so that that two bolts don't interfere with each other and make it annoying for you to install them
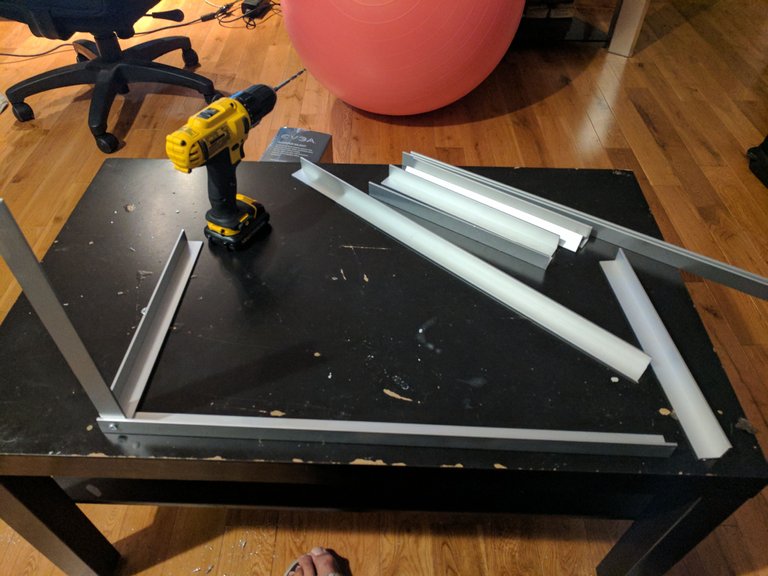
Start by cutting 4 pieces that are 2 feet long and 8 pieces that are 1 foot long. Now the assembly is quite straight forward, put 3 pieces together and mark where you will have to drill with a sharpie or pencil. See picture below for my first corner.

Continue doing this until you have a nice rectangular frame.

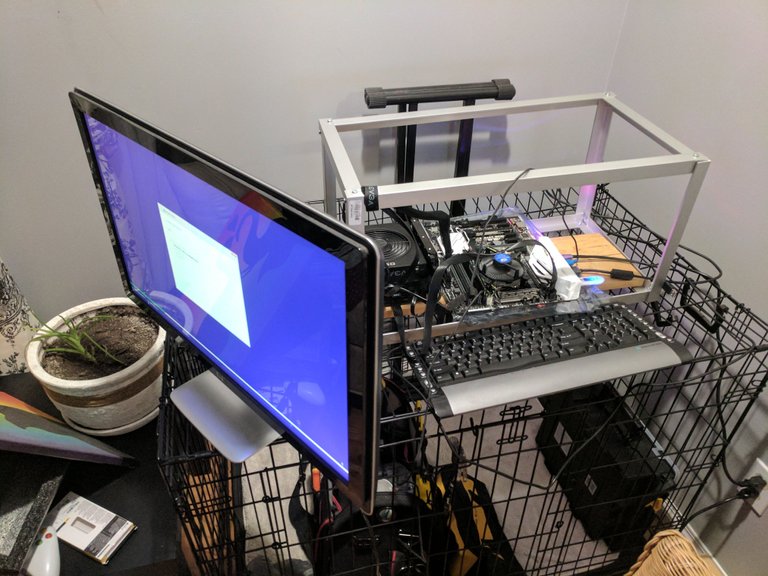
Sorry that I didn't take better photos, I decided to write this article post build. Here is my build before I got the GPU's I was just getting windows and the software I needed installed so that I didn't have to do it later on.
Please note, I measured the height of my GPU and lowered the 2 foot bar at the top closest to the wall so that the GPU's could rest on it and remain level. Here is a picture in case that wasn't clear enough.

Please note, you should now have a sweet ass frame.
3. Installation
Now that the frame is built, we can get excited about installing all of our components onto the frame.
Place your PSU's in the corners and your MOBO in the middle. It will help if your plugins for your MOBO are facing you so that you don't have to keep reaching around to plug shit in.
Since you are not using a case, all you have to plug into your MOBO is your PSU and your hard drive.
Install windows 10 before plugging your GPU's in.
Checking your hardware is important
Doing this is worth it and will give you peace of mind when installing the GPU's that none of them, or their connectors, or your MOBO are having issues.
GPU TEST
- Get some sticky tabs or something you can mark your GPU's with.
- Plug one GPU into your PCIE_1_16 slot when your PC is powered down.
- Power up your PC and go to device manager, check to see if it has recognized your GPU and download the latest drivers. (This is available in device manager, just double click the GPU and you will find the option to update drivers.)
*Please note - Sometimes your GPU won't show up. If this occurs, check other devices and you should find it there. Install the drivers and it will show up in its proper spot. - Repeat this for every GPU you plan on installing. Was it a pain in my ass? Yes. Should I have done it at the very beginning and saved myself a few hours of wondering if GPU's or their Risers or the MOBO were having issues? Yes.
- Put on sticky tabs and write if the GPU worked. I had green and red sticky tabs. If I had issues with the GPU (such as finding it in other devices, or some code warnings, I would fix the issue and mark it with a green and red tab, just to keep track of what I had issues with.)
RISER AND MOBO TEST
Once all your GPU's clear your inspection and are all clearly labelled, put all but one aside and test your risers and MOBO. You can kill two birds with one stone by doing the following:
- Get your riser, plug it into your GPU, and plug that GPU into your first PCIE slot on your MOBO while your PC is powered off (make sure to plug in power from your PSU to your GPU or it wont work.)
- If the GPU is recognized that means that your riser and your PCIE slot are both a-OK. Label the riser with a sticky tab and move on to your next riser.
- Plug the next riser into your GPU and plug the riser into the MOBO into the NEXT PCIE slot.
- Power up your computer and check device manager to see if the GPU is recognized.
- If yes, repeat until your run out of risers and PCIE slots.
- If not, either your PCIE slot is having an issue or your riser. You can verify which by using a trusted riser into the questioned PCIE slot. If it is recognized with the trusted riser, then it is the riser in question that is having issues. If it is still not recognized then it is your PCIE slot.
Once you have checked all of your GPU's, risers and PCIE slots, you are basically ready to go! Just some configuration BS that took me too long to figure out left.
4. Configuration
Next, it's time to configure your BIOS so that your rig is optimized for mining. Without following this step, your rig will not recognize more than 3-4 GPU's and it will oftentimes run into problems when trying to run things. Please do not skip this step.
Go in to your BIOS and here is what you need to change:
(Please note that these settings are for a Z270 MOBO, but should be relatively similar to others.)
- DCI Max Link Speed - Gen2
- PCIEX16_1 Link Speed - Gen2
- PCIEX16_2 Link Speed - Gen2
- PCIe Speed - Gen2
- HD Audio Controller - Disabled
- In sleep, hibernate and soft off states - Off
- Above 4G Decoding - Enabled
Bypassing PSU for multiple PSU's
If you only have one PSU, you are ready to go. If you have 2 PSU's there is one last thing we need to do, because the PSU that is not plugged into your MOBO will not supply power if it doesn't think it is plugged in. They are jealous creatures.

WITH THE PSU UNPLUGGED
You will have to connect the green pin (pin #16) to the next black one (pin 17) with a paper clip. If you are not comfortable doing this MAKE SURE you get someone who is. Cover it with electrical tape and you are good to go. Or if you don't know anyone who is comfortable doing that, get a PSU supply tester and plug that into the main power connector. This should also allow your PSU to power your devices.
I can't stress enough that you should never adjust electrical components if you are inexperienced or uncomfortable. Safety first, always.
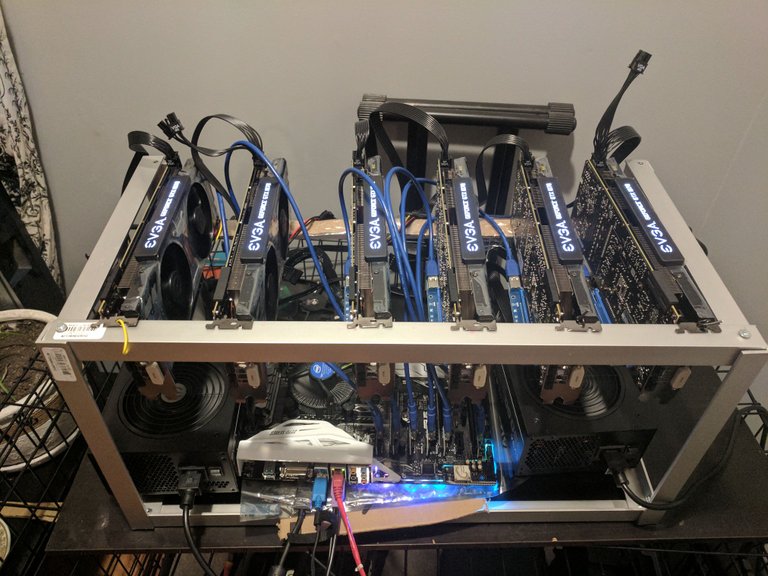
Alright! You are ready to plug in your GPUS to your MOBO and start mining. You should end up with something that looks like this.
_
Final notes:
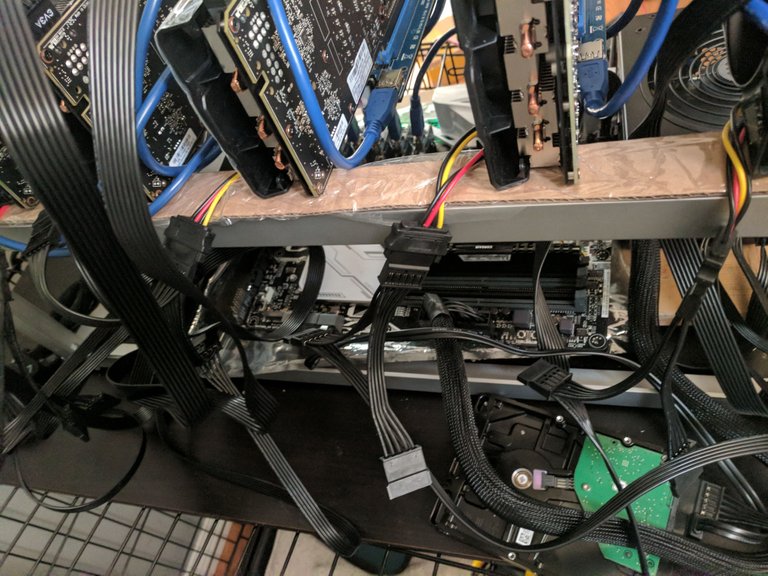
-Make sure your MOBO NEVER Touches the metal frame, unless you feel like destroying it. Use cardboard (dry cardboard) and the electrostatic resistant bag your MOBO came in to keep your MOBO safe.
-I also used cardboard where I rested my GPU's just to be safe, I kept it on with some hot glue.
-Make sure your GPU's are secure and wont move when bumped.
-Happy mining! Please let me know if you liked/hated this or if there is anything that I missed, or something I can improve. If you have any questions don't hesitate to ask!
:)
Really good article it helps a lot keep up the good job !
Thank you sir :)
beautiful content
I really appreciate that, thank you.