For many, this post may not seem directly related to homesteading, but I would respectfully disagree. Tools and machinery are a vital part of any homestead, and they will all, at some time, require maintenance and repair. Having the ability to do your own repairs will save you a great deal of money, and in most instances, a lot of time as well.
I will not go into a lot of very specific detail on my repair posts, but rather I will try to keep to the points that nearly every system will have in common. If I leave you with any questions, I will try to answer them in comments. If you need more specific information for a particular vehicle or machine, you can find how-to videos for nearly anything on YouTube, and more detailed repair guides on Instructables and similar sites. The example vehicle used is an '03 Honda Accord coupe, LX trim. I believe the DX is exactly the same, the EX will have drum brakes on the rear.
This little guide is for vehicles with rear disc brakes. If your vehicle has a disc-drum combo on the rear, this guide will still apply for changing the caliper and bracket, but you will probably not have to disconnect the emergency brake cable.
If I've already lost you with all this talk of disc and drum and emergency brakes, don't worry about it. Knowing the names of things isn't essential to being able to fix them. I developed almost 100% of my skills not knowing the proper names for anything I was working on, or the names of the tools I was using. Knowing those names can help you understand better when you're reading about repairs, but with persistence and practice, you'll learn what's what.
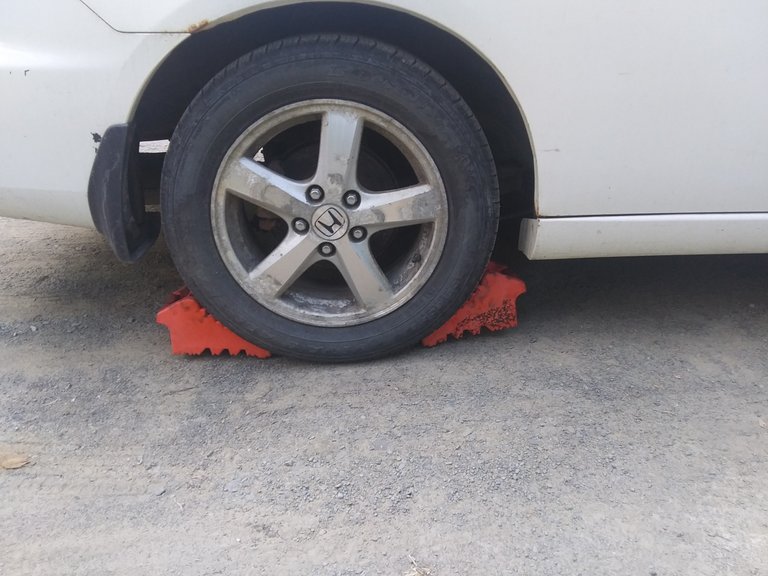
The first thing you will want to do is block BOTH SIDES of one of the tires that you will not be jacking up. This is a very important safety point, since you will not be able to engage the parking/emergency brake for this repair, and having the vehicle transmission in park/gear will still allow it to roll forward or backward enough to roll off the jack. If this happens, it will almost certainly damage both your jack and the vehicle, as well as any people or things that are under the vehicle. Your wheel blocks to not have to be fancy. I've used bricks, rocks, chunks of wood, and even hammers. I prefer to block the wheel directly opposite the one I'm working on.
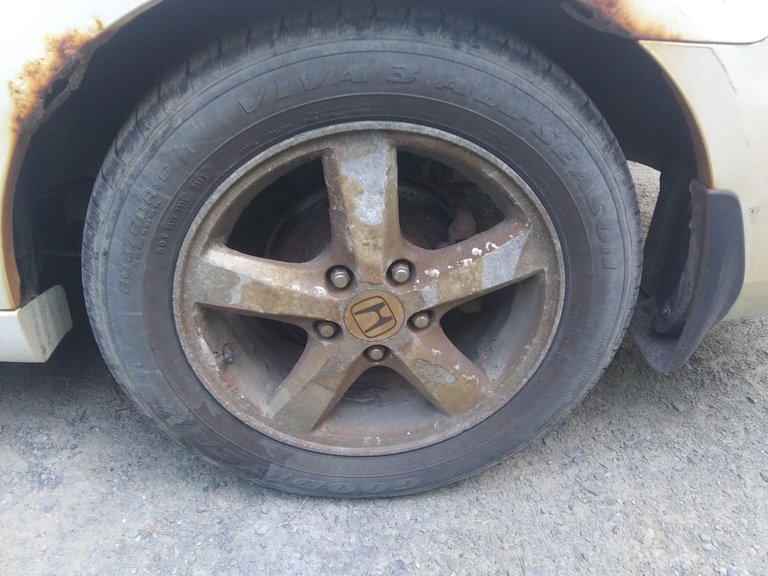
You can see at a glance that this wheel has had some trouble. Where the other one was still a healthy silver color (despite some tarnish), this one is noticeably brown. This was caused by the brakes wearing through the pads until the bracket was pressing against the rotor, which caused the wheel to get extremely hot and burn the clear coat. That is the brown you see on the wheel spokes. The brownish grey on the inside of the wheel is a layer of iron and asbestos that built up as it was ground off from the pads and bracket, over top of more burned clear coat.
Pro tip, it helps to loosen (but don't remove!) the wheel nuts before you jack up the tire. I'll skip over jacking up the car and removing the tire, because if you don't know that, you're not ready to change the brakes. Also, there are 3 different types of common jacks that a person might have, and a lot of variation with wheel nuts and ways to remove them.
Cleaning up the wheel isn't completely necessary, if you're in a hurry, but I highly recommend it. The cleaner your wheels are, the lighter they are, which causes less stress on the wheel and makes your vehicle handle better. This crust is enough to significantly change the wheel balance, so I will give it a quick scrape and check the balance afterward.
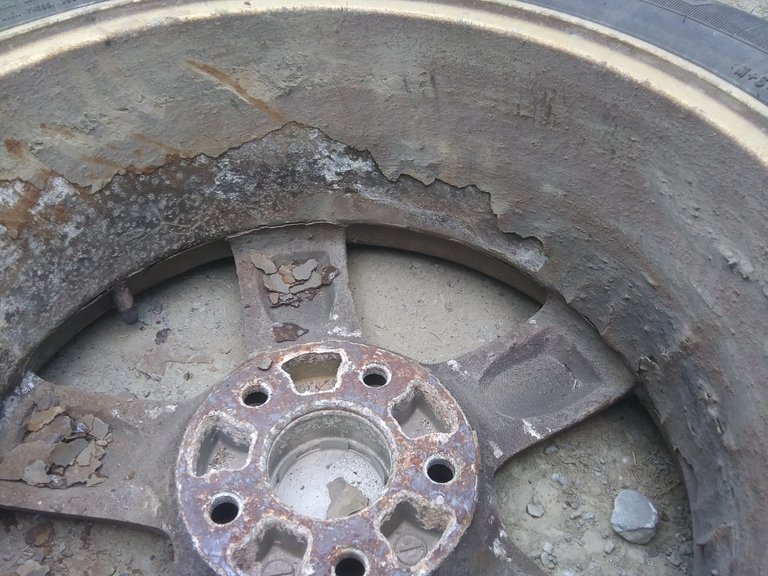
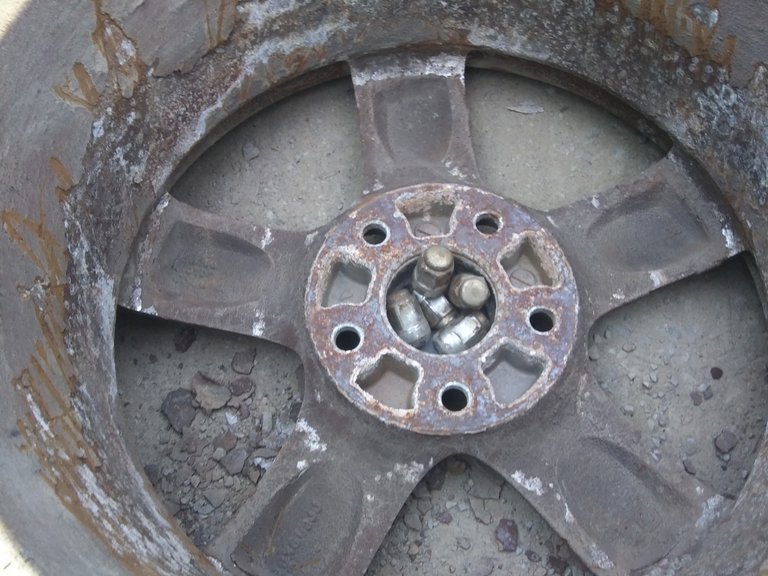
Another pro tip, keep your wheel nuts in the wheel hub cover (or hub cap, if that's what you have) so you don't lose them. You can see here that where the clear coat has peeled away from the wheel the build up comes loose quickly. Where the clear coat is still attached, I'll get in there with a stiff wire brush to remove the rest of the iron dust build up.
With the wheel taken care of, it's time to move on to the brakes themselves. The caliper is the part that squeezes the pads together against the rotor. This one is getting replaced because the bleeder valve is broken off, the banjo bolt threads are stripped, and the anvil end that presses the outer brake pad has had about 1/4" worn off it. Individually, I may try to repair any one of these problems, but all together, it's easier just to change the whole caliper. The bracket is getting replaced because the slides where the caliper bolts on are loose. This is why, if you look at the rotor, you can see that it is worn on the top half, but rusted on the bottom half. The loose slides are allowing the rotor to twist when the brakes are applied, which is causing this uneven wear.
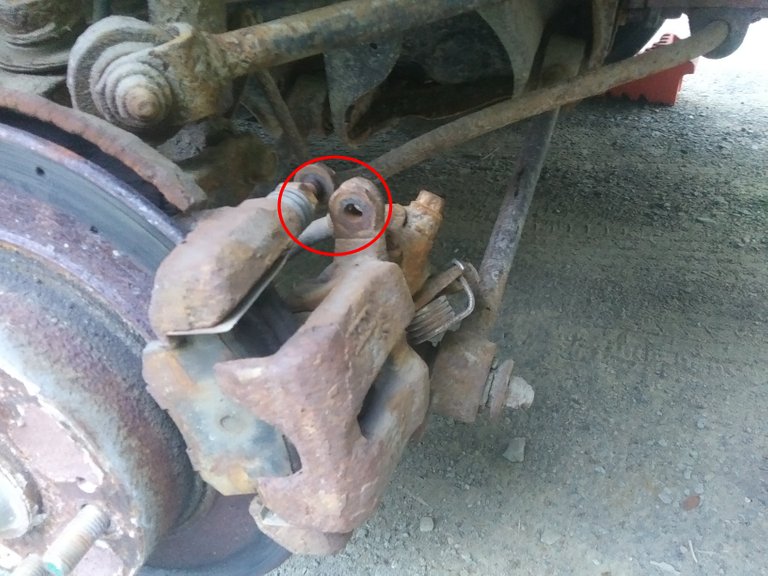
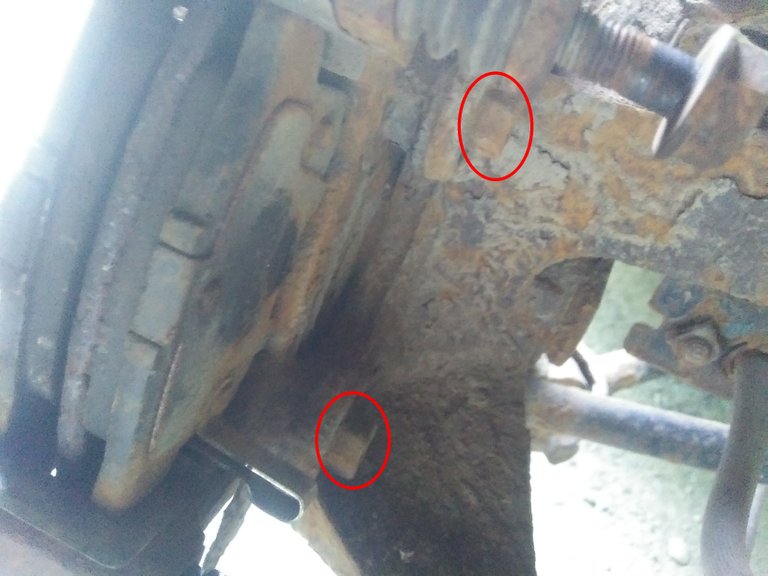
The circled part shows the top bolt that holds the caliper to the bracket. The one in the picture has already been removed and separated from the bracket, with the bolt replaced to make it easier to see. There will be an identical bolt on the bottom side. You can see here, at the very left of the circle, the rubber boot that covers the slides. The caliper bolts will always be fastened into these slides. More pro tips: whenever possible, thread whatever bolts you remove back into the holes they came out of. This will keep your bolts from getting lost, and prevent dirt from getting into the holes they go in. Also, make sure you are turning them the right direction when you are first breaking them loose. This can be confusing with bolts that you aren't directly facing, especially if you do a lot of drinking or pot smoking while you do your repairs :D
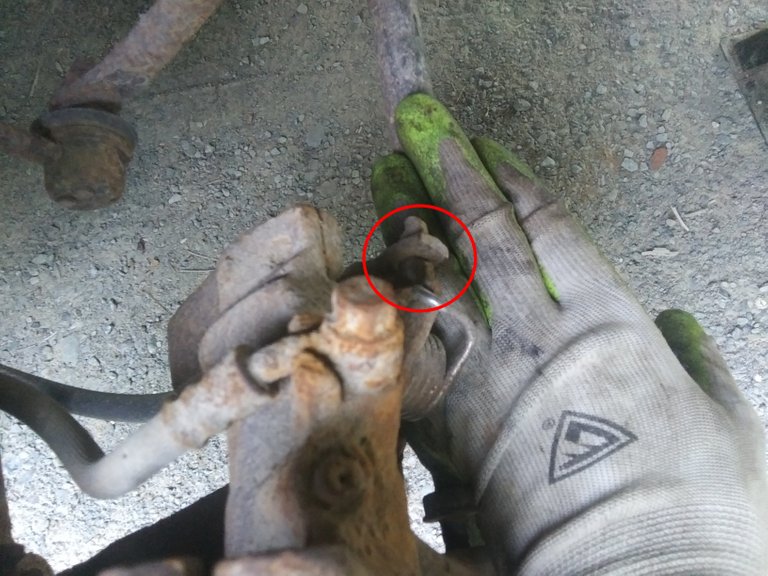
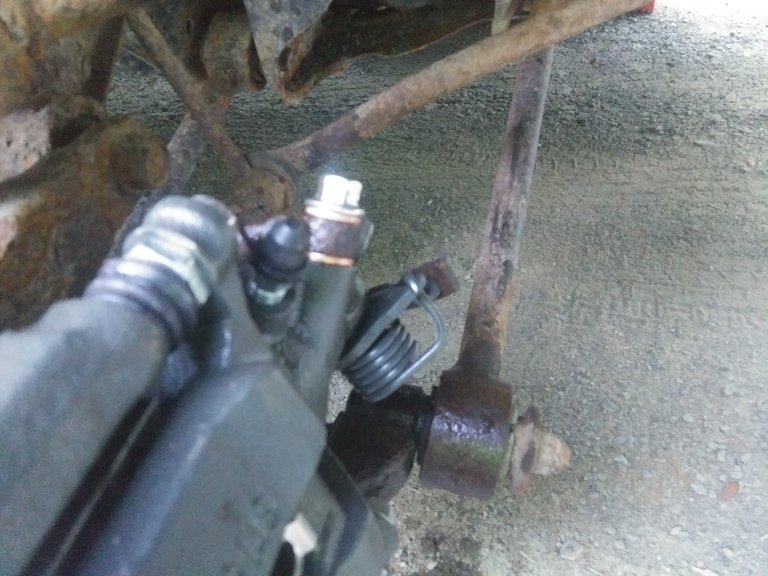
Once the caliper is loose, you will want to disconnect the emergency brake cable. These are not all exactly the same, but will have two connection points in common. First is the end that moves the brake activator on the caliper. That will be attached to a lever with a wound spring, as you can see here. For this Honda, the end of the cable just slips over the lever and rests in a close fitting notch, as you can see in the circled area. These can often be removed just by hand. If they are stubborn, clean off whatever dirt and rust you can, and use a pair of pliers to grab and move the cable end. These can be a little like chinese puzzles, so be patient and don't force things too hard. Breaking the end of the emergency brake cable will usually mean that you have to replace the whole cable.
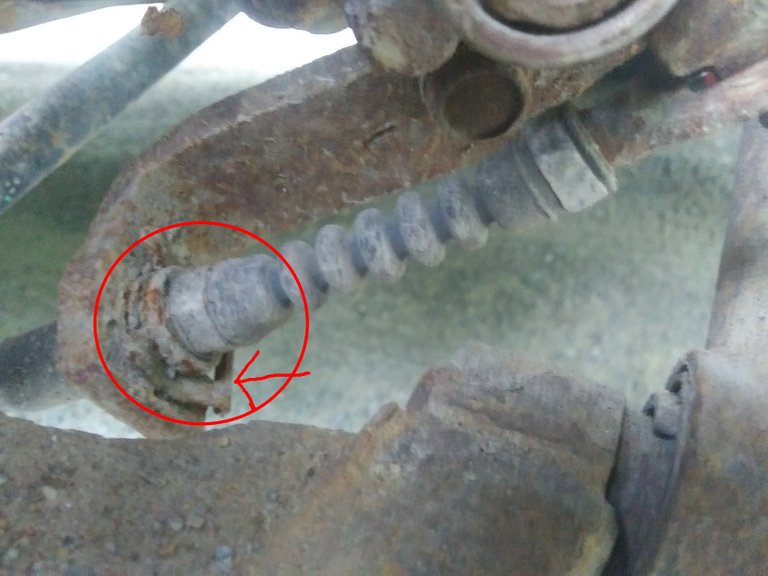
The other point of attachment will be where the cable is held in place, usually with a clip like the one seen in the circled area below. The arrow points to the back side of the clip, which always has a lip on it that you can get under with a screwdriver to easily pry the clip back. These clips are often very worn and corroded, and can be difficult to remove without breaking. For some vehicles, they can be a hard item to find without buying a whole brake cable. Once the clip is removed and the end detached, the cable can be pulled free.
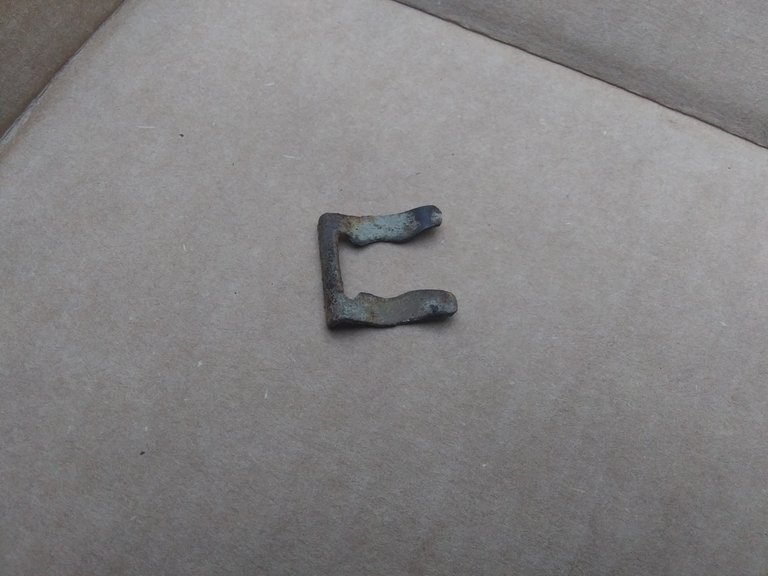
Below is a better picture of the clip, to help you identify it. On some vehicles, the cable and cable end may be bolted into place, or held with cotter pins.
The last thing holding on the caliper will be the banjo bolt, which is where the actual brake line attaches. Every vehicle I've seen with rear disc brakes has a flexible rubber line attached to the caliper. If yours has a steel line going into the caliper, you will have some differences that I'll address better in my next repair post. Always take care not to damage the brake lines when you disconnect them from the caliper. Another pro tip, keep a small container handy that you can put under the brake line, which will drip fluid until you have it hooked back up to the new caliper. At this point, you can remove the caliper. It may take a little work and patience to get it free; it will probably be pressed tight against the pads still, and be a very tight fit on the bracket.

Usually after removing the caliper, I will remove the brake pads from the bracket. This isn't necessary for removing the bracket, and I left them in place here to make it a little easier to identify things in the picture. The bracket will usually be held on by two bolts, circled in the picture below. Some larger vehicles may have four bracket bolts. They are often torqued down pretty tight, as well as corroded, and can be very difficult to remove. Heating the part of the bracket that they thread in to with a torch can help a lot. If you do this, be careful not to burn any wires or rubber in the area. Keep an extra eye for smoke coming from the area of the wheel hub bearing, there are often rubber seals in that area that you cannot see.
Putting it all back together is the reverse of taking it apart. Brake lines should be bled of air after a repair like this. Myself, I usually just open the brake bleeder (the part with the black rubber cover over it in the picture below) and remove the lid from the brake fluid reservoir, and leave it alone until brake fluid drips from the bleeder valve. I'll do another post sometime about properly bleeding brake lines.
Once everything is back together, your brake fluid is topped off, and the wheel is back on, be sure to test the brakes before driving the vehicle anywhere. Make sure they are holding pressure before and after you start the engine. If the brake pedal is too 'squishy' or goes to the floor when you first press it down, but will build pressure if you pump the brakes, there is still air in the lines. If it always goes to the floor, then something is either loose or broken. Do not drive unless your brakes will hold pressure and properly stop the vehicle.
I hope this helped someone out, or at least interested you a little bit. Future repair posts will cover other common repairs like plugging tires and installing mufflers, as well as some crazier things, like re-packing hydraulic cylinders and rebuilding small engines.
Thanks for the click, and I hope to see you again!
Congratulations @paradoxtma! You have completed the following achievement on the Hive blockchain and have been rewarded with new badge(s) :
You can view your badges on your board And compare to others on the Ranking
If you no longer want to receive notifications, reply to this comment with the word
STOPTo support your work, I also upvoted your post!
Do not miss the last post from @hivebuzz:
Support the HiveBuzz project. Vote for our proposal!