Prerequisite:
Oracle Virtualbox or VMware.
Latest version of docker.
Knowledge of linux commands.
Basic knowledge of docker like image and containers etc.
Step by Step Guide:
1- First pull docker image using
docker pull mongo
2- Now run first docker instance of mongo db, name it (e.g. mongo 1 ) and replica set name it (e.g. rs1 ), note that –p 27017 will map port 27017 of mongo1 instance to your localhost. Make sure not to add this parameter when starting mongo2 instance.
docker run --name mongo1 -p 27017:27017 -d mongo --shardsvr --replSet rs1
3- Run second docker instance, name it (e.g. mongo 2), name replica set (e.g. rs2) and link it to mongo1(previous up running instance), this –link parameter will create host entry of mongo1 in mongo2 instance, so that mongo1 will be accessible to mongo2 by name.
docker run --name mongo2 --link mongo1:mongo1 -d mongo --shardsvr --replSet rs2
4- Access the shell of mongo1 using following command
docker exec -it mongo1 /bin/bash
5- Once you are inside mongo1 instance, execute following command
mongod --configsvr --replSet rs3 --dbpath /data/configdb &
This will run mongo config server in background, it’ll be piping lots of output to stdout, but don’t worry.
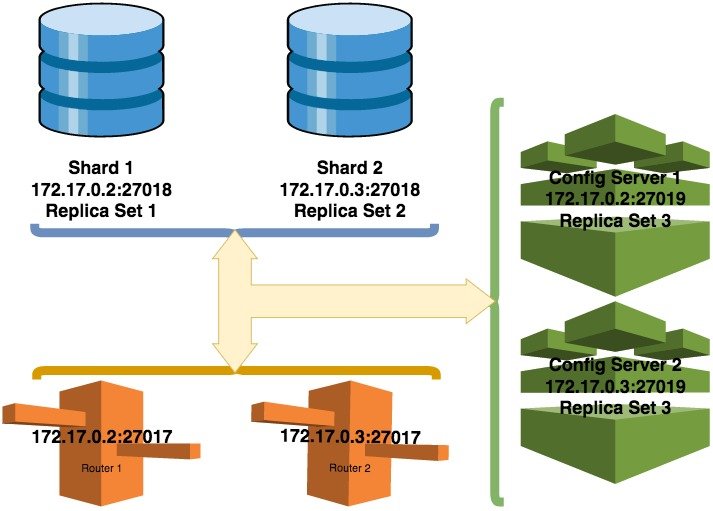
Now you’ll have two servers running on the machine i.e. shard server on port 27018 and config server on port 27019, please make sure to run config server on mongo2 instance as well.
Please note that there are three replica sets, i.e. one replica server in shard servers rs1, one replica server in shard server 2 i.e. rs2, and one replica set on config server rs3, please keep rs3 on both mongo instances.
6- Now execute the following command, this will take you to mongo shell of config server
mongo --host 172.17.0.2 --port 27019
7- Please note that I am using IP of my docker instance, your docker instance may have a different IP, you can get it using following commands on host machine if you are on mac or linux
docker inspect mongo-rs1 | grep -ir "IPAddress"
docker inspect mongo-rs2 | grep -ir "IPAddress"
8- Once you are in mongo shell of config server execute following
rs.initiate(
{
_id : "rs3",
configsvr: true,
members: [
{ _id : 0, host : "172.17.0.2:27019" },
{ _id : 1, host : "172.17.0.3:27019" } ]
} )
This will connect both servers to replica set, please not again this should contain IP’s of your mongo1 and mongo2 instances.
9- Exit mongo shell and execute following to get into mongo shell of shard server 1
mongo --host 172.17.0.2 --port 27018
10- Now execute following command
rs.initiate(
{
_id : "rs1", members: [
{ _id : 0, host : "172.17.0.2:27018" }]
} )
Exit the shell, perform same command on mongo instance 2, make sure id is rs2 this time and IP is of mongo2 instance.
11- Now runs mongos instance on both servers using following command
mongos --configdb rs3/172.17.0.2:27019,172.17.0.3:27019 &
This will start mongos router, start it on both instances, this will start mongos on port 27017.
12- Now grab the mongo shell of mongos using following command
mongo --host 172.17.0.3 --port 27017
13- Once you are in mongos shell, execute following commands
sh.addShard( "rs1/172.17.0.2:27018")
sh.addShard( "rs2/172.17.0.3:27018")
14- Now we are ready to enable sharding for a collection, lets assume DB you want to shard is facebook, and that db has a collection named users, and every user has a username. We want to shard facebook DB’s users collection and we want to user username as shard key, following is the set of commands we need to execute inside the mongos shell we acquire in previous step
sh.enableSharding("facebook")
use facebook
db.users.createIndex({username:1})
sh.shardCollection("facebook.users",{ username:1})
sh.enableBalancing("facebook.users ")
15- Now you can start inserting data, also please note that the port 27017 is mapped to your localhost, any data imported using mongoimport will directly be imported to mongo1 instance, and if it is inserted in facebook db, it’ll be sharded. To check the sharding status, you can run the following command
db.facebook.getShardDistribution()
This will display the shards and data being stored by each shard.
Deployed Sharding Architecture

Congratulations @syedmeesumali! You received a personal award!
Click here to view your Board
Do not miss the last post from @steemitboard:
Congratulations @syedmeesumali! You received a personal award!
You can view your badges on your Steem Board and compare to others on the Steem Ranking
Vote for @Steemitboard as a witness to get one more award and increased upvotes!