Tutorial :
After seeing the same copy pasted links on Trending (again) it seems like people want to learn how to program, but throwing a bunch of links at people is a pretty poor way to do this, so here is a basic tutorial on getting started with programming and on your way to creating your own programs!
I will provide examples and a link to my source code for those that want to download and run it throughout the tutorial, and if anybody has any questions ask in the comments and I'll make sure to answer when I can.
In this tutorial I'll cover the following:
- Setting up your programming environment (IDE or Integrated Development Evironment)
- How to create, compile, and run your first program
- Basic syntax, data types, variables, and operators
- Basics of functions and control flow
- Dealing with input and output
With these basics everybody should be able to easily write their own simple programs in no time at all!

C++
For this tutorial I'm going to be using C++, now a lot of people are going to disagree with me as C++ is a difficult language to start with but there are a number of reasons I think C++ is the best language to start with. If you don't care about my reasons go ahead and skip to the next image.
Starting with C++ makes it much easier to move to other languages, as learning how to program in a strict environment makes it much easier when going to less strict environments rather than starting in an environment with very few rules and suddenly having to move to one with many rules. I'm a firm believer in learning something by the rules before going and breaking them, and C++ is a good way to learn the basics. When starting with easier languages like PHP or Python it makes the programmer lazy, and if you have to move to a harder language like C# or C++ it becomes more difficult to suddenly have to follow many rules when you don't know how. The IDE is quick and easy to set up and get going for C++. If this tutorial goes well I may do other tutorials for other languages too, but for now I'll be focusing on C++.

The IDE
For this tutorial we'll be using Visual Studio 2015, as it is super easy to set up and start programming with and provides a lot of features that make programming easier for beginners. There are plenty of other IDEs out there but this one of, if not the easiest IDE to start with for C++. Below is the link to download Visual Studio 2015 with the C++ libraries, you can download either the 64 bit or 32 bit version depending on your system. The program is free, though it may require you to register it after 30 days, the registration is still free though! Make sure that during the installation you get the C++ libraries, it should be through the link provided. If the libraries don't get installed don't worry, it's super easy to install a missing set of tools!
https://www.visualstudio.com/en-us/products/visual-studio-community-vs.aspx
Line Numbers
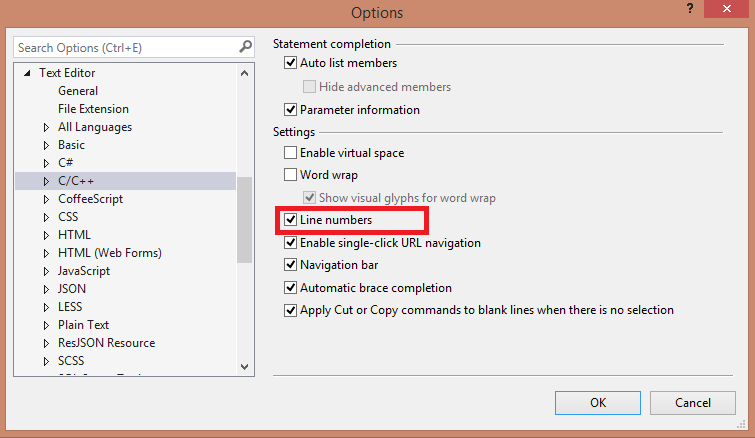
Once the IDE has been installed we need to set the most important option of any editor, enabling line numbers. Click on Tools->Options, find the Text Editor, click on C/C++, and under general make sure the box is checked to display line numbers. This makes it much easier to track down errors when something goes wrong!
Create Your Project
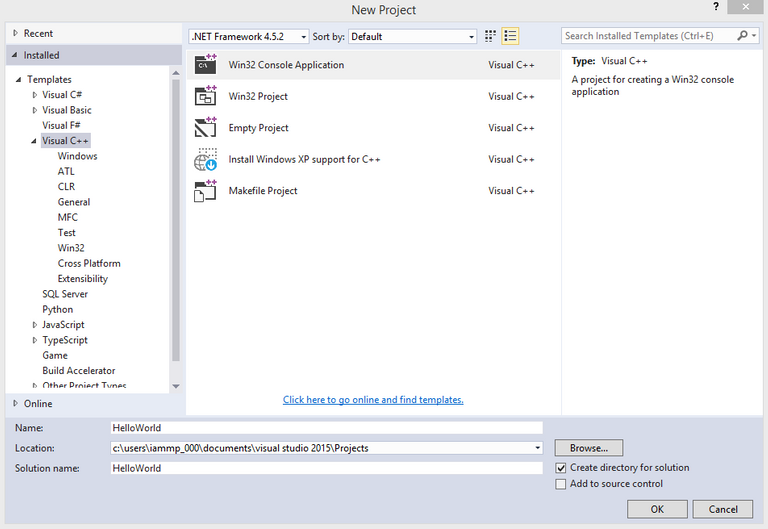
Now we need to create the project through which we'll be writing our code. Click on either the New Project button or go to File->New->Project to open this window. In this window select Visual C++ under Templates. Make sure Win32 Console Application is selected and name your project "HelloWorld". It is a tradition for those who are just starting to program to create an application with this name who's sole function is to output the text Hello World. In computer engineering there is a similar thing called Blinky but that is a topic for an entirely different post.
After entering the name of your project, and with the desired settings selected click ok.
If you don't see the options in the image above, you may need to install the C++ tool set, in which case select that and click ok, Visual Studio will do the rest.
THE MIGHTY WIZARD
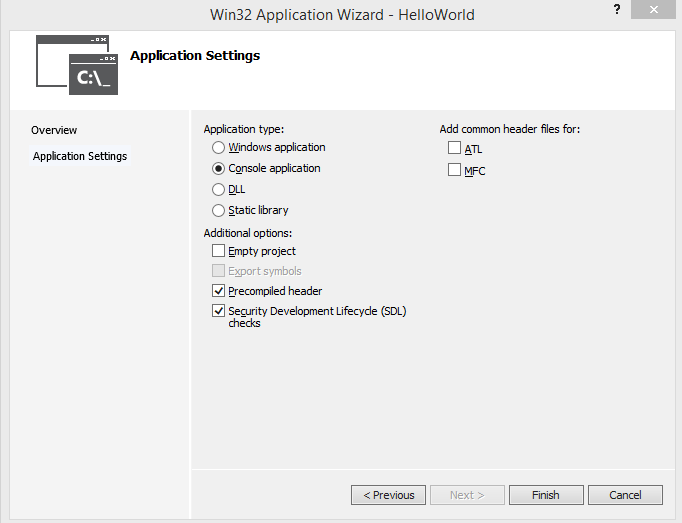
Ok, not so mighty, but the settings here are important. Make sure that the Application Type has Console Application selected, and ensure the box for Precompiled header is checked. This will make it much easier to get your first program up and running. Click finish and let Visual Studio do its thing.
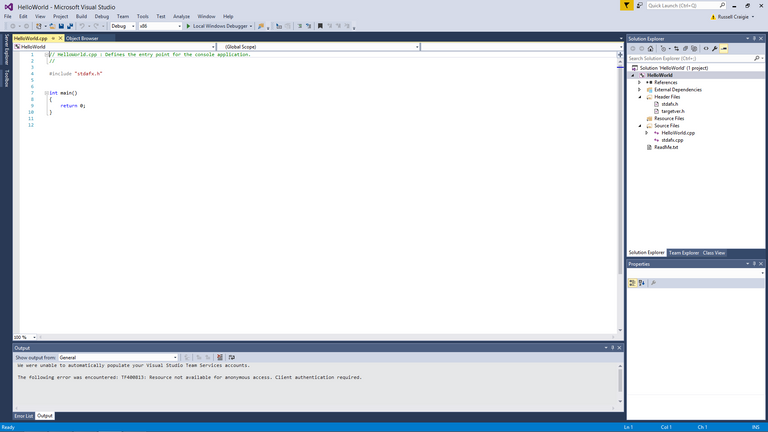
THE MIGHTY EDITOR
Actually pretty mighty, if you did everything right, you should now be looking at a window that looks exactly like this. This is the actual editor where you'll be writing your code.
What you see here an include file, and your int main function. When your program is told to run the code that is in this function will be run line by line until it reaches the end of the function and returns 0. Code executed in this way is called procedural, though you don't necessarily need to remember that. Don't worry about the return line yet either, we'll get to that. Don't worry about the Solution Explorer, Properties, or Output sections in the window either. For now we'll only be focusing on the HelloWorld.cpp tab in the editor.
Everything should now be setup to being writing code, so you're ready to make your first program right?!
What is a Program?
Well, not yet. So before we get into actually writing some code I wanted to discuss what exactly a program is in an abstract sense. Basically, all a program is at it's most basic level, is a set of instructions that the computer follows and executes. Computers do EXACTLY what we tell them, which is why bugs seem so common, frequently when we "speak" to computers through these instructions we give them a slightly incorrect instruction and the computer interprets that exactly as it was written. Keep this in mind when writing any code, all programs are simply instructions that tell the computer exactly what to do, and every line of code is one or more instructions. Nothing about programming is particularly difficult, it's just learning the language of the computer and learning how to communicate and instruct it effectively.
Comments
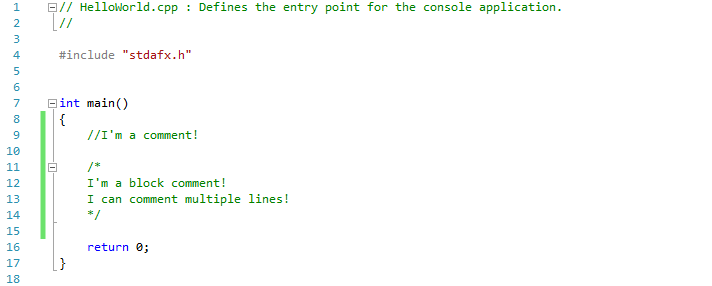
Now it's time to write some code! (sort of) The first bit of syntax you'll be learning, and arguably one of the most important bits, is how to comment your code. A comment is exactly what it sounds like, it's something that the programmer can write that will not be executed by the program when its run. Comments are vital to keeping track of what piece of code is doing, and it's extremely important to comment your code as you write it so you remember what it does! Comments can also be used to temporarily disable code, for example if you want to try something but disable the execution of a single section you can comment one or more lines of code to prevent them from being executed. Useful right?
There are two types of comments in C++, the first is a single line comment. A single line comment only comments a single line of text. To create a single line comment simply add two forward slashes, //, in front of the text. The // can be added anywhere on a line of code, and everything that comes after it on that line will be treated by a comment and will not be executed by the program.
//I'm a comment!
The second type of comment is a block comment. Block comments are used to create comments that have multiple lines rather than a single line. A block comment starts with a forward slash and an asterisk, and ends with an asterisk and a forward slash. The comment starts after the first /* and ends after the /, anything in-between will be treated as a comment. Anything that comes before the / or after the */ will be treated as code and executed by the program.
/*
I'm a block comment!
I can comment multiple lines!
*/
Try to make a habit of making good comments, believe me when I say that if you don't comment your code you WILL regret it as your programs get larger. Try writing a few comments in your code and see how the editor reacts, anything that is a comment will appear green in this editor.
Variables and Basic Data Types
Now let's declare some variables!
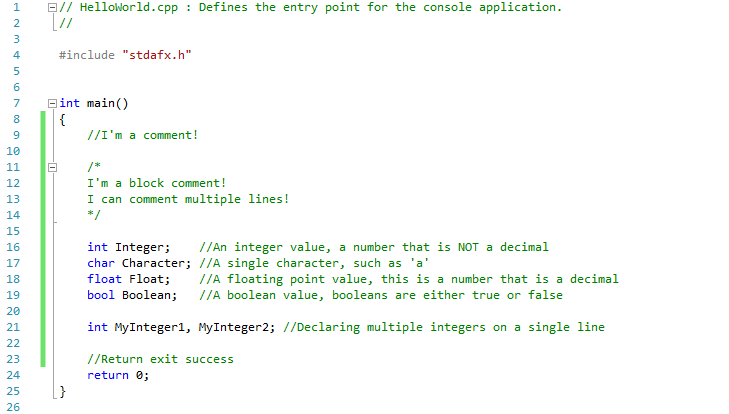
First, what is a variable? A variable is simply something that you declare to store information. Each variable starts with an identifier that determines what type of data is going to be stored in our variable. After the identifier you can put almost anything you want for the name of your variable. Naming variables has some rules in C++, such as not being allowed to contain spaces, punctuation, and not being able to start with a number. Most of what you'll do in programming is manipulation of variables, we'll cover that in the next image. When writing a line of code in C++ make sure to always add a semicolon once you finish writing an instruction! Some "lines" of code can actually span multiple lines, but for now you should be fine with adding a semicolon after every line of code. When creating variables make sure each variable has a different and descriptive name based on what you are storing in it, you cannot declare two variables with the same name.
For now we'll be focusing on four of the most common data types in C++. These data types are int, char, float, and bool.
An int is a data type that is simply an integer, it is a number between -2,147,483,646 and +2,147,483,647. That's right, there is a limit to how much information these can store, but don't worry about this for now! ints can only store integers, no decimals allowed here. You declare an int like this.
int MyIntVariable;
A char is a data type that stores a single character like 'a'. Easy right? You declare a char in the same way as you did an int, like so.
char MyCharVariable;
A float is a slightly more complicated data type, however for our purposes simply think of it as a decimal number. You can declare a float just like the other data types.
float MyFloatVariable;
The fourth and final data type we'll be looking at right now is a bool. A bool is a boolean value, that is to say it is either true or false. It doesn't store anything else, only whether something is true or something is false. This is a very important data type and we'll describe how to use it later, for now just know that it exists and this is how to declare one.
bool MyBoolVariable;
You can also declare variables of the same data type on a single line if you separate them with a comma, however declaring two variables of different data types require separate lines. This is shown below.
int MyInt1, MyInt2;
char MyChar1, MyChar2;
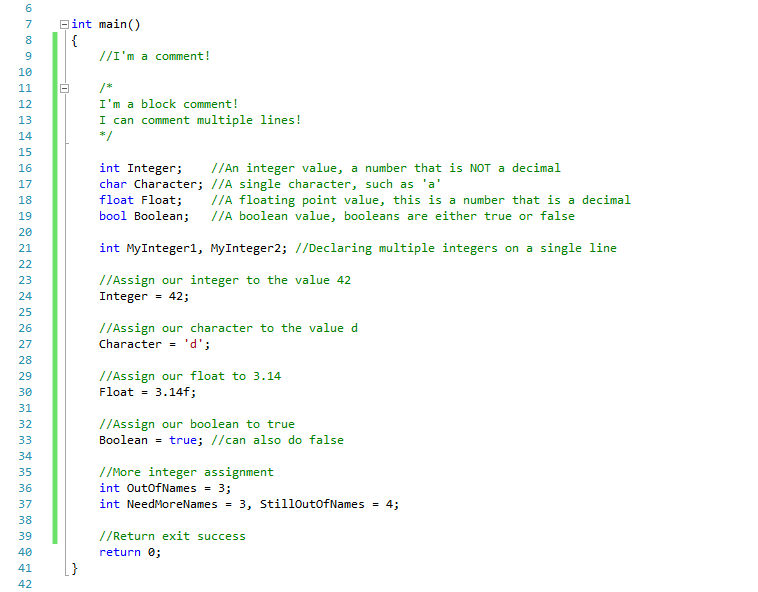
Assigning Values to Variables
Now that we have some variables declared, let's give them some values so we can start to use them! Assigning a value to something is really easy, simply use an equal sign. If you have a = b, then a is given the value of b. When assigning something, they should be of the same data type! You can run into problems when trying to assign values that shouldn't be there, though sometimes you can use this behavior to your advantage. For now, just focus on using the same data type for assignment. Below is an example of assigning an integer a value of negative 5.
int MyInteger1;
MyInteger1 = -5;
The image has examples for giving each variable a value, when a variable has not been assigned a value you cannot be sure what the value is. When declaring variables, you can assign the new variable a value in the same line you declare it. Super useful! Here is an example.
int MyInteger2 = -6;
You can comma separate these as well to create and assign multiple variables!
int Test1 = 1, Test2 = 2, Test3 = 3;
When assigning floats it is good practice to place f at the end of the number, signifying that the value is a floating point and not a double (another decimal data type).
float MyFloat = 0.0f;
For characters place the character you want inside of single quotes, here is an example.
char GiveHerThe = 'd';
And finally for bools simple type true or false exactly as they are.
bool MyBool = true;

Assigning One Variable to Another
Something to note is that when you assign one variable to another in the format above, it makes a copy of the data. This means that if you assign one variable to another and change the data of one variable, it does NOT change the data in another variable. There is a way to do this but that is out of the scope of this tutorial, so just be aware that the data is copied and not directly linked!
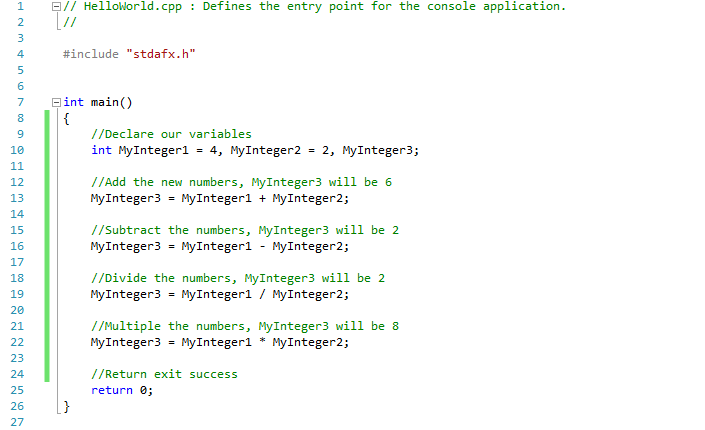
YEAH MATH!
Everybody loves math right? Well this is how you do math in programming! All you need to do is use your +, -, /, or * keys to signify the different math operations. In the code example above we're simply performing these operations and storing them in another variable. Super easy, when doing division you will get an integer rounded down to the nearest number unless you store the value in a float, so be wary!
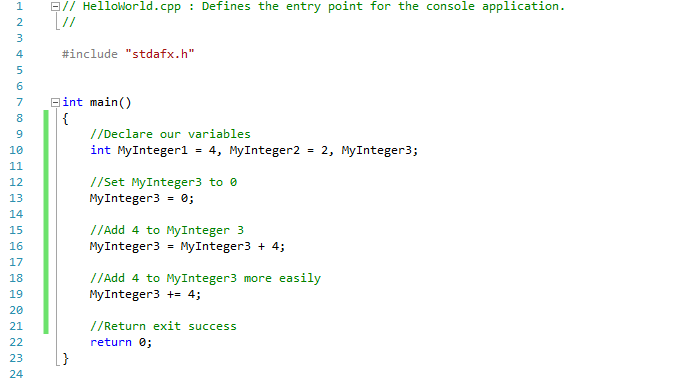
YEAH, MORE MATH!
Because I know you all love math so much, here is some more! If you want to add a number to an existing variable there are two ways you can do it, the first is simply by stating the name of the variable on both sides of the equal sign. This will perform the desired arithmetic operation to the variable, and store the result into the same variable like so.
int MyInt = 0;
MyInt = MyInt + 4; //MyInt will be 4
There is an easier way to do this, like this
MyInt += 4; //MyInt will be 8
You can do this with any of the arithmetic operations, +, -, *, or /.
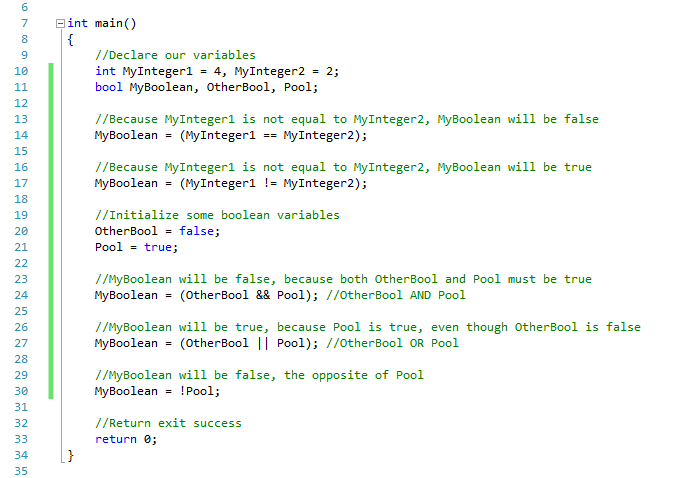
Comparison, Booleans, and YOU!
Now we are going to start getting into some boolean arithmetic, this basically means checking if something is true or false. There are a number of operators here that you will need to know, and these let you compare values to get either a true or false result. The operators we will be covering here are == (equal), != (not equal), > (greater than), < (less than), >= (greater or equal), <= (less or equal), !(not), && (and), and || (or). Do not confuse the == with the = operators!
The ==, !=, >, and < operators should all be very straightforward. == checks to see if two values are equal, != checks to see if they are not equal, > checks to see if one is greater than another, < checks if one is less than other, >= checks if one is greater OR equal, and <= checks if less OR equal. These should be pretty straightforward, however the others may be a little weird.
The && operator is likely you haven't seen before, but it's still very easy! What the && operator does is check to see if the values on both sides are true, and if so it will give you a value of true. So basically if A and B are both true, give true. For example.
bool a = true;
bool b = false;
bool c = a && b;
Here, c will be false, because only a is true, where both a and b need to be true.
|| is somewhat similar except it gives a true value if either a OR b are true, meaning either one can be true and it will give you a value of true. In the previous example, if we replace && with || c will be true.
bool a = true;
bool b = false;
bool c = a || b;
This is because a is true, and as long as one is true the entire thing is true.
Finally we have the ! operator, when used on a boolean variable it gives you the opposite of that boolean. For example
bool a = true;
bool b = !a;
Here, b will be false, as using the ! operator b is being set to the opposite of a.
&&, ||, and ! should only be used on boolean values, and in the next image we'll see how important boolean values really are in programming.
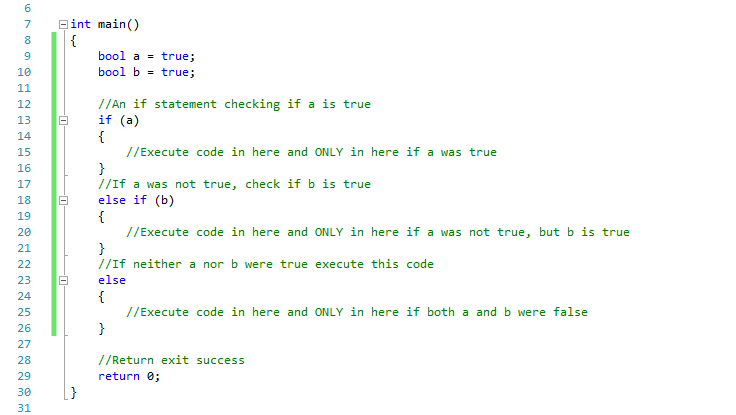
Control Flow
Alright guys, we're almost done with the basics! In this section we are going to talk about control flow, or how we can control what code executes under what circumstances. This is where those boolean values become so important, as we are going to be using what are called if statements. An if statement simply checks to see if something is true or false, if its true it will execute code, otherwise it either check other statements, execute other code, or do nothing. To create an if statement simply write a statement like this.
if(BooleanSatement)
{
//Code to execute)
}
Here, the BooleanStatement could be anything, such as checking if two integers are equal to each other, a character is a specific character, or if a series of conditions are met.
If you want to execute something else if that if statement isn't true, you use an else statement.
if(MyStatement)
{
//Execute this if MyStatement is true
}
else
{
//Execute this if MyStatement was false
}
Finally, if you want to check multiple if statements in a single block of code, you would use else if. You use an else if block like so.
if(MyBool)
{
}
else if(MyOtherBool)
{
//Execute if MyBool was false and MyOtherBool is true
}
A single block of if statements (if, else if, and else) will only execute a single block, meaning if one block has been executed, the other blocks will be ignored. Blocks are made up of a single if statement, however many else if statements as desired, and a single else statement if desired.
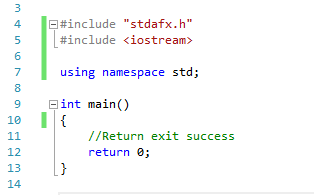
Input and Output
Alright, now that we know the basics its time for us to create a basic user interface and run our program! Start by adding these two lines of code to your system, for the #include don't include a semicolon, includes are one of the few things that do not require them. Don't worry too much about what these two lines of code do, just know they are required to do the basic input and output we'll be working with.
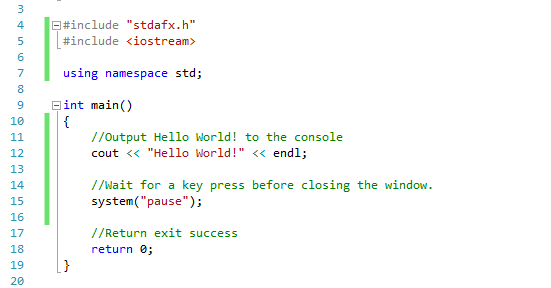
Output Code
Next we are going to write some code that will output some text to the console. The text itself should be wrapped inside of two double quotes, and this data is different than a single character. To output something to the console use the following format.
cout << Output1 << Output2 << Output3 << endl;
What this does is outputs Outputs 1, 2, and 3 onto the same line before ending that line. In the case of our program it will be outputting Hello World!
Next the system("pause"); command, this simply waits for the user to press any key before continuing to execute. When the program reaches that return 0 in the main function, the program will terminate and we want to make sure we can see our output!
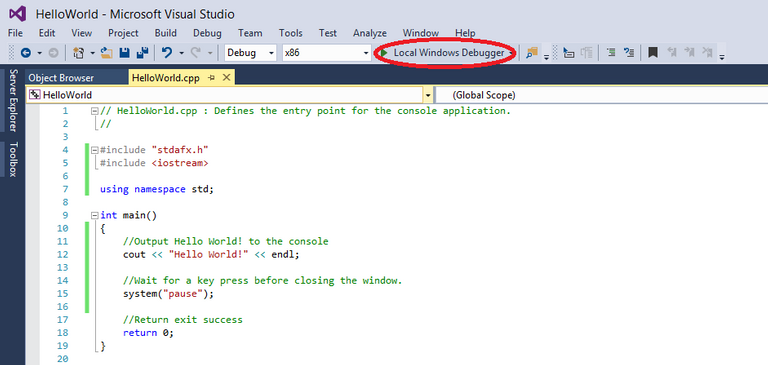
Run the program!
It's finally time! You get to compile and run your first program! To do this look for the button with the Green Arrow at the top and press it!
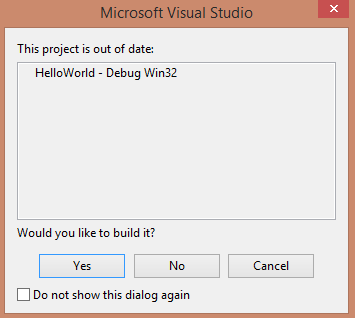
Compile the program!
Chances are you'll get a dialog like this, for the purposes of this tutorial you can just hit yes, don't worry about what it means right now, and if you want you can click the checkbox before hitting yes and you won't see this dialog again unless you change a setting. After pressing this button Visual Studio may take a few moments to compile and run your program.
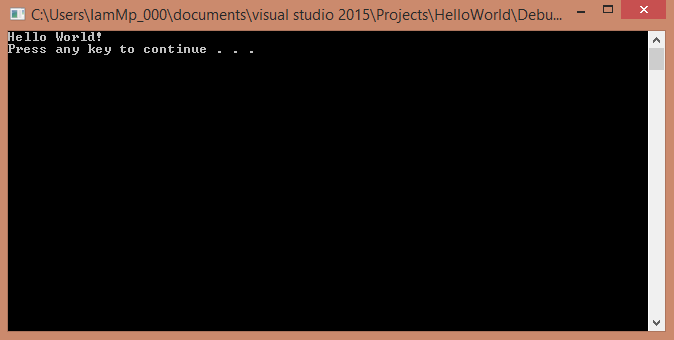
YOU DID IT!
If you did everything right now you should see this window, congratulations on running your first program! You're almost to the end of this tutorial, I have one more concept to talk about!
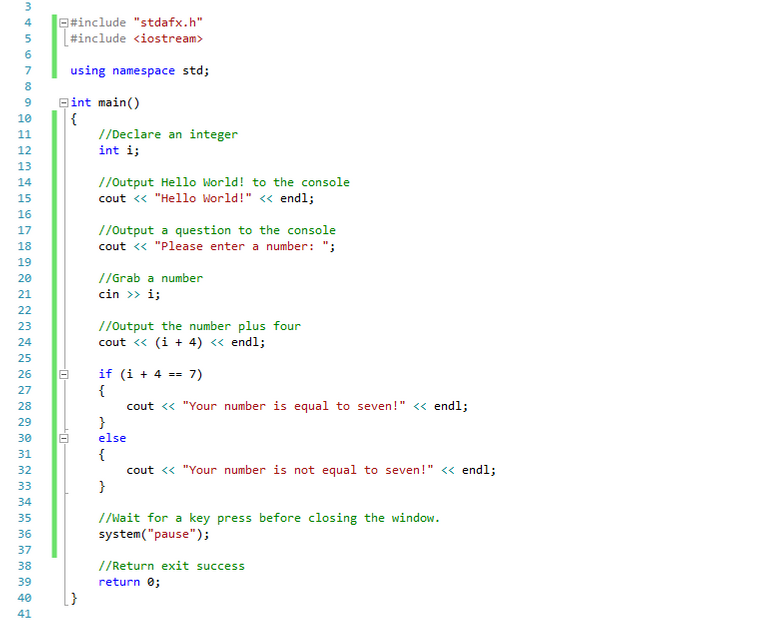
Reading Input and Applying Knowledge
Finally we are going to cover how to read input, and using what we've learned in this tutorial to create a little interactive program. Using cin you can read a single value into a declared variable, the console will wait until you've entered some value and pressed enter before continuing, here is an example.
int i;
cin >> i;
cout << i << endl;
This will simple have you enter a number, and output the number back at you. If the program example I provided you can see how I've combined everything I have taught up until this point to create a little interactive program. The output is in the image below.
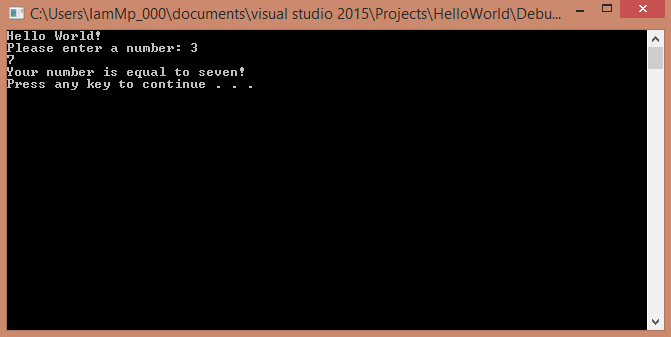
More Output!
Here is some more output from the previous code example, notice how it only outputs that the number is equal to seven, this is because of our if statement.
Also, if you want to get really good at programming, follow your ABCs (always be coding), the best way to get good at something is with practice, so keep at it! You are awesome and can do it!
 Either get busy living or get busy dying

ohh the irony talking about programing and my only audience are bots.
hhh
Nice work man
finally a human bean!!
thanks man, i really appreciate your kind reply
if its not much trouble i want to ask how did you stumble upon my post.
i still figuring out steemit and how it works, thank you
Oh and for upcoming tutorials, you might want to also consider posting them under utopian.io (based on steemit) if you plan to write high caliber tutorials about open source projectsI think you shared it on @arabsteem discord channel? I manage that :)
ok i will definitely take on your advice, thank you so much for your help.yes i did share it on @arabsteem i didn't know it was your channel (well organised channel good job on that )
Peace, Abundance, and Liberty Network (PALnet) Discord Channel. It's a completely public and open space to all members of the Steemit community who voluntarily choose to be there.Congratulations! This post has been upvoted from the communal account, @minnowsupport, by bitius from the Minnow Support Project. It's a witness project run by aggroed, ausbitbank, teamsteem, theprophet0, someguy123, neoxian, followbtcnews, and netuoso. The goal is to help Steemit grow by supporting Minnows. Please find us at the
If you would like to delegate to the Minnow Support Project you can do so by clicking on the following links: 50SP, 100SP, 250SP, 500SP, 1000SP, 5000SP.
Be sure to leave at least 50SP undelegated on your account.