A few weeks ago I wanted to make something out of wood, preferably a board game. While searching for suggestions, I came across a Video of the British Museum about the game "The Royal Game of Ur" and was immediately impressed.
The game was quite easy to learn and seemed to be a lot of fun for the two players. When I found out that the corresponding boards were discovered during excavations in the 1920s and dated to around 2600 BC, I had found my new project. ^^ Which I then successfully completed. :)
Since I wanted to build a second one anyway, I thought it would be great to document this ...
Tools and Parts

Tools:
- Saw
- Grinder
- Folding rule
- Pen
- Brush
- File for Wood
- Woodburning Pen/Woodburner
- Wood Varnish
- Sewing mashine
Parts:
- Plank (I used a board from an old cabinet)
- Wooden Stick (For example an old Broomstick ^^)
- Some Scrap Wood
- Some Remnant
- Cord
The Plan
A game board is needed, for each player seven tokens and three dice.
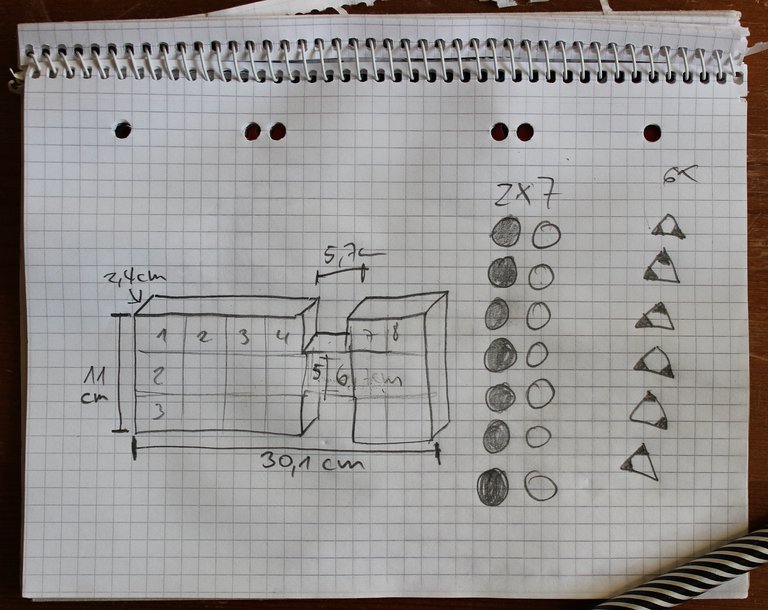
In terms of the dimensions of the game board, I have oriented myself to the information of the British Museum. The size for dices and tokens were given by the existing material. I used the following measurements:
Board: 30,1 cm (L), 11 cm (W), 2,4 cm (T)
Dices: ~ 1,5 cm (Edge Length)
Tokens: ~ 2,2 (Ø), 0,8 cm (T)
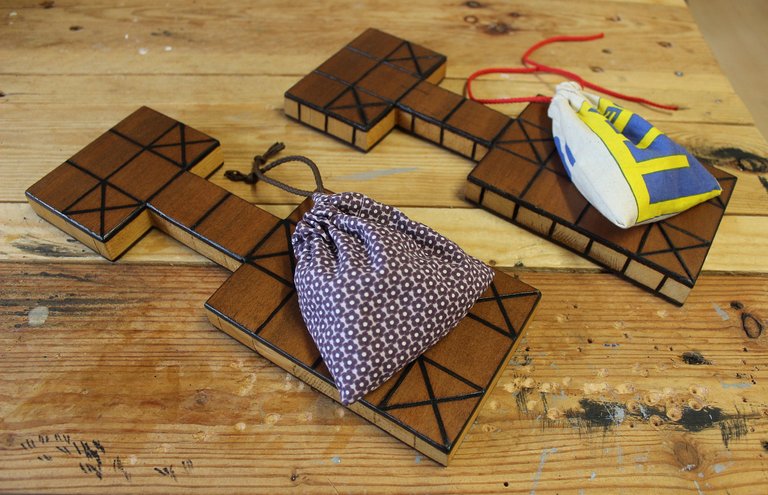
For the storage of the little parts I sewed a small bag. The measurements were at the end approx. 10 cm (H), 11 cm (W).
The Game Board

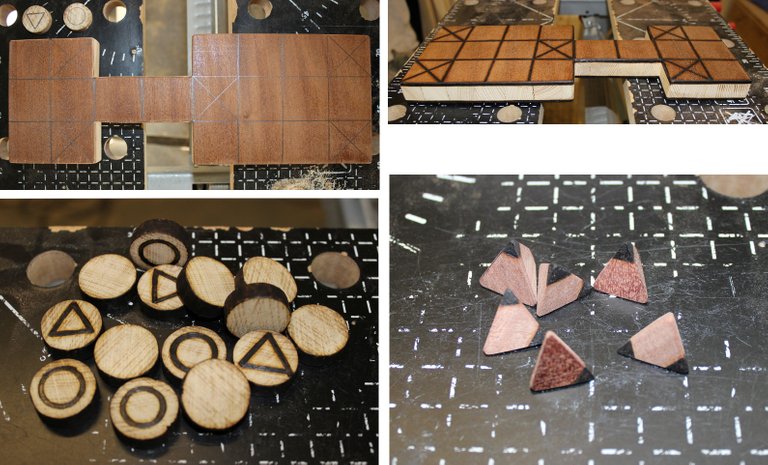
After sawing the board, I divided the length and width by the number of squares needed and then drawn them on the wood. I also marked and sawed out the cutouts.
Then everything was sanded off well.
The Tokens

For the tokens I cut pieces about 1 centimeter wide and sanded them well off, too.
The Dice

For the dice I drew triangles with a side length equal to the wood thickness.
After sawing, I then made a point on one side in the middle. And removed each of the three sides diagonally to the point so that a tip is formed.
I then ground off the subtleties by eye.
Decoration

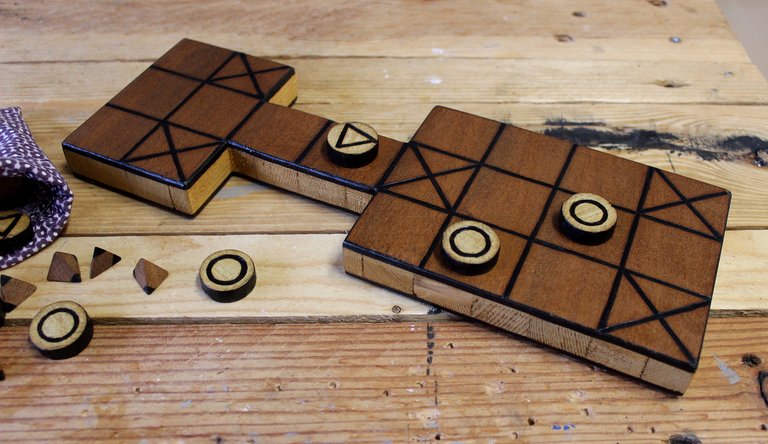
Instead of rosettes, I decided to burn crosses and give the whole thing a minimalist design.
With the Woodburning Pen i made a cross in the second square from the right and the first square from the left at the top and bottom rows. A fifth cross was added in the fourth square from the left in the middle row. I also burned the Edges of the board just for the look.
Two tips each were blackened on the dice.
In the case of the tokens, I have branded seven triangles and seven circles. In addition, the edges where made nice dark.
Glazing the Wood

To protect the wood and to give the whole a more beautiful look, I have varnished all the wooden parts. For that I simply used the rest of a glaze for parquet, which is even safe for toys.
The Bag

Attention! As you can see from the pictures, I did something wrong and the tunnel openings for the cord are inside. It still works. :D
After the fabric was cut to size, the edges were sewn to prevent tearing. Then two of the pages were folded and sewn accordingly. This will be the edges of the tunnel for the cord. So they will later look nice and not tear. The tunnel was then added to one of the other two sides.
Finally, I then folded the fabric in the middle and sewn it together. After everting, I was able to pull the cord through the tunnel with the help of a safety pin.
Finish!
In the first version I made decorative lines on the sides and used a sharp blade to burn the squares. The fabric came from a torn carrying bag.
Rules!
The game can be played in different ways. The most common is probably that of the above linked video. An overview can be found at Mastersofgames.com.
I hope the tutorial was interesting and may have even animated someone to rebuild it. :)
Tim Schabe
[Deutsch]
Vor einigen Wochen hatte ich Lust etwas aus Holz zu basteln, am besten ein Gesellschafftspiel. Bei der Suche nach Anregungen, bin ich auf ein Video des Britischen Museums über das Spiel "Das königlische Spiel von Ur" gestoßen und war sofort begeistert.
Das Spiel war recht einfach zu erlernen und schien den Spielern sichtlich Spaß zu machen. Als ich dann erfahren habe das entsprechende Spielbretter in den 20er Jahren bei Ausgrabungen entdeckt wurden und auf ca. 2600 vor Christi datiert wurden, war es um mich geschehen. Ich hatte mein neues Projekt gefunden ^^ Welches ich dann auch ganz zufrieden beendet habe. :)
Da ich sowieso noch ein Spiel bauen wollte, dachte ich mir es wäre doch ganz toll dies ein wenig zu dokumentieren…
Werkzeug und Teile

Werkzeug:
- Säge
- Schleifmaschine
- Zollstock
- Bleistift
- Pinsel
- Holzfeile
- Brennkolben
- Holz Lasur
- Nähmaschine
Teile:
- Brett (Ich hab eines von einem kaputten Schrank genutzt)
- Holz Stange (Zum Beispiel von einem alten Besen ^^)
- Etwas Restholz
- Ein wenig Reststoff
- Kordel
Der Plan
Benötigt wird ein Spielbrett, für jeden Spieler je sieben Steine und drei Würfel.
Bei den Maßen für das Spielbrett, habe ich mich an die Angaben des Britishen Mueseums orientiert. Die Größe für Würfel und Steine wurden vom vorhandenen Material vorgegeben. Folgende Maße habe ich verwendet:
Spielbrett: 30,1 cm (L), 11 cm (W), 2,4 cm (T)
Würfel: ~ 1,5 cm (Edge Length)
Spielsteine: ~ 2,2 (Ø), 0,8 cm (T)
Für die Aufbewahrung der Teile habe ich einen kleinen Beutel genäht. Die Maße waren am Ende ca.: 10 cm (H), 11 cm (W).
Das Spielbrett

Nach dem aussägen des Spielbretts habe ich die Länge und Breite durch die Anzahl der benötigten Kästchen geteilt und diese dann auf das Holz gezeichnet. Die Ausschnitte habe ich dann auch markiert und ausgesägt.
Dann wurde alles gut abgeschliffen.
Die Spielsteine

Für die Spielsteine habe ich Stücke von etwa 1 Zentimeter Breite geschnitten und diese dann auch gut abgeschliffen.
Die Würfel

Für die Würfel habe ich Dreiecke mit einer Seitenlänge gleich der Holzdicke auf das Holz gezeichnet.
Nach dem aussägen, habe ich dann auf eine Seite in die Mitte einen Punkt gemacht. Mit dem Schleifgerät habe ich dann jede der drei Seiten schräg bis zum Punkt abgeschliffen so das eine Spitze entsteht.
Die Feinheiten habe ich dann nach Augenmaß weg geschliffen.
Das Dekor

Anstatt Rosetten, habe ich mich entschieden Kreuze ein zubrennen und dem ganzen ein etwas minimalistischeres Design zu geben.
Mit dem Brennkolben habe ich dann Kreuze in das zweite Kästchen von Rechts und in das erste Kästchen von Links der oberen und unteren Reihe gemacht. Ein fünftes Kreuz wurde in das vierte Kästchen von links der mittleren Reihe hinzugefügt. Außerdem habe ich alle Kanten für ein besseres Aussehen angebrannt.
An den Würfeln wurden immer je zwei Spitzen geschwärzt.
Bei den Spielsteinen habe ich je sieben Dreiecke und sieben Kreis rein gebrand. Zusätzlich habe die Ränder schön dunkel gemacht.
Die Holz Lasur

Um das Holz zu schützen und dem ganzen ein schöneres Aussehen zu verpassen, habe ich sämtliche Holzteile lasiert. Dafür habe ich einfach den Rest einer Lasur für Parkett verwendet, welche sogar für Spielzeug geeignet ist.
Der Beutel

Achtung! Wie man anhand der Bilder sehen kann, habe ich irgendwas falsch gemacht und die Tunnelöffnungen für die Kordel befinden sich innen. Funktionieren tut es trotzdem. :D
Nachdem der Stoff passend zugeschnitten war, wurden die Ränder vernäht um ein einreissen zu verhindern.
Dann wurden zwei der Seiten umgeklappt und entsprechend vernäht. Dies werden die Ränder des Tunnels für die Kordel. So es später dann schöner aus und reisst nicht ein.
Schlußendlich habe ich dann den Stoff in der Mitte gefaltet und zusammen genäht. Nach dem um stülpen musste dann nur noch mit Hilfe einer Sicherheitsnadel die Kordel durch gezogen werden.
Finish!
In der ersten Version habe ich dekorative Linien in die Seite gebrannt und für die Kästchen eine spitze Brennklinge verwendet. Der Stoff stammte von einer gerissenen Jutetasche.
Regeln!
Das Spiel kann man auf unterschiedliche Weisen spielen. Die gängigste ist wohl die des oben verlinkten Videos. Eine Übersicht findet unter folgendem Link: Mastersofgames.com.
Ich hoffe das Tutorial war interessant und hat vielleicht sogar jemanden zum Nachbau animiert.
Tim Schabe


super detail on this post!
Thanks! :)
What an amazing and functional piece of artwork. Maybe you should go into business reproducing these. I know I would be interested in purchasing one to play with my family. Great post I'm glad I discovered you thanks to @curie! Following!
Since I have some older projects standing around anyway, I have indeed thought about selling some of my stuff. At the moment I'm looking for alternatives to eBay and Etsy, Peerhub and Openbazaar would be an option. I will definitely report on it. ^^
Thanks for your comment and following. :)
Congratulations @schabenstolz! You have completed the following achievement on Steemit and have been rewarded with new badge(s) :
Click on the badge to view your Board of Honor.
If you no longer want to receive notifications, reply to this comment with the word
STOPThanks! :)
Hi @schabenstolz,
I love you using your craftsmanship to recreate an ancient game. Great post, fun to watch it come together.
This post was nominated by a @curie curator to be featured in an upcoming Author Showcase that will be posted Saturday evening (U.S. time, about 12-16 hours from now.) on the @curie blog.
NOTE: If you would like us to NOT feature your post in the Author Showcase please reply, email, or DM me on Discord as soon as possible. Any photos or quoted text from your post that we feature will be properly attributed to you as the author.
You can check out our previous Author Showcase to get an idea of what we are doing with these posts.
Thanks for your time and for creating great content.
Gene (@curie curator)
Hello Gene aka. @randomwanderings,
I am glad that you like my post so much that I appear with it in the author showcase.
There is not much to say about me. I am a child of the 80s, I come from Germany and love to be creative. As I am always interested in new technologies, I also had to try out this Steemit that everyone is talking about. Even though the background processes are not very clear to me, I think this platform is great. Every day, I discover many new topics that inspire myself in my creativity or to think about topics that are not otherwise of interest to me. By writing my contributions, I hope to be able to give a little back to the Internet.
I was totally surprised that people find my "stuff" really interesting, commenting and even willing to reward me. Especially with the background that I translate my English texts up to ~ 73% with the help of an online translator. ^^ (btw. sorry for that :x)
Maybe some infos or photos from my Introduceyourself post are useable.
Regards,
Tim Schabe
Your post was mentioned in the Steemit Hit Parade for newcomers in the following categories:Congratulations @schabenstolz!
I also upvoted your post to increase its reward
If you like my work to promote newcomers and give them more visibility on Steemit, consider to vote for my witness!
Yay! Thank you very much. :D
Hello this is looking like a fun game to play i never heard about it before.
Hi, yes it's really fun to play. I think it's best compared to "Mensch ärgere Dich nicht".
Ganz ganz großes Kino. Du hast direkt mein Interesse geweckt ! Ich finde den bärtigen weißen Prof. aus dem Video ja grandios. Leider ist mein Englisch nicht so fest als das ich jedes Detail verstanden hätte...
Super Artikel, weiter so !
Grüße, Benny
Freut mich das der Artikel so gut angekommen ist.
Ja, der Professor ist echt sympathisch und macht wohl den Löwenteil der Beliebtheit des Videos aus.
Bezüglich der Sprache müsste ich mal schauen, ob man da wenigstens Untertitel anschalten und auch so dann verlinken kann. Auch sollte ich wohl nur deutschsprachige Texte verlinken (Regeln..), wäre zumindest für die Zukunft besser.
Dankeschön, Benny. Fürs Lob und die Anregung. :)
That's such an excellent project idea, reading this made me want to go make one right now when I haven't even read how to play the game yet. Nice.
Thank you very much. :)
Großartig! Danke sehr für den Bericht und dafür, dass Du Dich über die Produktion eines so ehrwürdigen Spieles drüber getraut hast :)
Das Spiel hat mich schon mehrfach fasziniert, aber nachdem ich hörte, dass man sich nicht sicher ist, wie es 'früher' gespielt wurde, hab ich's wieder sein lassen. Stimmt das etwa nicht? Du erwähnst hier ja, dass es mehrere Spielweisen gibt. Weißt Du mehr dazu (z.B. ob die Unterschiede regional oder zeitlich entstanden sind)?
Gerne doch. Freut mich das dir der Bericht gefällt.
In der Tat ist man sich nicht sicher wie es früher gespielt wurde. Die heute verwendeten Spielregeln wurden wohl größtenteils anhand einer 177 v. Chr. gefundenen Tontafel entwickelt. Aufgrund des Altersunterschiedes der Spielbretter und der Tontafel bezweifelt man jedoch das dies die ursprünglich gespielten Regeln sind. Mein Wissen diesbezüglich stammt auch nur aus dem verlinkten Video, des Links(Regeln) und dem entsprechenden Wikipedia Eintrag. :x
Übrigens toller Nutzername. :)
Ah gut, dann stimmt das wenigstens irgendwie, was ich gehört habe. Ein spannendes Bastelprojekt ist es allemal!
Danke bzgl. des Namens. Im Gegenzug darf ich meine Begeisterung für Dein Profilbild ausdrücken, haha. DA schaut man hin! :)
Stimmt und recht simpel auch noch.
^^ Dankeschön.
That is a rather intriguing game. Ding ding.... new project! I love the step by step, there is a lot you can do with a project like this. I made a chess board one time using alternate colored boards, that might be interesting to try with a board like this. Then the rules, just have to get all of that down, lol.
Glad the post inspired you. :D
Using alternate colored boards sounds interesting and would give the whole thing a more noble look. With the rules, I thought about burning them under the board. But then I did not do it, because I have too little experience with wood burning and it would have become very complicated.
However, I could well imagine a small roll of parchment for the rules, which then also fits into the bag.
It would be cool to burn the rules into the bottom in cuneiform from the tablet he had. Not that anyone could read it but it would be cool. Hmmmm, I wonder if they put a copy right on the game... lol
Great idea, I could well imagine cuneiform on the sides. Because of the different types of wood ... On Instructables, someone has recently built the game and realized that.
seriously, dang it. It always seems my brilliant ideas end up as someone else's ideas.....
Hi schabenstolz,
Visit curiesteem.com or join the Curie Discord community to learn more.
Wow! You have sweetened the day of a little maker very much. I will look into your project. Thank you. :)
That must have been a really fun project, it must have felt like going back in time.
The royals played the game? That must have been a really expensive piece back then. But well, you have been able to recreate it and it turned out really well!!
It was definitely fun and maybe I'll do one more in the near future.
Since I made mine from scrap wood, it was not that expensive. Almost a version for the people. :D Thank you very much. :)
That will be really great!
Yeah, a version for the people!! Well, that's what up-cycling is all about- creating masterpieces out of already owned stuffs and at an affordable rate.
Wunderbar! Alles gut erklaert. Danke fuer die Links. Qwirkle ist auch ein tolles Spiel: https://steemit.com/esperanto/@johano/kvirklo-domeno-de-la-21-a-jarcento
Gerne. Danke für die Empfehlung, ich schau mal rein.
Congratulations @schabenstolz! You have completed the following achievement on Steemit and have been rewarded with new badge(s) :
Click on the badge to view your Board of Honor.
If you no longer want to receive notifications, reply to this comment with the word
STOPDo not miss the last post from @steemitboard:
SteemFest³ - SteemitBoard support the Travel Reimbursement Fund.