I just wanted to let you all in on the secrets of how we put together a wicking garden that is hooked up to a 500 gallon water cistern. The first time we worked on it we definitely had our fair share of mishaps. The goal of this article is to help you keep from making those mistakes. We will use a customer's project as an example:

We needed the following materials:
- Western Red Cedar
- Galvanized Corner Brackets (that we make)
- Screws & Washers
- Weed Barrier
- At least 45 MM rubber pond liner
- Geotextile Pond Underlayment
- PVC Pipe and Couplings
- A toilet flush valve (you’ll see)
- Gravel
- Soil
- Water
And of course the tools: wheel barrow, shovels, picks, level, drill, staple gun, circular saw.
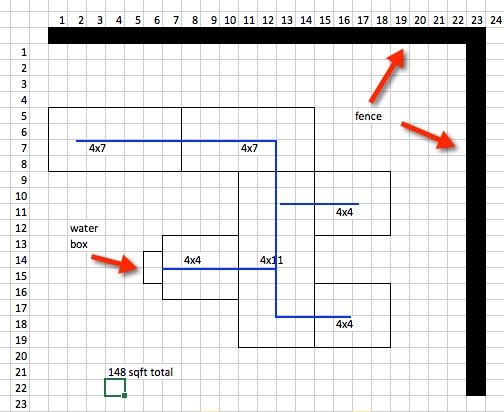
The first thing you want to do is make a drawing so you know how much of each material you are going to need exactly. When you are building something that is meant to hold a large amount of water being precise is very important. You will need to remember that you are filling up some of your garden space with water. We recommend the lowest point in your garden to not be any shorter than 18 inches. It can be as simple as using an excel spreadsheet to make a drawing as you can see below.

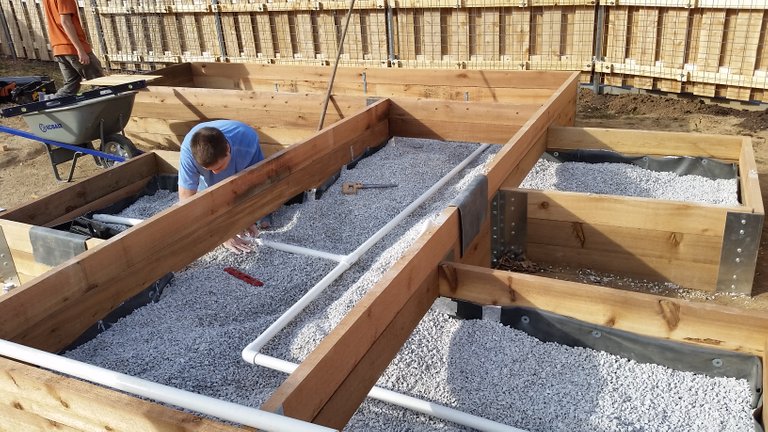
Next you will need to level the area where the frame of the bed will be placed. This part can be tricky. If you do not have a long level you can use one of your boards and place a level on it to help make sure the distance is level. Once this is leveled you will start building the frame of your wicking garden, like the picture below.

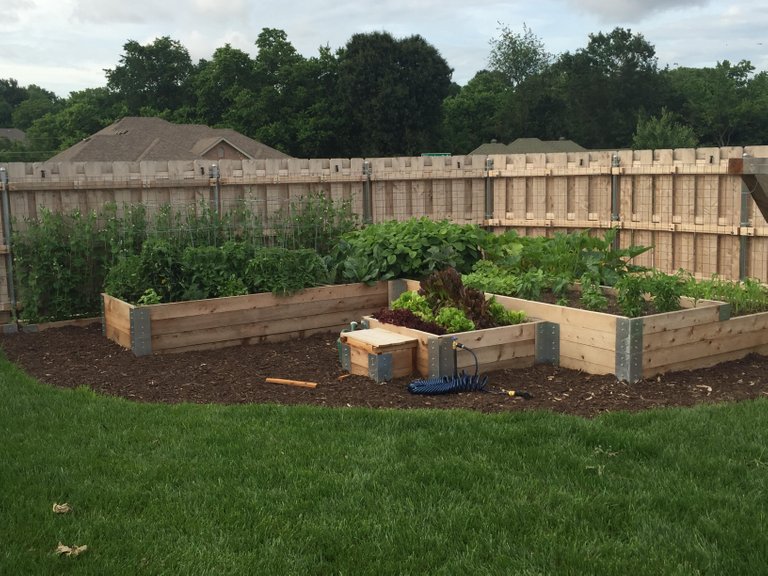
Now it should look like a normal garden bed, your frame is level and built to where you want it to be. If you just stopped here and filled up the area with soil you would have a normal raised garden bed! But for you adventurers let’s look at what we need to do next to build a wicking garden.
Start with your geotextile, geotextile is a pond underlayment that helps pond liners not rip by 400%. You are going to put a sheet of geotextile on the bare ground as a base for your pond liner to go in on. You might want to use a heavy staple gun to help keep the geotextile in the corners of the bed
Next is your pond liner, for this you will need to make sure that the liner is pulled up to the depth that you want, we recommend 12 inches from the ground (check the picture for reference). This part is very important, if you garden is not level then your pond liner will not be level, if the pond liner is not level your garden will leak in the low spots. You will use the screws and washers to hold the pond liner to the garden bed. Make sure you make the pond liner as flush with the garden bed and ground as you possibly can to help prevent a rip in the liner. Fasten the liner to the bed every 4 to 6 inches. Next you will fill the liner with gravel, you will want to leave 1 to 2 inches of space to place your PVC pipe.
Now we are going to hook up the toilet flush valve and PVC pipe. You will need an exterior box like in the picture below, you will follow the same rules as above with the geotextile and liner. Once you have that in places you will drill a hole large enough for you PVC pipe to fit through, use a hose clamp to keep the hole for the PVC pipe from leaking. The toilet flush valve is placed in the box and set to the level of the PVC pipe. It acts just like a toilet, the valve box is connected to a water catchment system uphill from the garden, the water catchment fills the entire garden bed with water and shuts off when the area is full. (The water catchment is not a must you can hook this up to a hose or underground irrigation system) Once all of that is connected you will then proceed to install the rest of the PVC pipe. You will only need to run one line to all area of the garden bed. Place 1 hole every 6 inches in the PVC pipe so the water from the catchment system can fill the bed quickly. Now you are going to need an overflow drain. Just pick the level that you want to garden to overflow at and add another PVC pipe that runs out of the garden bed. This will prevent you garden from getting too much water when it rains.

I would stop here for a while, fill you bed up with water and make sure there are no leaks in your liner. Let the water stand in the garden for at least 24 hours. If everything checks out you are free to move on! Now you will lay your weed liner on the gravel and over the PVC pipe to keep the soil from getting into the water and making a mud pit. Use your staple gun again to keep the weed liner flush on the garden bed. You are now ready for your garden soil. Plant and enjoy the garden without watering it. If you have any questions feel free to leave them in the comments. Or check out of Facebook page to learn more about gardens and sustainable landscaping! If you are interested in building a wicking bed yourself we will help you with the design and materials that you need to get started.
I am an Author at SustainablebyNature.com, I have posted a blog there to verify
such a cool guide! I love systems like this. Subsoil irrigation is so much more efficient.
Thank you @cryptohustlin I appreciate the feed back!
Very cool.
My landlord made a self watering garden which has helped his veggies grow lovely and strong. He turns the water on for an hour per day then turns it off when it is done. He used more of a tube than a pvc piping system though. Anyway really cool!
Also a friend of mine uses a trout tank and a water system that uses the fertilizer from the trout poop and such water his garden/veggies inside his greenhouse he built and it was really really interesting!!! He is a fish expert (used to teach at a college about marine life) so it is cool he used fish to incorporate his garden.
Great post! I love learning what people do like this.
Thats great! Since its your landlord do you have anything cool at your place? and Yes the aquaponics one sounds very interesting. I may have to get one on here about that topic also. Thank you for the comments and feedback.
Love this! Thanks for sharing.
No Problem! Thank you for reading!
Yes, very cool. My wife and I found out about wicking beds about three years back, and they work very well. While we still have to add water manually, they are an excellent way to grow food with very little water. I am new here and made my first post about our system. Please have a look. I originally got the idea from a series of youtube videos from a gardener in Australia and adapted for our needs. We have more wicking beds to build and look forward to incorporating the float system for self watering.
https://steemit.com/gardening/@specreman/wicking-garden-beds-how-to-have-a-luscious-vegetable-garden-with-minimal-water
That is awesome. I really enjoyed the post thank you for sharing it with me. The float system is a great and easy addition I think. I like being able to save water however we can. Please share the new beds with me if you can
Thank you. I have about 800 gallons of water storage between a 12x12 greenhouse and an 6x14 traditional raised bed. It is my intention to install wicking beds in both in the next year with a float system. I'll post, but it might be a few months.