Edit/repost: Back in the day, I made this guide because the majority of advice that was given out was being given out by bad players, which made me kinda mad and disappointed. As a response to all the bad guides out there and as a sort of replacement, I wrote this one. This is essentially the ultimate guide to GU, summarizing lots of important ideas. However, it will be largely useless to those who have lots of experience with card games, something more common with the now growing player base.
I've reposted this article because of the new influx of players and because I've refurbished a few really wonky statements. The people needeth, I giveth.
I'm a somewhat reliable source, considering I'm a consistent mythic player and have been top 10 a few times and top 20 more often then not. I've been playing card games for a while, and I do take a lot of time thinking about this game. In the future, it's incredibly possible someone will take my place for this role of "the good player who gives good, honest advice," but for now, you'll have maybe a guide every month or two about various things GU.
Alright, enough chit-chat, let's get into the nitty-gritty!
Deck Building - Your Tool for Success
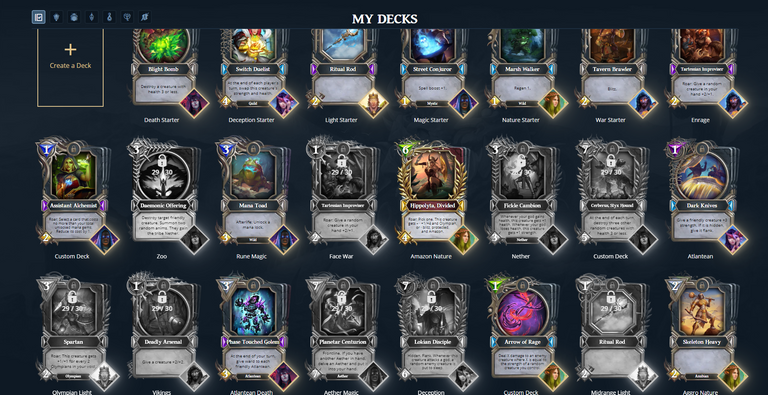
Good players can't win with bad decks, and bad players can't win with good decks. Of course, this statement as an absolute would be an exaggeration, but if you want to bump your win rate, keeping this idea in your head is essential. This part of the guide will help you with the first part (even if you're actually a bad player).
Win Conditions - How am I winning this?
You can't win without a win-con, so knowing what yours is and what leads to it is incredibly important. In my personal interpretation, there are four types of win-cons, and they all correlate with a deck archetype: aggro, mid-range, control, and combo. Aggro wants to win by over-powering the opponent early and reaching lethal (winning) before the opponent gets to their own win-cons. Mid-range is sort of the same thing, except they don't prioritize turn 1 and 2 as much in terms of reaching their win-con; they play a bit more defensively early and their power plays come out later. Mid-range also could have multiple ways to deal with the bigger cards that come from Control decks, unlike Aggro. Control's win-con is to make multiple big plays later on, so they want just enough presence early to extend the game late enough to make those plays. True Combo decks don't really exist in GU right now, but it'll be when there are a certain combination of cards in the deck that essentially win you the game when you play them together. I'll go deeper into each of these archetypes later when we talk about tempo and value, as those are the driving concepts between how these decks play. A good way to think about it for now is that Aggro decks are more proactive, Control decks reactive, and Midrange somewhere in the middle.
When you are building a deck, you have to think about what follows along with your win-con, since if it doesn't, it isn't helping you. You don't play reactive cards in aggro unless it enables your other proactive plays, and you never want to play defensively. You don't play early game cards in your control deck unless it helps you advance to the late game. You don't put in mid-late game or slow cards in your aggro deck because you don't want to last into the mid-late game. Now that we know generally what not to play, let's give a quick snapshot of what each archetype does want to play:
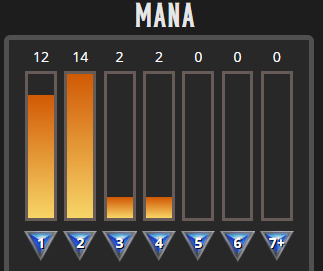
- Aggro: Lot's of strong 1 and 2 costs (about 2/3rds-5/6ths of the deck), a few 3-drops if they're good enough, and a few 4 and/or 5 cost finishers.
- Mid-range: A good lineup of defensive and/or strong 1 and 2 costs (about 1/3rd of the deck), a healthy spread of 3, 4, and 5 costs that accelerate the game a little, and a few 6 and 7 cost finishers that win the game a few turns after they're played (about 1/5th of the deck). If your chosen god has the tools, you should also include a few cards to counteract big plays that come from Control if your deck is not aggressive enough to end games reliably before a turn or two into 7 mana (Master of Indulgences and Penitence are good examples).
- Control: A bit more complicated, but in simple terms, you want to run whatever accelerates your win-con (mana unlocking) or slows down your opponent's win-con (removal). You'll probably still have about 1/3rd of your deck for early game, but that will almost be purely made up of removal and mana-boosting cards. Pack plenty of board clears and a powerful win-con (generally a big creature that costs 8-9 mana, and only one or two cards are needed).
A nice way to look at this is through the observation of mana curves, or the number of cards in each level of mana cost. I won't go to deep into it in those terms, as I already explained that in different words, but I'll go ahead and share an example curve for each archetype:
Aggro (Enrage War by me):
Mid-range (Mid-range Light by GGian):

Control (Control Death by YodaFett):
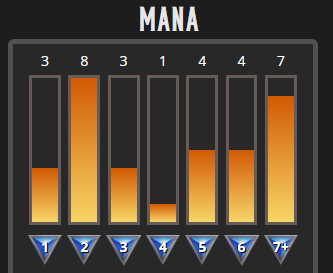
These aren't perfect reflections of each archetype (especially since they're a bit outdated), but they're close enough for you to get a sense of what's going on.
Those are the absolute basics for deck building. Thing is, that was really general, and applying those frameworks will only bring you so far. Next up will be two aspects that I think are heavily overlooked in our community.
Re-Defining Net-decking, an Essential Tool for All Players
Yes, I'm about to tell you how to net-deck. You're not going to win with whatever hipster deck you have going on in your workshop if you don't know the game well enough. Sorry if deck building is an integral piece to the fun for you; unless you really know the meta well, you're not going to make a fully original deck that will do well on high ladder without some luck. Even top players (including myself) look at decks that are doing well for reference, so there's no shame in it. Creativity can also be practiced through optimization instead, which is something I'll go further into depth right after this. For now, all you need to know is that you don't need to copy a deck card-for-card to net deck efficiently. In fact, it's better to experiment with slots of the deck you feel are weak.
The main lesson I want to emphasize in this section is that there is no shame in net-decking! Don't feel ashamed about it, and don't get all stuck-up if you don't do it! Look, if you want to do well in this game, especially in high-level play, such as 1400+ MMR games and tournaments, you have to have a good deck, no ands, ifs, or buts about it. There are plenty of people out there who make good decks, and their information is out there for you to sample. Shoot, as well versed in the game I am now, I still gotta look at other versions to see something I might not be seeing, or if I'm incredibly unfamiliar with the deck itself (my Slayer War list is just a variation of something I saw on GUDecks when scrolling through high win rate decks a week before I started playing it a while ago).
Now, to find the good decks to net-deck, there are 2 resources I like to use in particular: Unchained Stats and GUDecks, both used in tandem with each other.
When I net-deck, I typically start in GUDecks, where I select the "Top Decks" tab and make sure to look up under the specifics of within a time frame of whatever includes weekend ranked but no further (7 days if it's a Wednesday or Thursday, 3 days if it's a Monday or Tuesday, or 1 day if it's during weekend ranked) and exclusive to Mythic rank.
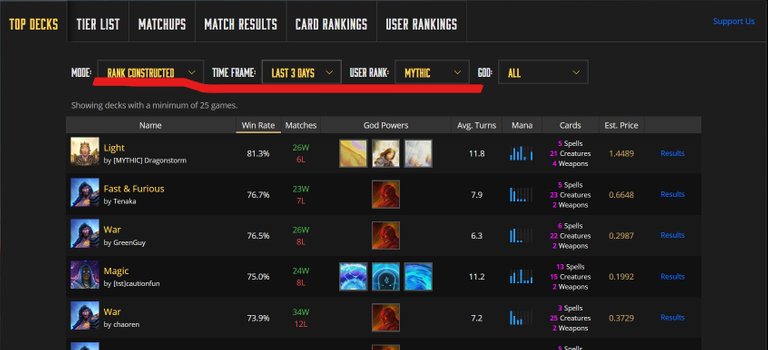
I usually just pick one up and optimize it until I think it's near perfect (which, spoiler alert, almost never happens). However, this doesn't work for someone without a good amount of experience. If you're that person, from here, we go to Unchained Stats where we look up the persons name and look for the list we just found. Lets use my own profile as an example here. After we find said person on Unchained Stats, scroll to the bottom right and find the "Player Decks" section. It'll look something like this:

If you scroll though them, you'll sometimes notice lots of variations of the deck before (or even after) it's longest played version. It's best to sticking to the decks with at least 20 games, since that typically means the builder had found their at least momentary "perfect list". Let's look at the one that shows up first for me:
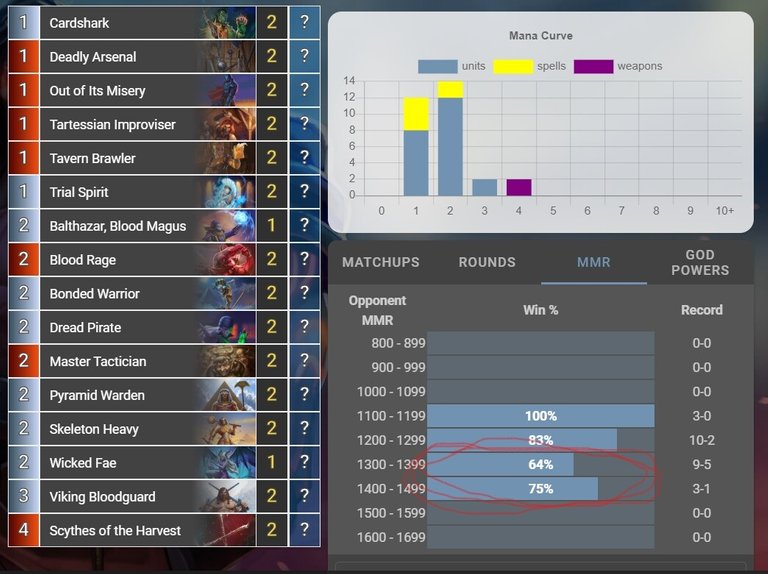
Looks like we found a winner! How do we know? You can tell it's a good deck because it doesn't have a negative win-rate against people from the 1300-1600 MMR range, the 1400-1500 MMR range being the most important here. Occasionally, there will be a deck that does really well in Mythic but not against high-level Mythic, which is a very important distinction. If you want a deck that can win, you want a deck that can win vs. Jackhigh and Dragonstorm. Here's an example of a deck I wouldn't use:
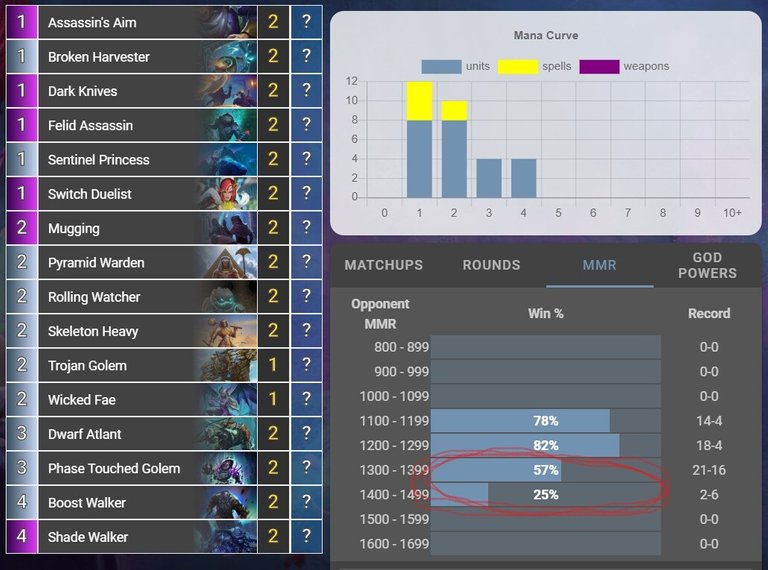
Yes, that's my deck again. Yes, I used to say atlanteans were utterly broken. You can stop laughing now. On a more serious note, this is typically a bad sign. Not always, since it's still a low sample, and those matches might be made up of the same 2 people using Mid-range Light, but it's best to avoid these kind of decks if possible. If you can't find other options (since these are typically really rare), at least choose a deck with a positive win-rate against the 1300-1400 MMR range.
Now, after reading this through and editting it, I'd like to emphasize that this is not a perfectly reliable method to see how good a deck is. These are incredibly low samples after all, and there aren't that many decks that do that well in the first place. The last sentence in my previous paragraph is the most important here, since if that is negative, you're much less likely to do well with it.
Okay, so you've gotten your net-deck chosen or you think you've built a really good deck. Should you play the same exact deck 100 times in a row? Depends, really, but chances are the answer to that is no. This is where optimization comes in.
Optimization - The Most Important Skill in Deck Building
It is extremely rare that you make a "perfect-list" on the first shot. Part of the reason why I say that is because of the quotations I put there. Technically, it is impossible for us as human beings to determine what the exact best list is; we can't calculate RNG, we can't calculate pocket metas, and we can't run every possible scenario of this deck in our heads... but we can try. There is a hypothetical best list, and knowing how to get as close to there as possible is key to building a good deck.
So, how do we do that? To be honest, it mostly takes experience with the game and the deck itself. Eventually after playing a deck for long enough, you stop thinking about the hypothetical situations a card could be useful and more about remembering if it was useful in your deck. During the optimization stage of building a deck, you'll typically notice that there's a card or two that's under performing for you (if you're observant enough; if you don't notice, practice actively thinking about the roles of the cards in your hand and whether or not they're useful to you during each turn). From here, all you need to do is try an alternative that might be better in more situations. It's hard to explain perfectly, so let me give an example from one of my previous Enrage decks: Respected Jarl.

Why did I include this card in the first place? Well, I heard a lot of hype around it and saw potential synergies in the deck. Blitz is good for the removal the deck typically lacks, and while the additional attack doesn't often matter in this case, the twin-strike buff helps us cut through frontline creatures like butter. When I played it, it did do just that... sometimes. Other times, it was just a dead card in my hand. Yeah, sure, it has blitz, and I can buff it with my god power for extra damage, but that's what Tavern Brawler is for. It was an awful result almost every time I pulled it with Out of it's Misery, and it sucked to top deck if I wasn't in the perfect situation. This is what we call a situational card: a card that helps a lot in extremely specific circumstances, but not often enough to be worth running over something that is useful more often. In this case, I chose to run Dread Pirate instead, because it shares a similar role in removing things and potentially buffing ally creatures. It might not be able to produce the power plays Respected Jarl can every now and then, but at least I won't groan half the time I draw it.
This approach could also be used when trying to make a deck you don't have all the cards to. What serves a similar role? If there is none, is the card important enough for me to wait whether or not I need the card to play the deck?
Now, in order to optimize correctly, you gotta know how to play and analyse your games properly. Let's talk about that now.
Playing the Game Correctly: Concepts You Should Know and Understand
Before I begin, let me tell you the absolute best way to become better at the game: watch a good player play the game and explain their choices as they go. Back in my Hearthstone days, Kripparian was a big influence on my game play, and there's a lot I wouldn't know if it weren't for him. After constantly watching him explain his thought process in Arena mode for his card picks and plays, I started to passively integrate his thought processes into my own game play. This was further strengthened by Swim in my DOTA Underlords days and a lot now for Legends of Runeterra, who constantly challenged the ideas people had for the meta and always explained in detail the intricacies of the game. I don't know many good streamers for GU since I don't typically watch GU streams, but if they sound like these two and if they're in Mythic, keep watching them! One person that comes to mind in the GU realm is Petrify; very descriptive content, whether its a stream or an informational video, and it's from what I've seen very solid advice. A lot of what he says may be applicable here. The reason why I stress watching content to improve is that content provides more examples, and examples are essential to figuring out how to figure out situations you encounter on your own.
Now that we have the arguably most important part of this half of the guide done, lets explain some ideas and how we use them.
Tempo - The Fundamental Idea Behind Success in Card Games
The simplest way to describe tempo (or at least, the way that I understand it) is how much presence you have on the board, aka how many usable stats are on the board. Playing a creature gives you tempo, while using removal takes away tempo from your opponent. To win a game, you must have more tempo than you opponent for a considerable amount of time. Every play influences tempo, even if it's for later turns (something I'll detail later). Each turn you hold tempo, you do one of 2 things: deal damage to your opponent's face (health) or to your opponents creatures. Some call these beats (as verbalshadow describes in his guide to tempo), but that's honestly a bit confusing to me to explain it that way; I just focus on whether or not I'm properly wielding tempo, which is something we'll go into detail in now.
Each archetype is a representation of when a deck focuses on making tempo-heavy plays. Aggro has tempo-heavy plays early game, Mid-range has them mid-game, and Control has them late game. Essentially, your win-con is determined by when you place tempo on the board. The rest of the deck is based on managing your opponent's tempo while you're not utilizing it yourself.
The hardest decisions are helped by using tempo as a reference. For example, let's say I'm playing Enrage War (old deck, I know, but it's fairly similar to Face War today, and this is a very similar scenario) and I have Cardshark, Tartessian Improviser, Pyramid Warden, and Out of it's Misery in my hand on the first turn, and I'm going first against Magic with the Blastwave god power. I have plenty of excellent plays in hand, so how do I determine which is the best one? Well, let's list out the plays and what they do for us:
- Cardshark: Kinda weak against Blastwave, as they could (and probably would) use a bag to just kill everything on our board to no cost of cards in their hand. Bad move!
- Tartessian Improviser: Very weak by itself, but it gives potential for a high-tempo play next turn. Buffing either Pyramid Warden or Cardshark would work well in our favor, as we'll probably be playing both our next turn using our bag, and the 1/1 token from Cardshark gives us a target for Out of it's Misery the turn after that. Although it gets killed easily by Blastwave, it probably isn't worth it for your opponent, as it would cost them a bag just to kill a 2/1. This is a good play.
- Pyramid Warden: A solid choice. We could buff it next turn if we want, though since we have Out of it's Misery in our hand, we'd rather use that next turn. Pyramid Warden cannot be killed by anything Magic has this early in the game, so we know for sure it'll be applying pressure from tempo for a while while also protecting our other cards for more secure tempo. Simple and safe play.
- Cardshark and Tartessian Improviser: Under normal circumstances, this would be a high tempo play; three buff-able tokens on the board, a buffed Pyramid Warden in hand, and a few potential targets or Out of it's Misery are all very good to have. However, remember that the opponent has Blastwave and can easily chip down two tokens. You could try to buff Cardshark with Tartessian Improviser first, but even if you play Pyramid Warden afterwards, they still get a second free kill from Blastwave. The buff is also arguably better on Pyramid Warden anyways. This play is might be good.
- Out of it's Misery and Tartessian Improviser or Cardshark: Either play's goal would be to be able to drop a huge tempo play next turn while sacrificing tempo this turn. Using Cardshark will leave a 1/1 token on the board that could bait removal from our opponent and save Tartessian Improviser for a better buff later. Tartessian Improviser will leave nothing on the board, but will give us more tempo in the future. Either would be a solid play.
Hard choice, isn't it? Let's go deeper then by remembering our win-con as Enrage War: to provide as much tempo possible early, or, in other words, to put as much stats on the board as possible. With this in mind, I see two possible best plays: either Tartessian Improviser by itself or a 1-drop plus Out of it's Misery. Although this gives us low tempo turn 1, Magic likes its opponent putting things down one at a time. If we prepare for powerful plays the following turns, we can easily provide a strong lead Magic can't handle immediately. However, I would say the 1-drop plus Out of it's Misery play is riskier, as our pull from it might not be as good on turn 2 (Tavern Brawler or Dread Pirate for example, both of which rely on the opponent having a creature on board to be good). If we save Out of it's Misery for turn 3, we have less bad pulls, and if we do get a bad pull, we likely pulled another 2-drop to temporarily fill in instead.
Now, often here I referenced making plays that provide low tempo on the turn it is played but high tempo in future turns. This one example of value.
Value - The Trick to Winning the Long Game
Value is the observation of how much mana it takes to out-tempo the opponent; the higher the ratio of you mana use vs. their mana use, the higher the value of a play or a series of plays. For example, just about any board clear is typically a high value card, as the opponent probably spent a lot more mana developing their board than it did for you to clear it. Another set of great examples are the classic Deception 3-drops Vault Vagabond and Shady Merchant. Both aren't even a complete 1-drop worth in tempo, but the longer they live, the more cards they put into your hand, thus the more value they produce. Value and card advantage are roughly the same idea, just in different contexts; while value is the observation of mana-to-mana, card advanage is card-to-card. If we bring up board clears again, we can say that they provide high card advantage because it took only 1 card to eliminate the many that your opponent played on the board for the past few turns.
The sooner a deck archetype's tempo is fully utilized, the less they want to rely on value. This is because value relies on either waiting to make bigger plays and is typically reactionary rather than proactive. Aggro only uses value in the form of small-scale, tempo-based removal (such as Primal Guidance and Mugging) and early hand buffs (such as those from Tartessian Improviser or Out of it's Misery) that benefit 2 turns later at the latest, as Aggro typically wants to end the game before it is even capable of utilizing the higher mana cost of high value cards, and they want as much tempo early as possible. Mid-range has a mix of value and tempo plays through out its curve, as it wants to be able to efficiently manage the oppressiveness of Aggro while also defeat Control before they unload. Control is made up almost completely of value or anti-tempo cards before it reaches its win-con.
The concept of value's main purpose is to help decide what to use removal on and when to use it, since you want the most out of it. For example, is using Starshard Bolt on a Marsh Walker a good idea? Typically, definitely not, since you just spent 2 mana on something that costed them 1 mana. Yeah, the little bugger is annoying sometimes and can do a bit of face damage every turn, but unless the opponent is playing an Aggro deck and is likely to buff it, it's worth keeping your Starshard Bolt to help kill something bigger like Overgrown Rhino or Agrodor Protector (plus your god power of course, but that doesn't cost any cards!). Another example is when to time your board clears. Sometimes if you notice your opponent conserving cards to avoid a board clear, it may be smart to wait to use your board clear later and bait out your opponents resources, since that provides much more value. It may cost a card or two to pretend that you're doing your best to prevent an advance, but it'll pay off in the destruction of all the resources they'd eventually push to finish the game.
Speaking of which, there's once more piece of advice when making decisions in GU: when and when not to conserve cards.
Counter Play - The Closest to a Hard Read in Smash Bros. You'll Get in a Card Game
This section will be short since it's hard to explain without lots of context, and it would take watching lots of examples to fully understand. However, I'll try to explain it in this concise paragraph. Sometimes, it's worth going all out because there's no other way of winning otherwise. Other times, it's worth slowing down to avoid being painfully punished. The general rule of thumb is that if you're Aggro, there's no way to "dodge" it, and if you don't play high tempo early, you risk not hitting lethal soon enough and losing to your opponent's win-con. Sometimes going all in is the counterplay; playing lots of high-health creatures makes Faraday Cage nearly useless. However, when playing against decks like Control Deception where their board clear is conditional (in this case, Rapture Dance), play your cards in a way that makes it least effective. This may not be an option if you play lots of low-health creatures and/or if you rely on burst to finish off your opponent. Essentially, it comes down to your end game goal and whether or not you can afford to receive a board clear to win.
Conclusion
Looks like I didn't need to update it too much, which is nice. Hope this was helpful for you!
When it comes to netdecking, I think the most important thing is that you understand the deck you are copying. I find too many people copy a list from top players exactly while not really thinking about it at all. Examine every single card and how it advances your win condition, and potential synergies in the deck. Knowing the purpose of a deck and each card is essential to both understanding how to pilot it and how to refine it. Just because the data looks good doesnt mean the deck is refined either, especially on lower sample sizes.
All very relevant stuff here, and I want to make sure I bumped this. I did kinda forget to mention actually trying to understand a deck before playing.
Congratulations @greenguy654! You have completed the following achievement on the Steem blockchain and have been rewarded with new badge(s) :
You can view your badges on your Steem Board and compare to others on the Steem Ranking
If you no longer want to receive notifications, reply to this comment with the word
STOPThis post was shared in the Curation Collective Discord community
community witness. Please consider using one of your witness votes on us here for curators, and upvoted and resteemed by the @c-squared community account after manual review.@c-squared runs a
Good post