
Want to have GUI on your Google Compute Engine instance or use Internet browser on it? Here are the steps to install minimum required UI on Ubuntu 14.04 LTS VM(virtual machine) with Firefox . So let’s start.
Note: I am assuming that you have already created a VM instance with Ubuntu 14.04-LTS image and successfully running it.
Connect to your instance either through SSH option or use gcloud option. Once connected update the source list.
$ sudo apt-get updateInstall the Gnome components
Then we need to install the Gnome components for our virtual desktop. So type the following command:
$ sudo apt-get install gnome-corewhen prompted type Y and then press [Enter]. This will install the basic gnome desktop components. Normally gnome takes time but on GCE instance it flies :) .
If you prefer a lighter and faster alternative like Xfce, refer to this post.
Install a Virtual Desktop using VNC
Now we need a VNC server to interact with desktop environment. I am using vnc4server, you can install your favorite one:
$ sudo apt-get install vnc4serverStart the vnc server, You’ll then be prompted to create and verify a new password:
$ vncserverNote: this password will grant access to your instance, so make it strong.
If everything went fine your VNC server is now running and listening on port 5901. You can verify this with netcat from the Google Compute Engine instance:
$ nc localhost 5901


RFB 003.008
We now need to kill the session we just created and make a tweak to the startup script for VNCServer to make it work properly. If we don’t perform this step then all we will see is a grey cross-hatched screen with an “X” cursor and/or a grey screen with a Terminal Session, depending on the Ubuntu version. Not very useful!So, type the following command to kill the session:
$ vncserver -kill :1Now open the file we need to edit:
$ vim .vnc/xstartupImportant: The modifications we need to make to this file depend on the version of Ubuntu we’re using so make sure you are using Ubuntu 14.04 LTS
Press the [Insert] key (“i” in Ubuntu) once (this will switch us into “edit” mode) and then edit the script so it ends up looking like this:
#!/bin/sh

# Uncomment the following two lines for normal desktop:
unset SESSION_MANAGER
# exec /etc/X11/xinit/xinitrc

#[ -x /etc/vnc/xstartup ] && exec /etc/vnc/xstartup
#[ -r $HOME/.Xresources ] && xrdb $HOME/.Xresources
#xsetroot -solid grey
#vncconfig -iconic &
#x-terminal-emulator -geometry 80x24+10+10 -ls -title "$VNCDESKTOP Desktop" &
#x-window-manager &

metacity &
gnome-settings-daemon &
gnome-panel &
So, we’ve unmasked the unset SESSION_MANAGER line and masked out all the rest. We’ve then added the last 3 lines.When you’re done editing the .vnc/xstartup file for your particular version of Ubuntu press the [Esc] key once and type the following to save the changes and bring you back to the command line:
:wqInstalling a VNC client
Now install a VNC client on your local machine. There are many options available ( TightVNC, RealVNC etc. ). Install any one.
Open the firewall
First step is to tag our instance as a vnc-server, for that go to the VM description page and click on “add tags”
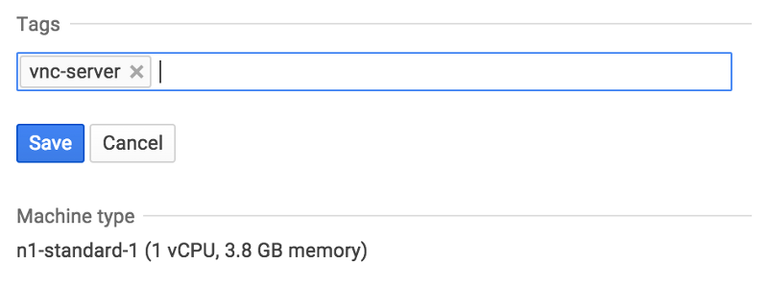
In order to communicate with our instance we need its external IP. You can find it on the Developers Console.

Let’s try to connect to it using netcat again:
$ nc 104.197.91.140 5901The connection will fail, this is expected as the firewall rules block all communications by default for security reasons.
Let’s fix that.
Navigate to the configuration for the default network “Compute > Compute Engine > Network” and then click on default. Or you could also click here and choose your project.
We’re going to add a new firewall rule, pressing the corresponding button.
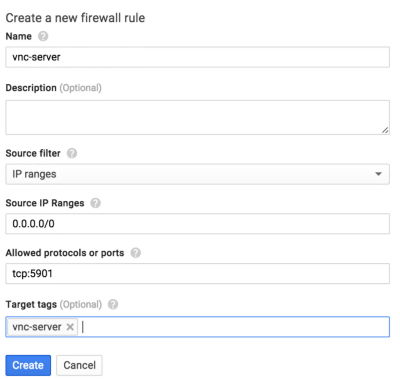
Choose a descriptive name for the rule.
We will allow traffic coming from any source, which is why we use 0.0.0.0/0, the IP mask equivalent to a wildcard.
The traffic will be on the port 5901 for protocol TCP and going to instances tagged as vnc-server.
Connecting to the VNC server
First, start the vncserver again on the VM by:
$ vncserverNow make sure that the connection is now allowed by the firewall:
$ nc 104.197.91.140 5901


RFB 003.008
Excellent! everything seems to be ready!!
If you still can’t connect but have followed steps correctly, there may be a issue of firewall blocking by your internet provider. Check the connection to port 22(SSH port).
$ nc 104.197.91.140 22


SSH-2.0-OpenSSH_6.6.1p1 Ubuntu-2ubuntu2.6
This can be resolved by ssh tunneling. Tutorials are available on google search :). Here is an example of tunneling command I used in my college where 5901 port is blocked. After this connect on localhost:5903 in the VNC Viewer.
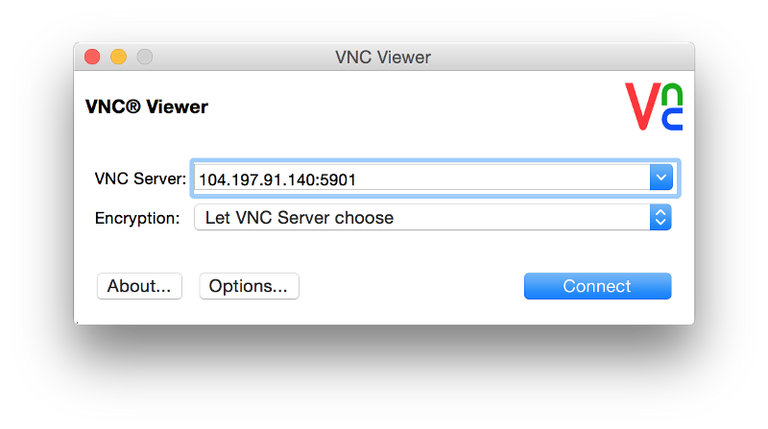
$ ssh [email protected] -L 5903:localhost:5901Open your VNC viewer and connect to the IP of your Compute Engine instance on port 5901 or connect on localhost:5903(for ssh tunneling). To connect you’ll need to provide the password you gave at the beginning of this tutorial.
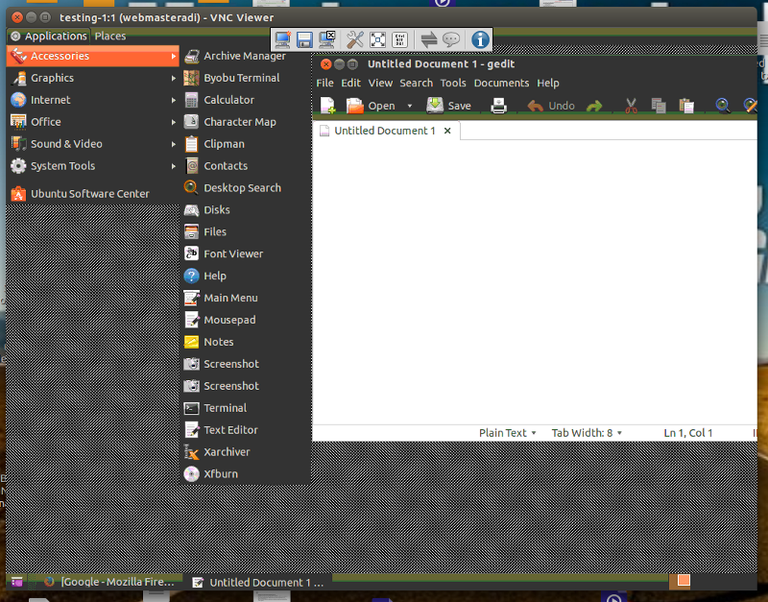
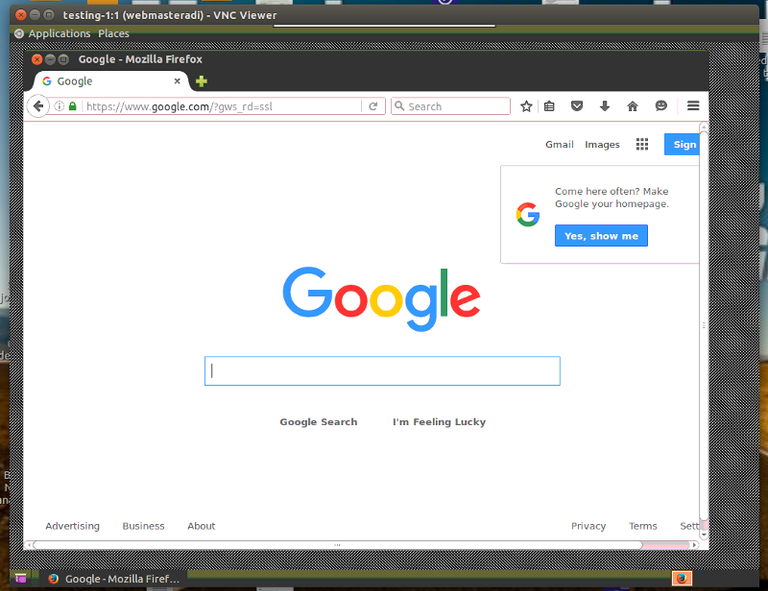
And boom!! Your Desktop environment is working. You can use Firefox browser for internet.
The Synaptic Package Manager
the Synaptic Package Manager does not get installed by default when you install the core gnome desktop. The Synaptic Package Manager is a great tool which makes adding and removing applications a breeze. You can install with this command:
$ sudo apt-get install synapticNote: VNCserver doesnot auto start on boot, you have to start it manually everytime you start the VM instance.
This post is taken from my post here.
Hi! I am a robot. I just upvoted you! I found similar content that readers might be interested in:
https://medium.com/google-cloud/graphical-user-interface-gui-for-google-compute-engine-instance-78fccda09e5c
This is my earlier post on medium.
Congratulations @aditya23! You have completed some achievement on Steemit and have been rewarded with new badge(s) :
Click on any badge to view your own Board of Honor on SteemitBoard.
For more information about SteemitBoard, click here
If you no longer want to receive notifications, reply to this comment with the word
STOPCongratulations @aditya23! You have received a personal award!
Click on the badge to view your Board of Honor.
Do not miss the last post from @steemitboard:
Congratulations @aditya23! You received a personal award!
You can view your badges on your Steem Board and compare to others on the Steem Ranking
Do not miss the last post from @steemitboard:
Vote for @Steemitboard as a witness to get one more award and increased upvotes!