In this hands-on tutorial you'll install persistent malware on to a system. There are many methods to do so including:
- Uploading malware into webpage code(this tutorial)
- Using Metasploit to use pre-made exploits(next tutorial)
- Creating a malicious program and getting the user to click on it(future tutorial)
- Installing malware when you have physical access(future tutorials)
Doing any of these methods correctly will give us persistent(permanent) remote access to the underlying file system of a machine. Metasploit will be covered in the next tutorial and is usually preferred as it makes things much easier by default but it is essential to know how to install a reverse shell onto a system.
Prerequisites:
- Mr Robot VM (go here for instructions)
- Kali VM (go here to create one)
- php-reverse-shell (download here)
What we Can Do With Our Admin Login
So we've gotten access to the WordPress admin page and there are many things we can try to do:
- we could change the password and email to seize control of the website(known as ATO or Account Takeover) and prevent the owner from having access to it
- we could edit the content of the site to what we desire(including making every page blank effectively DOS'ing the site)
- we can change the settings(for example changing payment plugin info or Bitcoin addresses to our own)
- we could exfiltrate backups and other data which we can later explore for useful information
The possibilities truly are endless but we have a goal in mind. That goal is to gain access to the most sensitive areas of the site and to have persistent access. To achieve this goal we're going to install a form of malware that sits quietly in the background, waiting patiently 24/7 for us to connect with it. It is called a reverse shell b/c it connects back to us from a remote computer(in this case the website we upload it to). Believe it or not using a reverse shell is very simple.
Uploading a Reverse Shell
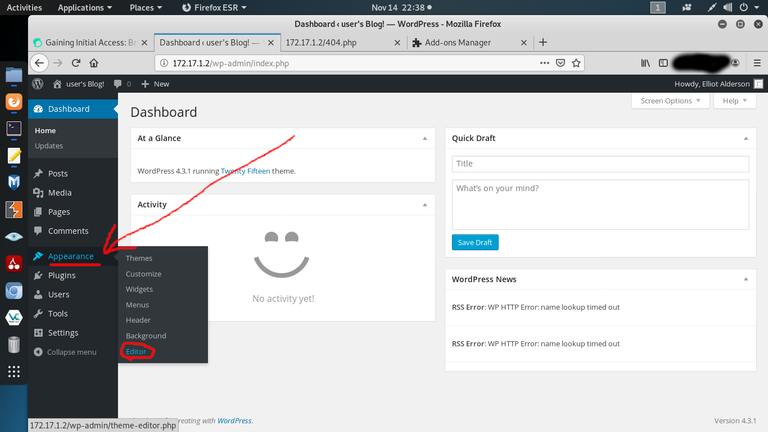
To upload a remote shell is very simple. This works for all websites however the steps may be slightly different. Essentially you need to put your reverse shell code into a page on the website so as long as you have the ability to add new pages or edit an existing one it will work. For WordPress sites you simply go to the left-side menu and click Appearence-Editor as shown below.

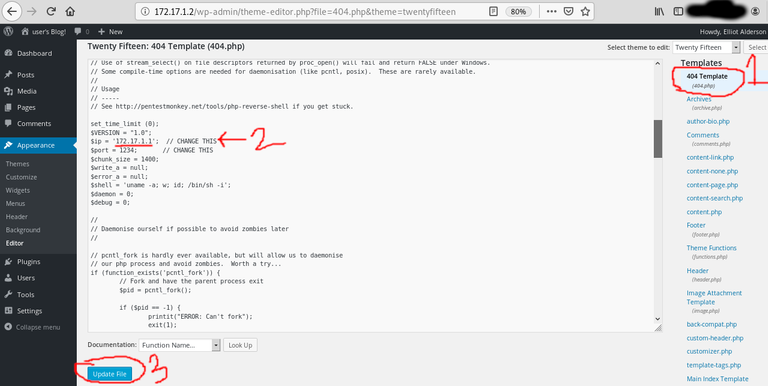
Next we need to edit or create a new page with our php shell in it. It is better to create a new page with the shell in it(with a long, random name). This somewhat prevents others from discovering our malware. However for simplicity we will edit an existing page. We'll choose the page 404.php. Now we need to do the following(all shown in photos below):
- Click right-side button 404 Template
- Erase the page code and copy/paste the reverse php shell code
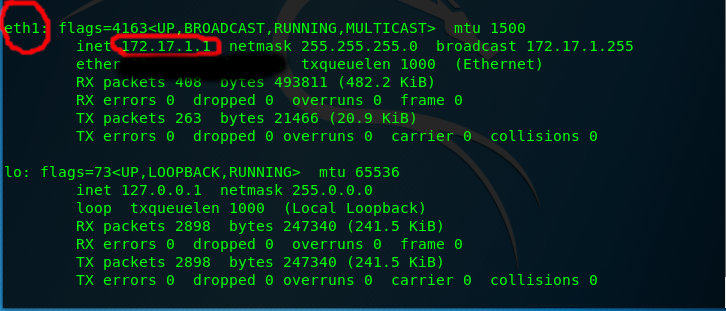
- Go to terminal and run ifconfig, copy inet address

- Change the IP in page editor to our ifconfig IP(Look for CHANGE THIS near top of code)
NOTE: In real life the computer we have the site connect back to would be the IP of a server we set up on the internet. This is b/c we obviously don't want our malware connecting back to our actual PC or IPas it would identify us. Doing this is as simple as buying a server from a hosting provider. - Hit Update File

Now to get access to our shell simply go to terminal and type:
- nc -nlvp 1234
and then visit the page with the shell(in this case 172.17.1.2/404.php). If successful you should see a blank page in the browser and the below information printed to the terminal.

Conclusion
Congratz you now have a shell! You can use terminal commands to interact with the file system. Though this is great we need to work on upgrading our shell(currently a "dumb"-shell) & escalating our privileges so we can get root and have unlimited access to all areas of the file system. This will be covered in future tutorials. I hope you enjoyed and as always if you have any questions or comments please leave them below. If you found this useful please up-vote & share. Until next time safe and happy hacking!
Seen your message bro..keep it going, upvoted and resteemed :)
Posted using Partiko Android