L'hashish o hascisc o hash is prepared from the most potent part of the cannabis plant – the trichomes. Trichomes are little hairy appendages found on plants that perform a wide variety of functions, depending on the particular plant. In the case of cannabis, the trichomes are packed full of THC and give your buds a white, frosty appearance. Hash is consumed in much the same way as cannabis buds by smoking in a pipe, bong or joint, hot-knifed or cooked, with similar effects. Unfortunately, decent hash is a rarity in the UK. All we have is “soapbar” – an incredibly hard, dark, poor quality material that is likely packed full of shit you don’t want to be smoking. Luckily for us, making hash is easy, fun and rewarding work, and you can put as much effort in as you like!
Why make hash?
Save Space – An ounce of hash takes up a lot less room than an ounce of weed, making it easier to stash. It also smells less.
Shelf Life – Hash will last a very long time if you keep it wrapped up tight, in the cold and dark. Bud, on the other hand, has a habit of going mouldy if you leave it too long.
Health – You need to smoke less hash (provided it’s decent, home-made hash and not soapbar) to get high. Also, since hash is primarily trichomes, you don’t smoke any of the other compounds in the buds that don’t get you high.
Notoriety – You will become “that guy with the amazing hash”. Simple as that. Since good hash is hard to find here, women will want you and other men will want to be you. Unless, of course, you’re a woman. Or gay. If you’re a gay woman, that will probably still happen.
Prevent Wastage – If you grow your own cannabis, you can use all your leaves, stems and male plants that would otherwise be thrown away.
Why the hell not? – You don’t need fields of cannabis plants to make good hash. If you’re a casual smoker, you can still get a pretty decent yield for next to no effort on your part, and you still get to smoke your weed as usual.
The Principle
Collect Trichomes
Press Trichomes
???
Profit
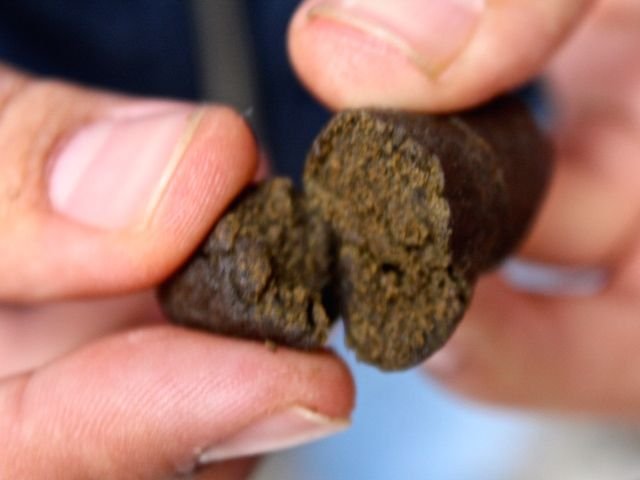
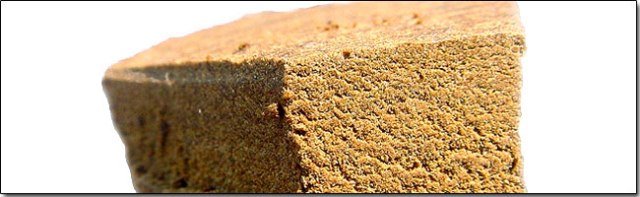
This piece of hash is made with the fingers and tools used for cutting the tops,
in just one day!
Collecting Your Trichomes
Cannabis Trichomes
Cannabis Trichomes
This step will vary depending on your level of commitment, budget and laziness. Traditionally, the first hash was created by people who would sit around and just rub buds and live plants all day. Gradually, their hands would accumulate a sticky resin that could be scraped off and pressed. Unfortunately, for this method to be any use today, you’d need a massive crop of cannabis plants at your disposal and a lot of elbow grease. Thankfully, we, as a species, have come up with some much more efficient methods since then. Let’s take a look:
Method #1 – Using a Pollenator or pollen catcher

For: The lazy pot smoker
Starting Material: Your usual weed supply
Effort: 1/10
Time Taken: Months
As I mentioned before in Top 4 Cannabis Tips, storing your weed in a container with a mesh screen in the bottom will net you a reasonable amount of trichomes from your bud. It will certainly take a while, but all you need to worry about is smoking your pot as usual. The idea is that constant storage and slight agitation will break off a small percentage of the trichomes on your bud, which fall through the screen into the chamber at the bottom. The mesh will be fine enough to only let the tasty trichomes fall through, keeping any other plant matter on top. The resulting unpressed trichomes are commonly referred to as kief.
Pro tip: each time you put more weed into your container, grind it up first, only fill it half way then feel free to give it a good shake from time to time. That ensures that more of the weed will come into contact with the screen, and that it has plenty of room to move around in your container.
Method #2 – Using a Sieve

For: The small time grower or the amateur hash producer
Starting Material: At least 2 ounces (56 g) of bud, or 200 g of old leaves, stems and entire male plants
Effort: 7/10
Time Taken: Several hours
Kief ready to be pressed
Kief ready to be pressed
This is simply Method #1 scaled up for some serious hash production. 56 g of quality bud should get you about 6 – 11 g of kief. You’ll need a mesh or silk screen with 65-125 micron holes, or 120-230 lines per inch. If the holes are smaller than about 65 microns, the trichomes that make it through will be small and immature, but if the holes are bigger than 125 microns, more unwanted plant material makes it through. Framed screens are best, for the extra stability. Printing shops tend to sell frames with a screen already in, or you can easily make your own with four bits of wood, nails, glue and your screen of choice. You’ll also need a clean, flat surface such as a mirror which you’ll sieve over. A light coloured surface makes it easy to see your results.
If you’re using bud, begin by grinding it up and placing it on your screen. Then, tilt the screen back and forth just enough enough so that your ground up bud moves over it. You’ll begin to see your kief collecting on your mirror or other surface. As less and less trichomes come through the screen, you’re nearly done. Now start to wobble and tap the screen to get the last remaining trichomes. Unlike Method #1, the weed is now not suitable for smoking, so you may as well use a shitload of it to make some cannabis butter. It won’t be very potent, but that’s better than throwing it out. You could also mix it in with your tobacco if you’re a joint smoker, to keep the delicious weed smell and stretch out your tobacco supply.
Pro tip: If you’re sieving massive quantities of weed, use multiple screens with different sized holes. The smaller holed screens will produce a small quantity of top quality kief, while screens with larger holes will produce larger quantities of less potent material. You can then save your highly potent stash should the Queen come for tea or any other special occasion.
If you’re using your unwanted plant material, make sure it’s fairly well dry first. Not too dry, otherwise it’ll crumble and end up going through the sieve. Place the screen down over your clean surface and stick your dried plant material on top. Then, gently push your plant material around on top of the screen. The slower you push, the higher quality hash you’ll produce.
Pro tip: Sieve your plant material once using a screen with slightly bigger holes than usual. This will let through all the trichomes plus small chunks of plant material. At this point, you can throw away your plant material and sieve the results again using the usual screen. This will ensure a potent hash even when using the worst starting material.
Method #3 – Using a Drum
For: The small time grower or the lazy amateur hash producer
Starting Material: A small amount of bud, or lots of old leaves, stems and entire male plants
Effort: 3/10
Time Taken: Several hours
A drum is an electrically powered cylinder lined with a screen like that in Method #2, and the yield is about the same. This is the same principal of sieving, but this time you’re harnessing the power of electricity to do all the actual work. As the drum revolves, your bud or plant material is tumbled against the mesh, freeing the trichomes which will collect under the screen. Unfortunately, this method involves much less quality control than sieving manually.
Pro tip: Tumble once for a short amount of time to get the top quality kief. Subsequent tumblings can then be performed to collect more low quality material.
Method #4 – Using a Blender
For: The small time grower or the semi-pro hash producer
Starting Material: At least an ounce (28 g) of bud, or 200 g of old leaves, stems and entire male plants
Effort: 4/10
Time Taken: < 1 hour
BlenderThis method relies on the fact that trichomes are heavier than water, and the colder they are, the more likely they are to snap off. 28g of weed should earn you 5 – 7 g of kief. For this, you’ll need a blender, two glass jars, a metal coffee filter or silk screen, paper coffee filters, some ice and some water. Begin by placing your bud or waste plant material in the blender until it’s half full. Then cover with cold water, add a lot of ice cubes and blend for less than a minute. We’re basically making a cannabis slushie at this stage. The agitation of the blender will snap off most of the now-brittle trichomes into the green frothy mixture, so the next step is filtration. Pour the mixture into your glass jar through the coffee filter or silk screen to get rid of the plant material, and you’ll be left with a greenish liquid and trichomes. Allow your jar to stand in the fridge for 30 minutes until all the suspended trichomes have fallen to the bottom of the container. Then, remove two thirds of the liquid being careful not to disturb the layer of goodness that’s settled at the bottom. If you’ve got more plant material to process, now’s the time. Make sure you keep filtering it into the same jar, so you only have to collect the trichomes once at the end. Put your jar in the freezer for 10 minutes before pouring the contents through a paper coffee filter into your second jar. The trichomes will collect on the paper. Dry the filter for at least 12 hours to several days and you’re done!
This method may seem completely counterintuitive (Add water? To MY cannabis?!), but don’t worry – science is on your side!
Pro Tip: After the first filtration through the metal filter or silk screen, you might want to put the contents of the jar back in the blender for one last whiz. This should further purify your end product. You might also try blending your discarded plant mush one last time to collect any remaining trichomes. Don’t add this to your first filtration product, as it will be much worse quality, but still better than the shitty soapbar available.
Method #5 – Using Hash Bags

For: The small time to semi-pro grower or the semi-pro hash producer
Starting Material: At least an ounce (28 g) of bud, or 200 g of old leaves, stems and entire male plants
Effort: 5/10
Time Taken: 1 – 2 hours
Hash BagThis method certainly has the most overheads, but will produce the most potent hash and is essential if you want to process large quantities of herb. The yield is also pretty high, recovering 5 – 7 g of goodness per 28 g of weed, separated by quality. If you’re using unwanted plant material, 200 g could net around 5 to 20 g, largely depending on the quality of the plant matter. Hash bags combine the best features of the blender method and sieving, using the cold to make the trichomes brittle and snapping them off with agitation from the sieve. For this, you’ll need a fucktonne of ice, two impeccably clean 20 l buckets, an electric hand whisk and a Hash Bag kit. These are comprised of many bags made out of different sized mesh screens that fit inside each other, and tend to be pretty pricey, but if you’re serious about hash, this is the way to go. Hash produced in this way is often referred to as “bubble hash” because it’s so awesome that it bubbles when it’s burned.
To start, freeze as much water as possible. Fill up ice cube trays, empty drinks bottles or whatever else is suitable and bang them in the freezer. Once you have enough ice for an igloo with a garage, empty the ice into one of your buckets, add your herb and top up with cold water. Now whisk the shit out it. You can whisk for as little as 15 minutes to over an hour, but remember, the more you whisk, the more you sacrifice quality for quantity. 45 minutes should be plenty. Also, take breaks every so often and allow the contents of your bucket to settle. Once the mixing is done, add your “work bag” (the bag with the biggest holes, usually between 200 – 250 microns) to your second bucket, and pour the contents of the first bucket into it. Remove the bag from the second bucket, squeeze as much water out as possible and set it aside for a second wash later. Now your first bucket is empty, arrange your other bags inside it so that the one with the smallest holes goes in first and the one with the biggest holes goes in last, then pour the green water from bucket #2 through the bags. As the holes in the final bag are so small, it will take some time to drain so be patient. The idea is that the multiple screens will automatically grade your trichomes by size, so that the more potent material will be found in the last bag and the least potent, more leafy material will end up in the top. Lift out all the bags in one go and set them aside. Stick your work bag back in bucket #2 (the empty one) and pour the green liquid from bucket #1 through it. Squeeze the bag once more to get as much water out as possible and set it aside for the last time. Place your hash bags back in bucket #1 and pour the liquid now in bucket #2 through them as before. Now you can remove the bags from the bucket, separate them out and scrape up the gunk from the screens. Place your wet kief on some paper, dab off excess moisture with some tissue and allow to dry for at least 12 hours to several days.
Pro tip: There are no pro tips, other than “use this method because it’s already awesome”.
Funking It Up
Why not add a bit of funk to your hash? Unfortunately, it’s not as simple as just adding a pinch of this or a pinch of that. We need pure chemicals whose dosage is know beforehand. Before you add anything, you need to weigh your kief so you know exactly how much hash you’ll end up with and you need to work out how much an average dose of hash weighs (you do weigh your weed, right?) You can then work out how many doses that hash will give you by dividing the total weight by your dose. When you know how many doses you’ve got, you can then multiply that number by the suggested dose of your additive, so you know exactly how much to add. Then you can blend it all together and get on with the pressing.
So what might be a useful addition? Here are a couple:
Synthetic cannabinoids such as JWH-018
This would give your hash more kick so you can use less of it. You’d only need 0.5 – 1 mg per dose. Read up on it here .
95% Mesembrine from Sceletium tortuosum
Sceletium tortuosum, or Kanna has a known synergy with cannabis, which is particularly useful for those with a large tolerance. You’d only need 15 – 20 mg per dose. Read up on it here.
Pro tip: If you’re adding large quantities of a certain additive, it will make your hash more crumbly. Add a little alcohol to your mixture before you press it to help it stick together.
Pressing Your Trichomes
Method #1 – Use lots of force

Hash PressIf you’ve only got a small amount of kief to press, you might want to buy a hash press for cheap. You basically pour your material in the empty press, assemble all the parts and screw it together as tightly as you can. Then just leave it for a week or two and open. The cheaper presses tend to break after a few uses, so you might want to get one for a bit more money if you plan on regularly pressing small amounts of kief (the lazy pot smoker, I’m talking to you).
Pro tip: Try tightening it some more every day.
Method #2 – Use heat
If you’re pressing a hefty quantity of material, pressing might not be an option, especially if you’ve only got a small press. For this method, you’ll need to cut a template out of cardboard that will be the shape of your hash bar. Next, wrap some heavy duty plastic wrap around the cardboard to make a kind of loose bag, and remove the cardboard. Then fill your bag with kief and seal. Next, wrap the bag in several layers of wet newspaper and place in a frying pan. Turn the heat on low making sure the paper stays wet all the time and turn every couple of minutes. Eventually the trichomes will melt together. When they do, remove the package from the pan, transfer to a flat worktop and roll with a rolling pin for at least half an hour. Stick your flattened parcel into the freezer for a bit to cool down and unwrap.
Miscellaneous Tips

If you don’t it sticks all over your hands and you’ll never recover all of it.
Freezing your kief before you press it will force all of the water out of it into a frosty coating.
This can then be dabbed off with tissue as it melts.
Water in your hash could lead to mould if you plan on storing it, so if you’ve used one of the “wet” methods to collect your trichomes, this might be a good idea.
Remember to air dry once again after freezing to ensure there’s no moisture in there at all.
If you plan on smoking your hash in a joint, be sure to crumble it up into grains as small as possible.
Anything over 1 mm might fall out of the doob and burn holes in your clothes and you.
I like the hash bags method the most.
It works great because it's a cheap and fast way. You only need a bucket, ice and those bags. When i have some leaves with thc on i usually make bubble hash with this type of bags: https://amzn.to/2t2z6MO