Puedes leerlo aquí, o simplemente desplázate hacia abajo en la página.
Good morning, friends. I hope you are having a lovely day. As usual, today we have a #pixelart practice session, where I continue trying to learn this wonderful art of bits and pixels. I have taken the learning of pixel art calmly and, above all, little by little. The most important thing is to have fun and learn along the way.
![]()
Today, it was time to learn how to create simple characters that can be used in video games. I was very scared to reach this part, especially because creating characters can be very difficult in terms of detail and the small workspace. In this case, I tried to ensure that the characters did not exceed a height of 32x32px and, as always, I limited myself to the default color palette of the creation program.

To create characters, I divided my study into four parts and I would like to share them with you in case you are interested:
- References: It is very important to look for references on the internet and observe the composition and proportions in detail. I wanted to be inspired by the sprites of one of my favorite games, the first three Final Fantasy games, and some indie video games.
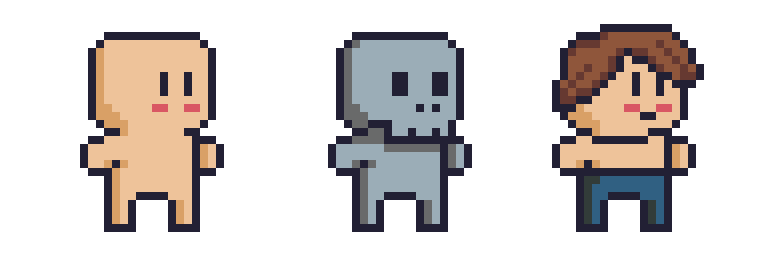
- Character Base: Before adding details like clothes, accessories, and colors, I need to create the base body, in a single color, with few shadows and the eyes, which will indicate where the character is looking.
- Personality: Choose a personality for the character. This goes beyond the emotions I want to convey; it answers the questions: Who is this character? What does he/she do? Is he/she a hero, a villain, or an NPC? Does he/she have powers? Does he/she stand out in something?
- Observation and Improvement: Observe the final result, look for those details that do not convince you, that you can improve and how. Compare it with your references. Repeat and improve.

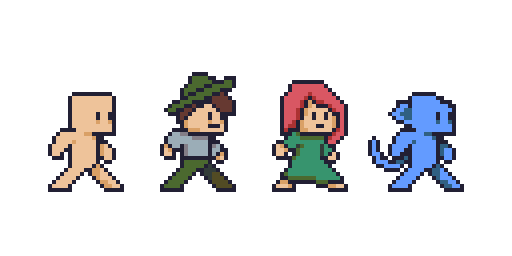
For my exercise, I created two base bodies and drew the following characters: an adventurer, a red mage, an aquatic reptile enemy, a skeleton, and a village boy.
And although the result did not fully convince me and I know there is much room for improvement, I am happy with what I achieved. A few months ago, it was impossible for me to think that I would improve so much and feel comfortable enough with the editing program. I encourage you to try #PixelArt; it can be a relaxing and enriching experience. By taking small steps every day, you will improve and progress.
I sincerely want to thank you for taking the time to read this article. Your support means a lot to me and motivates me to continue sharing content that can be useful and interesting for you. If you found this article useful or enjoyed reading it, I would greatly appreciate your comments. Best wishes.

Práctica de PixelArt. Personajes
Buenos días, amigos. Espero que estén teniendo un lindo día. Como ya es costumbre, hoy nos toca práctica de #pixelart, donde sigo tratando de aprender este maravilloso arte de bits y píxeles. Me he tomado el aprendizaje del pixel art con calma y, sobre todo, de a poco. Lo más importante es divertirse y aprender sobre la marcha.
![]()
Hoy tocaba aprender a realizar personajes sencillos que podrán ser usados en videojuegos. Me daba mucho miedo llegar a esta parte, sobre todo porque crear personajes puede ser muy difícil en cuanto al detalle y el pequeño espacio de trabajo. En este caso, traté de que los personajes no sobrepasaran una altura de 32x32px y, como siempre, me limité a la paleta de colores por defecto del programa de creación.

Para crear personajes, dividí mi estudio en cuatro partes y me gustaría compartirlas con ustedes por si se animan:
- Referencias: Es muy importante buscar referencias en internet y observar detalladamente la composición y las proporciones. Me quise inspirar en los sprites de uno de mis juegos favoritos, los primeros tres Final Fantasy, y en algunos videojuegos indies.
- Base del personaje: Antes de agregar detalles como ropa, accesorios y colores, necesito crear el cuerpo base, de un solo color, con pocas sombras y los ojos, que indicarán hacia dónde mira el personaje.
- Personalidad: Escoger una personalidad para el personaje. Aquí va más allá de las emociones que quiero transmitir; responde a las preguntas: ¿Quién es este personaje? ¿A qué se dedica? ¿Es un héroe, un villano o un NPC? ¿Tiene poderes? ¿Destaca en algo?
- Observación y mejora: Observa el resultado final, busca esos detalles que no te convencen, que puedes mejorar y cómo. Compáralo con tus referencias. Repite y mejora.

Para mi ejercicio, creé dos cuerpos base y dibujé los siguientes personajes: un aventurero, una maga roja, un enemigo reptil acuático, un esqueleto y un niño de un pueblo.
Y aunque el resultado no me convenció del todo y sé que hay mucho margen de mejora, estoy feliz con lo que logré. Hace unos meses atrás, se me hacía imposible pensar que mejoraría tanto y me sentiría lo suficientemente cómodo con el programa de edición. Te animo a que intentes hacer #PixelArt; puede llegar a ser una experiencia relajante y enriquecedora. Dando pequeños pasos cada día, irás mejorando y progresando.
Quiero agradecerles sinceramente por tomarse el tiempo de leer este artículo. Su apoyo significa mucho para mí y me motiva a seguir compartiendo contenido que pueda ser útil e interesante para ustedes. Si encontraron este artículo útil o disfrutaron leyéndolo, les agradecería enormemente sus comentarios. Éxitos.

| I’m Ernesto, a Cuban passionate about art and writing. Always learning, always growing. Excited to share and learn more every day! I write about art, drawing, video games, nature, and review the things I like. My goal is to inspire and connect with others through my creative journey. |
|---|
Translated with DeepL.com (free version)
I apologize if there are any grammatical errors, English is not my native language, I have tried to be as careful as possible.
I regularly create images on Pixabay, which are free of copyright. Access my gallery by clicking here.
All assets, illustrations and banners have been created by me and are original content, unless otherwise specified.
Congratulations @soyernesto! You have completed the following achievement on the Hive blockchain And have been rewarded with New badge(s)
Your next target is to reach 2000 upvotes.
You can view your badges on your board and compare yourself to others in the Ranking
If you no longer want to receive notifications, reply to this comment with the word
STOPCheck out our last posts:
En 32 x 32 es sumamente facil hacer pixel art... ¿que software usaste para hacer los que muestras?.
Sigue practicando, estas apenas dando los primeros pasos y tienes ante ti todo un universo infinito de técnicas, practicas, etc.
Hola manclar, estoy usando una versión de Asprite que compile desde git, la verdad 32x32 se me complican los lienzos pequeños. Estoy dando pasitos, quiero aprender.
ya veo, te sugiero empieces con la paleta de colores standard, y practiques entonces con 8 x 8 y 16 x 16, luego pasas entonces a tamaños mas grandes...yo ya hago piezas como esta en 1024 x 1024.
Es buena idea que aprendas la teoria del color y practicar mucho. Yo hago todo usando aseprite compilado también.
Wow 🤩 los degradados del cielo y el agua, jajaja me falta un montón por aprender, gracias por los consejos los voy a poner en práctica y seguir practicando.
Mañana pienso hacer un post sobre mis primeras prácticas en pixelart. Soy una cubana apasionada por la animación, y quería aprender nuevas técnicas.
Ayer finalmente me interesé de verdad por el pixelart después de conseguir aseprite y de la inspiración que causó en mí la obra del youtuber Andy Land, y pues me puse a buscar en todos lados información, consejos y tutoriales. Muy interesante tu publicación, ¡Gracias por las sugerencias, me ayudarán en estos pasos iniciales!
Espero mantengamos juntos el hábito aquí en Hive de practicar y aprender esta técnica :D