Happy and blessed day, I think it is the first time that I publish this great community, I really appreciate that your contest is open to all, since in this way I have the honor to participate .. I love to create and innovate more than my work is my passion and you giving me an open letter to create was wonderful uffs. I have made you a tutorial of a Christmas Hat made at home step by step I hope you like it, Christmas is a time to help and give back all that we have by being grateful.
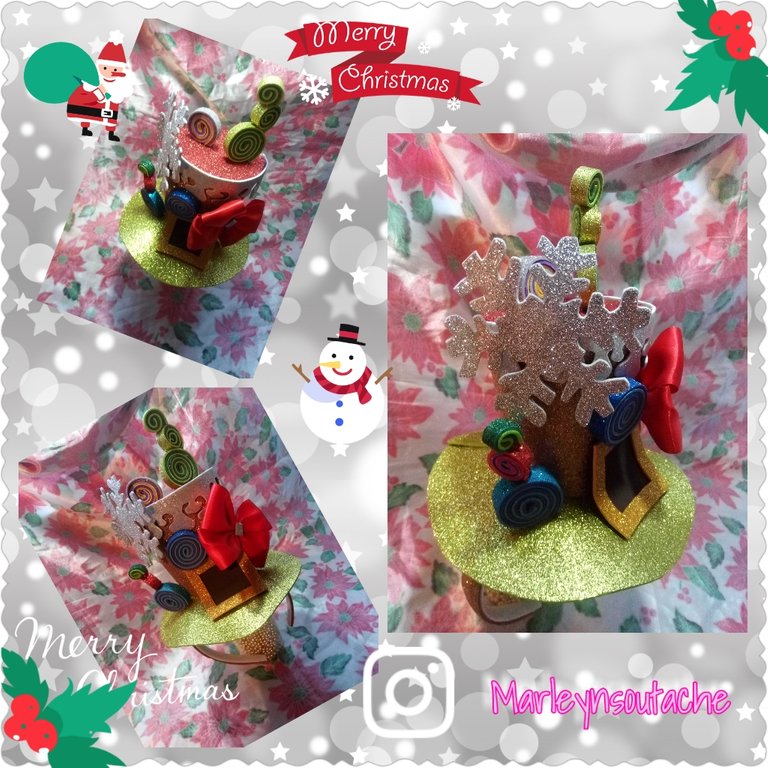
Eh realizado un sombrero de Navidad con foami escarchado, es bastante elaborado, trate de explicarlo mde la manera mas detallada posible, mi intención fue realizar un sombrero de copa me inspire en el sombrero de el Sombrerero de la película Alicia en el País de las Maravillas, es la primera vez que hago uno, entre errores aprendí muchísimo y de verdad que disfrute el proceso, se lo explicar paso a paso con una secuencia de imágenes. Atrévete a aprender junto a mi!! Comenzamos:
I have made a Christmas hat with frosted foam, it is quite elaborate, I tried to explain it in the most detailed way possible, my intention was to make a top hat inspired by the hat of the Hatter from the movie Alice in Wonderland, it is the first time I have made one, between mistakes I learned a lot and I really enjoyed the process, I explain it step by step with a sequence of images. Dare to learn with me !! We start:
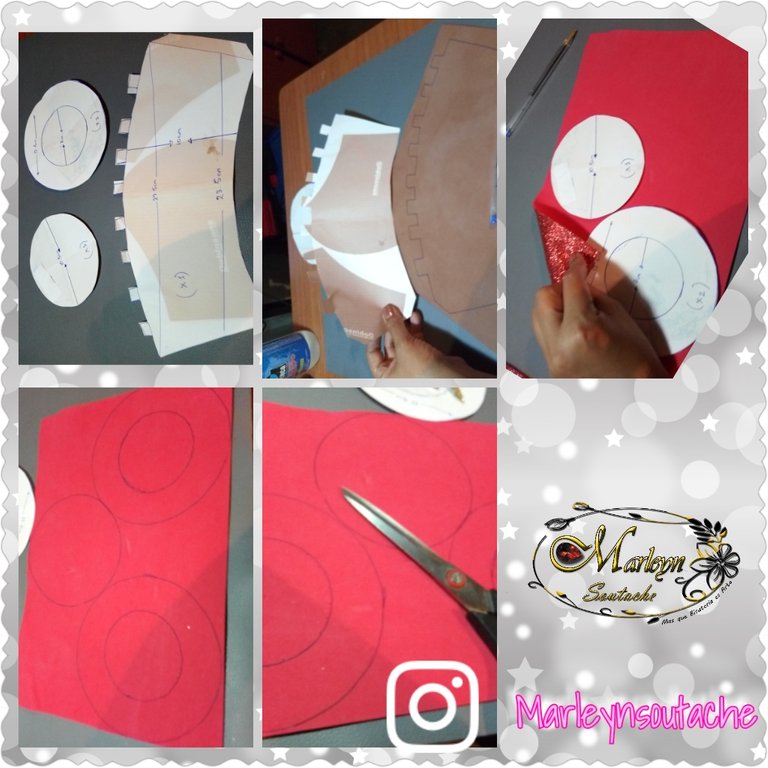
Paso 1: como verás las imágenes debemos hacer los patrones en cada imagen está el patrón con sus medidas luego lo recortas y lo transfieras por la parte de atrás al foami con un lápiz, luego con cuidado recortas todo el foami para crear la pieza.
Step 1: as you will see the images we must make the patterns in each image is the pattern with its measurements then cut it out and transfer it from the back to the foami with a pencil, then carefully you cut out all the foami to create the piece.
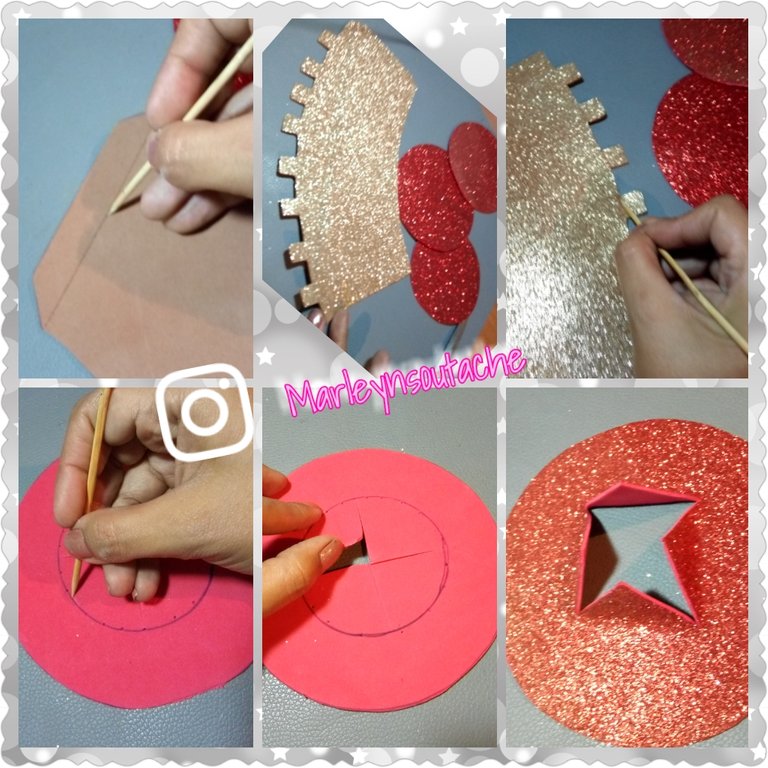
Paso 2: Cuando terminemos de cortar las piezas en el foami, puedes pasar por toda la orilla un palito de altura, luego en uno de los círculos grandes realiza un círculo más pequeño en el centro en la parte 1 están los patrones y la medida debes cortarlo por el centro en cuatro.
Step 2: When we finish cutting the pieces in the foami, you can pass a height stick around the edge, then in one of the large circles make a smaller circle in the center in part 1 are the patterns and the measurement must be cut in the center in four.
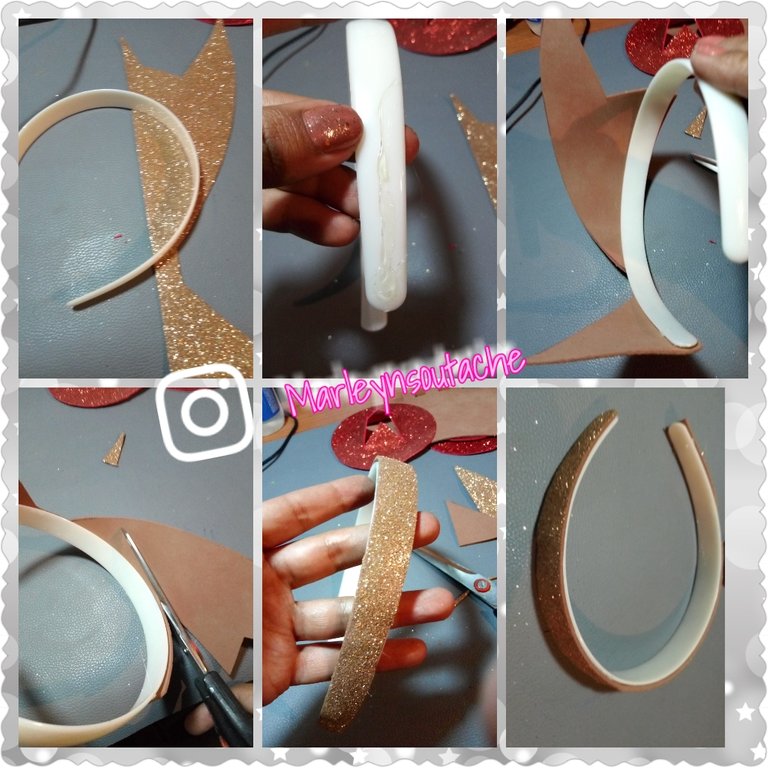
Paso 3: Vamos a forrar la base para la diadema con silicon caliente y foami, para empezar empieza a colocar una línea de silicón caliente en la base para la diadema y pega el foami no importa si el foami es más grande porque después con la tijera puedes cortarlo al tamaño de la diadema ahora vamos a dejar esto a un lado para que seque bien y continuamos nuestro sombrero
Step 3: We are going to line the base for the headband with hot silicone and foam, to begin with, start placing a line of hot silicone on the base for the headband and glue the foam no matter if the foami is bigger because later with the scissors you can cut it to the size of the headband now we are going to put this aside so that it dries well and we continue our hat
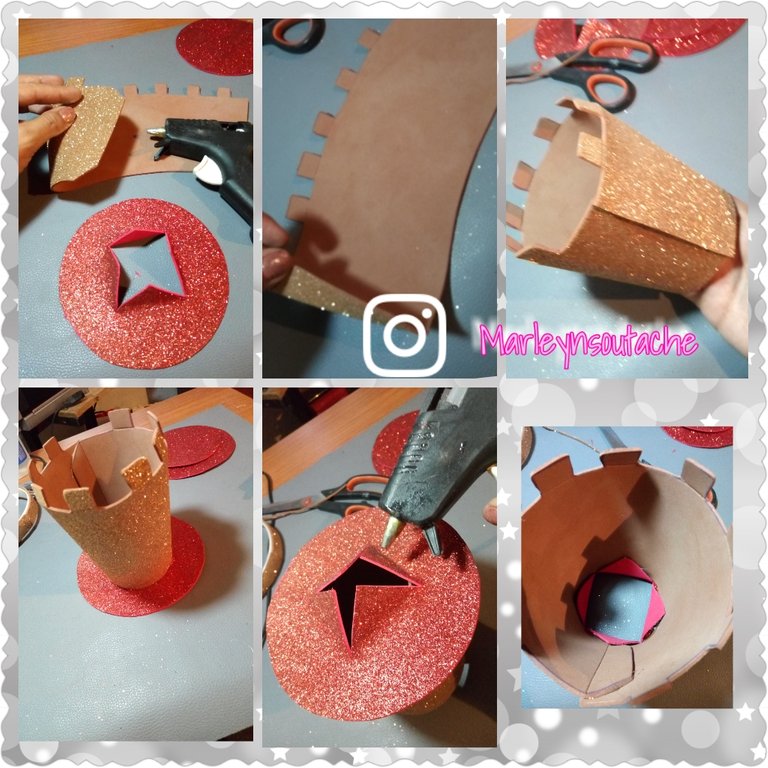
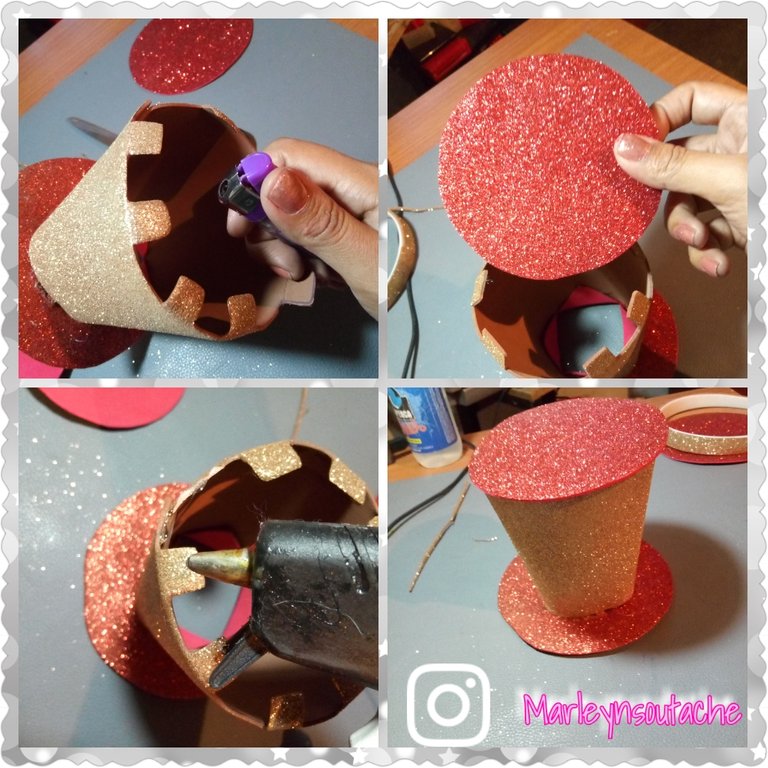
Paso 4: con ayuda de la pistola de silicón vamos a pegar la parte central como verás nosotros le dejamos una pestaña, coloca silicón caliente en la misma y pega la otra punta sobre ella, ahora en el círculo que le abrimos el centro en El Paso anterior vamos a colocar silicón caliente a los alrededores y éste va a estar pegado al centro de la pieza, puedes ayudarte con la secuencia de imágenes!
Step 4: with the help of the silicone gun we are going to glue the central part as you will see, we will leave a tab on it, put hot silicone on it and stick the other end on it, now on The circle that we opened the center in El Paso above, we are going to place hot silicone around it and it will be glued to the center of the piece, you can help with the sequence of images!
Paso 5: con mucho cuidado pasa la llama del encendedor por toda la orilla de la pieza de manera que la pueda bajar y quede Lisa ahora coloca un poco de silicón caliente por la orilla y en cada pestaña y pegas el círculo pequeño.
Step 5: very carefully pass the flame of the lighter along the entire edge of the piece so that it can be lowered and smooth. Now put a little hot silicone on the edge and on each tab and paste the small circle.
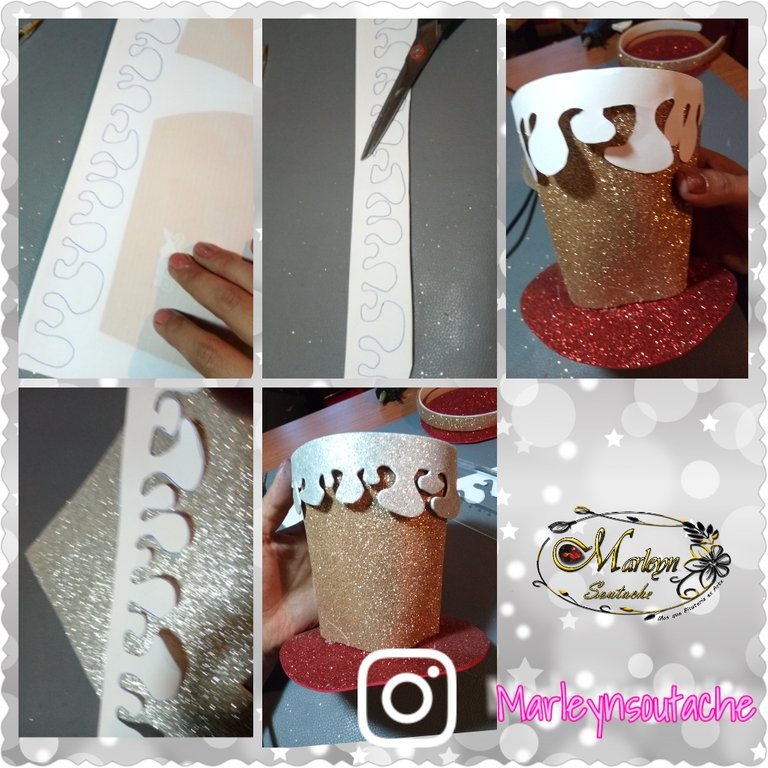
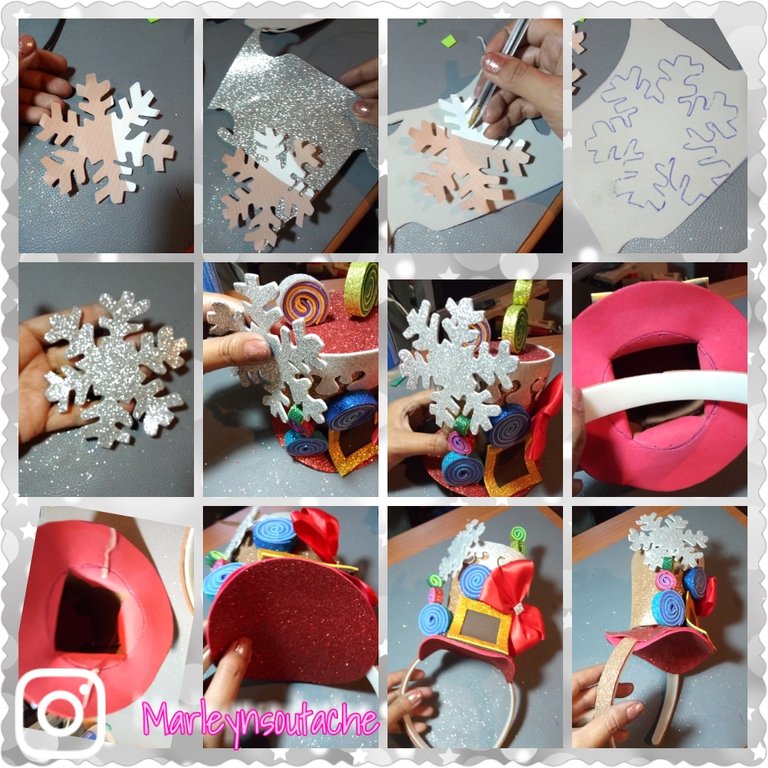
Paso 6: Realiza en una hoja un patrón como de nieve goteando, cortarlo y transferirlo al foami, luego lo cortas nuevamente y con ayuda de la pistola de silicón lo pegas en la orilla superior del sombrero. Se vera hermoso 🤩
Step 6: Make on a sheet a pattern like dripping snow, cut it and transfer it to the foam, then cut it again and with the help of the glue gun, stick it on the upper edge of the hat . It will look beautiful 🤩
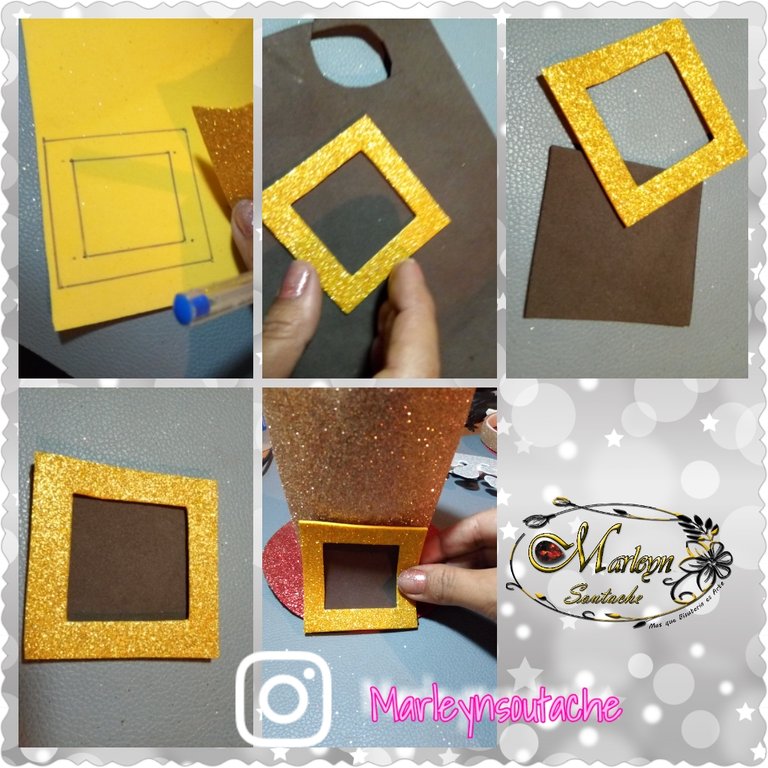
Paso 7: Con paciencia vamos a realizar una hebilla con dorado y negro, bueno yo utilice marrón por que no tenia negro 🤦🤷 realiza dos cuadrados de 6 centímetros de diámetro cada uno, pega uno sobre otro arriba el dorado y luego lo pegaremos sobre el sombrero justo en el centro.
Step 7: With patience we are going to make a buckle with gold and black, well I used brown because there was no black 🤦🤷 make two squares of 6 centimeters in diameter each, paste one on another one on top of the gold and then we will stick it on the hat right in the center.
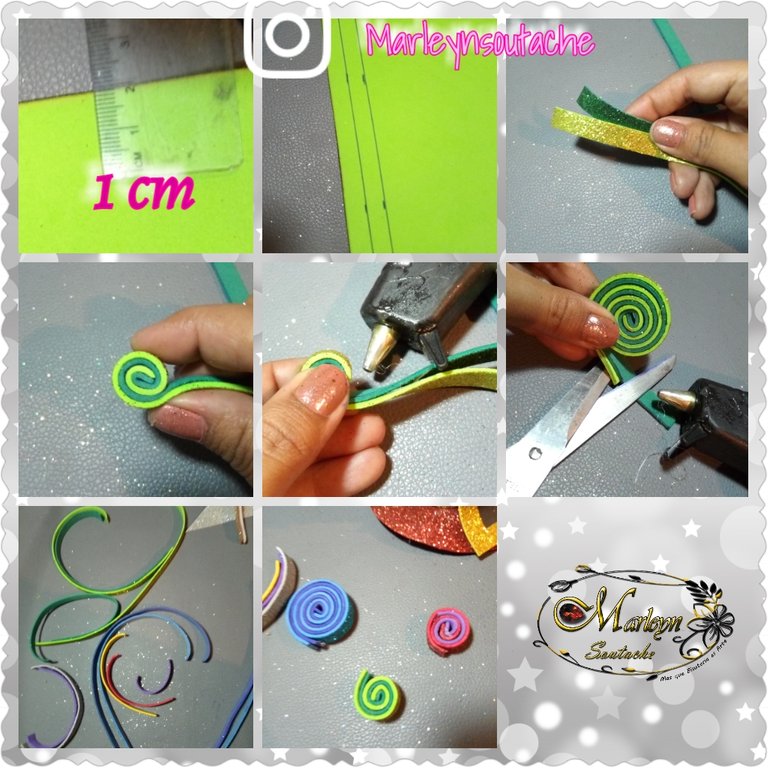
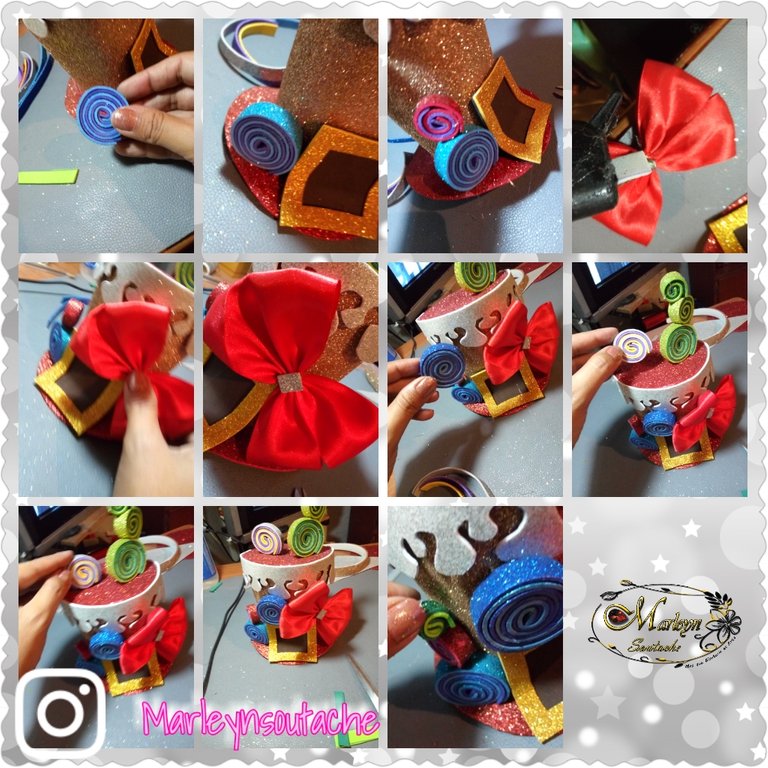
Paso 8: Vamos a hacer las decoraciones, corta tiras de foami de 1 centímetro de ancho de dos colores o como te guste mas, comienza a enrollar sobre las mismas Y colocando un poco de silicón caliente, ten cuidado de no quemarte si le colocas mucho saldrá por los lados. Al terminar corta el restante realiza tantos como te gusten.
Step 8: We are going to make the decorations, cut strips of foami 1 centimeter wide in two colors or whatever you like best, start rolling over them AND placing a little hot silicone Be careful not to burn yourself if you put too much it will come out from the sides. When finished, cut the rest, make as many as you like.
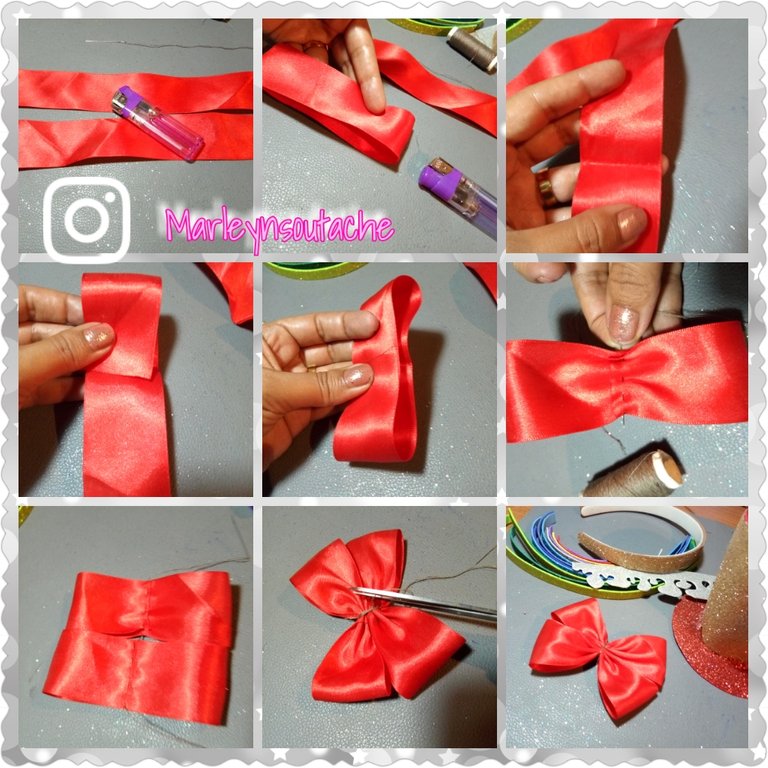
Paso 9: Es momento de realizar el lazo, corta 2 tiras de 18 centímetros de largo por 4 centímetros de ancho cada una con ayuda del encendedor quema las puntas de la cinta, ahora doblarla por la mitad y pasar el encendedor con cuidado para marcar el centro, doblar cada punta hacia adentro y coser por el centro con una costura recta realiza este paso en la otra tira y coser con el mismo hilo, al terminar halar dar vuelta con el hilo para hacer presión luego amarras y cortas el hilo restante.
Step 9: It's time to make the loop, cut 2 strips 18 centimeters long by 4 centimeters wide each with the help of the lighter burn the ends of the ribbon, now fold it at the half and pass the lighter carefully to mark the center, fold each point inwards and sew through the center with a straight seam, carry out this step on the other strip and sew with the same thread, when finished pull the thread to make pressure then tie and cut the remaining thread.
Paso 10: En este paso puedes comenzar a pegar las decoraciones, a tu gusto no necesitas que sea igual se creativo y atrévete a innovar! 🤗😊
Step 10: In this step you can start gluing the decorations, to your liking you don't need it to be the same, be creative and dare to innovate! 🤗😊
Paso 11: Realiza en una hoja el patron de un copo de nieve, cortarlo y traspasarlo al foami. Si eres bueno dibujando solo debes dibujarlo en el foami y cortar, al terminar colocarle silicon caliente y pegarlo en una orilla de nuestro hermoso sombrero navideño. Ahora vamos a fijarlo en el cintillo mide donde se va a colocar, unta un poco de silicon caliente y pegar el sombrero de navidad, ahora pegar por abajo el circulo grande que nos queda, de esta manera tapamos el Cintillo y el hueco.
Step 11: Make the pattern of a snowflake on a sheet, cut it and transfer it to the foami. If you are good at drawing, you just have to draw it on the foami and cut, when finished, put hot silicone on it and stick it on one edge of our beautiful Christmas hat. Now we are going to fix it on the headband, measure where it will be placed, spread a little hot silicone and stick the Christmas hat, now stick the large circle that we have left underneath, in this way we cover the Headband and the hole.
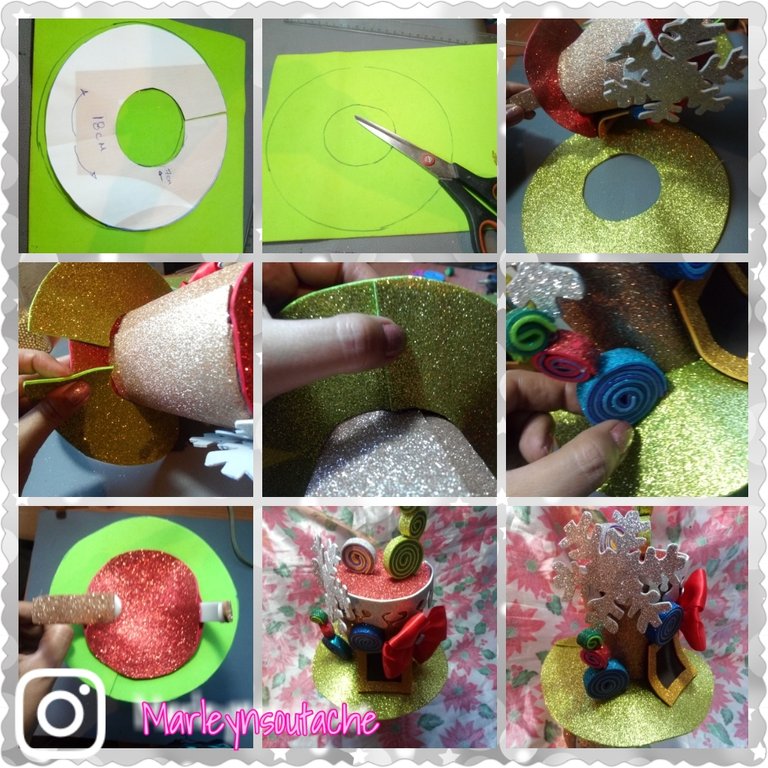
Paso 12: Este paso es opcional, cuando termine el sombrero note que la parte de abajo había quedado muy pequeña y no se me parecía a la idea que estaba en mi mente, así que le agregue una pieza extra para que quedara mas grande y así tomo vida, en la secuencia de imágenes tienes la medida si quieres hacerlo, al realizar el patrón y cortar en el foami corta el foami por un lado para que lo podamos introducir en el sombrero debemos pegarlo con silicon caliente con cuidado, vuelve a pegar las decoraciones y de esta manera terminamos nuestro hermoso sombrero navideño! Gracias por leerme... 🤗😊💋😄
Step 12: This step is optional, when I finished the hat I noticed that the bottom part had been very small and did not resemble the idea that was in my mind, so I added An extra piece to make it bigger and thus take life, in the sequence of images you have the measurement if you want to do it, when making the pattern and cutting in the foami cut the foami on one side so that we can insert it into the hat we must glue it with hot silicone carefully, reattach the decorations and in this way we finish our beautiful Christmas hat! Thanks for reading ... 🤗😊💋😄Si tienes una duda escríbeme un comentario, estaré feliz de ayudarte con cualquier detalle, Espero que mis diseños les gusten tanto como a mí me gusta, aprendan con placer ...!
Nunca olvides que el Poder es Querer y si quieres Puedes... Eres Luz eres Energía, TU PUEDES ... Que el universo infinito Conspire para que todo siempre sea mejor ... Se les quiere ...
Venezuela FE Somos Seres Abundantes! Qué las energías del universo vibren en sintonía con las de cada uno de nosotros en armonía! Cuidemos nuestras palabras, acciones y pensamientos!
If you have a question, write me a comment, I will be happy to help you with any details, I hope you like my designs as much as I like, learn with pleasure ...!
Never forget that Power is Wanting and if you want you can ...
You are Light, you are Energy, YOU CAN ... May the infinite universe Conspire so that everything is always better ... They are loved ...
Venezuela FAITH We are Abundant Beings! May the energies of the universe vibrate in tune with those of each of us in harmony! Let's take care of our words, actions and thoughts!

Autoría del texto y todas las imágenes: @Marleyn , La edición de las imágenes las realicé yo misma, Por favor no Utilices mis fotos sin mi autorización, edites ni re-publiques mi material ¿Deseas ponerte en contacto conmigo? Escríbeme:
Correo electronico: [email protected]
Discord Marleyn#7821
Twitter: @marleynleal1
Imstagran: @MarleynSoutacheAuthorship of the text and all the images: @Marleyn, Editing of the images was done by myself, >Please do not use my photos without my authorization, edit or re-publish my material Do you want to >contact me? Write me:
Email: [email protected]
Discord Marleyn #7821
Twitter: @marleynleal1Imstagran: @MarleynSoutache

Mi trabajo es mi pasión y cuando tu trabajo es tu pasión nada es imposible / My work is my passion and when your work is your passion nothing is impossible
