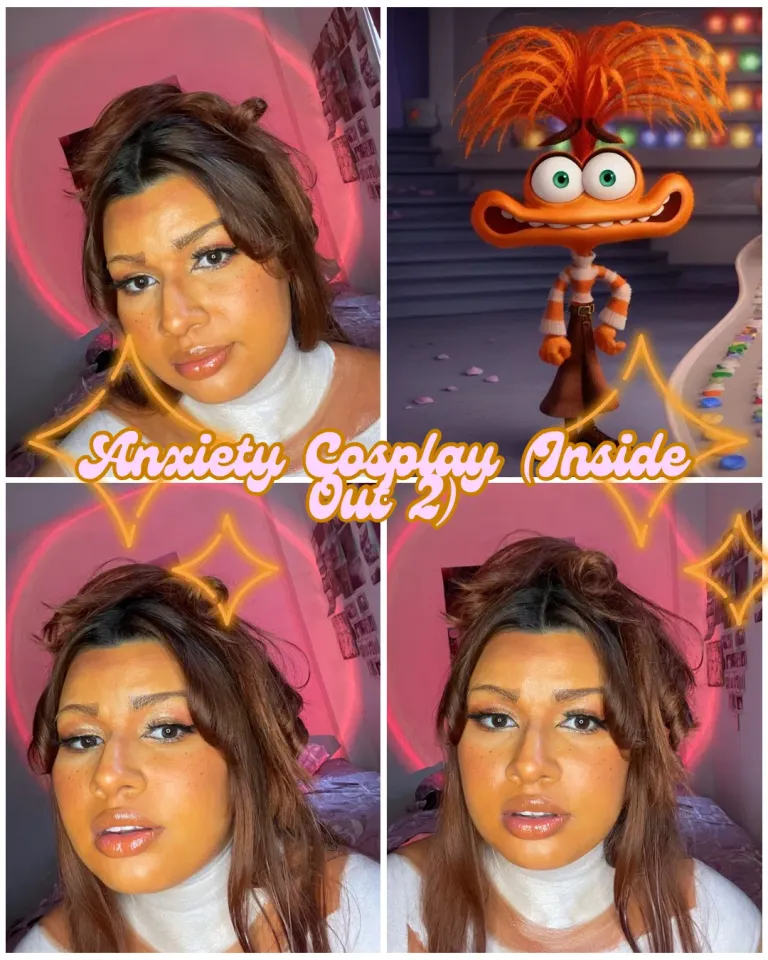

Hello, everyone! Today, I want to share a cosplay that I absolutely loved doing: Anxiety, the new character from Inside Out 2.
If you like eye-catching and colorful cosplays, this look is perfect for you. In this post, I’ll take you through the entire process step by step, from the base to the final details. Let’s get started!
Step 1: Preparation and Base
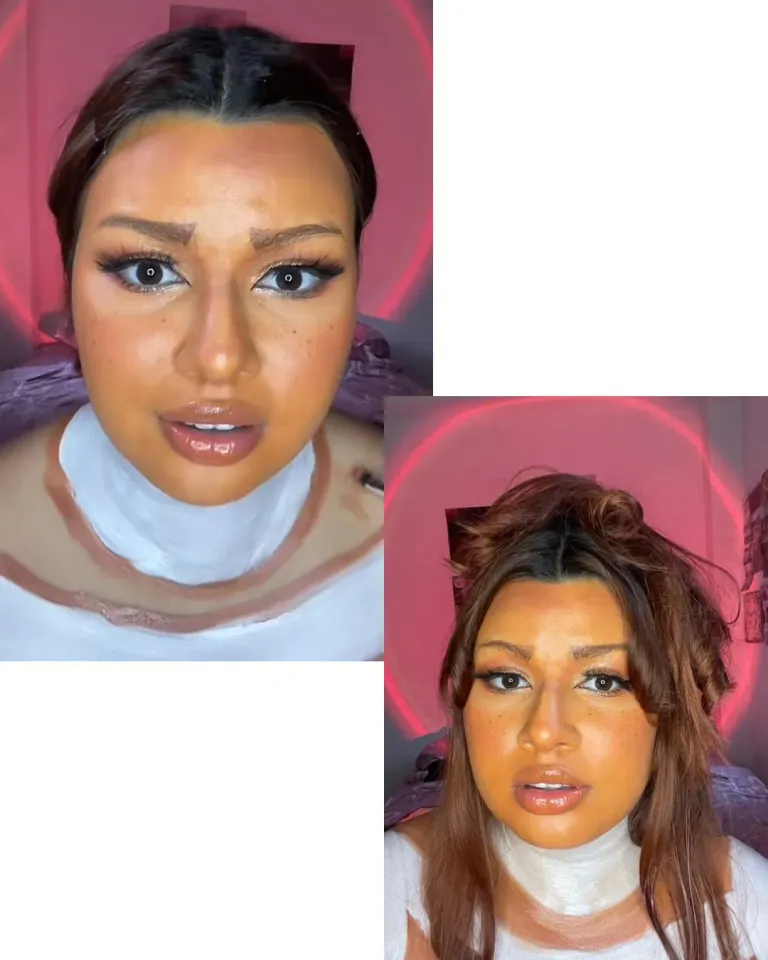
Since Anxiety’s skin has a vibrant orange tone, the first thing I did was apply orange body makeup all over my face, making sure to blend it well for an even and patch-free finish.
Once I achieved the desired coverage, I set everything with translucent powder. This helped the makeup stay in place for longer and reduced shine in certain areas. This step is crucial to ensure the makeup lasts for hours without moving.
Step 2: Contour and Facial Details
To add more dimension to the face and avoid a flat look, I used a darker orange eyeshadow to contour key areas: cheekbones, temples, and jawline. This created depth and enhanced the features dramatically, just like in the movie.
Next, I worked on the eyebrows. Anxiety has thin, angular brows, so I outlined their shape with a dark pencil, giving them an expressive and intense look. To add more realism, I created fake freckles using a fine brush and light brown eyeshadow, adding texture to the face.
Step 3: Eye Makeup
I started by applying a brick-orange eyeshadow to the outer "V" of the eye and blending it well to create depth. Then, on the eyelid, I applied a shimmering gold eyeshadow, which added a touch of light and contrast.
To make the look more dramatic, I did an elongated black eyeliner to intensify the gaze. Finally, I added full strip false lashes, which further enlarged the eyes and gave the makeup a more striking effect.
Step 4: Lips and Final Touches
Since Anxiety’s lips have a subtle orange tone, I applied an orange gloss that complemented the look perfectly.
Step 5: Chest Characterization and Hairstyle
To make the cosplay more accurate, I drew the lines of Anxiety’s clothing design on my chest and carefully painted them with body makeup, ensuring the colors and shapes matched the character.
For the hairstyle, I added volume to the top and created soft waves, mimicking the messy yet styled look of the character.
I loved how it turned out because it truly captured the essence of the character and her intense yet intriguing personality.
Creating this makeup was a fun challenge, and the best part is that you don’t need advanced techniques to recreate it. With the right products and a bit of patience, anyone can achieve it!
VERSION ESPAÑOL
¡Hola a todos! Hoy quiero compartir con ustedes un cosplay que me encantó hacer: Ansiedad, el nuevo personaje de Intensamente 2.
Si te gustan los cosplays llamativos y llenos de color, este look es perfecto para ti. En este post, te contaré todo el proceso paso a paso, desde la base hasta los detalles finales. ¡Vamos allá!
Paso 1: Preparación y Base
Como la piel de Ansiedad tiene un tono anaranjado vibrante, lo primero que hice fue aplicar maquillaje corporal naranja en todo el rostro, asegurándome de difuminarlo bien para que el acabado fuera parejo y sin parches.
Una vez que logré la cobertura deseada, sellé todo con polvo traslúcido, lo que ayudó a que el maquillaje se mantuviera intacto por más tiempo y a reducir el brillo en ciertas áreas. Este paso es clave para que el maquillaje dure horas sin moverse.
Paso 2: Contorno y Detalles Faciales
Para darle más dimensión al rostro y evitar que se viera plano, utilicé una sombra naranja más oscura para hacer el contorno en las áreas clave: pómulos, sienes y mandíbula. Esto creó profundidad y resaltó los rasgos de manera más dramática, como en la película.
Luego, pasé a las cejas. Ansiedad tiene cejas finas y angulares, así que tracé su forma con un lápiz oscuro, dándoles un aspecto expresivo e intenso. Para darle más realismo al look, agregué pecas falsas con un pincel fino y sombra marrón clara, lo que ayudó a darle más textura al rostro.
Paso 3: Maquillaje de Ojos
Empecé aplicando una sombra naranja ladrillo en la "V" externa del ojo y difuminándola bien para crear profundidad. Luego, en el párpado móvil, apliqué una sombra shimmer dorada, que aportó un toque de luz y contraste.
Para darle más dramatismo al look, hice un delineado negro alargado, resaltando la mirada de manera intensa. Para finalizar, coloqué pestañas postizas corridas, que agrandaron aún más los ojos y añadieron un toque de dramatismo al maquillaje.
Paso 4: Labios y Toques Finales
Como los labios de Ansiedad tienen un tono anaranjado sutil, decidí aplicar un gloss naranja, que iba perfecto con el look.
Paso 5: Caracterización del Pecho y Peinado
Para hacer la caracterización más fiel al personaje, tracé en mi pecho las líneas del diseño de la ropa de Ansiedad y luego las pinté cuidadosamente con maquillaje corporal, asegurándome de respetar los colores y formas del personaje.
En cuanto al peinado, opté por darme algo de volumen en la parte superior y hacerme unas ondas suaves, imitando el look desordenado pero estilizado del personaje.
Me encantó cómo quedó porque realmente capturó la esencia del personaje y su personalidad intensa pero intrigante.
Hacer este maquillaje fue un reto divertido, y lo mejor es que no se necesita demasiada técnica para recrearlo. Con los productos adecuados y un poco de paciencia, cualquiera puede lograrlo.
Photos taken with my Iphone12
For the best experience view this post on Liketu
Congratulations @ariwang! You have completed the following achievement on the Hive blockchain And have been rewarded with New badge(s)
Your next target is to reach 30 posts.
You can view your badges on your board and compare yourself to others in the Ranking
If you no longer want to receive notifications, reply to this comment with the word
STOPCheck out our last posts:
Surely my main emotion 🤣🤣
🤣🤣