https://images.app.goo.gl/8bXftUtViGpPJLwn6
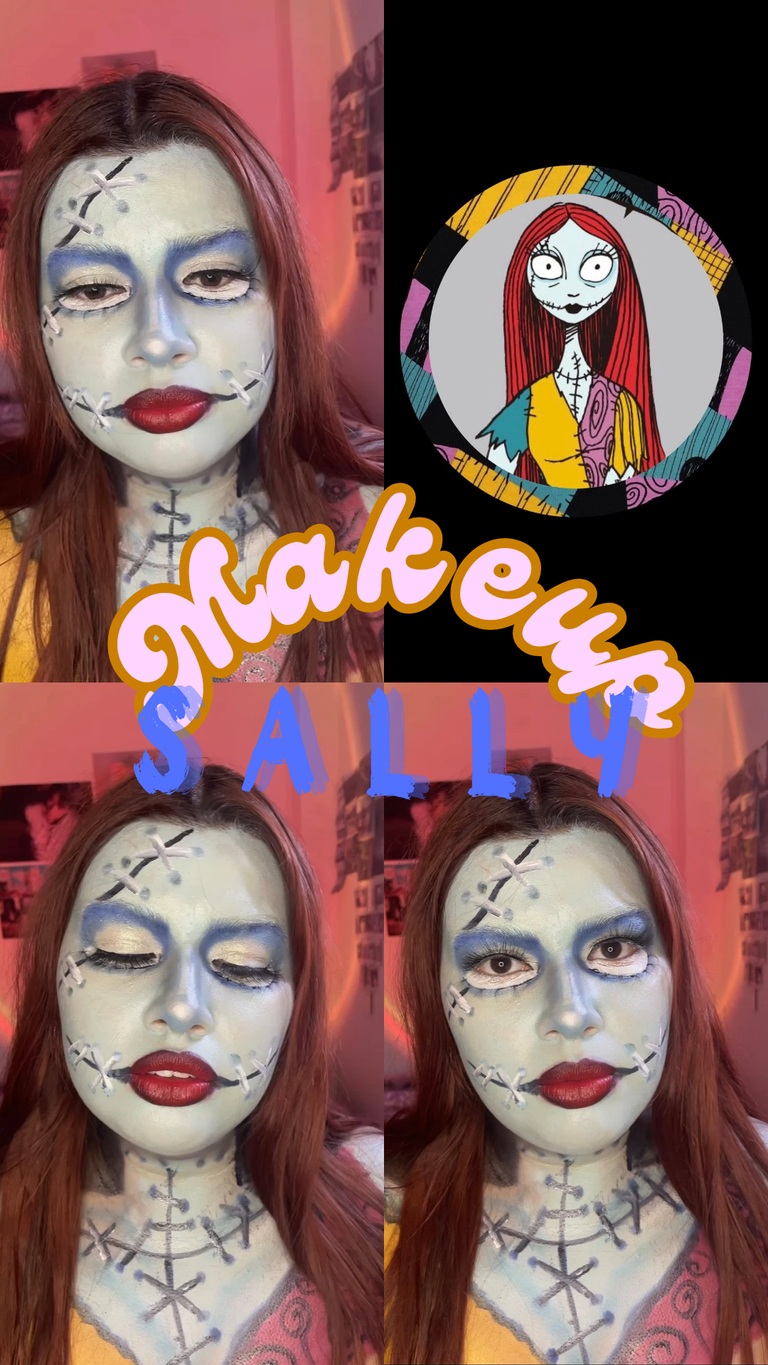
I’ve always loved costumes and the world of cosplay, but this time I decided to take my creativity to another level. Although I’ve recreated characters before, this was my first time using a body paint palette, and the experience was incredibly fun and challenging. Today, I want to share with you the step-by-step process I followed to transform into Sally from the iconic The Nightmare Before Christmas.
Step 1: The Makeup Base
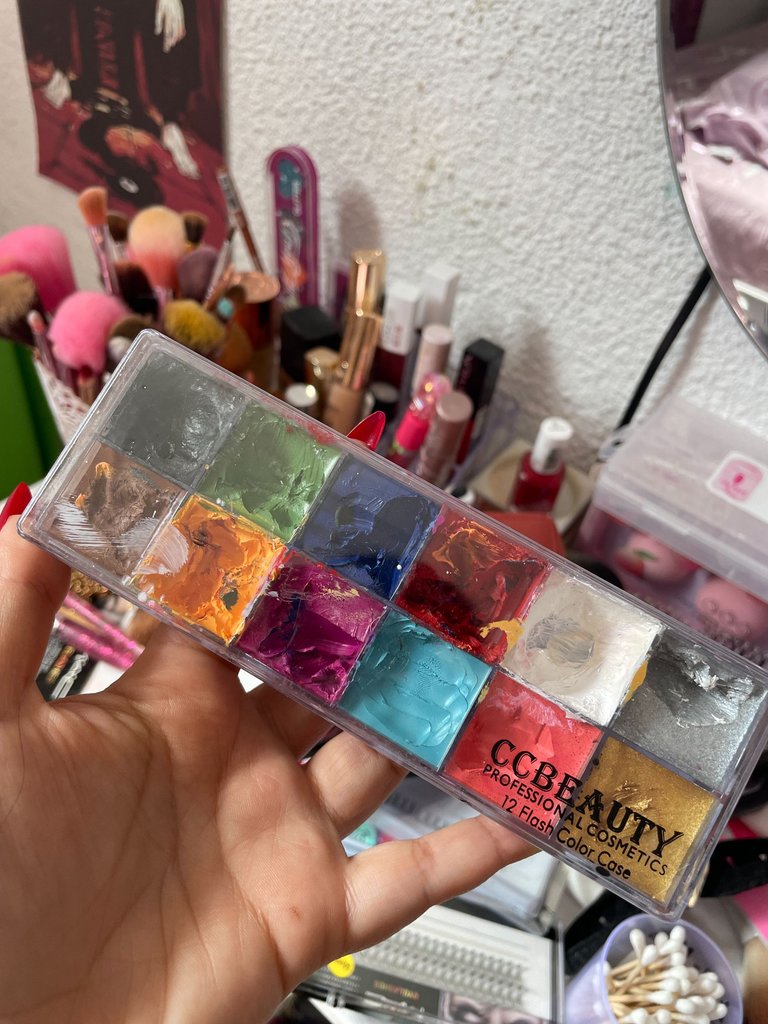
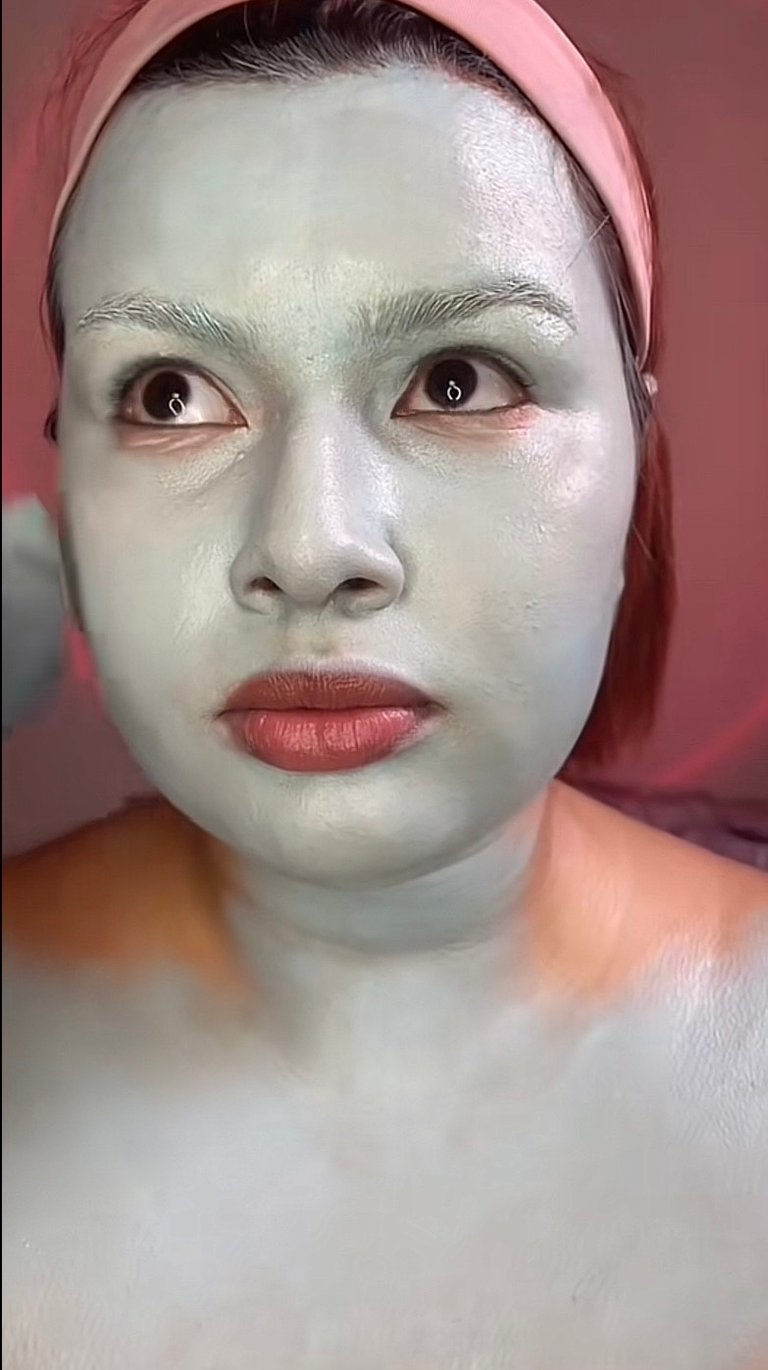
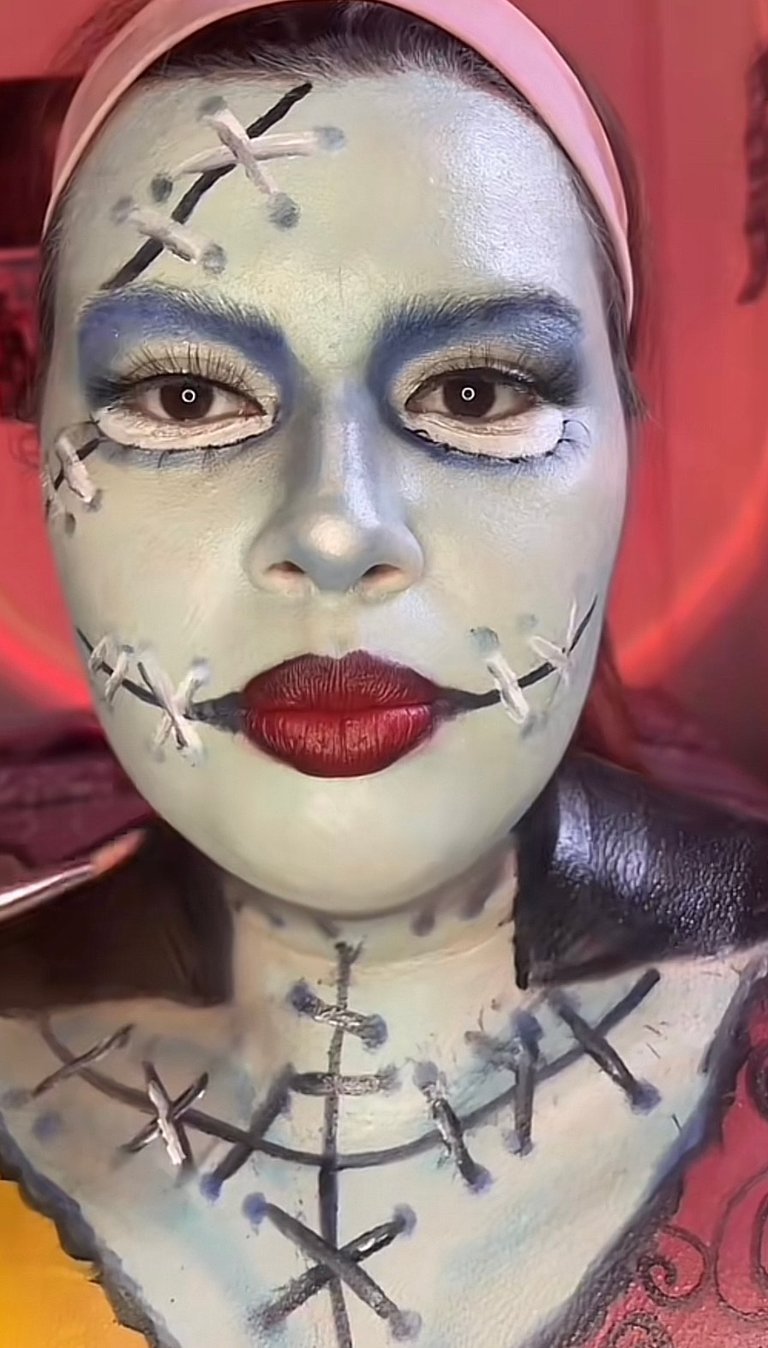
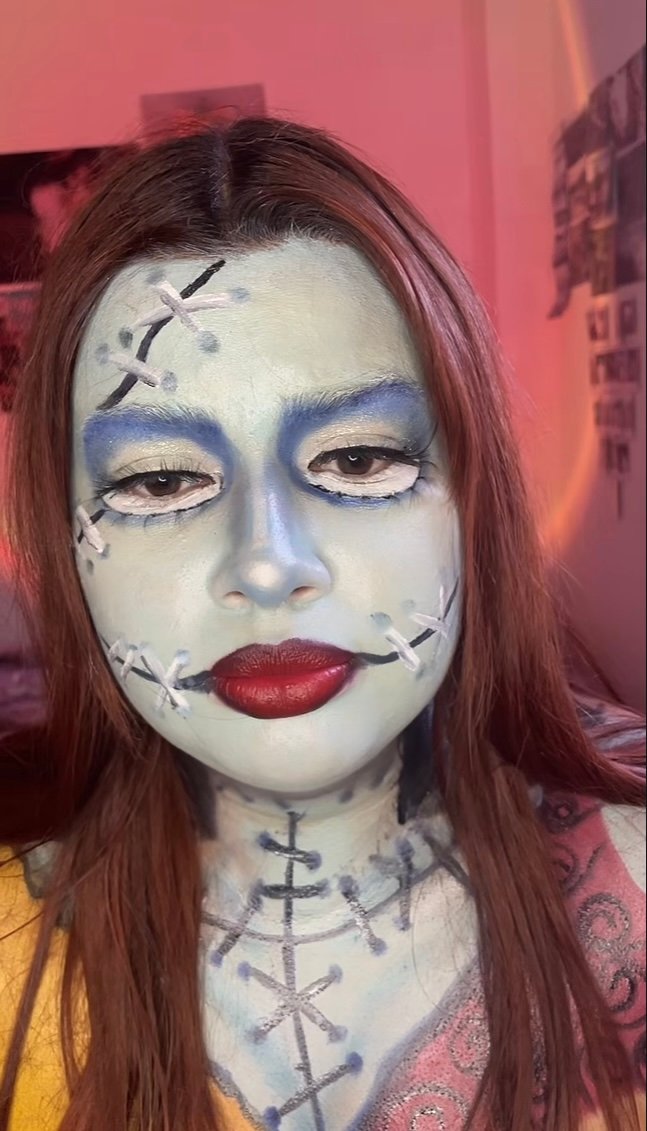
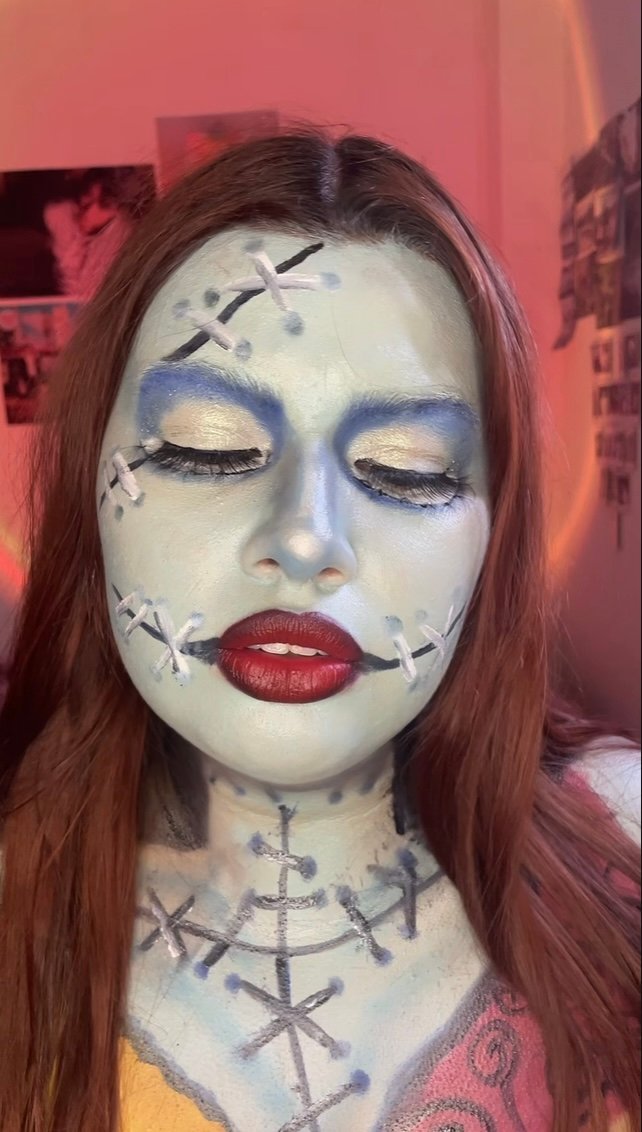
To achieve Sally’s signature pale blue tone, I mixed blue, white, and gray body paint until I got the perfect shade. I applied the mixture all over my face, neck, and part of my chest, blending thoroughly to ensure an even finish.
Step 2: The Eyes
Eye makeup is essential to bringing the character to life: * On the upper eyelid (from the crease to the brow), I applied a dark blue eyeshadow to create depth and contrast with the light skin tone. * On the mobile lid, I first applied a white shadow as a base, then added a sparkly one to give it a magical, luminous touch. * Using white paint, I drew a large eye on my lower eyelid to mimic Sally’s expressive eyes. I outlined it with black eyeliner to define the edges and add realism. * Finally, I added false lashes to both the upper and lower lids, which enhanced the makeup effect even more.
Step 3: Dimension on the Face
To give my face dimension and highlight the features, I used the same blue shadow from the eyes as a contour. I applied the color beneath my cheekbones, along the sides of my nose, and along my jawline. This added more depth to the makeup.
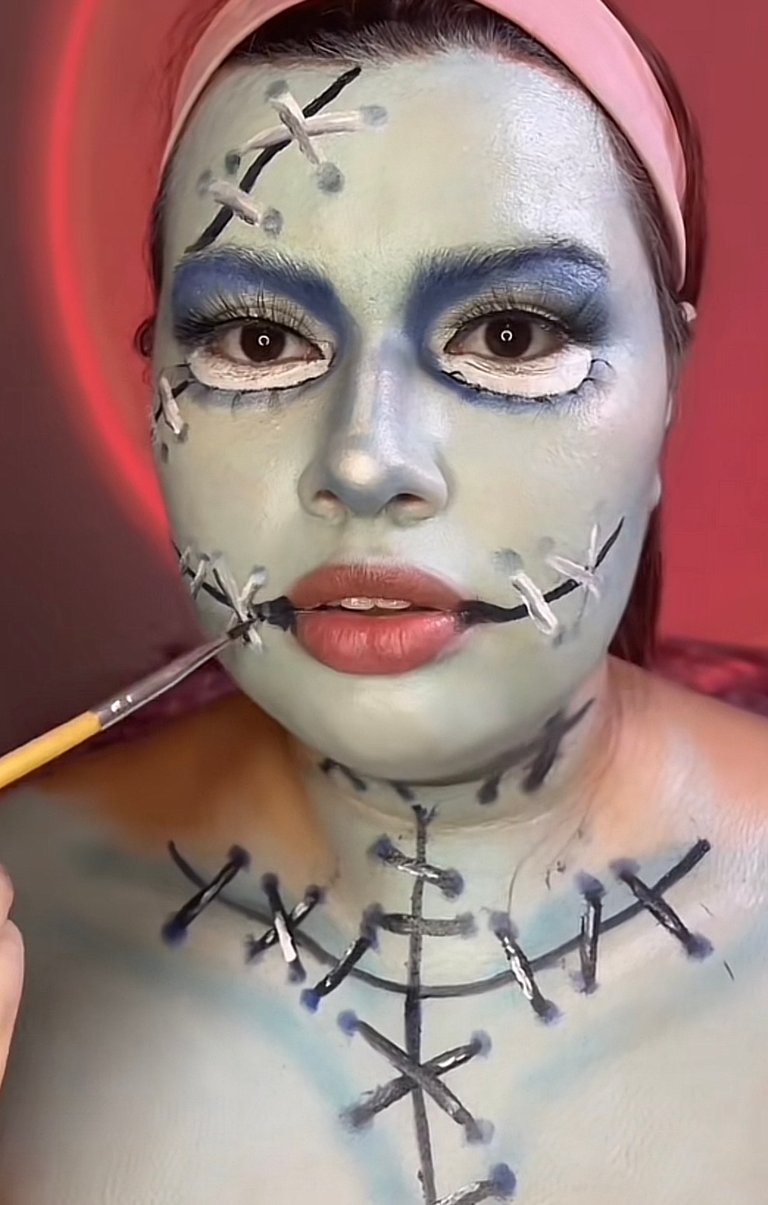
Step 4: Sally’s Stitches
One of Sally’s most distinctive features is her stitches. To recreate them: * I first drew guide lines with a brown makeup crayon, which made it easier to correct any mistakes before adding the final details. * Then, I went over the lines with black paint to simulate scars and added small crosshatch strokes to mimic stitches.
Step 5: Red Lips
Sally wouldn’t be Sally without her iconic red lips. I chose a bold red lipstick and carefully applied it, following the natural shape of my lips so they stood out against the rest of the makeup.
Step 6: The Body and Final Details
To complete the transformation: * I painted the characteristic patterns of Sally’s dress on my chest, incorporating shapes and colors similar to the character’s. * I painted the rest of my chest and neck black to mimic Sally’s slender neck, making the dress details and my face stand out even more. This experience was truly unique for me. Using body paint allowed me to explore new techniques and feel even more connected to the character. If you’re thinking about recreating Sally or any other character, go for it! The process may be challenging, but it’s also incredibly rewarding. Remember, the key is to enjoy every step and add your personal touch. Would you dare to try it?
 |  |  |
|---|---|---|
 |  |  |

Mi transformación en Sally del Extraño Mundo de Jack
Siempre he amado los disfraces y el mundo del cosplay, pero esta vez decidí llevar mi creatividad a otro nivel. Aunque ya había recreado personajes antes, esta fue mi primera vez usando una paleta de maquillaje corporal, y la experiencia fue increíblemente divertida y desafiante. Hoy quiero compartir contigo el paso a paso del maquillaje que hice para transformarme en Sally, del icónico El Extraño Mundo de Jack.
Paso 1: La base del maquillaje
Para lograr el característico tono azul pálido de Sally, mezclé maquillaje corporal azul, blanco y gris hasta obtener el tono perfecto. Apliqué la mezcla en todo mi rostro, cuello y parte del pecho, asegurándome de difuminar bien para un acabado uniforme.
Paso 2: Los ojos
El maquillaje de ojos es fundamental para darle vida al personaje:
En el párpado fijo (desde el pliegue hasta la ceja) apliqué una sombra azul oscura, creando profundidad y un contraste con el tono claro de la piel.
En el párpado móvil, utilicé primero una sombra blanca como base y luego añadí una con brillos para darle un toque mágico y luminoso.
Con pintura blanca, dibujé un ojo grande en el párpado inferior para simular los ojos expresivos de Sally. Lo tracé con delineador negro para definir los bordes y darle realismo.
Por último, coloqué pestañas postizas tanto en el párpado superior como en el inferior, lo que realzó aún más el efecto del maquillaje.
Paso 3: Dimensión en el rostro
Para darle dimensión al rostro y acentuar las facciones, utilicé la misma sombra azul de los ojos como contorno. Apliqué el color debajo de los pómulos, en los laterales de la nariz y a lo largo de la línea de la mandíbula. Esto ayudó a darle más profundidad al maquillaje.
Paso 4: Las costuras de Sally
Uno de los detalles más distintivos del personaje son sus costuras. Para hacerlas:
Primero tracé líneas guía con un crayón de maquillaje marrón. Esto facilitó corregir cualquier error antes de añadir los detalles definitivos.
Luego, repasé las líneas con pintura negra para simular las cicatrices y añadí pequeños trazos transversales para las puntadas.
Paso 5: Los labios rojos
Sally no sería Sally sin sus icónicos labios rojos. Elegí un labial rojo intenso y lo apliqué cuidadosamente, siguiendo la forma natural de mis labios para que destacaran sobre el resto del maquillaje.
Paso 6: El cuerpo y los detalles finales
Para completar la transformación:
Dibujé en mi pecho los patrones característicos del vestido de Sally, jugando con formas y colores similares al del personaje.
Pinté el resto de mi pecho y cuello de negro para simular el cuello delgado de Sally, logrando que los detalles del vestido y mi rostro resaltaran aún más.
Esta experiencia fue única para mí. Usar maquillaje corporal me permitió explorar nuevas técnicas y sentirme aún más conectada con el personaje. Si estás pensando en recrear a Sally o cualquier otro personaje, ¡anímate! El proceso puede ser desafiante, pero también muy gratificante. Recuerda que la clave está en disfrutar cada paso y ponerle tu toque personal.
¿Te atreverías a intentarlo?
| | |
|---|---|---|
| | |

Congratulations @ariwang! You have completed the following achievement on the Hive blockchain And have been rewarded with New badge(s)
Your next target is to reach 50 comments.
You can view your badges on your board and compare yourself to others in the Ranking
If you no longer want to receive notifications, reply to this comment with the word
STOPI like nightmare before Christmas a lot one of my favourite childhood movie, and I like your creepy make up a lot 💕
Thank you!! I also love that movie; it’s a must for Halloween and Christmas.🫶🏻
!LOL
Posted using Hive Images
lolztoken.com
It didn't stop ringing.
Credit: reddit
$LOLZ on behalf of hivephoto
(6/10)
Farm LOLZ tokens when you Delegate Hive or Hive Tokens.
Click to delegate: 10 - 20 - 50 - 100 HP@ariwang, I sent you an