
Christmas Special
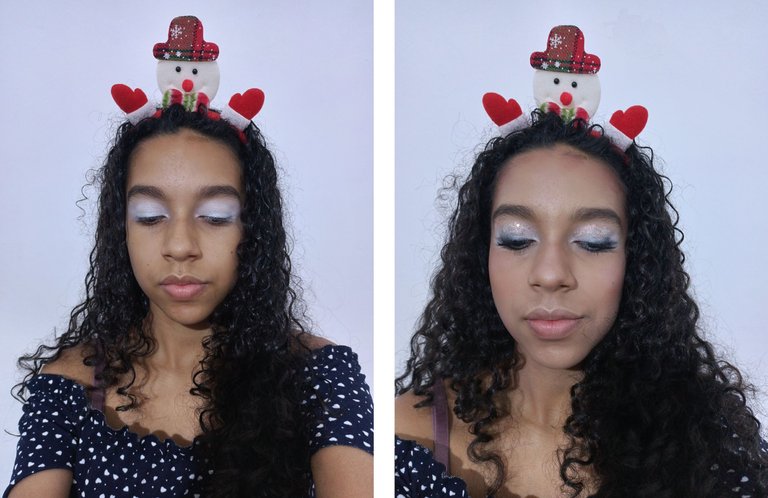
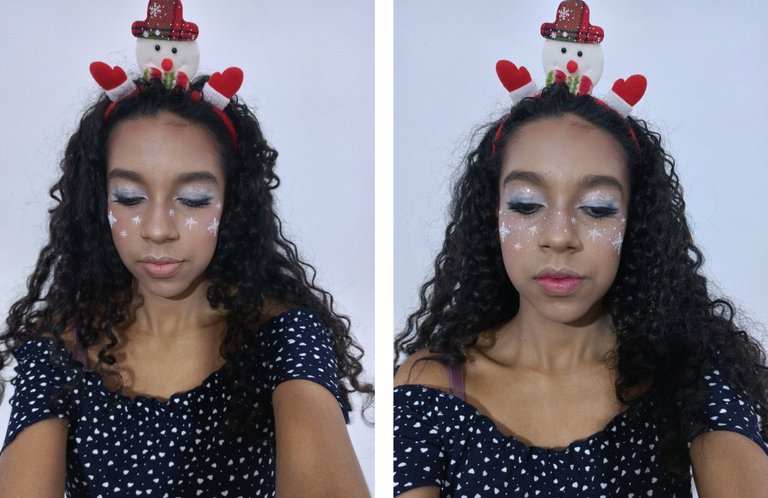
Hello MakeUp Power beauties! For this new occasion I bring you a special makeup inspired by the snow as we are in the festive season, it should be noted that if it was very complicated for me to solve it because it cost that my skin tone grabs the whites well, besides looking around the shape of the makeup to look decent and not look like a fright with white eyes, in the end I managed to get a good solution nice for you if you like you can recreate it, then I will leave the step by step of everything that was to make this style of snow:
¡Hola hermosuras de MakeUp Power! Para esta nueva ocasión les traigo un maquillaje especial inspirado en la nieve ya que nos encontramos en fechas festivas decembrinas, cabe resaltar que si estuvo bien complicado para mi persona resolverlo ya que costaba que mi tono de piel agarra bien los blancos, además de buscarle la vuelta a la forma del maquillaje para que se viera decente y no pareciera un espanto con los ojos blancos, al final logre obtener una buena solución agradable para que ustedes si gustan puedan recrearlo, a continuación les dejare el paso a paso de todo lo que fue realizar este estilo de nieve:
Paso a Paso
Step by Step
- First of all, in order for the white color to be able to get a good grip on our skin we need to apply a lighter concealer than our natural tone, and distribute it all over our mobile eyelid with a sponge and dabbing.
- Then, the trick I had to use to get my skin to grab the white tone was to take a white creamy eye pencil, and pour that pigment on my index finger until it was all white, and then start dabbing it all over my eyelid until it was sufficiently pigmented.
- It should be noted that this process will be easier if you have those special cream paints that are used for artistic makeup, as in my case I do not have, I have to improvise.
- En primera instancia para que el color blanco pueda agarrar bien en nuestra piel necesitamos aplicarnos un corrector mas claro de nuestro tono natural, y lo distribuimos por todo nuestro parpado móvil con una esponja y a toquecitos.
- Luego, el truco que tuve que utilizar para que mi piel agarra bien el tono blanco fue tomar un lápiz cremoso para ojos de color blanco, y echar ese pigmento sobre mi dedo índice hasta que estuviera todo blanco, para luego empezar a aplicarlo a toquecitos sobre todo mi parpado móvil hasta que consigue que quedara lo suficientemente pigmentado.
Cabe resaltar que este proceso será más fácil si cuentas de con esas pinturas especiales en crema que se utilizan para maquillajes artísticos, como en mi caso no tengo, toco improvisar

Step by Step
- Once the white cream pigment is applied, we proceed to take our eyeshadow palettes and with a blending brush, we fill it with a white matte tone, we remove the excess and start applying all over our eyelid in order to seal the cream applied before.
- To continue and enhance the white, we take frosted shades ranging from a pearl white, to a gray and frosty black and start applying it all over our eyelid with our index finger to make it brighter, absolutely everything with shadows.
- We take a frosted black shade and apply it with a flat brush on the lash line as if we were going to outline our eye, but this time, with shadow, and then we blend a little upwards so that it doesn't look so contrasting with the white, but as a gradient that goes from light to dark.
- After that we can proceed to apply glitter all over our mobile eyelid line, so if it is at night when you lower your gaze, highlight your eyes with glitter and make them look much bigger.
- Una vez aplicado el pigmento blanco en crema, se procede a tomar nuestras paletas de sombras y con una brocha de difuminar, la llenamos de un tono blanco mate, le quitamos el exceso y empezamos a aplicar sobre todo nuestro parpado para así poder sellar la crema antes aplicada.
- Para continuar y darle más realce al blanco, tomamos tonos escarchados que van desde un blanco perla, hasta un gris y negro escarchado y lo empezamos a aplicar por todo nuestro parpado con nuestro dedo índice a toquecitos para que quede más brillante, absolutamente todo con sombras.
- Tomamos un tono negro escarchado y lo aplicamos con una brocha plana sobre la línea sobre las pestañas como si fuéramos a delinear nuestro ojo, pero en esta ocasión, con sombra, y luego difuminamos un poco hacia arriba para que no se vea tan contrastante con el blanco, sino como un degradado que va de claro a oscuro.
- Luego de eso podemos proceder a aplicar glitter por toda nuestra línea de parpado móvil, para de esta forma, si es de noche cuando bajes tu mirada, resaltar con brillos tus ojos y hacer que luzcan mucho más grandes.

Step by Step
- To give more glamour to our look, we are going to put on false eyelashes of the size we consider appropriate, in my case I did not have the running ones so I put on the point by point accentuating more from the corner of the eye to the half of this, and complement with mascara to unify everything.
- Now to complete the face part, I applied my foundation, concealer and contouring as I normally do, I finished with a light orange blush and to give that touch of coolness to everything, I put a lot of highlighter on my cheekbones, a little on the nose and on my collarbones.
- To make the snowflakes, first I took my white eyeliner pencil and drew them on my cheeks and then I took a brush and white paint and applied them on top of the strokes I made before so they would be well marked, I finished with more dots to give the effect of snow and I applied illuminator again on top of all this, this way we would finish with this makeup.
- Para darle más glamour a nuestra mirada, vamos a colocarnos unas pestañas postizas de la medida que consideremos adecuada, en mi caso no tenía de las corridas por lo que me coloque las de punto por punto acentuando mas desde el rabillo del ojo hasta la mita de este, y complemente con mascara de pestañas para unificar todo.
- Ahora si para completar la parte del rostro, me aplique mi base, corrector y contornos como normalmente lo hago, me termine colocando un ligero rubor naranja y para darle ese toque de frio a todo, coloque mucho iluminador por mis pómulos, un poco en la nariz y en mis clavículas.
- Para realizar los copos de nueve, primero tome mi lápiz delineador blanco y los dibuje sobre mis mejillas para luego tomar un pincel y pintura blanca y aplicarlos sobre los trazos antes realizados para que quedaran bien marcados, termine colocándome mas puntitos para que diera el efecto de nevado y aplique de nuevo iluminador por encima de todo esto, así finalizaríamos con este maquillaje.


Créditos
Credits
- All images were taken by myself from my Tecno Camon 17 Pro phone.
- English translation
Todas las imágenes fueron tomadas por mi persona desde mi teléfono Tecno Camon 17 Pro
Traducción al inglés
Hola muchachona, genial la muestra de maquillaje que nos haz mostrado en este post, a mis mamis les encantaria y seguro lucirian muy lindas y con mucho glamour. Te dejo mi hachazo like, animate y recuerda puedes unirte a nuestro Trail de Apoyo para que así podamos seguir motivando y apoyando tus excelentes y de alta calidad creaciones de contenido, cualquier duda le puedes escribir a mis mamis 🤗🤗
This post has been voted by the HappyWhaleX project.
You can support it by delegating HP, to improve every day.
You can also join the Trail of this account, to support more quality content.
Thank you very much.
The HappyWhaleX Team
Muchas gracias Prometeos 😃 claro que me unire
Que bonito 👏🏼👏🏼
A PERO TU SABES VALEEE ME GUSTO ESO
Preciosa 😚
Congratulations @lin-lindsey! You have completed the following achievement on the Hive blockchain And have been rewarded with New badge(s)
Your next target is to reach 200 upvotes.
You can view your badges on your board and compare yourself to others in the Ranking
If you no longer want to receive notifications, reply to this comment with the word
STOPCheck out our last posts: