¡Hola hola, queridos amigos de Makeup Power! No saben lo feliz y emocionada que estoy de volver a compartir por acá con ustedes después de unas semanas de ausencia, en donde el Internet me ha jugado bastantes malas pasadas peeero han sucedido muchísimas cosas maravillosas en mi desenvolvimiento como maquilladora y creadora de contenido que muy pronto les estaré contando con lujo de detalle🙈
Por ahora les traigo el pictorial de este hermoso look que estuve realizando un par de días para cumplir con un contenido para marcas en Insta y aunque allá compartí algunas fotos del resultado con lentes de contacto (aquí al final pueden observar otras de como quedó el look total con ellos😍), obviamente preparé con todo el cariño del mundo este pictorial y fotos exclusivas para mi maravillosa familia de Hive y Makeup Power así que sin más, comencemos con el pictorial💚💙
Hello hello, dear friends of Makeup Power! You don't know how happy and excited I am to be back here with you after a few weeks of absence, where the Internet has played me quite a few tricks but they have happened many wonderful things in my development as a makeup artist and content creator that very soon I will be telling you every detail🙈
By now I'm bringing you the pictorial of this beautiful look that I was doing a couple of days to fulfill a content for brands on Insta and although there I uploaded the photos of the result with contact lenses (here at the end you can see how the total look turned out with them😍), obviously I prepared with all the love in the world this exclusive pictorial for my wonderful family from Hive and Makeup Power so, let's start with the pictorial💚💙
💎💚 Paso a paso | Step by Step 💙💎
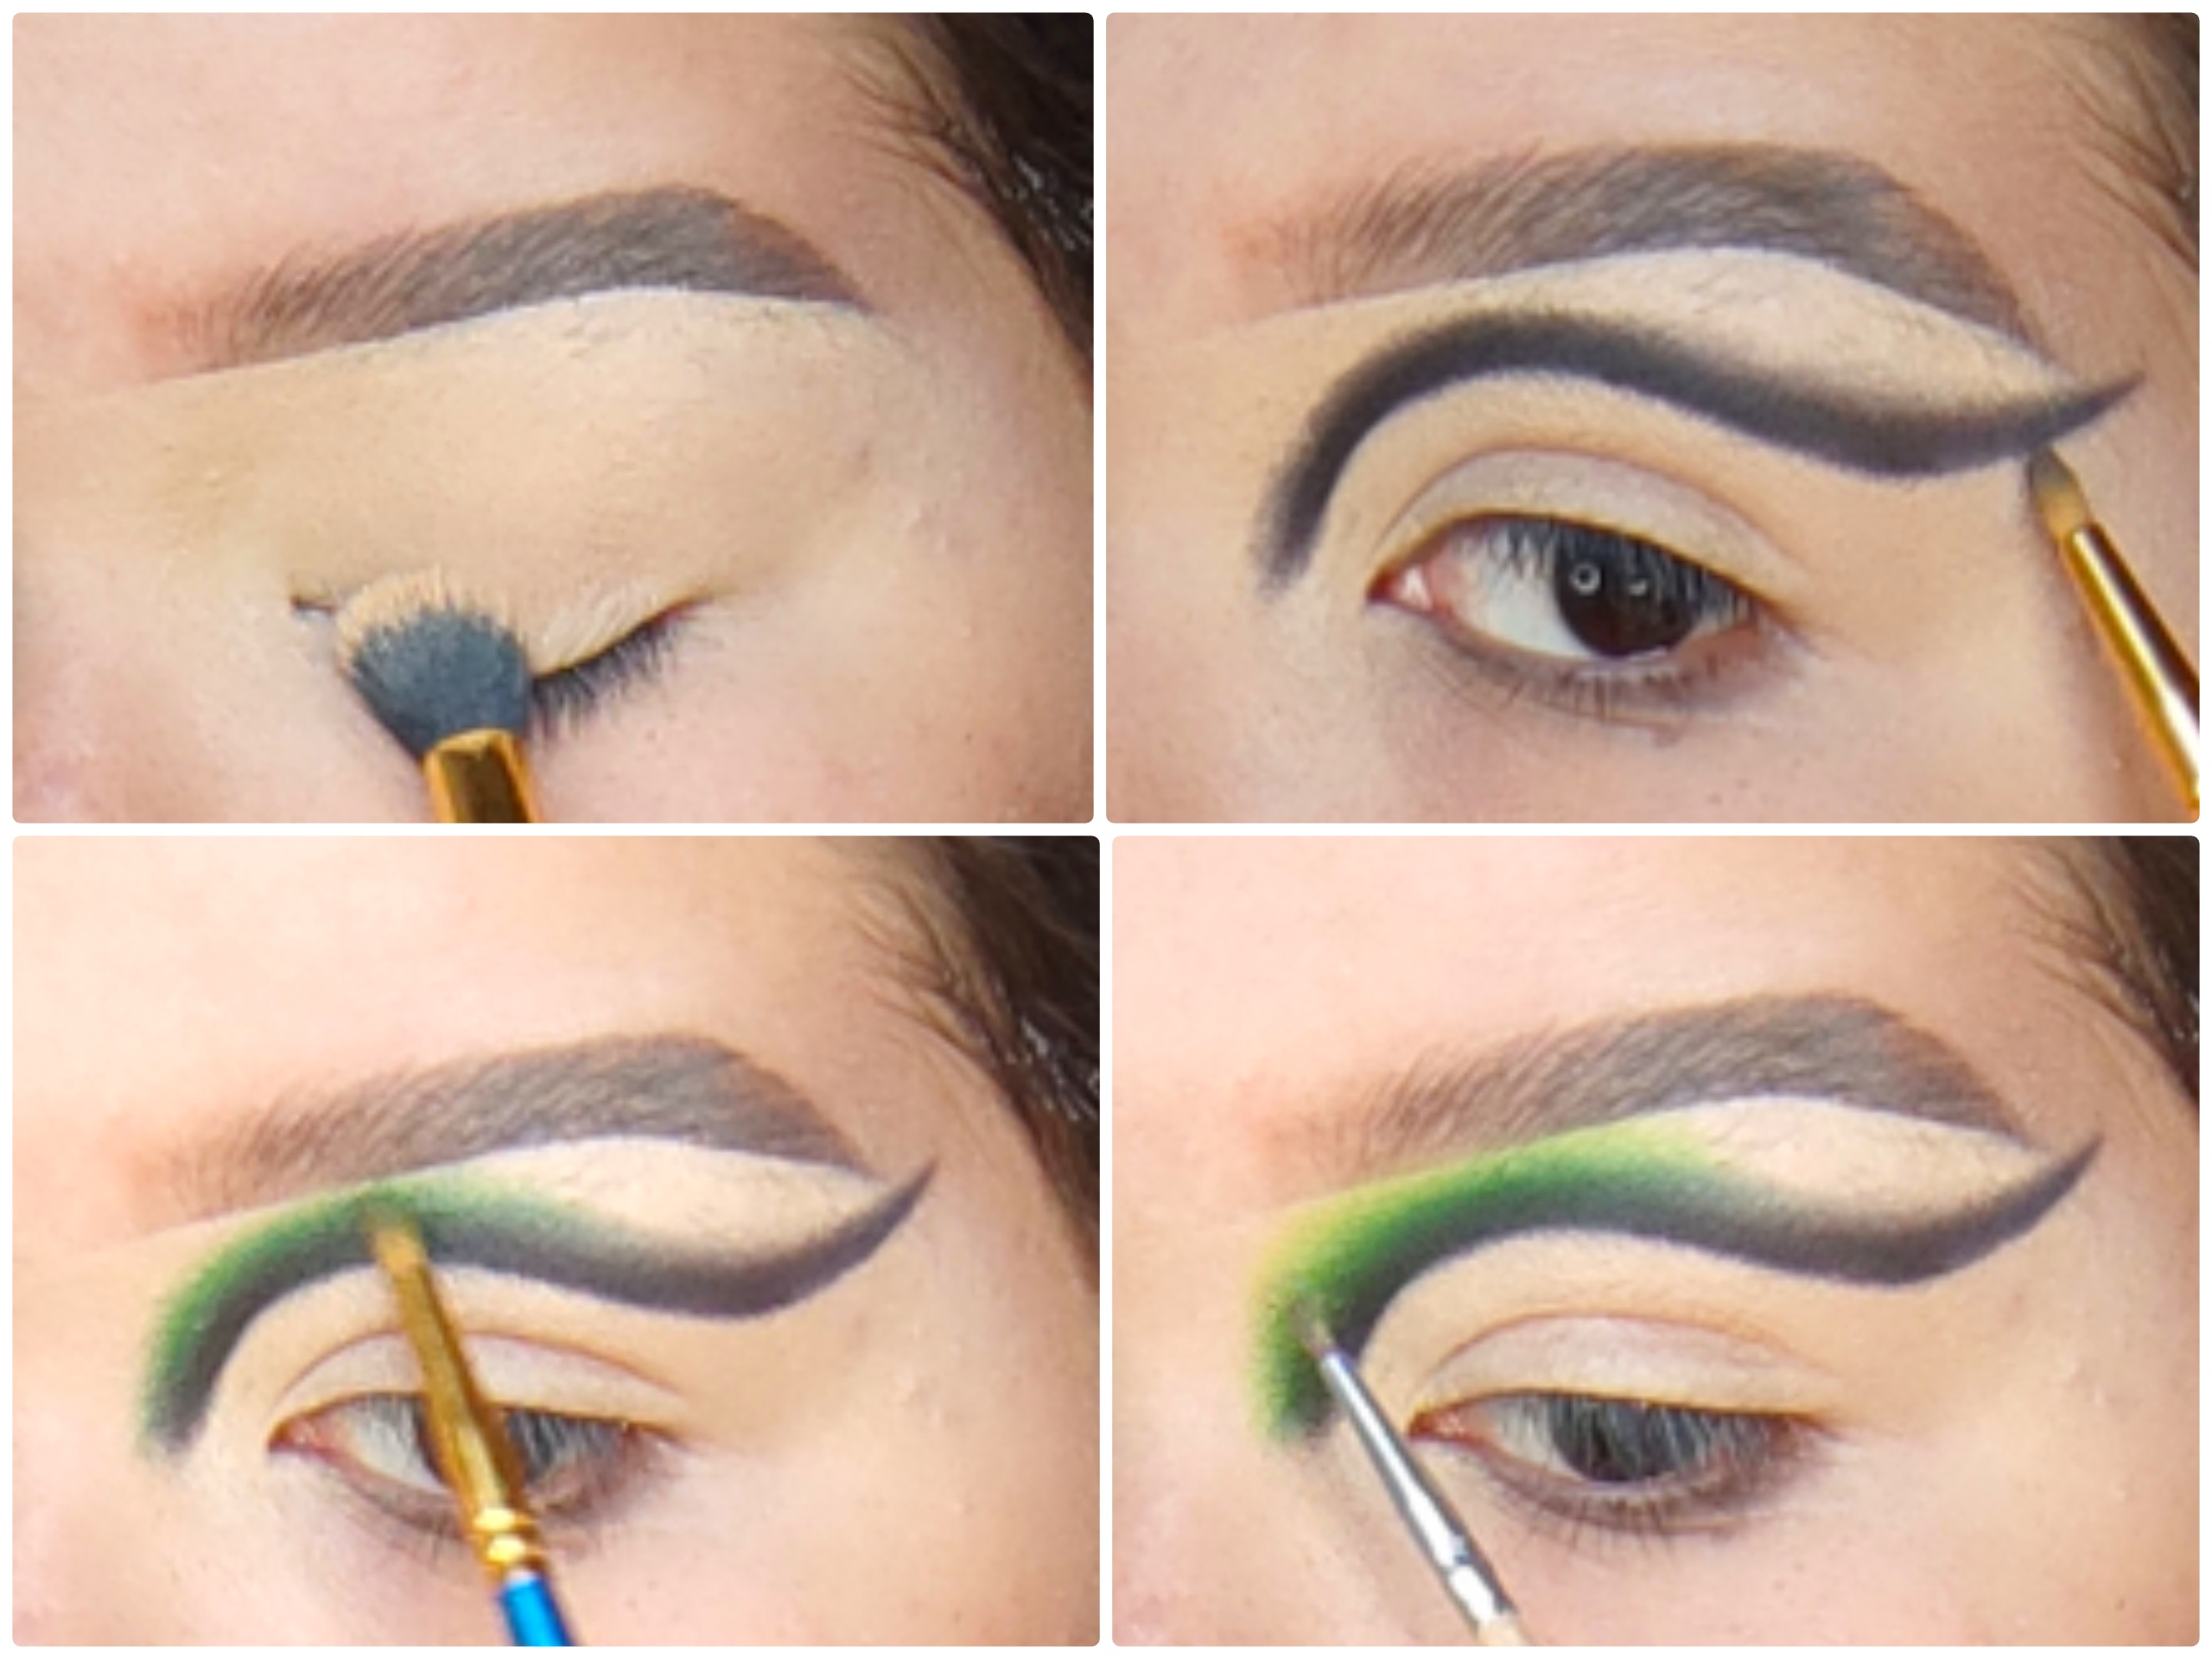
Empezaremos realizando este look con nuestro skincare aplicado y con unas cejas híbridas ya que, vamos a estar las fijando hacia arriba con pega en barra como si fueran cejas orgánicas pero definiremos y rellenaremos con pomada, al mejor estilo de unas cejas sombreadas, ayudándonos a obtener unas cejas bien prolijas pero no tan llamativas ya que queremos que el centro de atención sean los ojos.
Definiremos las cejas con corrector y difuninaremos el excedente hacia el párpado para usar como prebase de sombras y tomaremos una sombra negra para definir nuestra cuenca y trabajar a partir de allí con los demás colores. No les voy a mentir, este método es arriesgado pero al dominarlo les prometo que se les hará mucho más fácil y rápido que dar profundidad al final.
Empezamos con el inicio del corte a difuminar con una sombra verde, muy cuidadosamente ya que queremos que se integre con el negro pero que también se perciba la verde para luego integrar una sombra verde neón y otra amarilla:
We will start doing this look with our skincare applied and with some hybrid eyebrows since, we will be fixing them upwards with stick glue as if they were organic eyebrows but we will define and fill in with pomade, in the best style of shaded eyebrows , helping us to obtain neat but not so striking eyebrows since we want the eyes to be the center of attention.
We will define the eyebrows with concealer and we will diffuse the excess towards the eyelid to use as a shadow primer and we will take a black shadow to define our basin and work from there with the other colors. I'm not going to lie to you, this method is risky but when you master it I promise you that it will be much easier and faster than giving depth at the end.
We start with the beginning of the cut to be blurred with a green shadow, very carefully since we want it to integrate with the black but also to perceive the green, and then integrate a neon green shadow and a yellow one:
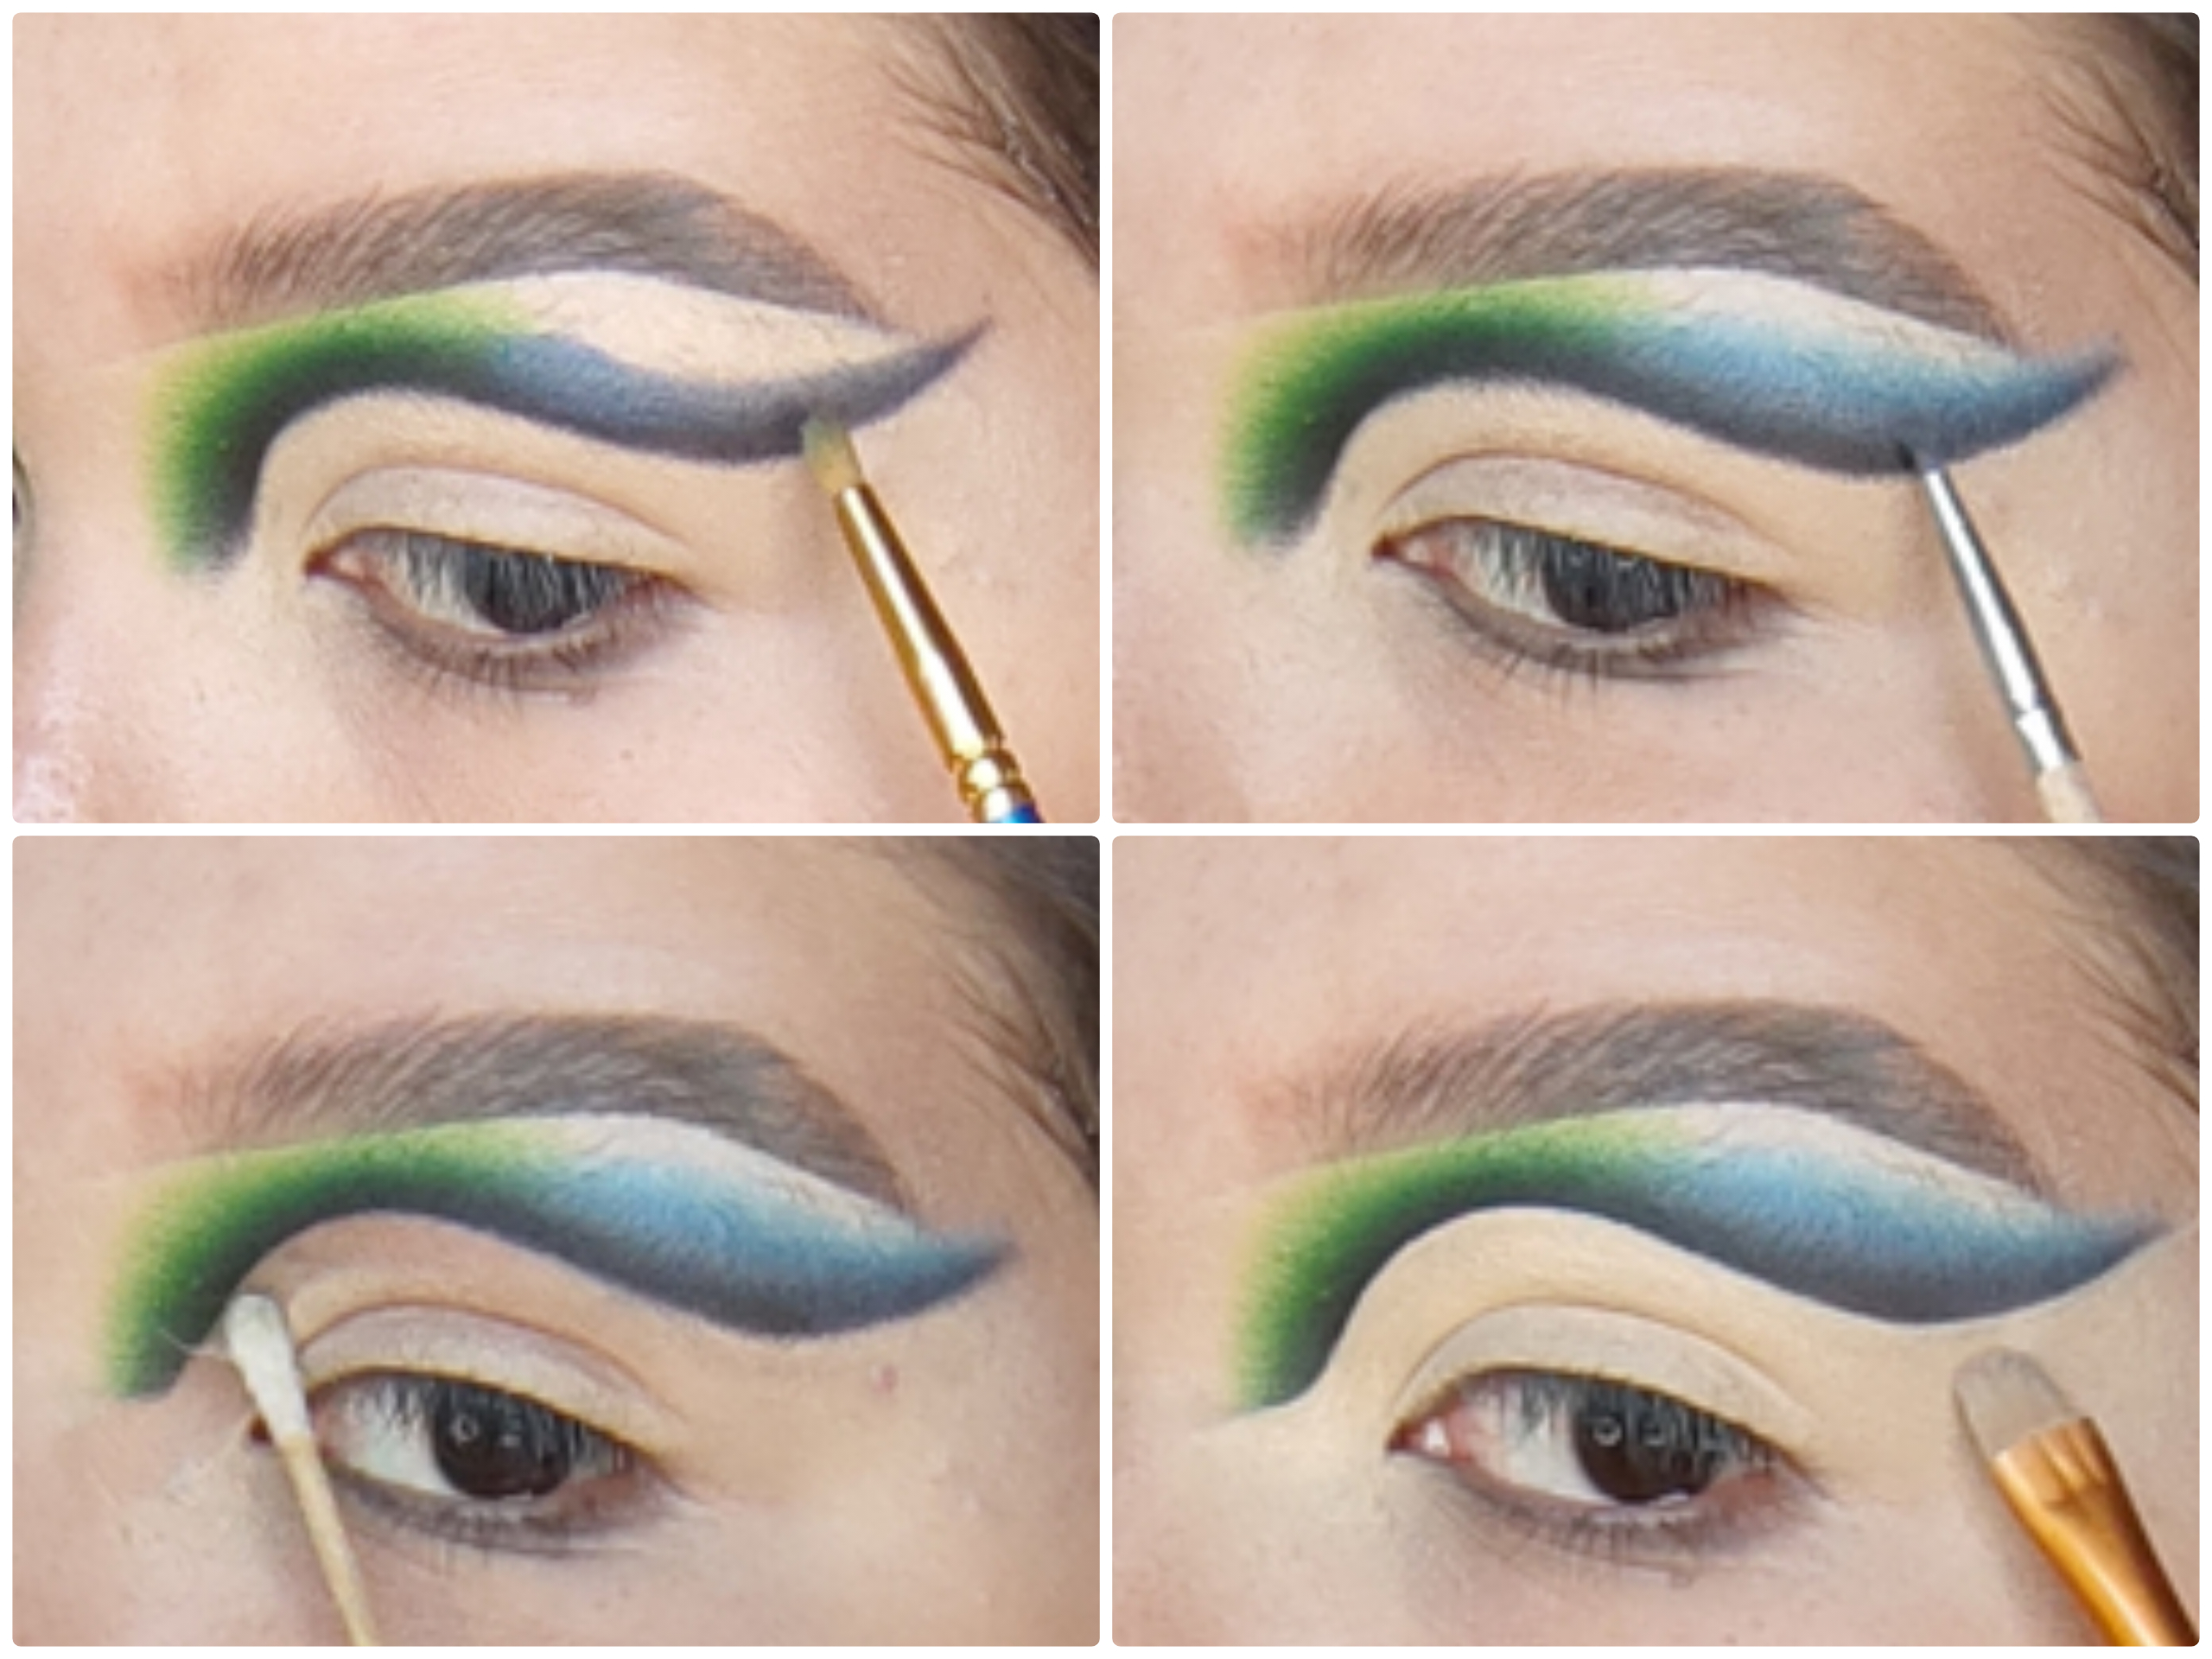
Ahora repetiremos el mismo procedimiento con la mitad exterior del corte pero en esta oportunidad usaremos una sombra azul, acá debemos ser más cuidadosos porque sino hacemos una buena integración de colores se puede generar parches y la idea es generar una difuminación suave, para luego poder integrar un azul más claro y generar varias tonalidades con una misma sombra.
Como luego vamos a realizar un corte de cuenta y necesitamos que sea preciso, vamos a limpiar la parte inferior de la profundidad antes de aplicar nuestro corrector, para una correcta y limpia aplicación del mismo:
Now we will repeat the same procedure with the outer half of the cut but this time we will use a blue shadow, here we must be more careful because otherwise we make a good integration of colors can generate patches and the idea is to generate a smooth blur, then be able to integrate a lighter blue and generate several shades with the same eyeshadow.
As then we are going to make an account cut and we need it to be necessary, we will clean the bottom of the depth before applying our concealer, for a correct and clean application of it:
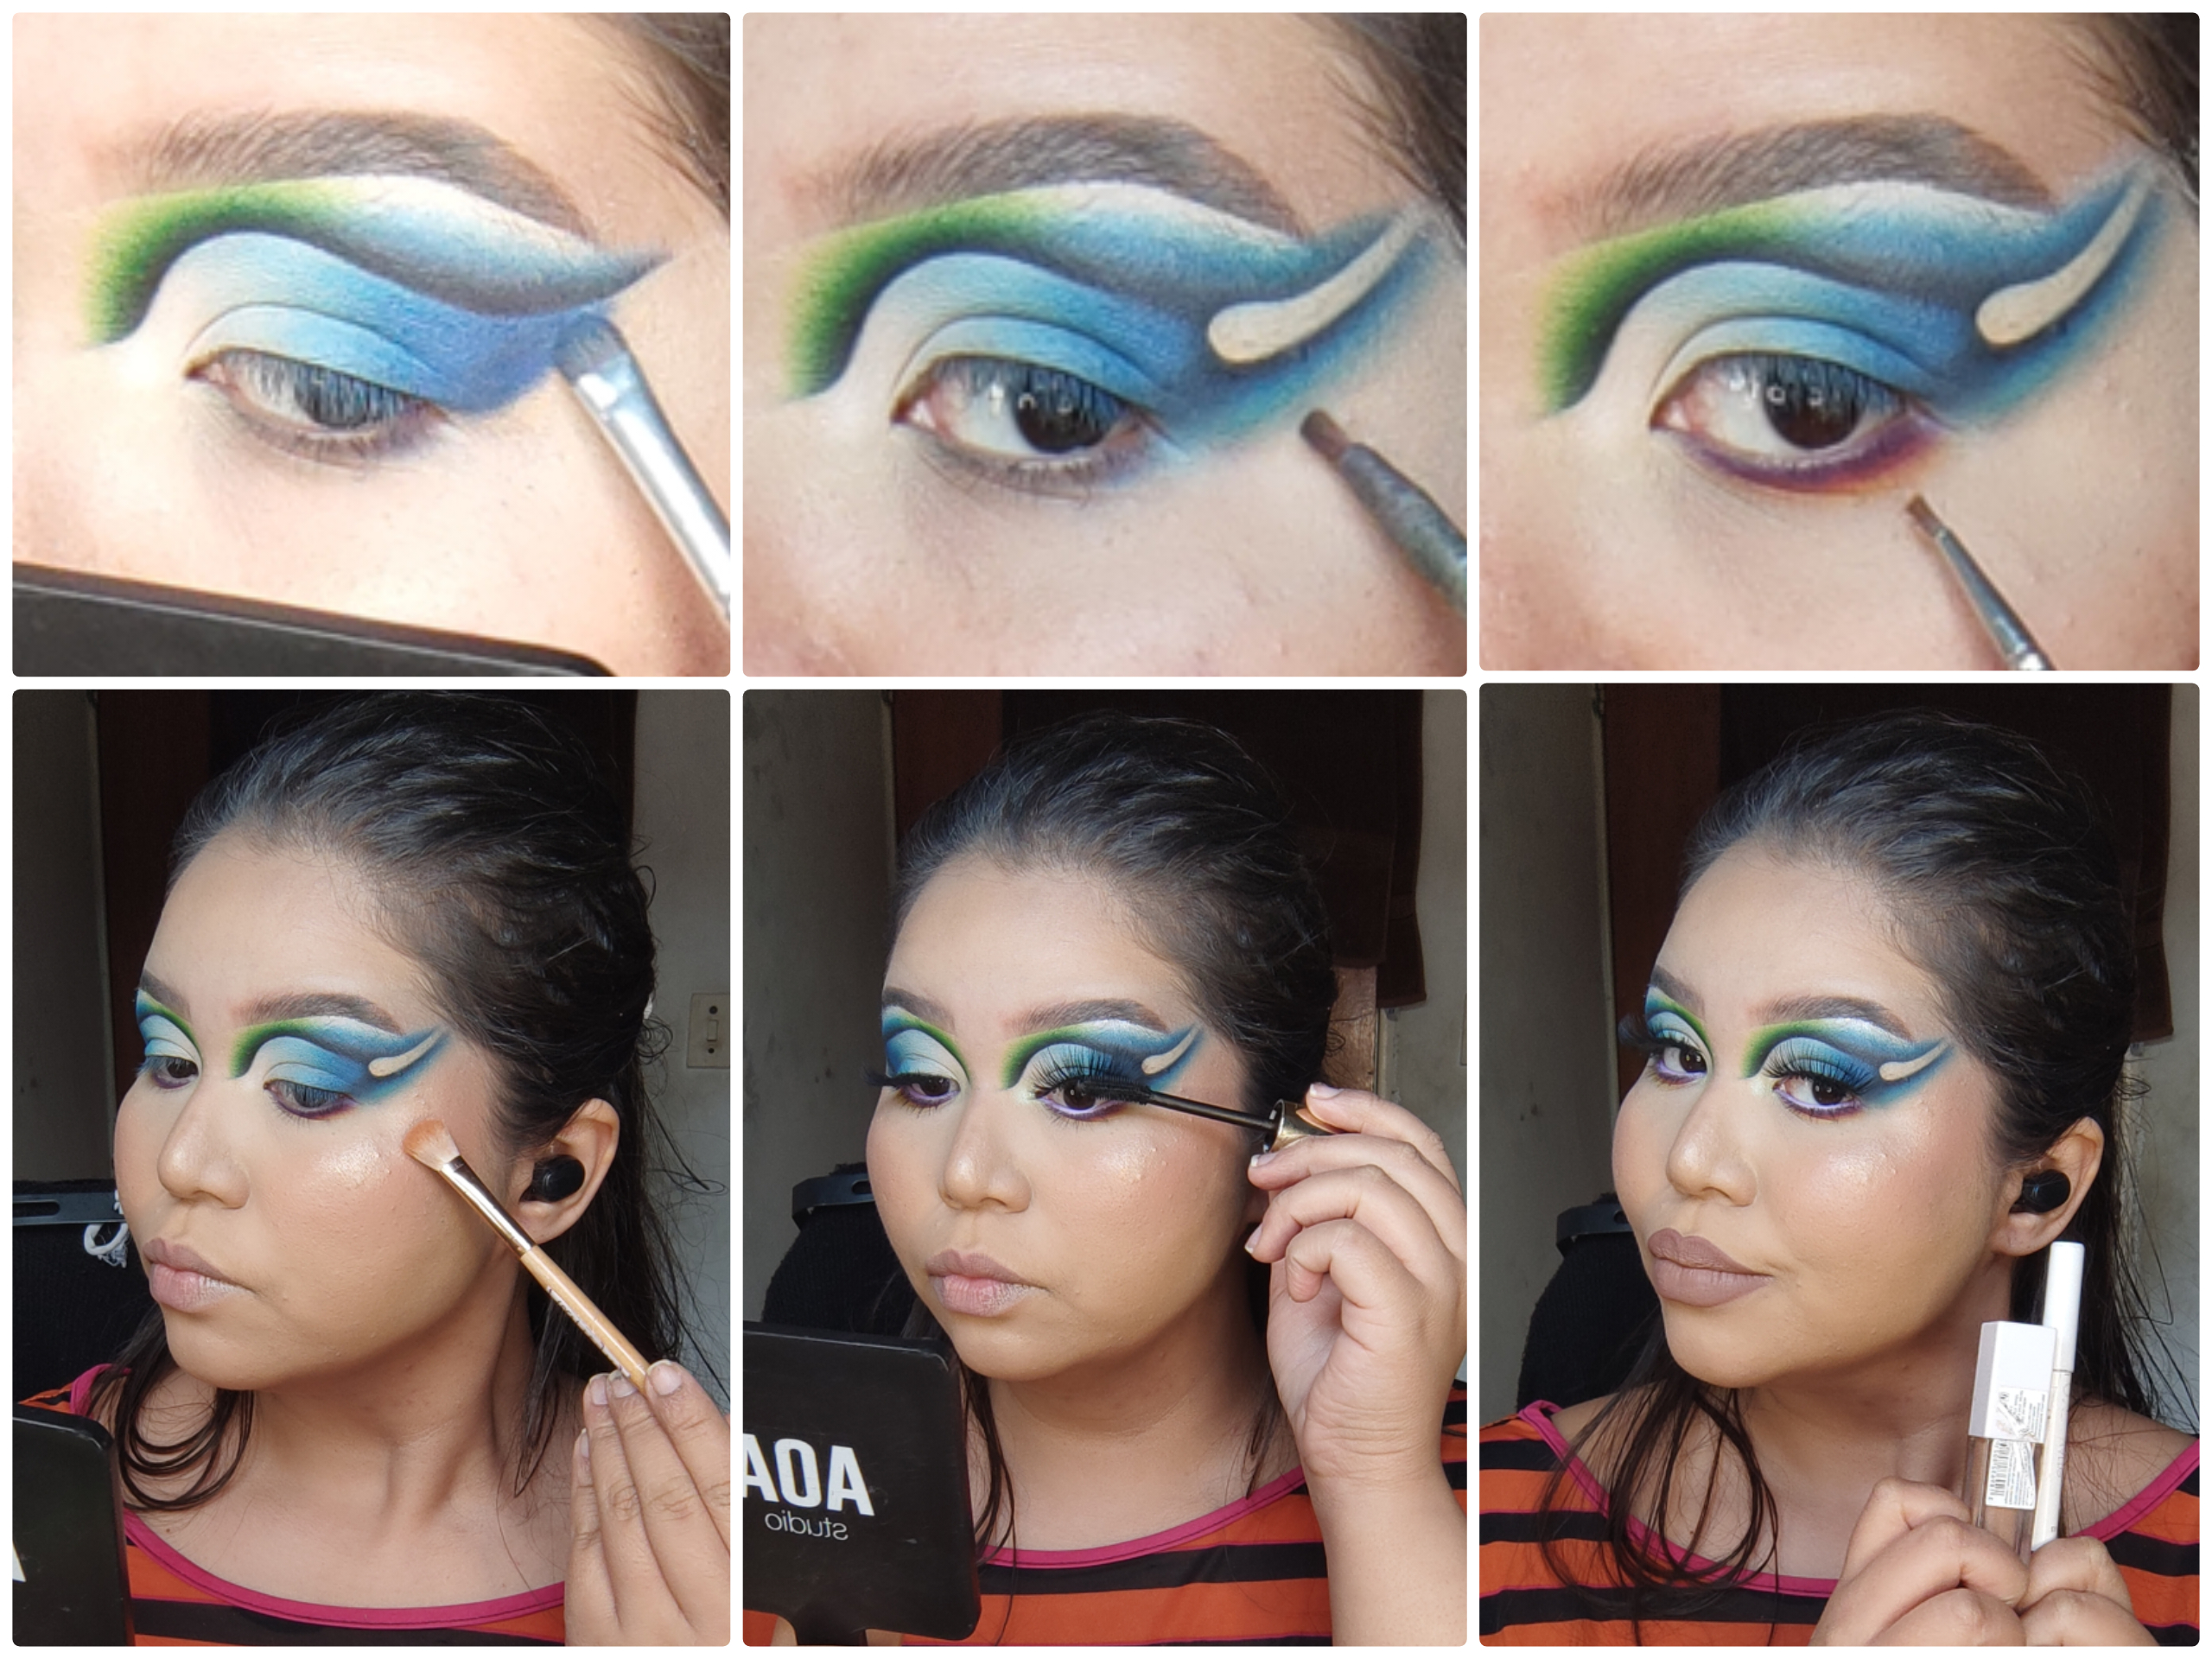
Rellenaremos ese corte con sombra blanca, azul y negro difuminando bien entre colores para generar un degradé y extendiendo el negro hacia el corte superior para que se integren ambas sombras y poder realizar el corte asimétrico, que rellenaremos con corrector matte.
Luego difuminaremos el borde inferior de esa sombra negra, con sombra azul y en nuestro párpado inferior haremos un mini ahumado usando sombra morada, roja y amarilla. Aplicamos corrector lila en la línea de agua y la sellamos con sombra morada, para proceder a realizar nuestra piel como de costumbre y terminar los ojos aplicando máscara de pestañas y pestañas postizas, para finalizar los labios delineando con lápiz marrón y rellenando con labial nude cálido:
We will fill that cut with white, blue and black eyeshadow, blending very well between colors to generate a gradient and extending the black towards the upper cut so that both shadows are integrated and the asymmetric cut can be made, which we will fill with matte concealer.
Then we will blend the lower edge of that black shadow, with blue shadow and on our lower eyelid we will make a mini smoked using purple, red and yellow shadow. We apply lilac concealer on the water line and set it with purple shadow, to proceed to make our skin as usual and finish the eyes by applying mascara and false eyelashes, to finish the lips lining with brown pencil and filling with warm nude lipstick:
Al finalizar estos pasos nuestro hermoso look está finalizado, así que ya podemos arreglarnos el cabello, jugar con lentes de contacto y tomarnos múltiples fotos💚💙
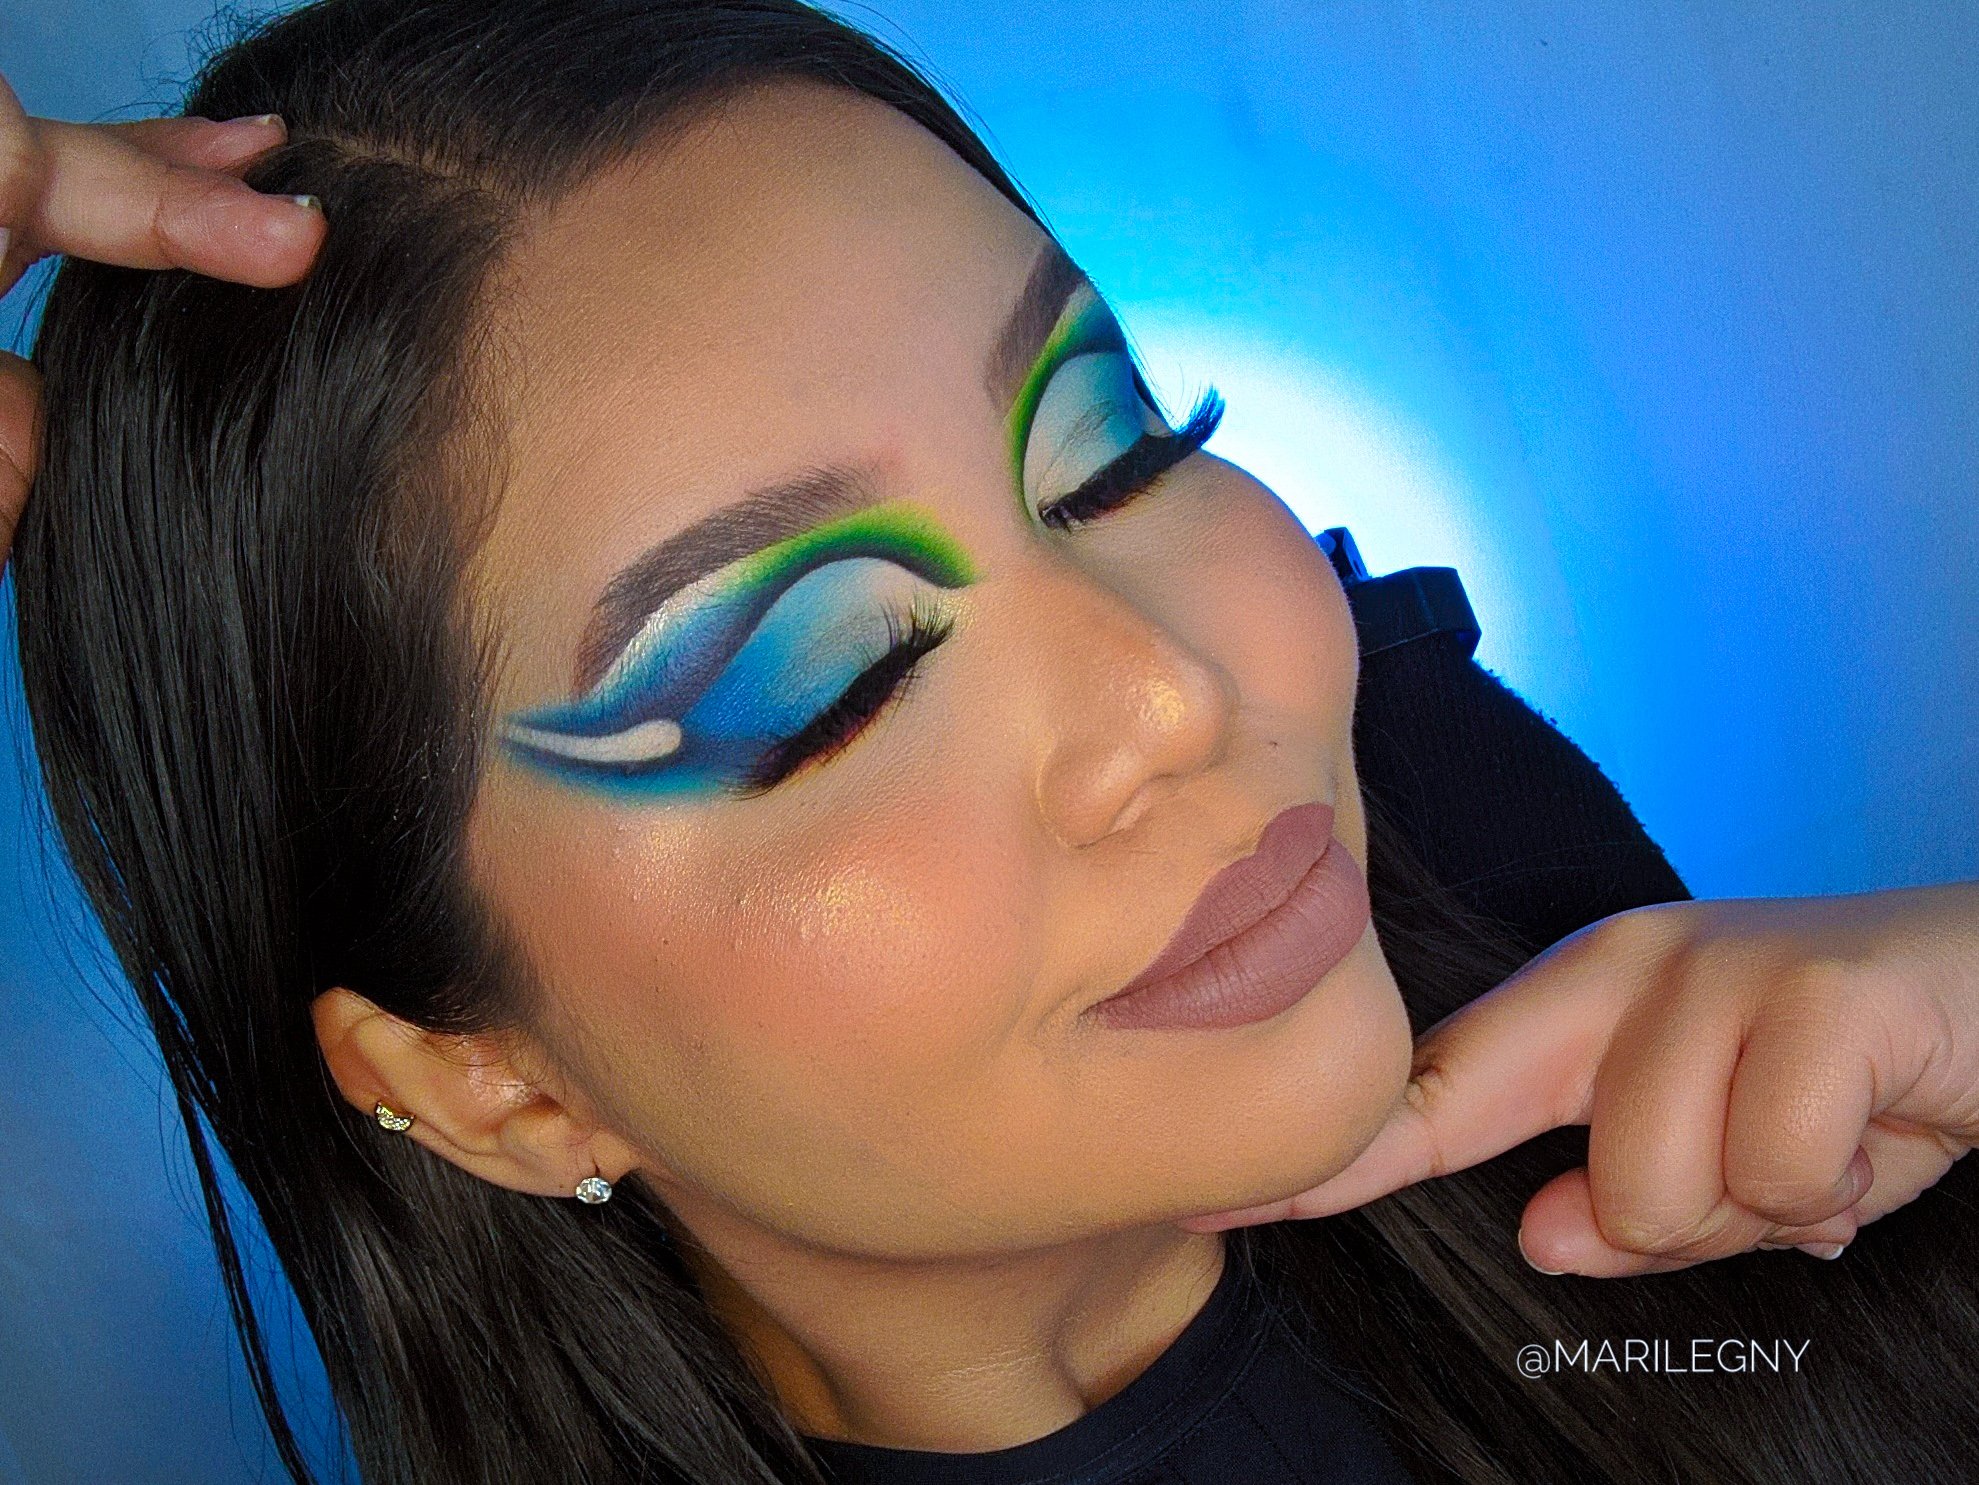
La piel tiene tonalidades diferentes en cada foto porque la cámara de mi cel decidió fastidiarme un poco ayer jaja, sin embargo amé este hermoso resultado y espero que ustedes también lo amen💘:
**At the end of these steps our beautiful look is finished, so we can fix our hair, play with contact lenses and take multiple fotos💚💙 **
The skin has different shades in each photo because the camera of my cell decided to annoy me a little yesterday haha, however I loved this beautiful result and I hope you love it too:
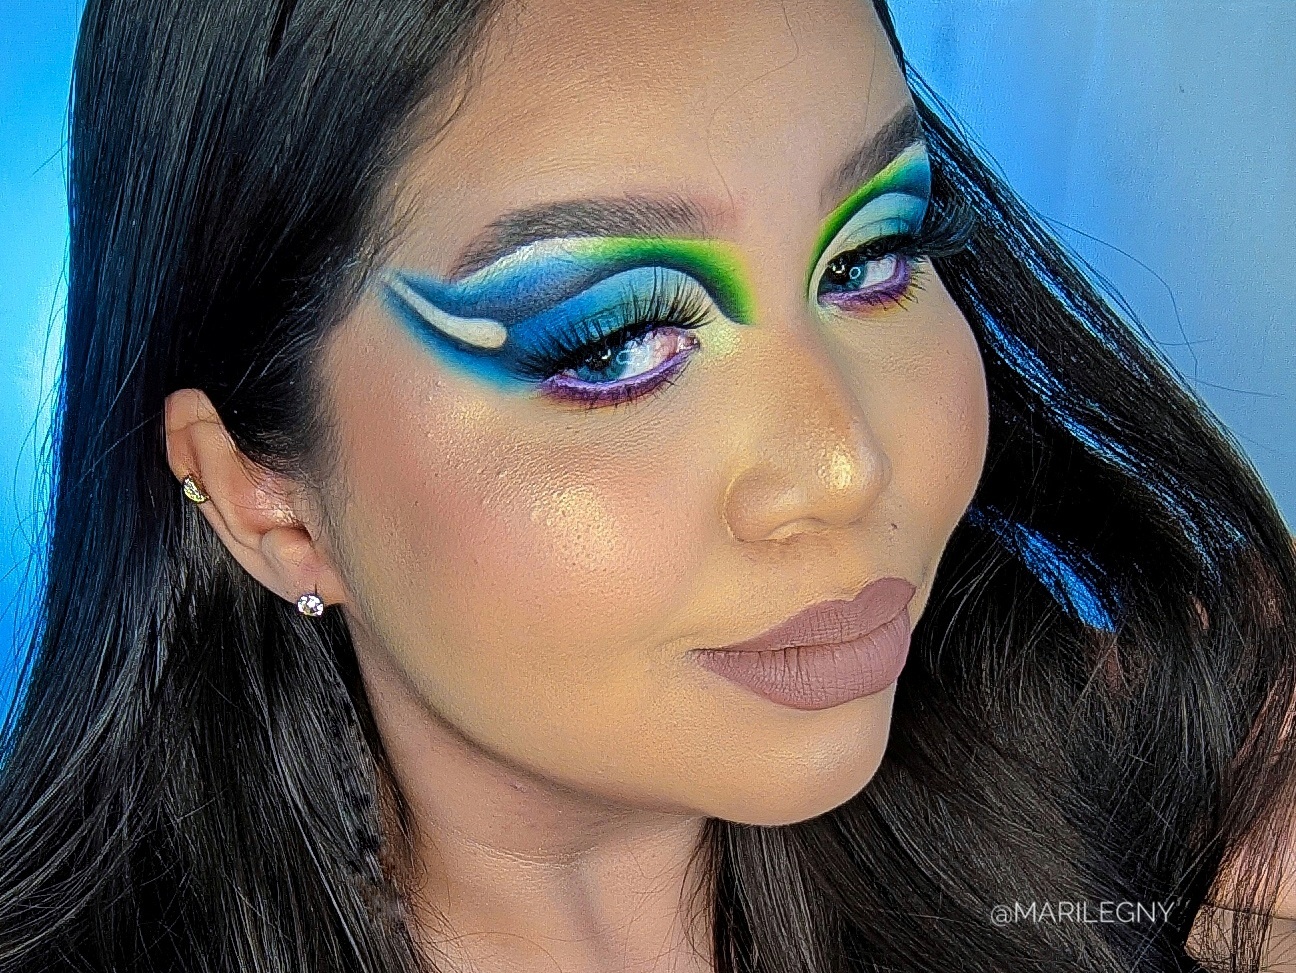

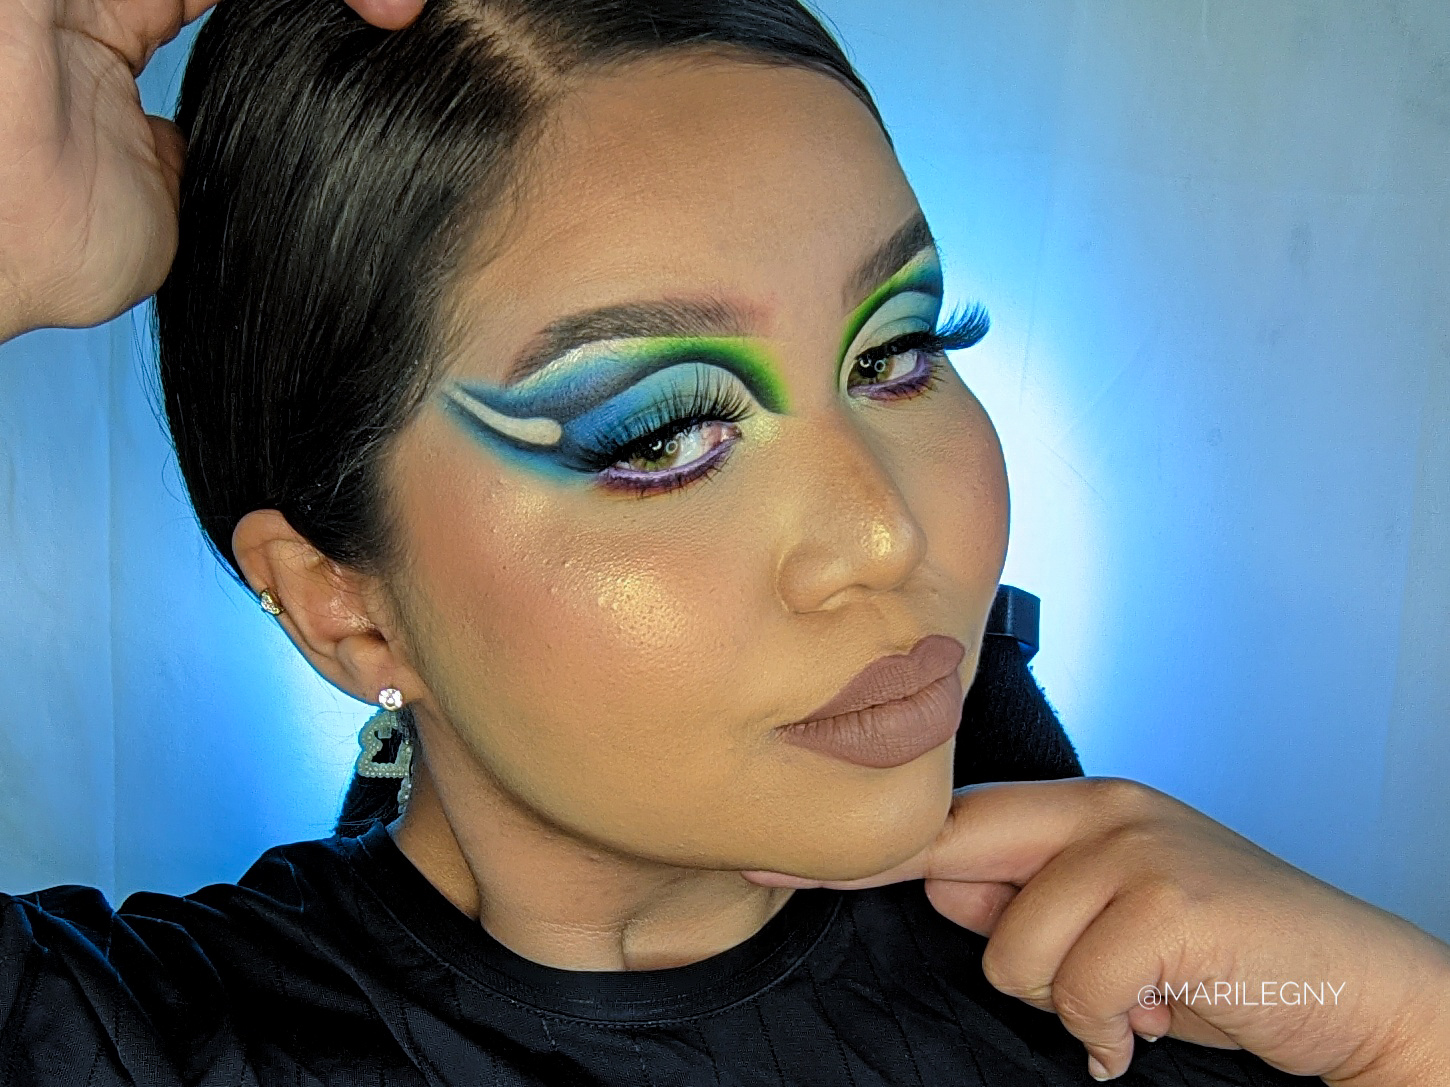
Espero les haya gustado mucho este tutorial pero sobre todo, que hayan aprendido algo nuevo o diferente💖 Yo como siempre, estoy muy contenta de compartirles este contenido que tanto disfruto realizar 😁 Nos vemos en el próximo 💞
I hope you enjoyed this tutorial but most of, I hope you learned something new or different💖 I'm, as always, really happy about sharing this content that enjoy to create 😁 See you in the next one💖
The rewards earned on this comment will go directly to the people sharing the post on Twitter as long as they are registered with @poshtoken. Sign up at https://hiveposh.com.
Super espetacular este makeup chama ame demassss 😍😍
Gracias bebeee como todos los tuyos jaja 💚💙
Más hermoso que la belleza ami, que hermosa tu técnica, estoy feliz de volverte por aquí nuevamente. Saludos ❤️
Gracias ami bellaaa, te mando un abrazo 💞💞💞
Uffff.... Que brutal este diseño 🔥 El difuminado, la forma, la foto, todo quedó impecable 👏 Nunca decepcionas 🤩
Ayyy muchas gracias hermosa🥺🥺🖤
Quedo muy lindo tu maquillaje, me gusta mucho la combinacion de tonos frios que usaste. Exitos ♥
Es de mi favoritas🙈 gracias y éxitos para ti hermosa 💙💚
Que maquillaje tan espectacular 😍
Pd: Me encantaron las fotos vale, comparte tips ajaja
Jajajaja, será que hago un post de cómo tomar fotos? 🤣 Gracias Muñeca 💚💙
Sii chama se necesita jsjs
Extrañabamos tus espectaculares look 🤗💐
Ay gracias hermosa, espero no perderme tanto 💙
Que excelente verte por acá 😘😻 ¡Me encantó este maquillaje! Me alegro de que estés progresando en el mundo del maquillaje. Éxitos bella 😻
Gracias Sarita, éxitos para ti ✨
Your content has been voted as a part of Encouragement program. Keep up the good work!
Use Ecency daily to boost your growth on platform!
Support Ecency
Vote for new Proposal
Delegate HP and earn more
Thank you so much for your support 💙
¡Felicidades! Esta publicación obtuvo upvote y fue compartido por @la-colmena, un proyecto de Curación Manual para la comunidad hispana de Hive que cuenta con el respaldo de @curie.
Si te gusta el trabajo que hacemos, te invitamos a darle tu voto a este comentario y a votar como testigo por Curie.
Si quieres saber más sobre nuestro proyecto, acompáñanos en Discord: La Colmena.
Muchas gracias por su apoyo amigos, me hace muy feliz 🥺💞
Bellísimo! Felicitaciones por tu creación.
Thank you for sharing this amazing post on HIVE!
non-profit curation initiative!Your content got selected by our fellow curator @stevenson7 & you just received a little thank you via an upvote from our
You will be featured in one of our recurring curation compilations and on our pinterest boards! Both are aiming to offer you a stage to widen your audience within and outside of the DIY scene of hive.
Join the official DIYHub community on HIVE and show us more of your amazing work and feel free to connect with us and other DIYers via our discord server: https://discord.gg/mY5uCfQ !
If you want to support our goal to motivate other DIY/art/music/homesteading/... creators just delegate to us and earn 100% of your curation rewards!
Stay creative & hive on!