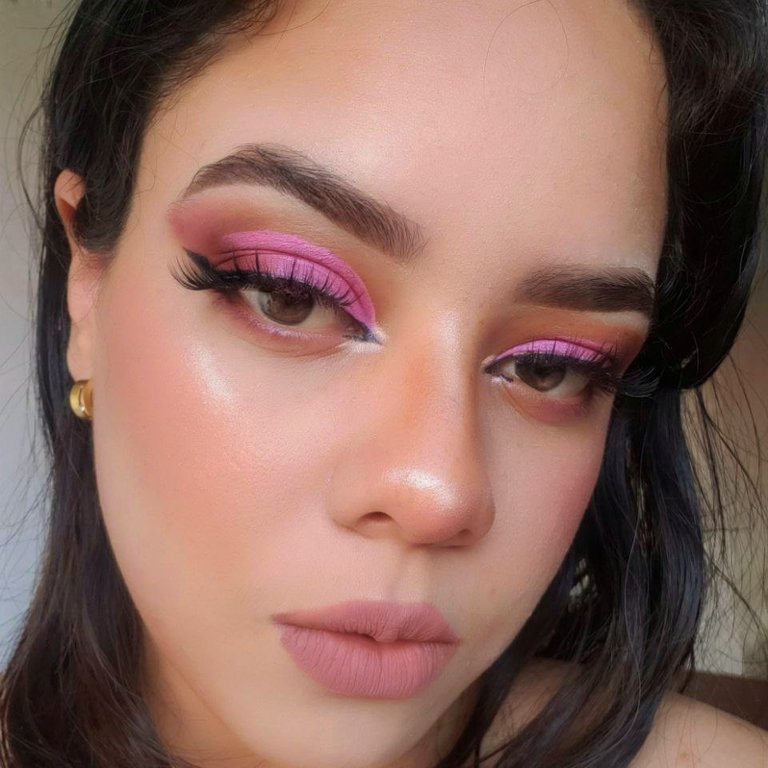
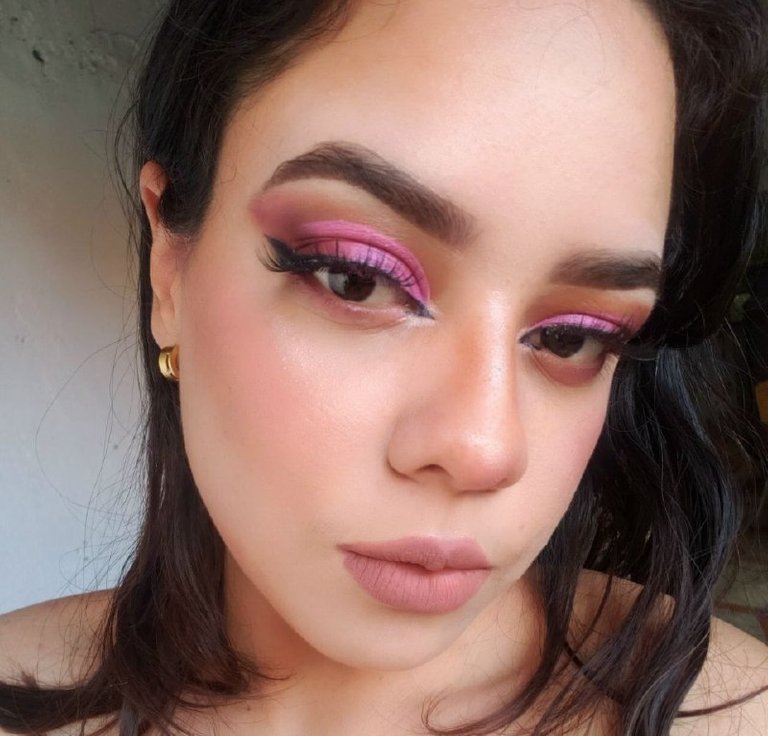
¡Hola, gente linda de Hive! Espero se encuentren de lo mejor hoy martes. Ya tenía unos días que no aparecía por acá, pero les comento que comencé el nuevo trimestre en la universidad así que he estado muy enfocada en eso, es por eso que me ausenté un poco. Pero ya volví! Y esta vez les comparto esta preciosidad de maquillaje, súper delicado, súper romántico, va perfecto para una cita. Este maquillaje es muy favorecedor, sobre todo en aquellas pieles con subtono rosa, le irá muy bien este maquillaje. Si quieren saber cómo se hace, sigan leyendo! PD: recuerden etiquetarme si lo recrean para ver lo hermoso que les queda.
Hello, beautiful people of Hive! I hope you're feeling better today, Tuesday. I haven't been here for a few days, but I have to tell you that I started the new term at the university so I've been very focused on that, that's why I was absent for a while, but now I'm back! But I'm back, and this time I'm sharing with you this gorgeous makeup, super delicate, super romantic, perfect for a date. This makeup is very flattering, especially in those skins with pink undertones, this makeup will suit you very well. If you want to know how to do it, keep reading! PS: remember to tag me if you recreate it to see how beautiful it looks on you.
Procedimiento / Process:

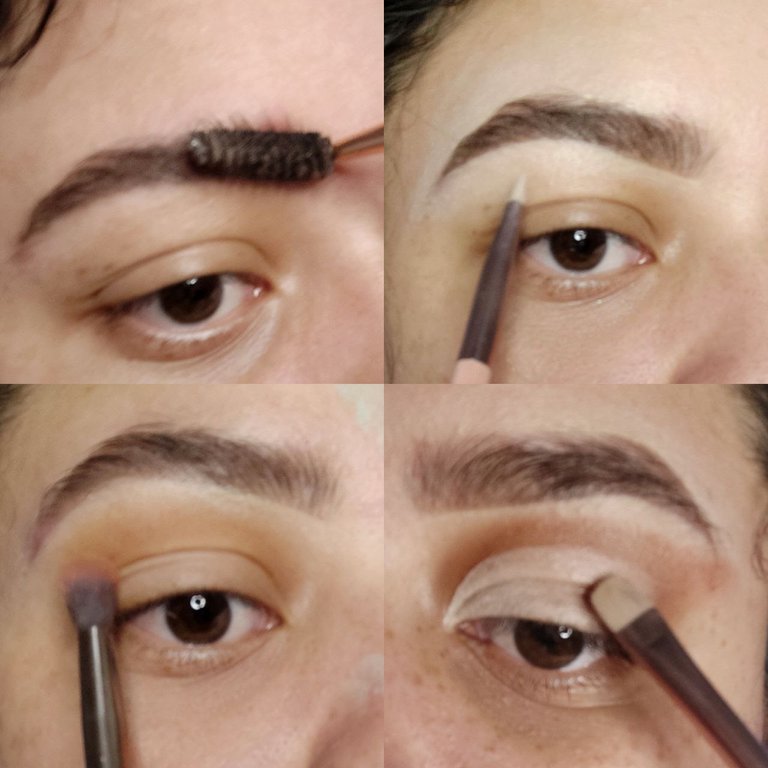
Lo primero que haremos como siempre serán las cejas. Comenzando tomando el producto del tono que usamos normalmente y lo aplicamos en todo el contorno inferior de la ceja, luego con un cepillo difumináremos hacia arriba y repetiremos el proceso dependiendo de la pigmentación que requiramos en las cejas. Ahora tomaremos base y una brocha para líquidos y aplicaremos la base en todo el borde de nuestra ceja difuminando hacia el exterior. Últimamente me gusta mucho más usar base porque siento que queda más bonito, intentenlo! Ahora tomaremos una sombra color marrón medio y la aplicaremos en toda la cuenca sacando un poco la cola en dirección a la ceja. Ahora para finalizar esta primera parte, haremos un semi cut-crease, recuerden que el semi significa que es solo hasta la mitad del párpado difuminando hasta un poco más.
The first thing we will do as always will be the eyebrows. Starting by taking the product of the shade we normally use and apply it all around the lower contour of the eyebrow, then with a brush we will blend upwards and repeat the process depending on the pigmentation we require in the eyebrows. Now we will take foundation and a liquid brush and apply the foundation all along the edge of our eyebrow blending outwards. Lately I like to use foundation a lot more because I feel it looks prettier, give it a try! Now we'll take a medium brown shadow and apply it all over the eye socket, pulling the tail out a bit towards the eyebrow. Now to finish this first part, we will do a semi cut-crease, remember that semi means that it is only up to the middle of the eyelid blending a little bit more.
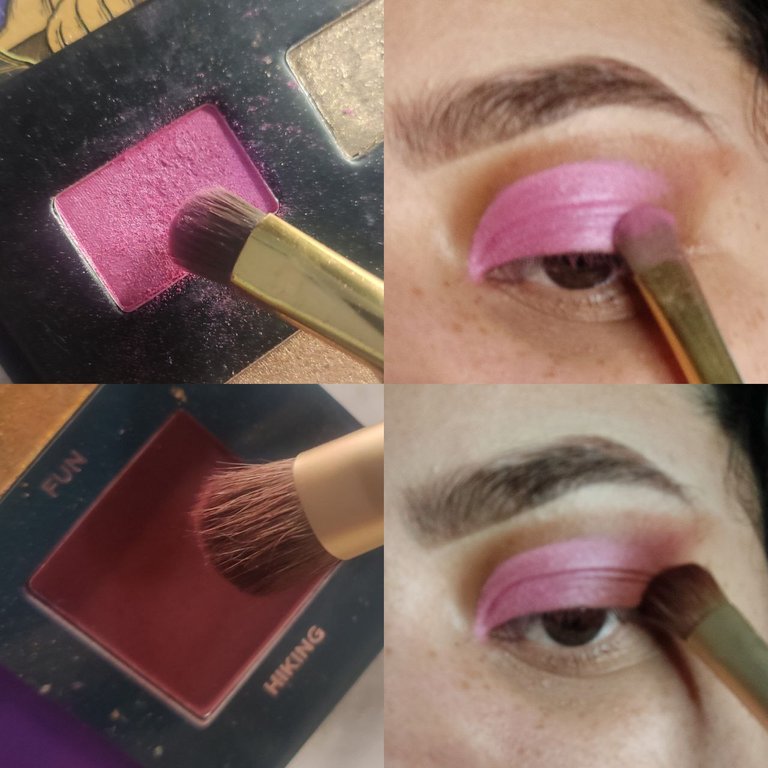
Ahora vamos a tomar una sombra de color rosa vibrante con destellos un poco perla. La aplicaremos en toda la zona donde hicimos el cut-crease y difumináremos un poco hacia el exterior. Tomamos una sombra color cocoa, como marrón bastante cálido tirando hacia el rojizo y lo aplicaremos desde la parte media de la línea de las pestañas, haciendo una línea inclinada en dirección hacia el final de la ceja. Eso lo difuminaremos muy bien hacia la parte interna.
Now we are going to take a vibrant pink shade with a little pearl sparkle. We'll apply it all over the area where we did the cut-crease and blend a little bit outwards. We will take a cocoa shade, like a warm brown color, which is quite warm and reddish, and we will apply it from the middle part of the lash line, making a slanted line towards the end of the eyebrow. We will blend it very well towards the inner part.

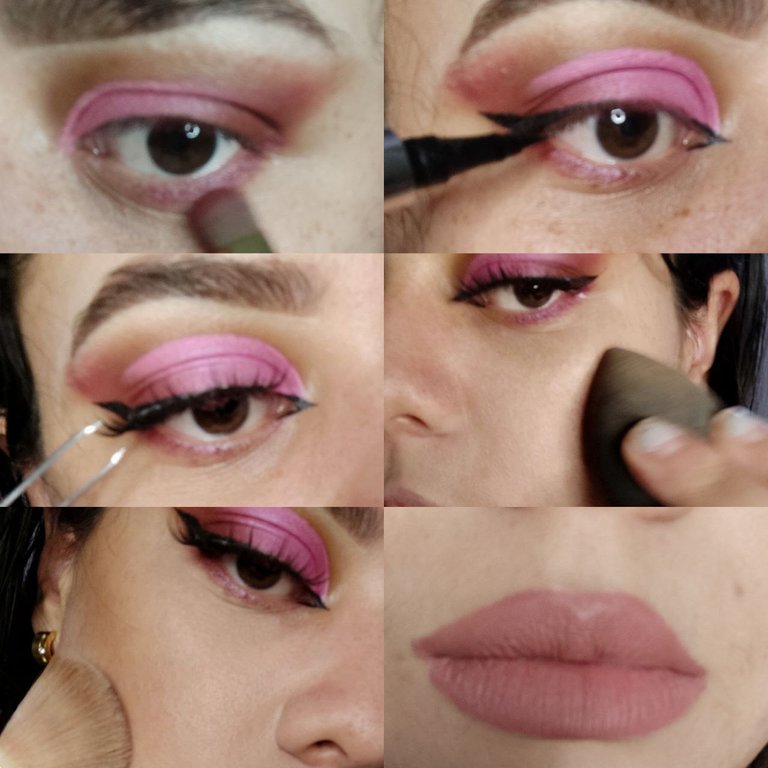
Ahora combinaremos las sombras marrón y rosa para pintar el párpado inferior donde se ubican las pestañas inferiores. Ahora enmarcaremos la mirada con un delineado muy foxy con cola en el lagrimal, yo lo realicé con delineador líquido. Aplicamos unas lindas pestañas postizas. Aplicamos base y corrector en el rostro y difuminamos con la blender. Aplicamos contorno, blush e iluminador. Y por último toque añadimos un sensual labial en tono nude (mate de larga duración, claro). Estamos listas!
Now we will combine the brown and pink shadows to paint the lower eyelid where the lower lashes are located. Now we will frame the look with a very foxy eyeliner with glue in the eyelid, I did it with liquid eyeliner. Apply some nice false eyelashes. Apply foundation and concealer on the face and blend with the blender. We applied contour, blush and highlighter. And for the last touch we add a sensual nude lipstick (long lasting matte, of course). We are ready!
🎉LOOK FINAL 🎊✨
Muchas gracias por leer mi post, como siempre estoy muy agradecida con el apoyo que todos ustedes me dan. Espero que les haya encantado este maquillaje, los quiero y espero leerlos en los comentarios con su recomendaciones y sugerencias ! los espero en el siguiente post! besos 😘
Thank you so much for reading my post, as always I am very grateful with the support you all give me. I hope you loved this makeup, I love you and I hope to read you in the comments with your recommendations and suggestions ! I wait for you in the next post ! kisses 😘.


Hermoso maquillaje amiga 💖❣️
Me alegra que te haya gustado 💖💖
Hello dear I like your face I want make up too but I’m busy
Ohh try sometime, i swear it'll be worth it ☺