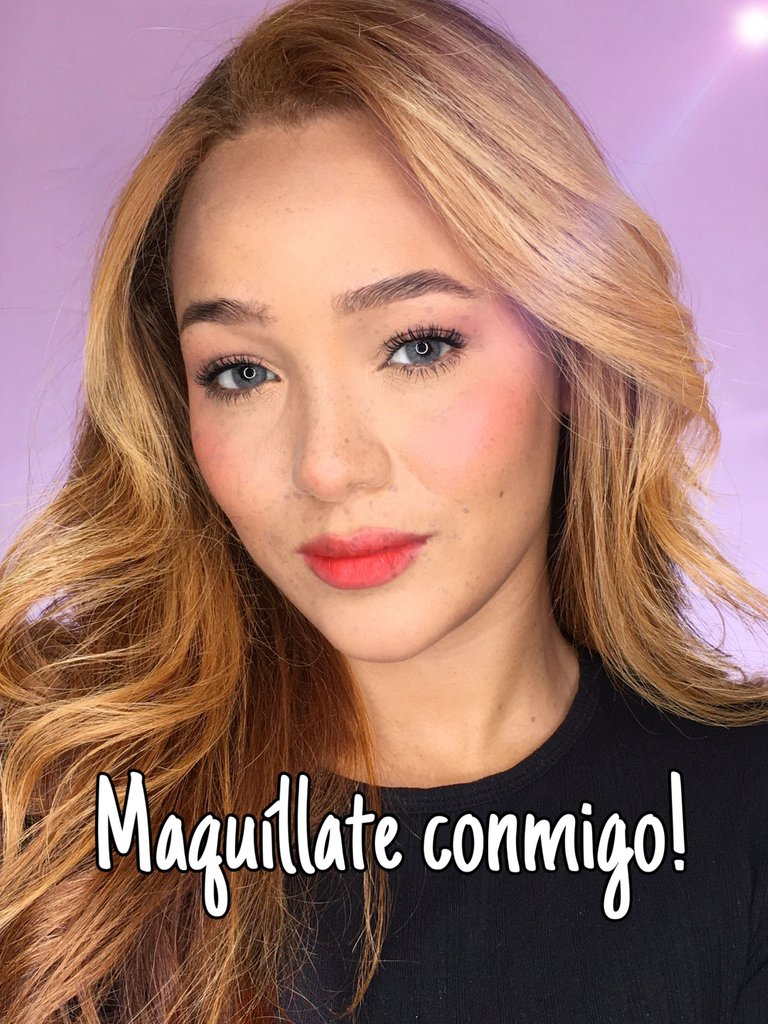
Hola hola amores, les cuento que el día de hoy aprenderemos a realizar un makeup no makeup, es decir, un maquillaje que se vea hermoso pero natural, y que puedas realizarlo en diez minutos
… así que comencemos.
Hello hello loves, I tell you that today we will learn how to make a no makeup makeup, that is, a makeup that looks beautiful but natural, and that you can do it in ten minutes.
... so let's get started.
Lo primero y primordial es tener nuestra carita preparada con la rutina de skincare que ya aprendimos en el post anterior; ya con este primer paso listo les voy a explicar cómo realizo yo este maquillaje, ojo, siempre les digo a mis alumnas que nosotros como maquilladores les damos la técnica, pero ustedes están en todo el derecho de adaptar todo este aprendizaje a su manera.
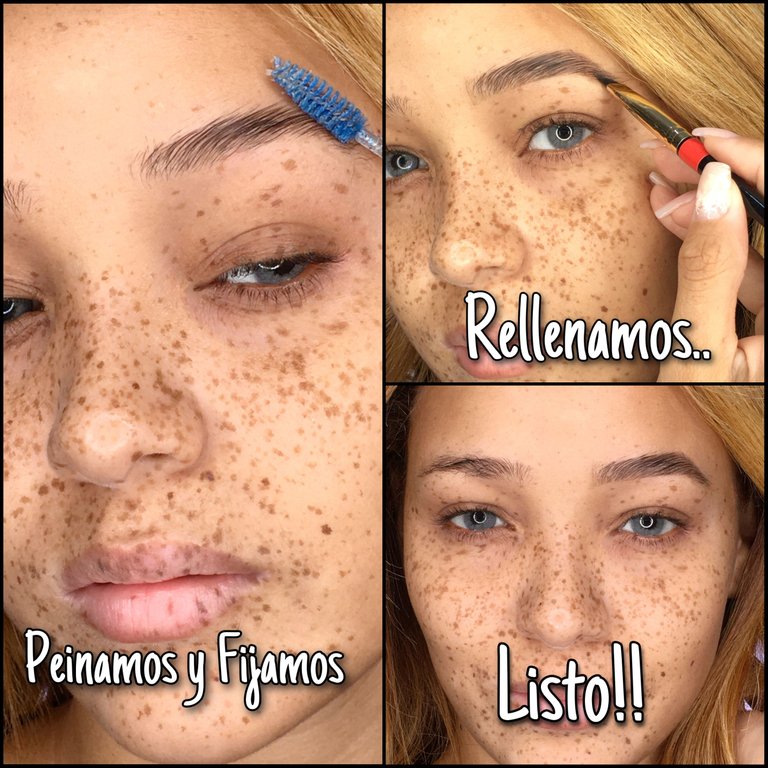
Empezamos realizando las cejas, y se preguntarán ¿por qué las cejas primero? bueno en este caso yo las realizo primero porque las hago laminadas, y como esta técnica se hace con jabón, si las hago despues de aplicarme la base, cuando empiece a peinar la ceja con el jabón será un desastre, por esa razón las realizo de primero.
Y ¿Qué son las cejas laminadas? Esta técnica se puso muy de moda ya que da un efecto de ceja muy poblada; para las personas que tenemos poco vellito en las cejas, esta te da un efecto de abundancia. Y se realiza, embadurnando un cepillito para cejas en un jabón de glicerina y peinando la ceja hacia arriba, y de esta forma ella se van fijando o pegando a la piel, luego con una pomada rellenamos los espacios donde no hay vellito y listo, cejas preciosas en un segundo.
Esta técnica es opcional, si tu tienes tu forma de realizarte las cejitas, puedes obviar este paso.
First and foremost is to have our face prepared with the skincare routine that we learned in the previous post; with this first step ready I am going to explain how I do this makeup, I always tell my students that we as makeup artists give you the technique, but you have the right to adapt all this learning in your own way.
We start by doing the eyebrows, and you may wonder why the eyebrows first? Well in this case I do them first because I do them laminated, and as this technique is done with soap, if I do them after applying the base, when I start combing the eyebrow with the soap it will be a disaster, that's why I do them first.
And what are laminated eyebrows? This technique became very fashionable because it gives a very populated eyebrow effect; for people who have little hair in the eyebrows, this gives you an effect of abundance. And it is done by smearing an eyebrow brush in a glycerin soap and combing the eyebrow upwards, and in this way they are fixed or sticking to the skin, then with a pomade we fill in the spaces where there is no hair and that's it, beautiful eyebrows in a second.
This technique is optional, if you have your own way of doing your eyebrows, you can skip this step.
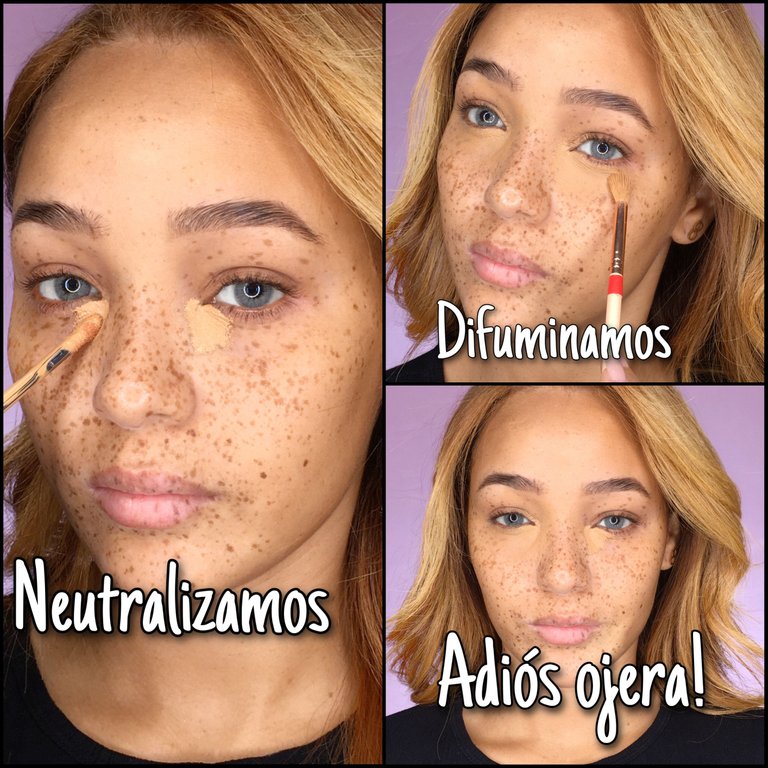
Luego que tenemos las cejas listas, vamos a neutralizar las ojeras, y zonas de hiperpigmentación en el rostro y aquí empezaremos a definir términos para que nos podamos ir entendiendo y familiarizado con este tema.
Cuando hablo de neutralizar, me refiero a corregir color, entonces neutralizar la hiperpigmentacion es corregir zonas de color oscuro en este caso, tambien podemos corregir rojeses, o alguna que otra manchita que nos moleste a la hora de maquillarnos, pero esta lo habalaremos luego cuando toquemos la colorimetria en el maquillje y teoria del corlor.
Para neutralizar las ojeras normalmente recomendamos un corrector con una sub-tonalidad naranja, y dirán ¿De qué me están hablando? jajaja, no te asustes es muy sencillo, los correctores como la palabra lo dice se usan para corregir, y cuando tenemos una mancha que queremos tapar lo hacemos con corrector, peeero, aquí viene lo bueno. Si no neutralizamos la oscuridad y colocamos un corrector claro creamos un efecto contrario y la ojera se notará mucho más.
After we have the eyebrows ready, we are going to neutralize the dark circles, and areas of hyperpigmentation on the face and here we will begin to define terms so that we can understand and become familiar with this topic.
When I talk about neutralizing, I mean correcting color, so neutralizing hyperpigmentation is correcting areas of dark color in this case, we can also correct redness, or any other spot that bothers us when applying makeup, but we will talk about this later when we touch on colorimetry in makeup and color theory.
To neutralize dark circles under the eyes we usually recommend a concealer with an orange undertone, and you will say what are you talking about? hahaha, don't be scared, it's very simple, concealers as the word says are used to correct, and when we have a spot that we want to cover we do it with concealer, but here comes the good part. If we don't neutralize the darkness and use a light concealer we create the opposite effect and the dark circles will be much more noticeable.
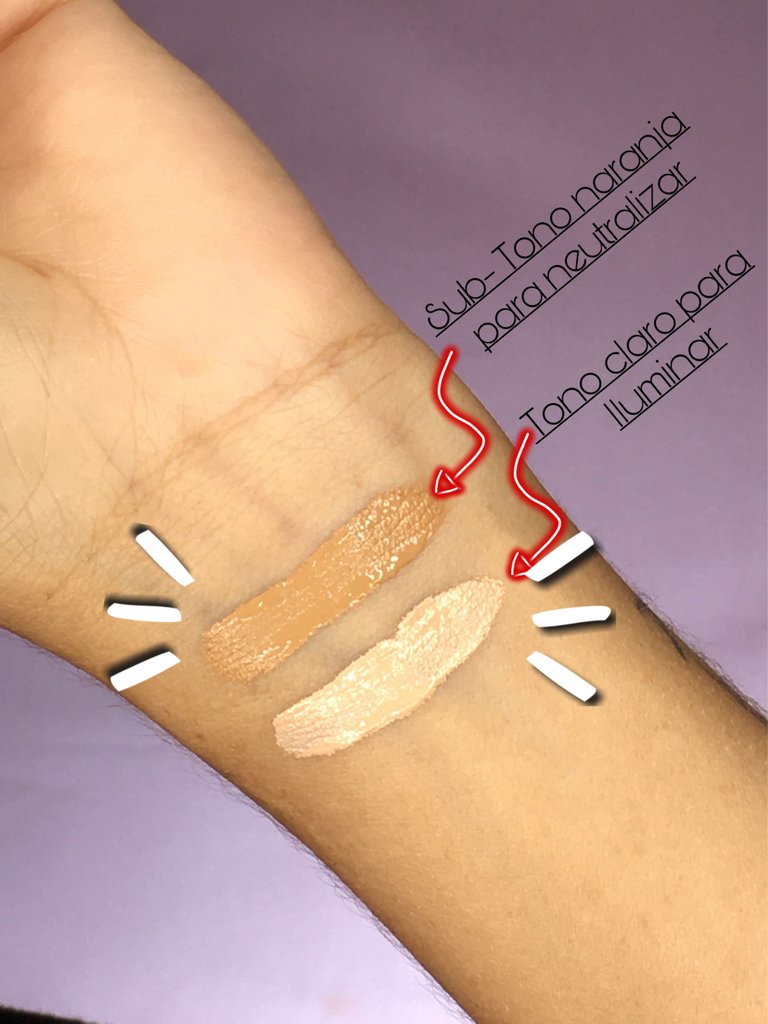
Un corrector con subtono naranja elimina esa coloración y luego iluminamos con un corrector un tono más claro que tu tipo de piel; un corrector con subtonalidad naranja es aquel que lo vemos de un marrón tirando a naranja, ojo no es corrector naranja NO es que tenga de subtono el naranja, ya te dejare ejemplos.
A concealer with orange undertone removes that coloration and then we illuminate with a concealer a tone lighter than your skin type; a concealer with orange undertone is one that we see a brown to orange, eye is not orange concealer is NOT that it has orange undertone, and I'll leave you examples.
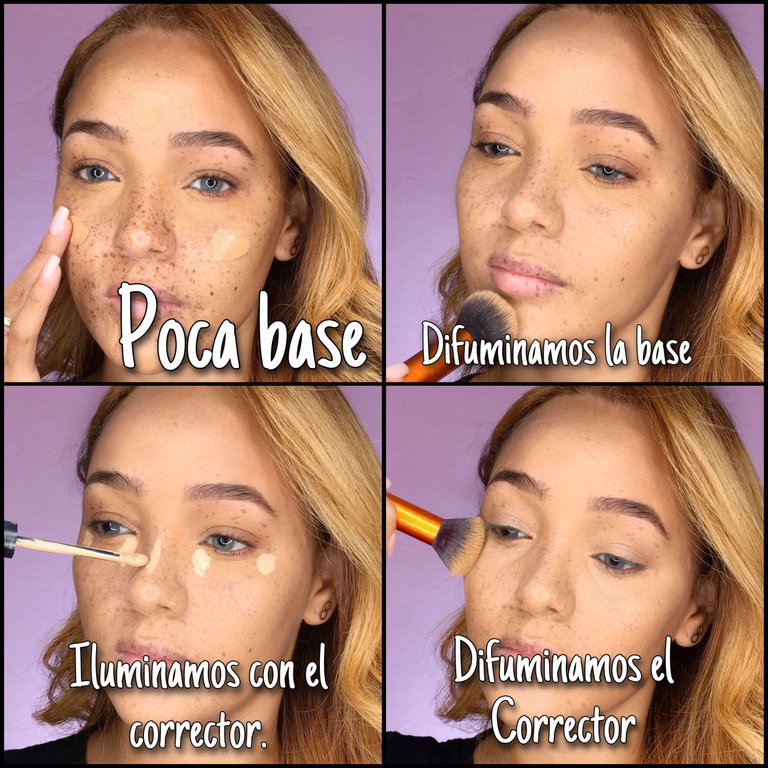
Luego que neutralizamos la ojera y manchas procedemos a aplicar muy poca base en el rostro, en este caso trataremos que la base sea de cobertura ligera para que nos deje un acabado bastante natural; esparcimos la base por todo el rostro sin tocar la zona de la ojera donde ya tenemos el corrector, y lo hacemos así para no sobrecargar esa zona con muchísimo producto, para aplicar la base puedes usar una brocha o una esponja, esto dependerá de tus gustos.
Luego de aplicar la base vamos a iluminar el rostro, lo haremos con un corrector un tono más claro que tu tono de piel, y lo posicionamos en la zona de la ojera (para cancelar el corrector de subtonalidad naranja que usamos para neutralizar la oscuridad de la misma), seguimos y colocamos un poquito en el tabique y otro poquito en el mentón.
IMPORTANTE: Cuando iluminamos es porque queremos resaltar zonas del rostro si hay algo que no quieres que se note demasiado allí no colocaras iluminación, en mi caso no iluminó la frente porque ya es bastante grande y no quiero que resalte.
Difuminamos el corrector claro, he integramos todo, evitemos retirar demasiado producto cuando estemos difuminando, ya que no se notara todo el trabajo que hemos realizado; el siguiente paso es sellar todo el rostro. Esto lo hacemos con polvo suelto de preferencia translúcido, si somos de tez bastante oscura usaremos un polvo banana.
After neutralizing the dark circles and blemishes we proceed to apply very little foundation on the face, in this case we will try that the base is light coverage to leave us a fairly natural finish; we spread the base all over the face without touching the area of the eye area where we already have the concealer, and we do it this way to avoid overloading that area with a lot of product, to apply the base you can use a brush or a sponge, this will depend on your tastes.
And now we are going to illuminate the face, we will do it with a concealer a tone lighter than your skin tone, and we position it in the area of the dark circles (to cancel the concealer we use to neutralize the darkness of the same), we continue and place a little bit on the septum and another little bit on the chin.
IMPORTANT: When we illuminate is because we want to highlight areas of the face if there is something that you do not want to be too noticeable there will not place lighting, in my case I did not illuminate the forehead because it is already quite large and I do not want it to stand out.
We blend the light concealer, I have integrated everything, avoid removing too much product when we are blending, as it will not show all the work we have done; the next step is to seal the entire face. We do this with loose powder, preferably translucent, if we are quite dark complexion we will use a banana powder.
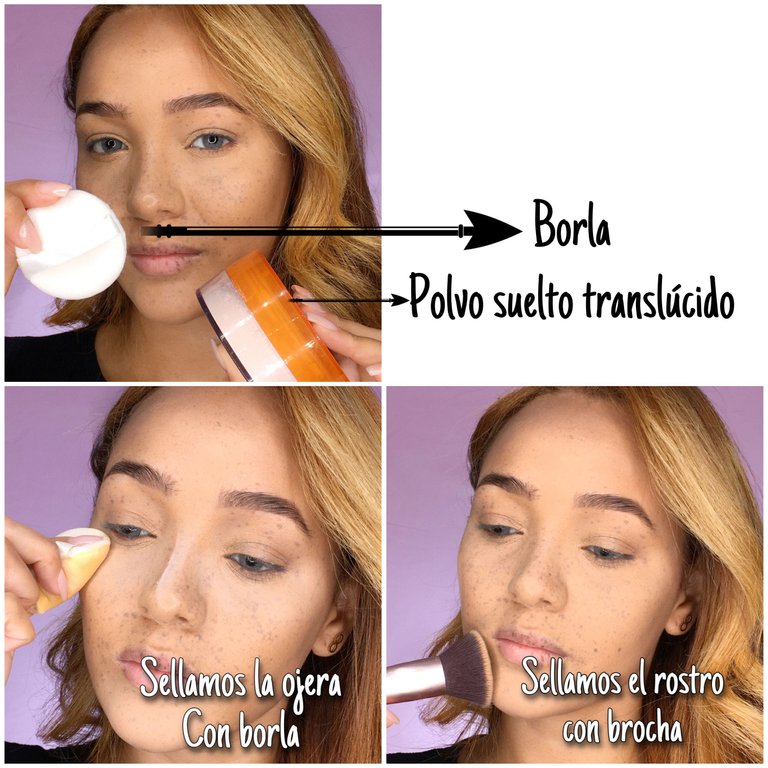
¿y como se cual es el polvo translúcido y el banana? ¿En qué influye el color de piel con los polvos?
ok el polvo translucido es un polvo blanco que tiene un alto rango de adaptación, y el polvo banana es de color amarillito.
El polvo translúcido por lo general es usado en pieles claras ya que no altera el color de la base, y el polvo banana al tener esta pigmentación es perfecto para pieles con tez oscura o morenas; si nosotros en una piel morena usamos un polvo translúcido la piel se verá gris, y no queremos eso.
and how do I know which is the translucent powder and which is the banana powder? how does the skin color influence the powders?
ok the translucent powder is a white powder that has a high adaptive range, and the banana powder is a yellowish color.
The translucent powder is usually used on fair skin because it does not alter the color of the foundation, and the banana powder has this pigmentation and is perfect for dark complexions or brunettes; if we use a translucent powder on a brunette skin, the skin will look gray, and we don't want that.
¿Cómo voy a sellar el rostro?
Esto lo haremos en dos pasos; el primero será sellar las zonas donde iluminamos con el corrector, y sellaremos con una borla o tu esponjita, tomaremos el polvo con la borla descargamos el exceso en la palma de la mano y sellaremos primero la zona de la ojera; importante: antes de sellr alli, verificaremos que no se acumulo correcto en las lineas de expresión, de ser así, difuminaremos con la esponja esas líneas mirando hacia arriba, y allí podremos sellar con el polvo.
El resto del rostro lo sellaremos con una brocha grande, verificando que todo esté bien sellado.
How am I going to seal the face?
We will do this in two steps; the first one will be to seal the areas where we illuminate with the concealer, and we will seal with a powder puff or your sponge, we will take the powder with the powder puff, we will discharge the excess in the palm of the hand and we will seal first the area of the dark circles; important: before sealing there, we will verify that it does not accumulate correctly in the expression lines, if so, we will blur with the sponge those lines looking upwards, and there we can seal with the powder.
The rest of the face will be sealed with a large brush, verifying that everything is well sealed.
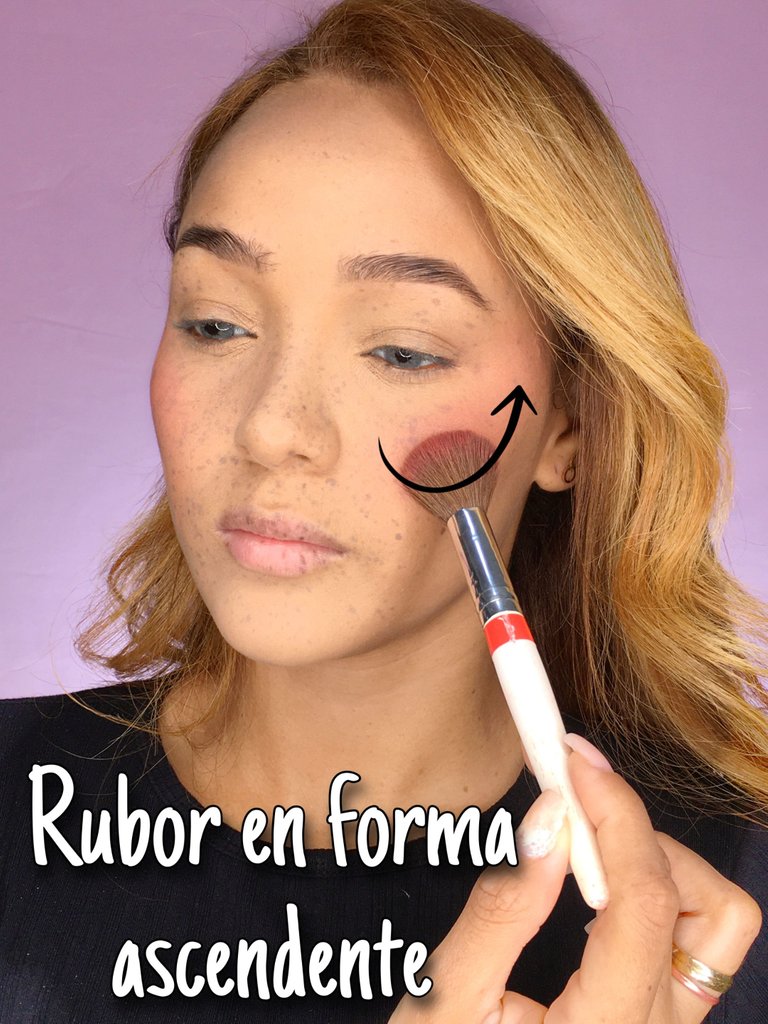
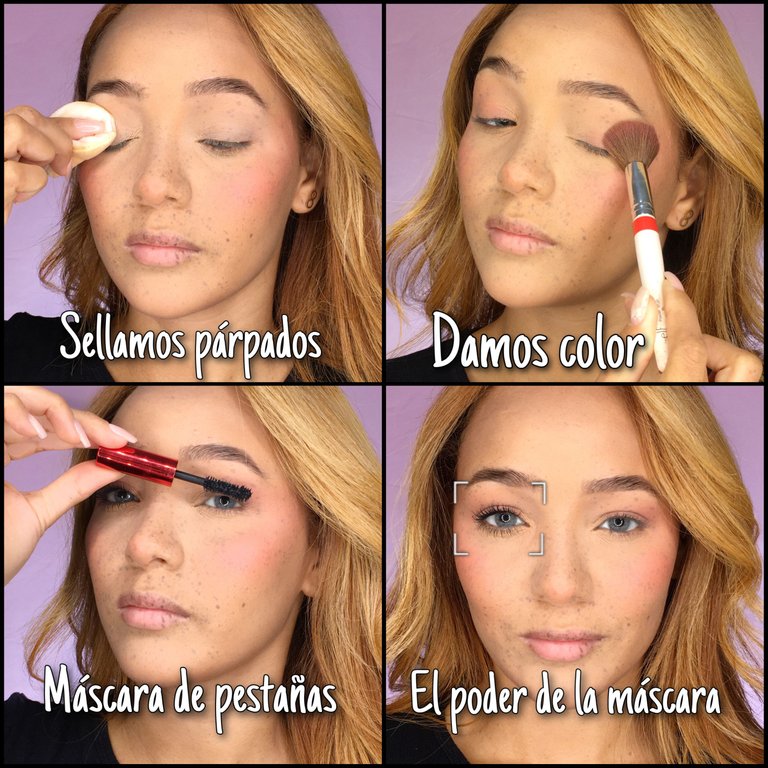
Siguiente paso, el rubor AMO el rubor jejeje, como estamos aplicando muy poca base no necesitaremos hacer contornos, y de eso les hablaré en otro post, entonces colocamos el rubor desde el pómulo hasta las sienes en dirección ascendente para que dejemos ese efecto lifting que está muy en tendencia, y para finalizar con el rostro aplicamos sellador de maquillaje.
Next step, the blush I LOVE blush hehehe, as we are applying very little foundation we will not need to make contours, and I will talk about that in another post, then we place the blush from the cheekbone to the temples in an upward direction so that we leave that lifting effect that is very in trend, and to finish with the face we apply makeup sealer.
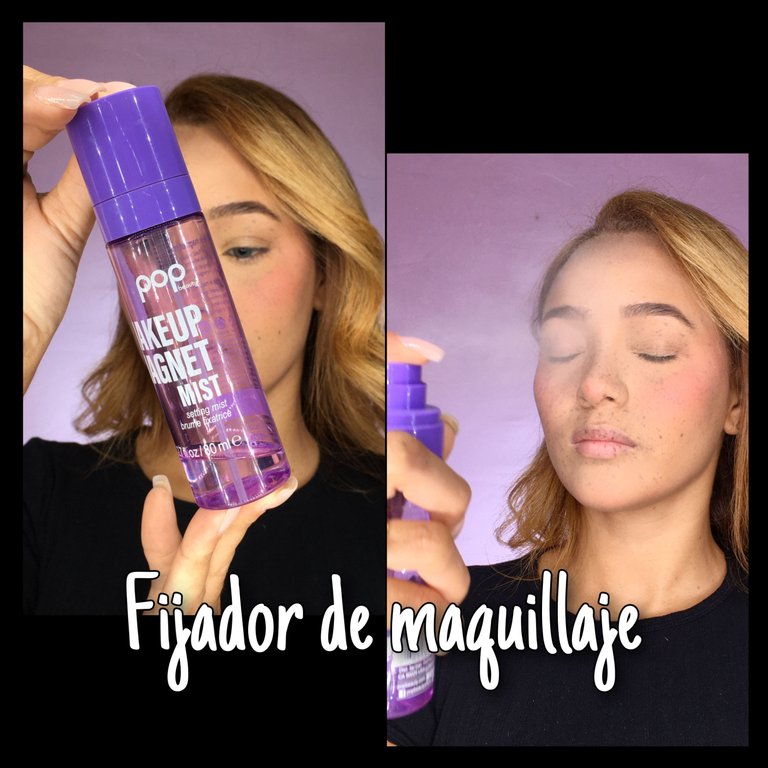
¿Cuál es la función del sellador? como la palabra lo dice, sellar, que todos esos productos se fijen al rostro, algunos selladores dejan un acabado glow, otros son matificantes, otros son hidratados, entonces adquiere el que mejor se adapte a tus necesidades.
What is the function of the sealer? As the word says, to seal, that all those products are fixed to the face, some sealers leave a glow finish, others are mattifying, others are moisturizing, so get the one that best suits your needs.
y ustedes me preguntarán nuevamente : ¿ Yose los ojos los vamos a dejar así, desamparados? pues no, a ellos también les daremos amor.
Con la brocha o esponja que aplicamos la base, la vamos a pasar por los párpados, y luego sellaremos esos párpados con nuestro polvo suelto, y para que se vean ojos lindos y sin mortificarse mucho lo que hacemos es pasar al descuido nuestra brocha de rubor (sin cargarla de rubor) creeme que con el producto que ya tiene en las cerdas es suficiente para darle color a esos ojitos, luego colocas máscara de pestañas, puedes aplicar varias capas, eso sí, dejando secar entre cada aplicación para evitar que se tomen grumos en las pestañas, no te olvides de las pestañas inferiores.
And you will ask me again: Are we going to leave the eyes like that, helpless? Well no, we are going to give them love too.
With the brush or sponge that we apply the foundation, we are going to pass it through the eyelids, and then we will seal those eyelids with our loose powder, so that they look pretty eyes and without mortifying much what we do is to pass carelessly our blush brush (without loading it with blush) believe me that with the product that already has in the bristles is enough to give color to those little eyes, then apply mascara, you can apply several coats, but let it dry between each application to avoid clumps on the eyelashes, do not forget the lower lashes.
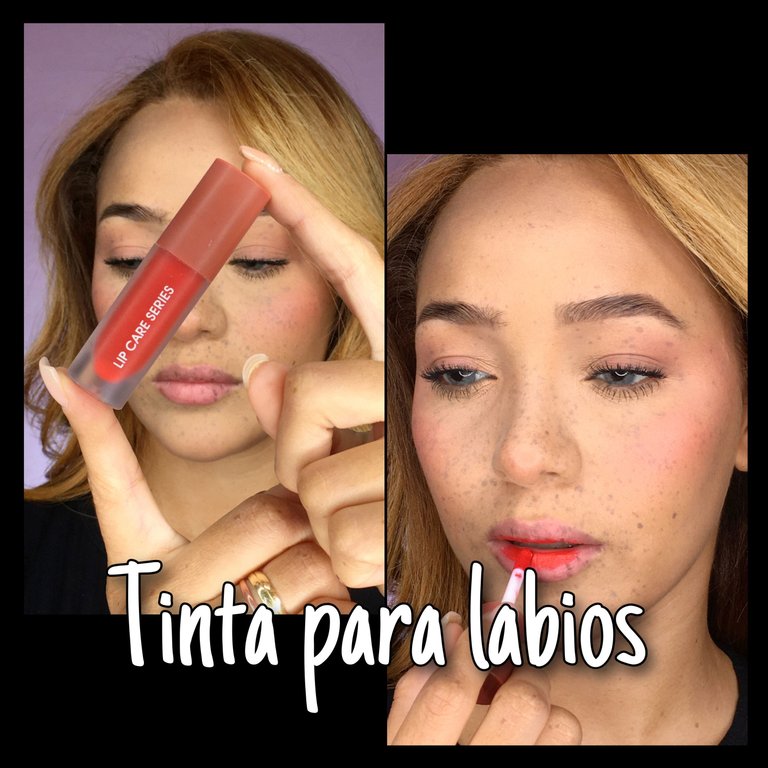
Y por último y no menos importante, labios , en este punto los labios puedes maquillarlos como desees, yo en lo personal amo las tintas de labios, son prácticas fáciles de usar, duraderas y se ven hermosas .
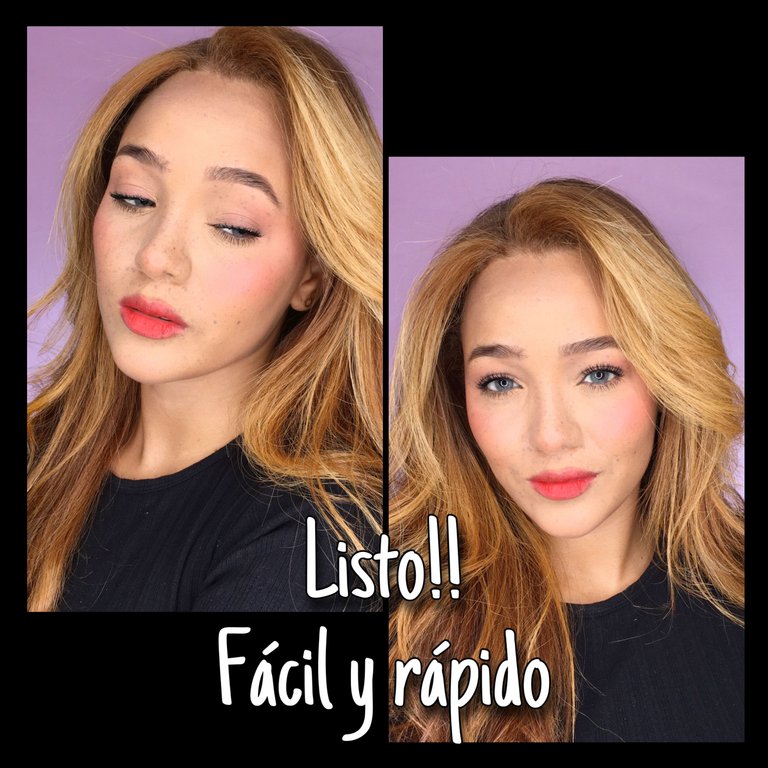
Las tintas son labiales en su mayoría matte que son resistentes ya que prometen durarte horas, dejando un acabado natural y precioso, puedes usar una tinta, un gloss, un hidratante con color, o el labial de tu preferencia; ¿como finalizamos este makeup? con un último sellado de piel, aplicamos nuestro fijador y listo hermosas de forma rápida y sencilla.
And last but not least, lips, at this point you can make up the lips as you wish, I personally love lip stains, they are practical, easy to use, long lasting and look beautiful.
The inks are mostly matte lipsticks that are resistant and promise to last for hours, leaving a natural and beautiful finish, you can use an ink, a gloss, a moisturizer with color, or the lipstick of your choice; how do we finish this makeup? with a last seal of skin, apply our fixative and ready beautiful quickly and easily.
¿Cuáles son mis recomendaciones para que el maquillaje se vea lindo?
1- No te maquilles en el baño, la luz del baño jamás es igual a la luz natural, maquíllate frente una ventana ya que así como te ves allí te verás cuando salgas.
2- No te maquilles a las carreras, el maquillaje es un arte y necesita tiempo y dedicación, además que es algo que debemos disfrutar y a apuradas no creo que lo disfrutemos.
3- Aprende sobre tu tono correcto en productos de maquillaje, esto es de suma importancia, de igual forma esto también lo hablaré en otro post.
4- Disfrútalo, recuerda que vernos bien es sentirnos bien.
What are my recommendations to make your makeup look nice?
1- Don't do your makeup in the bathroom, the light in the bathroom is never the same as natural light, do your makeup in front of a window because the way you look there you will look when you go out.
2- Don't do your make-up in a hurry, make-up is an art and needs time and dedication, besides it is something we should enjoy and in a hurry I don't think we will enjoy it.
3- Learn about your correct shade in makeup products, this is of utmost importance, I will also talk about this in another post.
4- Enjoy it, remember that to look good is to feel good.
Congratulations @yosemohamed0! You have completed the following achievement on the Hive blockchain and have been rewarded with new badge(s):
Your next target is to reach 50 upvotes.
You can view your badges on your board and compare yourself to others in the Ranking
If you no longer want to receive notifications, reply to this comment with the word
STOPTo support your work, I also upvoted your post!
Check out the last post from @hivebuzz:
Support the HiveBuzz project. Vote for our proposal!
Me encantó tu publicación es muy sencilla y práctica la tendré muy en cuenta para mejorar en el ámbito del maquillaje, muy hermoso y natural felicitaciones, un abrazo ❤️
que bueno que te gustara, siempre tratare que la forma de enseñar sea sencilla.