Muy buenas a todos, soy nuevo en hive y elegí a geek zone como mi primera comunidad
Tenía pensado presentarme mediante un gameplay, pero surgio un imprevisto que me impidió hacerlo y aprovechando que la comunidad justamente trata de tecnologia, me pareció una buena idea compartir la experiencia de dicho suceso.
Tengo una laptop lenovo 320 ideapad, mi compañera de trabajo y estudio, la cual repentinamente le había dejado de funcionar su pantalla LED. Al otro día yo tenía que presentar trabajos de la universidad como también asistir a las clases, por tanto, me sentí desesperado.
Acudi a un amigo que le había pasado algo similar con el fin de tener el contacto telefónico de la persona que reparó su pantalla, le pregunté en cuanto tiempo se la reparó y cuanto cuesta una reparación de ese estilo. Lo que seguidamente me dijo: “Estuvo aproximadamente una semana para arreglarla, lo del precio no te sabría decir, lo que sí, a mí me cobró 5000 pesos”. Literalmente no sabía que hacer, ya que no solo me iba a retrasar con mis obligaciones, sino que tampoco tenía el dinero para pagarle.
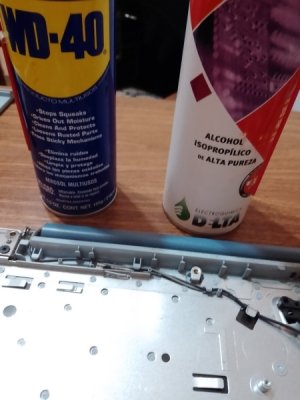
Cuando se presentan tales situaciones de jaque, a veces combiene actuar con base a las herramientas que uno tiene a disposición, en mi caso, un celular con internet y un cuchillo ja, ja.
Pasé bastante tiempo con videos tutoriales, como también explorando foros sobre como resolver el problema y como era de esperar, todo era muy complejo. La solución más sencilla que encontré era simplemente limpiar los contactos con alcohol, aproveché también para hacer el mantenimiento de la placa y eso es lo que hice.
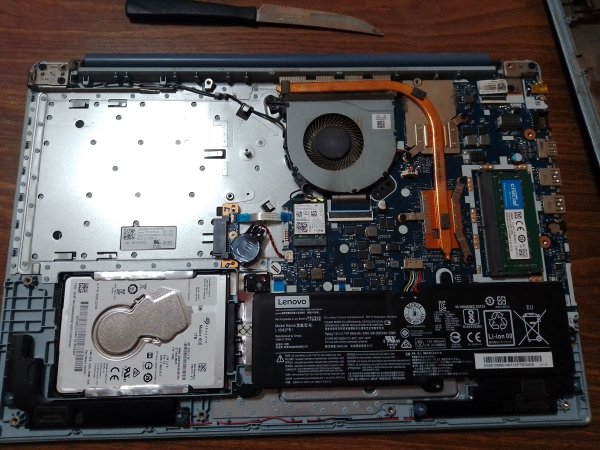
Luego de limpiar todos los contactos, le tocó al procesador y a la placa de video su respectivo mantenimiento.
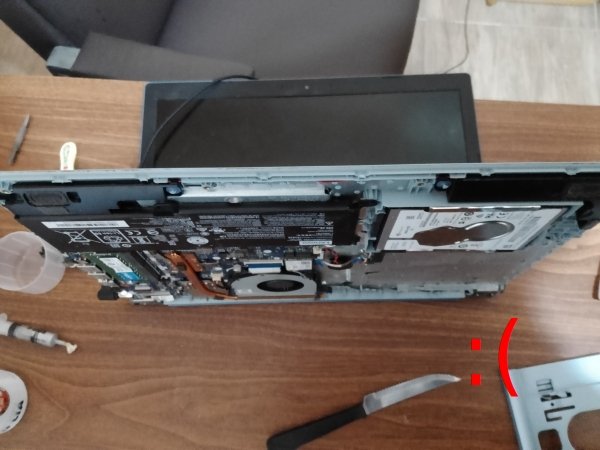
Al finalizar, con la computadora toda abierta, conecté la fuente de alimentación y le dí al botón de encendido...
Aunque yo esperaba un milagro, la pantalla seguía sin responder. Lo que me dejó pensando, y me dije a mí mismo, “¿qué tal si limpio la pantalla también y quizás así funciona?”. Acto seguido me puse a desarmar toda la pantalla.


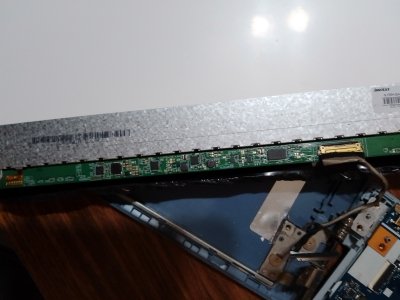
Por debajo de una cinta negra encontré un circuito electrónico, entonces me puse a limpiarlo todo con alcohol y un cepillo de dientes.
Sin montar la pantalla conecté el cable de video directamente a la placa madre e hice de nuevo la prueba. Al encenderla, todavía no mostraba imagen. Ahí comprendí que con alcohol no se puede solucionar todo ja, ja.
Resignado y molesto por haber perdido tanto tiempo, monté la laptop completamente y aún así, al terminar de cerrarla, la encendí nuevamente. Sorpresivamente esta vez la pantalla encendió. ¿Pero qué pasó?.
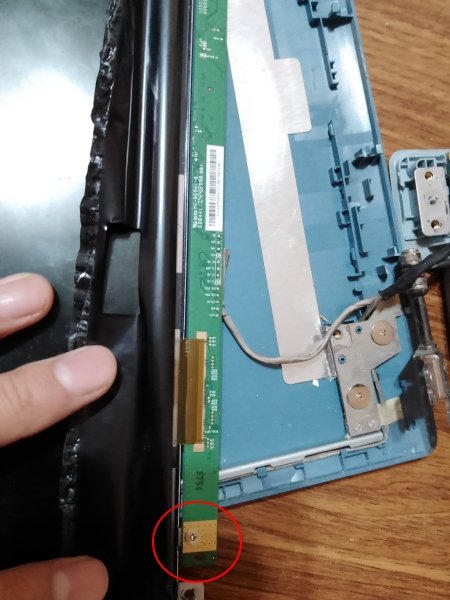
Resulta que el tornillo de la pantalla que ajusté cumplía alguna función eléctrica (o eso creo), porque al revisar una de las fotos que tomé, me dí cuenta de que había una chapa de cobre por debajo.
Pensar que el problema solamente era un tornillo que se había aflojado por el uso, y eso me llevó a desarmar la computadora completamente. Estoy muy feliz, no solo porque ahorre dinero y tiempo, sino porque también aprendí algo nuevo.
La proxima vez que tenga un problema de este tipo, voy a tratar de resolverlo por mi cuenta y voy a compartir mi experiencia en el proceso tal como lo hice en este post.
Un saludo cordial a toda la comunidad y gracias por leer. Hasta pronto!.


Hi everyone, I'm new in hive and I chose geek zone as my first community. I'm still learning English so the following text might sound a little bit off.
I was planning to introduce myself with a gameplay, but an unexpected event hindered me from doing it. Knowing that the community is about technology, I thought it would be a good idea to share the experience of this event. So this post is more like an experience than a tutorial itself.
I own a lenovo 320 ideapad laptop, my work and study partner, whose LEDs had suddenly stopped working. The next day I had to do university stuff and attend classes, so I felt desperate.
I appealed to a friend of mine who had experienced something similar in order to get the phone number of the person who had repaired his screen, I asked him how long it took and how much a repair like that costs. Then he said: "It took about a week to fix it, regarding the prices I can't really tell, but he charged me 5000 pesos" (25 USD). I literally didn't know what to do, since not only was I going to be delayed with my obligations, but also I couldn't afford that.
When you are involved in such a situation of check like that, when you feel there's no way out, sometimes is better to resort to any available tool you find right off the bat, in my case a phone with internet and a knife. LoL.
I've been digging through video tutorials and several forums so as to solve the problem and, as it was expected, those were pretty hard to diggest. The simpliest solution I got to find was to clean the motherboard's circuits with alcohol so that's what I did.
After cleaning all the contacts, it was time for the processor and the video card to have their respective maintenance.
At the end, with the computer all open, I connected the power supply and pressed the power button...
Even though I was hoping for a miracle, the screen was still dead. Which got me thinking, "how about I clean the screen too and maybe that will work?".I immediately started taking the whole screen apart.
Underneath a black tape I found an electronic circuit, so I cleaned it all with alcohol and a toothbrush.
Without assembling the screen, I connected the video cable directly to the motherboard and tested it again. When I turned it on, it still didn't show any image. That's when I realized that alcohol can't solve everything. (at least when it comes to electronics LoL).
Resigned and annoyed for having wasted so much time, I mounted the laptop completely and still, when I finished closing it, I turned it on again. Surprisingly, this time the screen turned on. Wait what?
It turns out that the screw on the screen board that I adjusted had some electrical function (or so I think), because when I checked one of the pictures I took, I noticed that there was a copper plate right below it.
So the problem was just a screw that had loosened from use, and that led me to completely disassemble the computer. I am very happy, not only because I saved money and time, but also because I learned something new.
The next time I have a problem of this kind, I'll try to solve it on my own and I will share my experience in the process as I did in this post. I encourage you to do the same!
Best regards to the community and thanks for reading. See you soon.
all images without a link below were taken for me.
Vamos los pibes! Yo no me habría animado a toquetear la notebook la verdad. Te felicito por tu iniciativa y por no quedarte quieto ante un problema. Me alegro de que hayas podido solucionarlo al final del día y de que ya esté todo funcionando.
Me gustó mucho como has articulado el post mi bro. Quedó genial y también respetaste el tema de las fuentes. Te felicito nuevamente y bienvenido a la Geek zone ❤️
Hubieron un par de plasticos rotos que obviamente no mostré jaja
Es un poco tedioso tener que meter mano donde no sabés y dudar si lo que estas haciendo está bien o si lo estas empeorando.
Gracias por la bienvenida hermano.
Excelente post mi estimado! Que bien que pudiste arreglarlo por vos mismo jaja, hay que tener cuidado igual con estas cosas.
Muy completo tu post, las imagenes muy claras. Gracias por traer contenido de calidad.
Mientras no sea algo que te electrocute, hay que animarse. Siempre con cuidado y siguiendo instrucciones muy detalladas.
Gracias por comentar
genio,venite pa mi casa que tengo una notebook que quema los discos rigidos jajajajaja se ve que sos muy bueno haciendo reparaciones me alegra muchisimo ver tu trabajo y espero subas mucho mas porque tu información ayuda muchisimo a que yo me vuelva a animar a arreglar yo solo mis cosas jejejeje !LUV
Habria que ver si hay algun tutorial para arreglar eso JAJA
Esa es la idea de este post, motivar a la gente a investigar un poco. Capaz si la llevaba a un tecnico, me iba a cobrar un monton solamente por ajustar un tornillo.
Dicen que poner un tornillo sale 1 peso pero saber que tirnillo poner y en donde puede valer miles - Frase de Wall Disney !PGM
@xefex, sorry! You need more $LUV to use this command.
The minimum requirement is 10.0 LUV in your liquid wallet.
More LUV is available from Hive-Engine or Tribaldex
(1/4) sent you LUV. wallet | market | tools | discord | community | daily
wow te felicito, yo no sé ni cambiar un foco 😅 jajaja te quedo muy lindo el post. saludos ✌️ !PGM !PIZZA
Muchas gracias maira. De a poco voy a ir agarrandole la mano para que mis post queden atractivos :)
Congratulations for the achievement. :)
!1UP
PIZZA Holders sent $PIZZA tips in this post's comments:
(2/5) @mairapanelo tipped @xefex (x1)
Join us in Discord!
You have received a 1UP from @thecuriousfool!
@stem-curatorAnd they will bring !PIZZA 🍕 The following @oneup-cartel family members will soon upvote your post:
Learn more about our delegation service to earn daily rewards. Join the family on Discord.
Congratulations @xefex! You have completed the following achievement on the Hive blockchain and have been rewarded with new badge(s):
Your next payout target is 100 HP.
The unit is Hive Power equivalent because post and comment rewards can be split into HP and HBD
You can view your badges on your board and compare yourself to others in the Ranking
If you no longer want to receive notifications, reply to this comment with the word
STOPCheck out the last post from @hivebuzz:
Support the HiveBuzz project. Vote for our proposal!