Saludos musicales amigos de Hive! 🎶🎶
Como están? Espero que hayan empezado marzo con muchas bendiciones, paz, amor y salud.
Hoy les traigo una experiencia que realicé hace unas semanas, tenía muchas ganas de usar una remera pero tenía unas manchitas que si bien eran chicas se notaban, entonces que hice? La teñí, con un método llamado "Batik"😲
Alguna vez realizaron esta técnica? Quédense porque voy a enseñarles el proceso que hice de TEÑIDO DE PRENDAS CON ACRILICOS, una idea fácil y que queda super original, ya que cada estampado es único🌈
Musical greetings friends of Hive! 🎶🎶
How are they? I hope you have started March with many blessings, peace, love and health.
Today I bring you an experience that I had a few weeks ago, I really wanted to wear a t-shirt but it had some small stains that were noticeable, so what did I do? I dyed it, with a method called "Batik"😲
Have you ever done this technique? Stay because I'm going to show you the process I did of DYEING GARMENTS WITH ACRYLICS, an easy idea that is super original, since each print is unique🌈
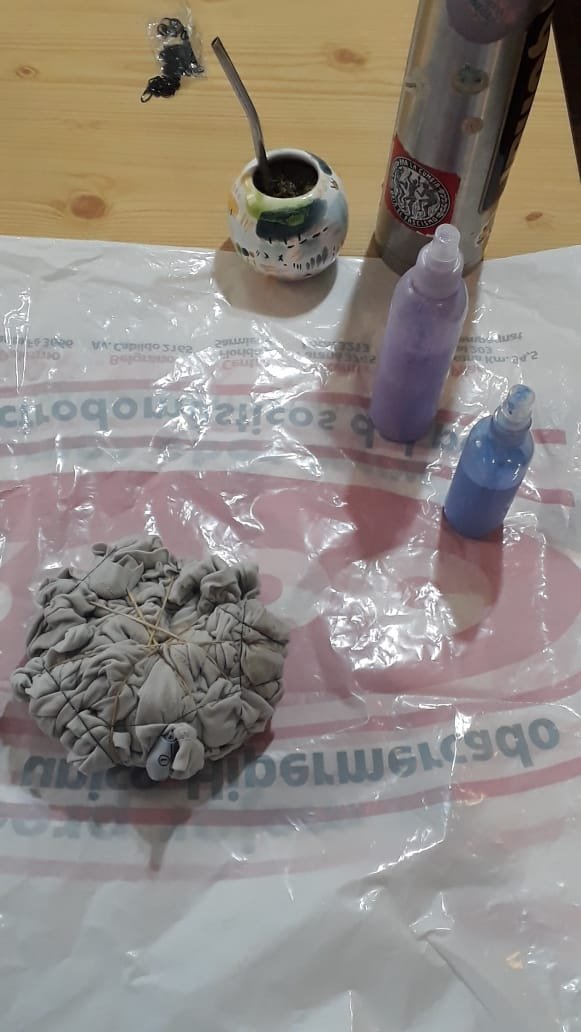
Para este proceso vamos a necesitar:
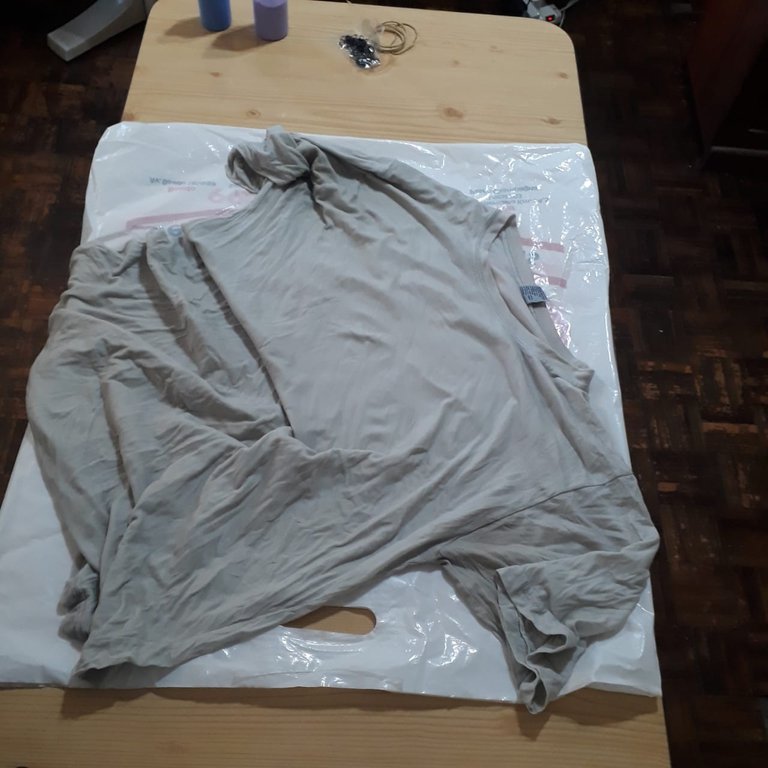
~ 1 prenda de algodón (o fibras naturales) para teñir, en mi caso utilice una remera vieja
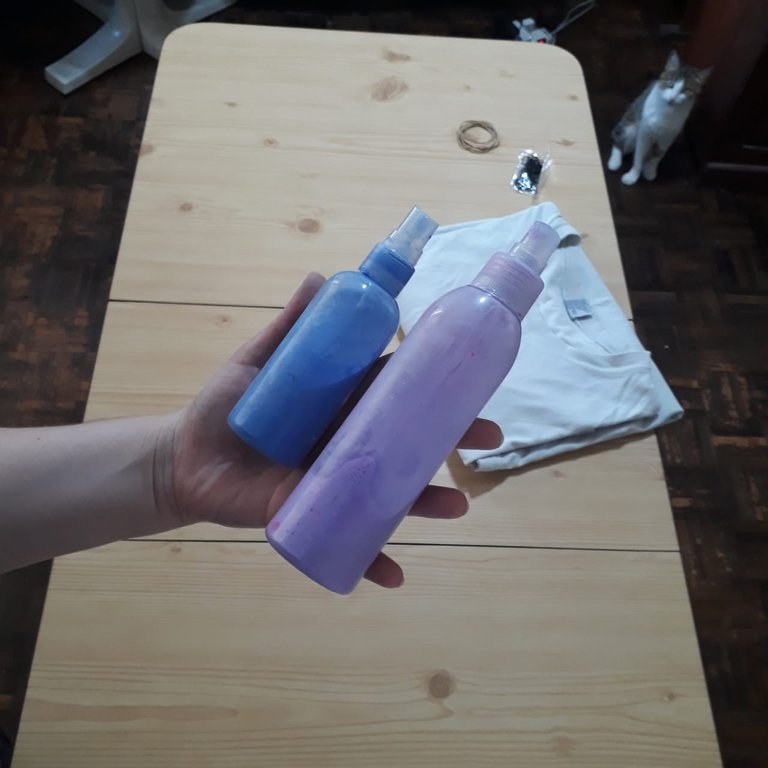
~ acrílicos, de los colores que prefieran. En mi caso utilice los colores primarios para crear un tono azul y un tono lila.
~ banditas elásticas, cuantas más mejor!
For this process we will need:
~ 1 cotton garment (or natural fibers) to dye, in my case I used an old t-shirt
~ acrylics, in the colors you prefer. In my case I used the primary colors to create a blue tone and a lilac tone.
~ elastic bands, the more the better!

PASO 1:
Comenzamos mojando la prenda a teñir, ya que el agua colabora con el proceso haciendo que la prenda absorba más color (este paso es muy importante!)
STEP 1:
We begin by wetting the garment to be dyed, since water collaborates with the process by making the garment absorb more color (this step is very important!)
PASO 2:
Preparar los colores a utilizar, podemos usar todos los colores, y es importante diluirlos con un poco de agua dentro de un recipiente. Recomiendo que sea recipientes donde puedan medir la cantidad de pintura que ponen, puede ser unos tarritos que tengan a mano, frascos o lo que encuentren, en mi caso use recipientes vacíos de fragancias (previamente lavados)
STEP 2:
Prepare the colors to use, we can use all the colors, and it is important to dilute them with a little water in a container. I recommend that they be containers where they can measure the amount of paint they put, it can be some jars that they have on hand, jars or whatever they find, in my case use empty fragrance containers (previously washed).
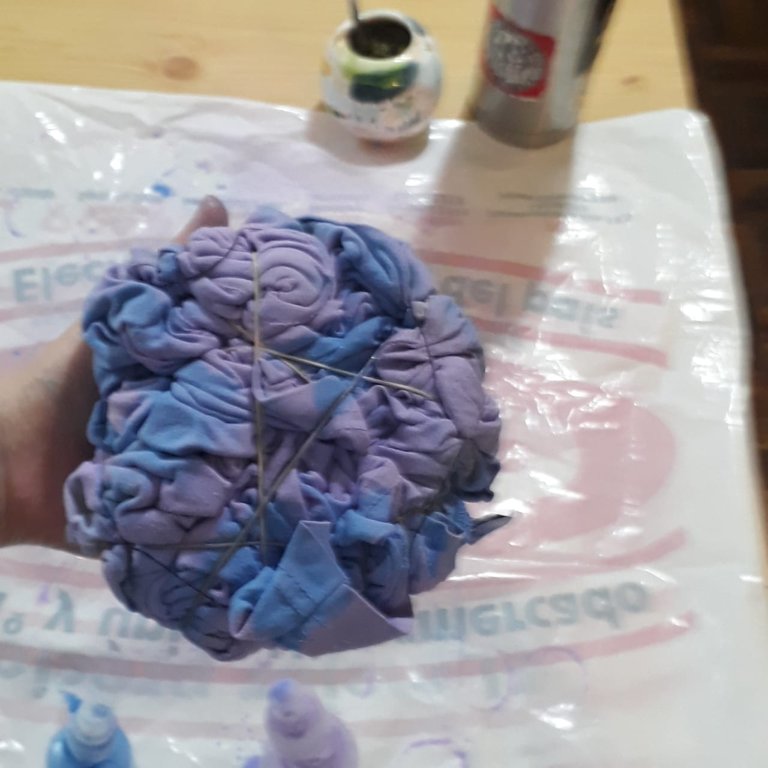
PASO 3:
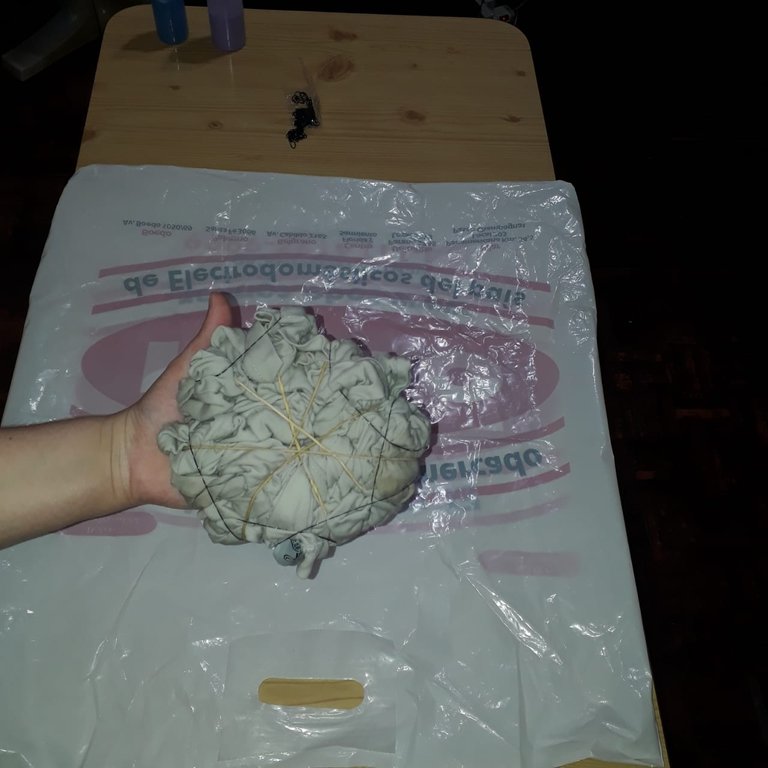
Enrollar la prenda como muestro en las imágenes como si nuestra prenda la transformáramos en una pelota. Una vez enrollada y comprimida, atarla con las banditas elásticas, logrando una especie de pelota.
STEP 3:
Roll the garment as shown in the images as if we transformed our garment into a ball. Once rolled and compressed, tie it with the elastic bands, creating a kind of ball.
PASO 4 (el más divertido)
A pintar! Esparcir el color por toda la prenda enrollada, mezclando los colores que utilizaste como más te guste.
STEP 4 (the most fun)
Let's paint! Spread the color throughout the rolled garment, mixing the colors you used as you like.
PASO 5:
Secar. Extender la prenda al aire libre donde pueda airearse y secarse. Este proceso puede demorar una noche o 12hs dependiendo el clima.
STEP 5:
Dry. Spread the garment outdoors where it can air and dry. This process can take one night or 12 hours depending on the weather.
PASO 6:
Lavar la prenda a modo preventivo, para eliminar toda la tintura excedente. Secar al aire libre.
STEP 6:
Wash the garment as a preventive measure, to remove all excess dye. Air dry.

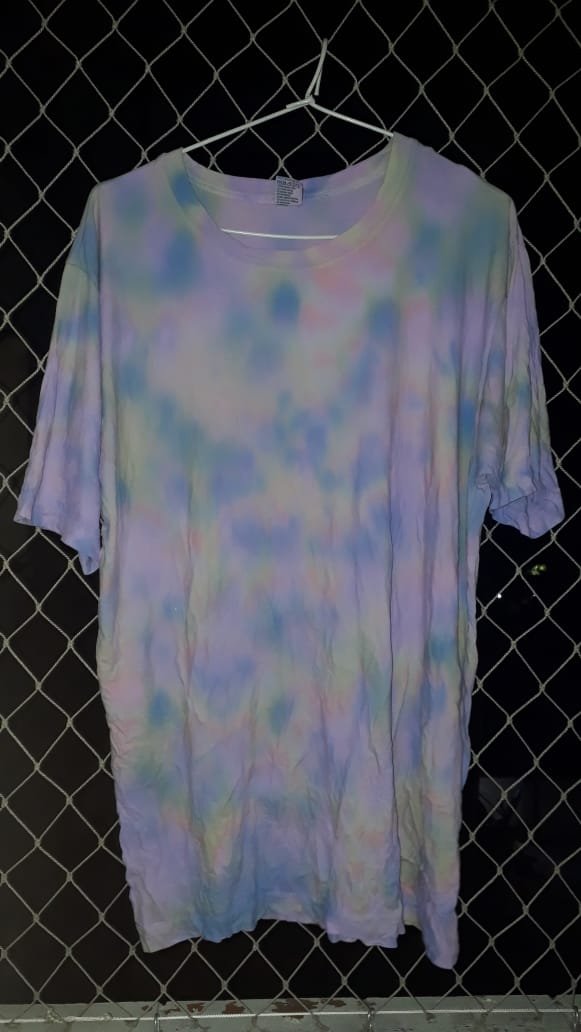
Y listo amigos! Este proceso es super fácil y divertido, podemos hacerlo con amigos o familia, ya que es una actividad que podemos realizar sin mucha ayuda. Los diseños que quedan son hermosos, y como dije antes únicos! No vas a encontrar prendas iguales ya que es un proceso de teñido irregular.
And that's it friends! This process is super easy and fun, we can do it with friends or family, since it is an activity that we can do without much help. The designs that remain are beautiful, and as I said before, unique! You will not find identical garments since it is an irregular dyeing process.
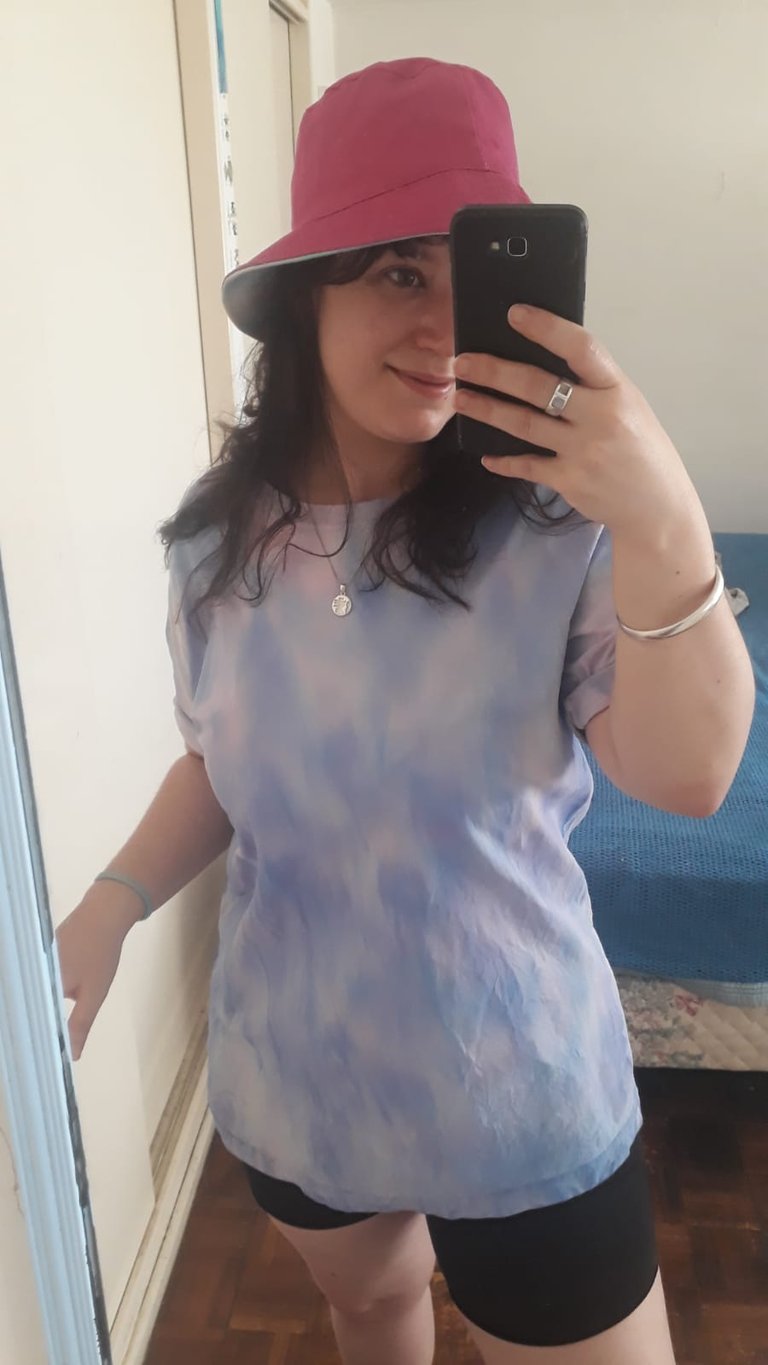
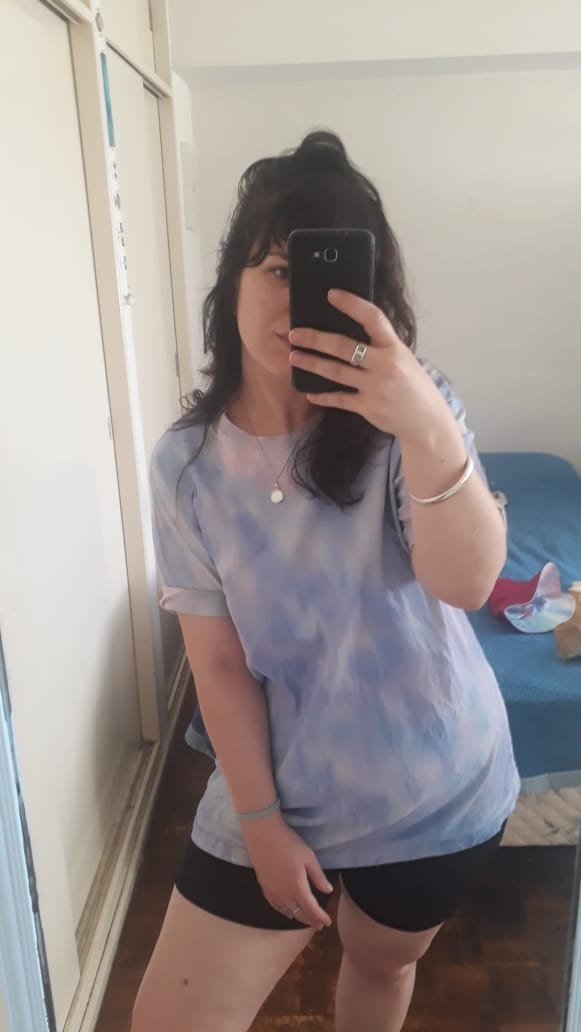
Miren como quedo mi remera 😁 estoy muy contenta con el resultado, por lo que pronto seguiré tiñendo más prendas.
Espero que les haya gustado este proceso y qué les sea de utilidad, para todos aquellos que quieran jugar con su creatividad o simplemente hacer un cambio en su vestuario. Anímense a hacerlo, no se van a arrepentir! Y si es así, comenten que tal les quedó. ❤️
Bueno amigos me despido con un gran abrazo y nos vemos próximamente! Saludos musicales 🎶🎶
Look how my shirt turned out 😁 I'm very happy with the result, so I'll continue dyeing more clothes soon.
I hope you liked this process and that it is useful to all those who want to play with their creativity or simply make a change in their wardrobe. Go ahead and do it, you won't regret it! And if so, comment on how it turned out for you. ❤️
Well friends, I say goodbye with a big hug and see you soon! Musical greetings 🎶🎶
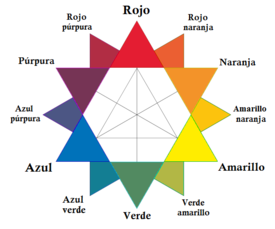
PD: Como mezclar colores para conseguir nuevos tonos? 🤔
Para esto debemos analizar el concepto de círculo cromático.
El círculo cromático o rueda de colores es una representación ordenada y circular de los colores de acuerdo con su matiz o tono, en donde se representa a los colores primarios y sus derivados.
PS: How to mix colors to get new shades? 🤔
For this we must analyze the concept of the color wheel.
The chromatic circle or color wheel is an ordered and circular representation of colors according to their hue or tone, where the primary colors and their derivatives are represented.

El círculo cromático denominado hexagrama, por ejemplo, es una estrella que se coloca en el centro del círculo cromático, donde la cantidad de picos corresponde a cada color y se pueden mostrar los opuestos o colores complementarios. En pocas palabras, es la representación de los colores en un círculo u otra figura geométrica.
The color wheel called hexagram, for example, is a star that is placed in the center of the color wheel, where the number of peaks corresponds to each color and opposites or complementary colors can be shown. Simply put, it is the representation of colors in a circle or other geometric figure.
Para poder crear tonalidades, precisamos al menos colores primarios, y para variar su claridad y oscuridad, blanco y negro.
Para conseguir las tonalidades que yo utilicé, deberán mezclar:
~ Para el azul violáceo: una buena parte de color AZUL, una pequeña cantidad de ROJO, y una pequeña cantidad de BLANCO.
~ Para el lila: una buena parte de color ROJO, una parte de color AZUL y una buena cantidad de BLANCO.
In order to create tones, we need at least primary colors, and to vary their lightness and darkness, black and white.
To get the shades that I used, you will have to mix:
~ For purplish blue: a good part of BLUE, a small amount of RED, and a small amount of WHITE.
~ For lilac: a good part of RED, a part of BLUE and a good amount of WHITE.
Congratulations, you received an ecency upvote through the curator @sahi1. Keep spreading love through ecency
¡Gracias!
Te invitamos a visitar las Comunidades Amigas apoyadas por el Proyecto Aliento. Si tienes dudas puedes escribir en nuestro servidor, en el canal #dudasypreguntas, donde con gusto te atenderemos.
Congratulations @stardust13! You have completed the following achievement on the Hive blockchain And have been rewarded with New badge(s)
Your next target is to reach 2500 upvotes.
You can view your badges on your board and compare yourself to others in the Ranking
If you no longer want to receive notifications, reply to this comment with the word
STOPCheck out our last posts: