Tag-specific intro, English only.
Greetings!
Going back to an old post of mine in order to reorganize and further develop a series of lessons concerning the basics of Photography. I will be using the core of an old lesson but with new editing and with added translation in Bulgarian after each part (and that will take some time so...hold on). This one is about...
Exposure
We all know what photography is (painting with light, literally) but there’s another term we use all the time in relation to it. Maybe it is not that familiar to each and every beginner. So let's see what Exposure means in Photography and then learn how to make a proper exposure by controlling our equipment.
So, we have a light-sensitive material which 'memorizes' the patterns that light it is exposed to would draw onto it. In digital photography, the sensor simulates that process. So a well-controlled Exposure means we let just the light we want to and do not let the rest of it reach our picture. We use the same term for the process of creation of a single frame.
We have three basic settings to work with in order to achieve that.
Експозицията
Всички знаем какво е фотографията (рисуване със светлина, буквално), но често използваме още един термин във връзка с нея. Може би е недотам познат на всеки начинаещ. Затова, нека видим какво е експозицията във фотографията и да се научим да експонираме (излагаме на светлина) правилно, контролирайки апаратурата си.
Така, имаме светлочувствителен материал, който "запаметява" шарките, които светлината, на която е изложен, ще нарисува върху него. В цифровата фотография сензорът симулира този процес. И така, добре контролирана експозиция означава да пропуснем точно толкова светлина, колкото ни е нужна и да не допуснем още от нея да достигне до картината ни. Използваме термина и въобще за процеса на създаване на единичен кадър.
За да постигнем това, имаме три основни параметъра, с които да работим.
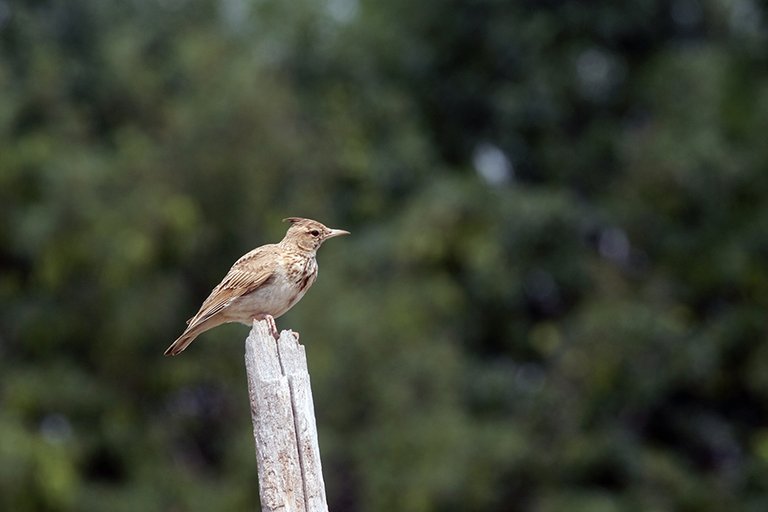
Letting light paint... But for a controlled time period (Shutter Speed), in a controlled beam (Aperture), interacting with the light sensitivity value (ISO) of our choice.
We shall learn more details about these tools of the craft in time. For now, we just have to bear in mind that...
Shutter speed is how fast the mechanical curtains open and close to allow light to print on the sensor/film;
Aperture is the opening installed in the lens unit through which light enters and it may be adapted like the pupil of an eye. It is much the same;
ISO in photography is the standardized measure of the light sensitivity of the sensor/film.
And all of those have side effects, too. And they can be used to achieve a variety of results in the same conditions.
Да оставим светлината да рисува... Но за контролиран период от време (Скорост на Затвора), в контролиран сноп лъчи (Бленда), взаимодействайки с избрана от нас стойност на светлочувствителност (ИСО).
За тези инструменти на занаята ще научим повече подробности във времето. Засега е достатъчно да имаме предвид, че...
Скоростта на затвора определя колко бързо се отварят и затварят металните механични пластини, които позволяват на светлината да премине и рисува върху сензора/филма ни;
Блендата е отворът, вграден в обектива, през който преминава светлината. Може да бъде регулиран подобно на зеницата на окото. Има същата функция;
ИСО във фотографията е стандартизираната мярка за светлочувствителност на този сензор/филм.
И всички тези фактори имат странични ефекти. Те могат да бъдат използвани за постигане на разнообразни резултати при едни и същи условия.
Histogram Feedback
Our digital cameras or editing software give us feedback on how we did by showing us Histograms - graphics, using vertical bars to show us how much of the frame has been exposed so that we achieve the best detail and how much of the frame has been underexposed or overexposed.
Let's see the three most common readings and what they mean:
Информация от Хистограмата
Цифровите ни камери и редактиращият софтуер ни дават обратна връзка как се справяме с експонирането, като ни показват хистограми — графики с вертикални стълбчета, които ни показват доколко кадърът е изложен на светлина, така че да постигнем по-добри детайли, и доколко е преекспониран или недоекспониран.
Да видим какво ни казват три от най-често срещаните графики:
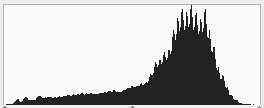
Exposed with no loss of detail.
Експонирано без загуба на детайл.
High bars here mean a lot of the volume of the frame fits that amount of exposure. The middle of the horizontal dimension means between total darkness and blinding light. It is the perfect exposure. But a frame may contain a variety of colors and shades and so we can't have everything in a diverse frame perfectly exposed. Unless we're shooting at something like a flat wall with the same color and with the same amount of light falling all over each section of it (or at least all that fits into the frame).
Dispersion to the left and the right is normal as some parts of the frame are slightly less exposed and some are slightly more exposed than the median.
Високите стълбове означават по-голяма част от обема на кадъра, която пасва на тази степен на експониране. Средата на хоризонталното измерение е умерената степен, еднакво отдалечена от пълна тъмнина и заслепително бяла светлина. Там е перфектното експониране. Но един кадър може да съдържа разнообразие от цветове и отсенки, така че не можем да имаме еднакво и перфектно експониране на всеки елемент от разнообразен кадър. Освен ако не снимаме нещо като плоска и равно осветена, а и равно оцветена стена, поне в рамките на кадъра.
Нормално е да имаме разстилане на графиката вляво и вдясно, тък като някои участъци от кадъра са леко по-слабо осветени, а други са леко по-силно осветени от средното.
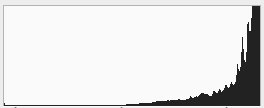
Overexposed. Some of the frames will be pure white.
Преекспонирано. Някаква част от кадъра ще бъде изцяло бяла.
A spike touching the right side means some detail has been lost to blinding light. The higher the bars, the more of the volume of the frame is overexposed or will be overexposed (the camera gives us histogram feedback even before we take the picture).
Sometimes we would allow that in order to expose another part of the frame since light is reflected unequally across the frame due to a lot of factors. Direction and shadows as consequence, reflecting surface, dispersion of light, etc.
Издигнат стълб, докосващ дясната страна на графиката, означава че някакъв обем от кадъра е изгубен в бяла светлина. Колкото по-висок е стълбът плътно вдясно, толкова повече сме преекспонирали или ще преекспонираме (камерата ни дава информация чрез хистограма и преди да направим снимката).
Понякога ще позволим на това да се случи, за да осветим правилно друга част от кадъра, понеже светлината се отразява неравномерно в различните зони от даден кадър поради редица възможни фактори. Посока и следствие на това и сенки, отразяващи повърхности, разсейване на светлина във въздуха и т.н.
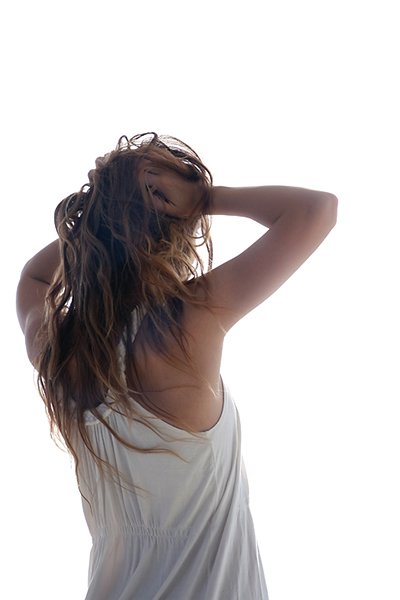
That image does not have exactly the histogram shown above. More of the volume is in the tones in the middle and some of the hair even touches the black on the left side of the histogram:
Това изображение няма точно показаната по-горе хистограма. Сравнително по-голяма част от обема е в тоновете в средата, а някаква част от тъмните сенки в косата на модела достигат дори черната лява част на хистограмата:
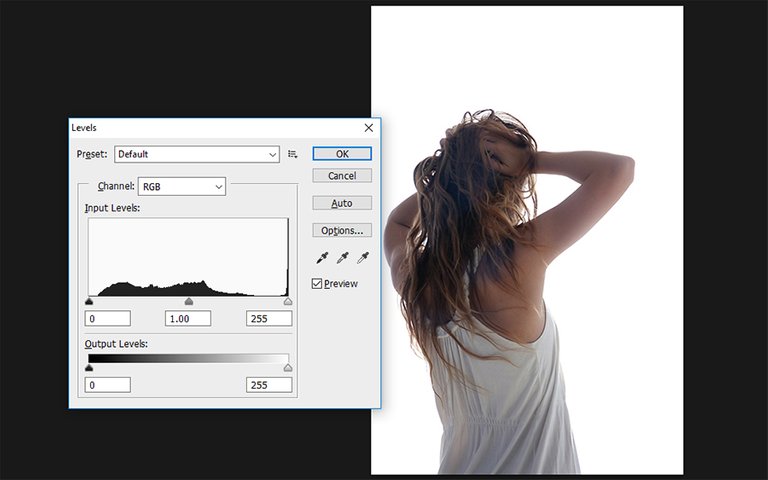
If we want our model exposed despite the shade, we allow enough exposure so that everything in the shade still reflects enough light. And we don't feel the shade that much or at all. But everything not in the shade reflects too much light in comparison so we have it become completely white. And sometimes we may allow that on purpose. Sometimes - as a compromise.
Same with underexposure...
Ако искаме модела добре осветен въпреки сянката, допускаме повече излагане на светлина, така че всичко в сянката отразява достатъчно за това светлина. И не усещаме сянката толкова или въобще. Но всичко, което не се намира на сянка, отразява твърде много светлина в сравнение с това и така то става съвсем бяло. Понякога може да допуснем това нарочно. Понякога — като компромис.
Така е и с недоекспонирането...
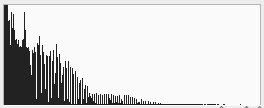
Underexposed. Some of the frames will be pure black.
Недоекспонирано. Някаква част от кадъра ще бъде изцяло черна.
Sometimes we would like to keep the background well exposed to keep details in the tones in the middle and the foreground will be in shade and completely dark since we try to avoid the flood of the relatively much intense background light. Strong light will be normal, normal light will be low light and low light will be darkness.
Понякога бихме искали да запазим фона добре експониран, за да запазим детайлте и тоновете му в средата, а предният план ще бъде в сянка и съвсем тъмен, тъй като се стараем да избегнем наводняването на кадъра с относително много по-силната светлина от задния план. Силната светлина ще бъде нормална, нормалната ще бъде слаба, а слабата ще потъне в тъмнина.
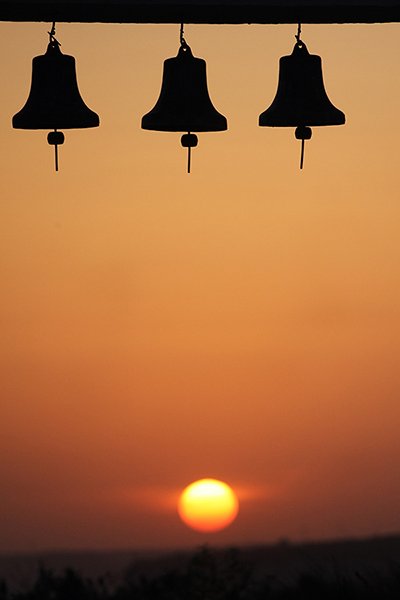
Here is the histogram for the image above:
Ето я и хистограмата на горното изображение:
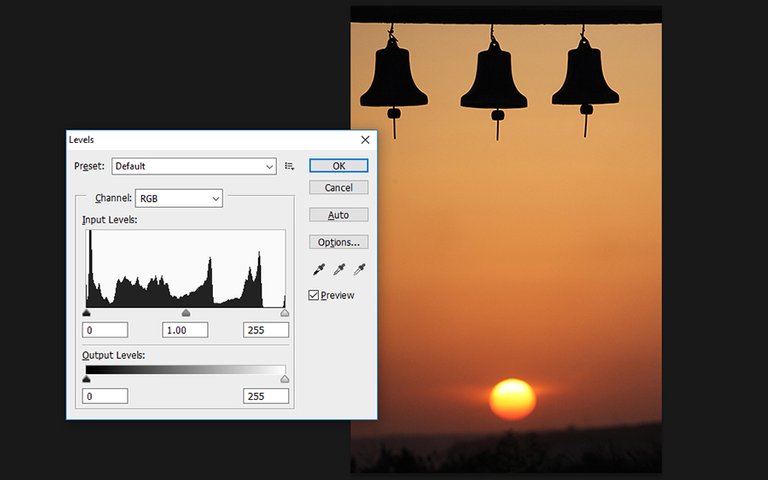
We see that it touches on the right where totally white is. With a small but pronounced bar. That means some part of the frame is overexposed, too. The histogram won't tell us which part of the frame this is. It shows only how large a portion and how exposed it is. Well, I know it is the white area in the disk of the Sun itself. The strongest source of natural light.
Виждаме, че се допира и вдясно, където е абсолютното бяло. С малък, но отчетлив стълб. Това означава, че някаква част от обема на кадъра е преекспонирана. Хистограмата няма да ни каже коя част от кадъра е това. Показва само колко голям обем колко е експониран. Е, аз знам, че това е малката бяла част от самия слънчев диск. Най-силният източник на естествена светлина.
The lesson should finish on...
Pick your light conditions carefully. Those will separate regular images from great images. Your skills, also, and that will include positioning, framing and control of the tools at your disposal. The moment, too. And so on, and so on. But light is essential.
Би било добре да приключим урока с...
Подбирайте си светлинните условия внимателно. Те ще отличат обикновени изображения от чудесни такива. Както и уменията ви като цяло, а това включва и позициониране, кадриране, контрол над наличните ви инструменти. Моментът, също е определящ. И така нататък. Но светлината си е съществена.
Please, leave me a comment if you have any questions I could answer.
Моля, пишете ми коментар, ако мога да отговоря на ваш въпрос.
Yours,
Manol


<>
This is an awesome write up. The histogram always confounds me and I often ignore it on the camera itself and try to trust my instincts instead. During post processing, however, particularly for RAW photos, the histogram is an essential tool; it's always the first place I go.
I'm hoping you write something up soon about composition!
I will, for sure. I just need to start it from scratch. Literally. Since I am scribbling and scratching again and again in a notebook during each personal lesson. I have to systemize those a bit.
Thanks for stopping by!
Experimenting with a camera, becoming more familiar with how to obtain great pictures, thanks for great detailed description to help amateurs go further in photography.
!tip
Thanks. I'll try to be consistent this time and write them lessons step by step. As I see it, the basics will be no more than 10 articles. On the other hand... this one took me awhile.
Working Through Stress - "Powerhousecreatives Contest"@joanstewart wrote lately about: Feel free to follow @joanstewart if you like it :)
Sending tips with @tipU - how to guide.
🎁 Hi @manoldonchev! You have received 0.1 HIVE tip from @joanstewart!Thanks for such an interesting post. Years back I took a free online post from an Australian University and learnt more about photography. Thanks to it I loved experimenting more with my camera.
Good. I intend to proceed with these and hopefully, I will be able to offer some new knowledge or idea to everyone who reads on.
Very interesting information! Thank you for this! 😃
I thank you, too. I will continue...soon.
Do you have another photo of that beautiful woman from a frontal view? 😁
I do, we've been to about five or six locations. I've posted and I will probably post again.
Thank you for the detailed explanation and how you make the world of photography understandable to laymans. 😁
My pleasure. Continuing soon. Which means this week.
I have no deep knowledge of photography. There are many things to learn from you.
Thanks :)
Thanks. I have just about enough knowledge to start making some things on my own.
Very interesting! A long time ago I was learning about this stuff, but now I just have a camera that I set on auto, but it doesn't allow all the manual settings like an SLR does. I can either set a scene type or let it choose with the auto setting.
Yeah, what the auto does is: "The Light-Meter is telling me we need these Parameters to make this Zone exposed in the middle of the Histogram, and to hell with everything else!"
Motion blur, cam-shake blur, depth of field and sometimes grainy noise are...random. Depending on external conditions. Of which the camera can measure only available light and contrast. Contrast determines/helps the autofocus. Which we all use most of the time. In DSLRs, we just have the choice of specific points of the frame where we want the Auto to find contrast and thus, focus.
How nice to learn something new every day that instructs you
Thanks for sharing about the histogram and about lighting. I never really paid attention to it but I see that it is just as important in photography.
Oh, generally, we get back to trusting our own eyes. But there are situations in which we can't see the display properly. Like snow blindness due to too much white light all around us, on the beach, under direct sunlight...In the evening the display looks more vibrant than the image really is, etc.
The histogram is just a tool to doublecheck or to check in advance. But you have to know how to talk to it ;)
Thanks for info on using the camera. Always good to know more on how it works.
As a photographer, there are many things beginners must learn. Taking one step at a time, I will arrive.
Great tips. I will forward this post to my daughter who is in Brazil. She loves photography and has an eye for it. She told me she just started checking on some online courses.
Well, I don't have the full collection of lessons prepared yet but thanks :) There are lots of courses out there, the thing is to find those that give you what you need.
Interesting! I never understood the histogram thingy. Love the photo of the sunset/rise with the bells! :)
People mostly use good taste and/or intuition instead of said thingy. But it's good for theory :) Thanks!
Wonderful lessons, @manoldonchev! I used to study photography but have forgotten so much of what I learned. It's great to be able to read your posts and regain some of it! I will book mark this one.
Hi. Thanks for your explanation of Exposure. I'm not familiar with a camera in any aspects. I just click with a small camera on a mobile phone. I have another camera, but can't figure it out so that my pictures aren't blurry.
Beautiful shots with wonderful information! Love the nature shots 😀
Thank you so much for sharing this with us~! Have a great day and stay safe always
@manoldonchev,
Manny, great post. Very informative and well explained.
Now all I need is a fancy camera. :-)
Quill
Thanks, wishing you a happy fancy camera! Lesson number 2 just came out, btw ;)
@manoldonchev,
I'll go have a look.
Quill