Buenas buenas a todos en esta linda comunidad, el día de hoy vengo a explicarles el paso a paso de como yo realizo mis retoques a uñas acrílicas.
Sin mucho más que decir empecemos. 💅

Paso 1: Empezamos evaluando las uñas de nuestra clienta, nos fijamos principalmente en cuanto crecimiento y tiempo tienen, muy importante verificar que no haya ningún tipo de desprendimiento en nuestras uñas. En este caso las uñas de mi clienta no tienen desprendimiento.
Paso 2: Continuamos (en este caso) retirando el esmaltado semipermanente con nuestro barril (si tienes drill) o con nuestra lima 150/150. De esta manera, también rebajaremos un poco más el acrílico y emparejamos el área de la uña con el crecimiento del acrílico. Aquí ya estamos creando canales de adherencia por lo que tenemos que tener mucho cuidado con el limado, y estar muy al tanto para no limar de más.
Paso 3: Luego de que ya tengamos nuestra, ya limada y nivelada, procedemos a sacar la forma. En este caso mi clienta quería sus uñas almendradas entonces esta fue la forma que yo realicé. Lime y saque forma con una lima 100/180.

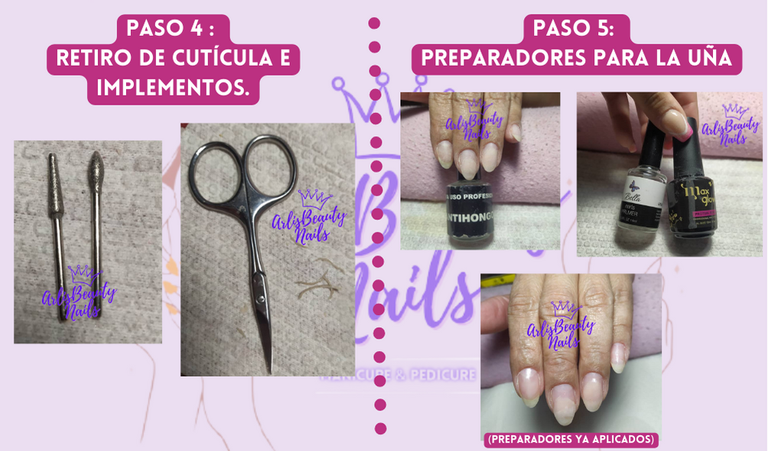
Paso 4: Luego procedemos a empujar cutícula y limpiar el perigeo de nuestra uña, acá abrimos el bolsillo de la cutícula con las puntas, (yo en mi caso utilizo estás porque son las que tengo de momento). Con nuestras tijeras para cutícula cortamos, (con mucho cuidado de no cortar o lastimar a nuestra clienta) yo les recomiendo cortar con tijera la cutícula ya que a mi parecer el corte queda más prolijo y con mejor acabado, sin embargo si aun quedan algún levantamiento pueden usar su corta cutícula para perfeccionar. Esa es la manera en la que yo lo hago.
Nota: Este paso, pueden hacerlo antes de los pasos anteriores, yo lo hice así porque fue más cómodo, pero tu puedes hacerlo antes.
Paso 5: Aplico un antihongo y espero que seque muy bien. Ya seco dicho producto, procedo a aplicar mi primer el cual curo 15 seg en lámpara, luego coloco una capa de protein bond que también curo en lámpara 30 seg.
Ya todo listo nuestra uña debería verse así.

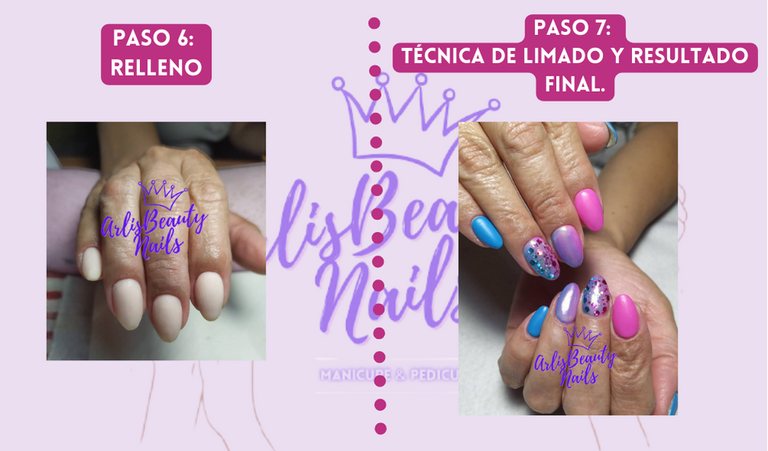
Paso 6: Con nuestra uña ya lista, ahora podemos proceder a rellenar el espacio con nuestro cover acrílico de preferencia.
Paso 7: Por desgracia no tengo la imagen que tome de esté paso, ya que no la consigo en mi galería. Pero para este paso, procedemos con nuestra técnica de limado (la cual varia según la manicurista y tu comodidad). Pulimos con buffer y nuestra uña esta lista para realizar el diseño.
Este es el resultado final de las uñas que realice ❤️

Siganme en mi:
Instagram: @arlisbautynails
TikTok: @arlisbella
Ahí siempre estoy subiendo contenido y videos interesantes sobre uñitas, también pueden encontrar el proceso completo de estas uñas y su resultado.
¡Gracias por ver!

Good morning everyone in this beautiful community, today I am here to explain step by step how I do my acrylic nail touch-ups.
Without much more to say let's start. 💅

Step 1: We begin by evaluating our client's nails, we look mainly at how much growth and time they have, it is very important to verify that there is no type of detachment in our nails. In this case, my client's nails do not have detachment.
Step 2: We continue (in this case) removing the semi-permanent enamel with our barrel (if you have a drill) or with our 150/150 file. In this way, we will also thin the acrylic a bit more and match the nail area with the growth of the acrylic. Here we are already creating adhesion channels so we have to be very careful with filing, and be very aware not to file too much.
Step 3: After we already have ours, already filed and leveled, we proceed to take out the shape. In this case, my client wanted her nails almond-shaped, so this was the way I did. File and shape with a 100/180 file.

Step 4: Then we proceed to push the cuticle and clean the perigee of our nail, here we open the cuticle pocket with the tips, (in my case I use these because they are the ones I have at the moment). With our cuticle scissors we cut, (being very careful not to cut or hurt our client) I recommend cutting the cuticle with scissors since in my opinion the cut is more neat and with a better finish, however there is still some lifting they can use their short cuticle to perfect. That's the way I do it.
Note: You can do this step before the previous steps, I did it this way because it was more comfortable, but you can do it before.
Step 5: I apply an antifungal and I hope it dries very well. Once said product is dry, I proceed to apply my primer which I cure for 15 seconds in a lamp, then I place a layer of protein bond that I also cure in a lamp for 30 seconds.
Everything ready, our nail should look like this.

Step 6: With our nail ready, we can now proceed to fill in the space with our preferred acrylic cover.
Step 7: Unfortunately I don't have the image I took from this step, since I can't find it in my gallery. But for this step, we proceed with our filing technique (which varies depending on the manicurist and your comfort). We polish with buffer and our nail is ready to make the design.
This is the final result of the nails I made ❤️


Follow me on me:
Instagram: @arlisbautynails
TikTok: @arlisbella
There I am always uploading interesting content and videos about nails, you can also find the complete process of these nails and their results.
Thanks for watching!


Hi good evening, sorry I haven't voted or commented on your work, I've really been having quite busy months as my nail work is in full swing thank God and hive is quite a new thing for me.
I loved your work and I found it super interesting and very well done, you are an incredible professional with a lot of skill, so I invite you to believe in our community and keep posting, that little by little we are getting better! Thank you!