
Hello, my lovely people from @foodiesbeehive at Hive! I hope you all are doing great and ready to enjoy a well-deserved weekend.
Sometimes, we are presented with challenges in life that seem to be very difficult or impossible to achieve, but the only way to know is to try and that's why I love baking so much, because in the decoration of each cake there is a challenge that I feel makes me grow.
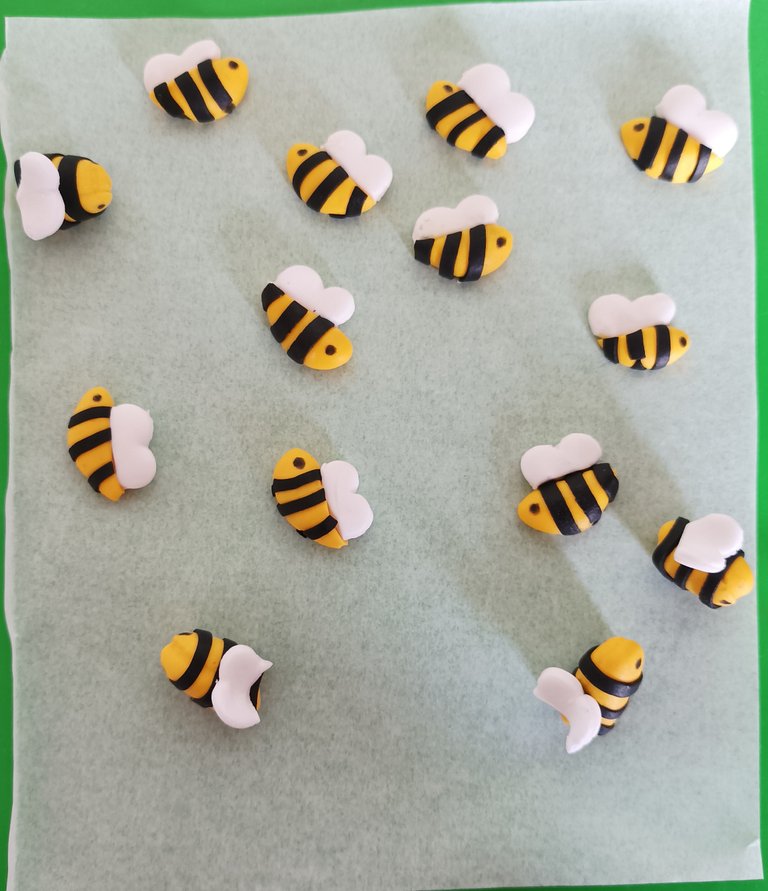
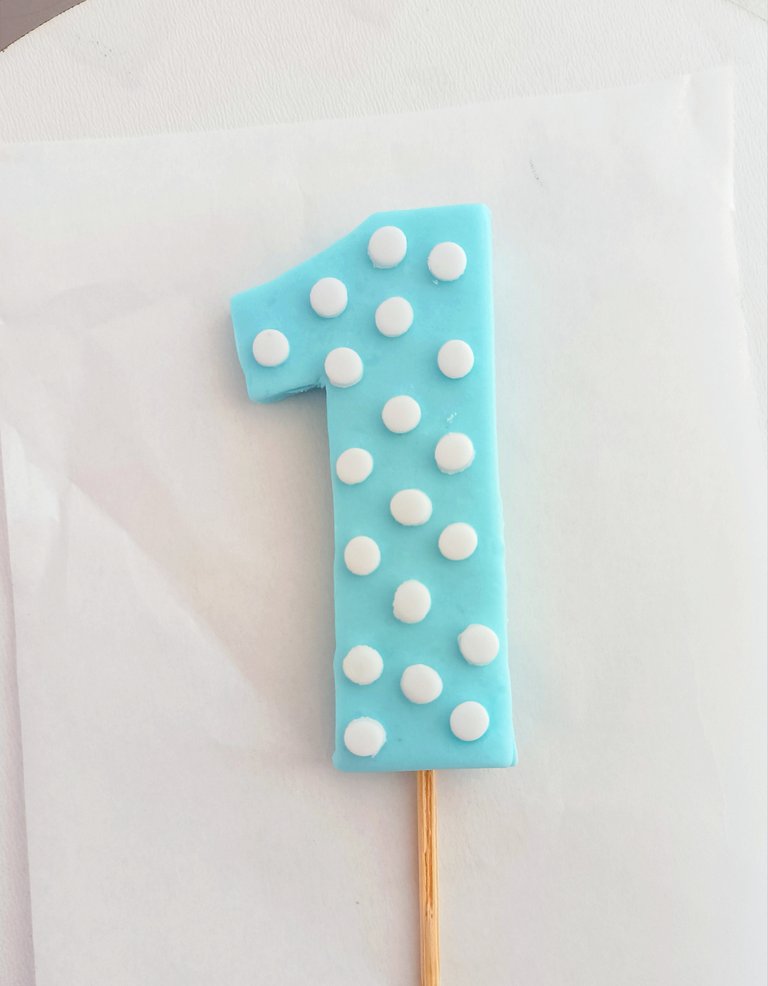
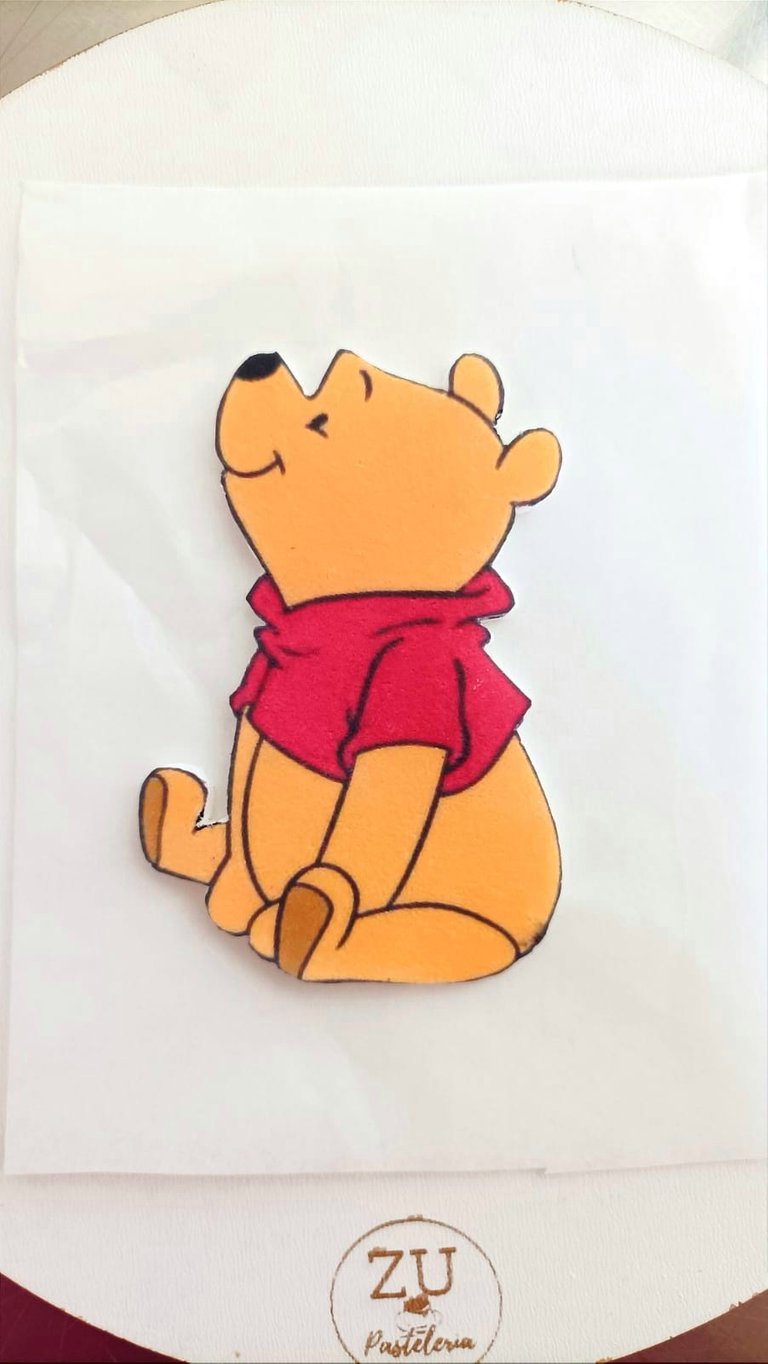
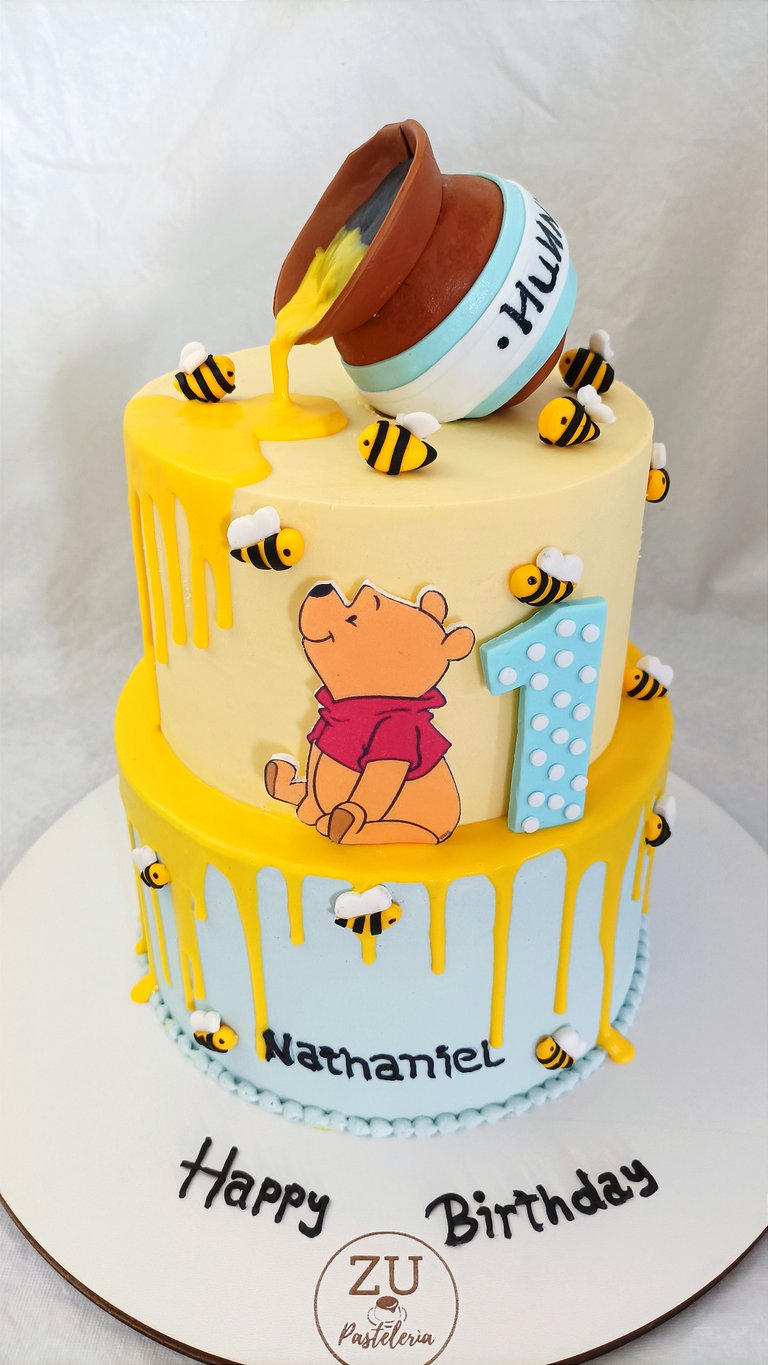
Last month, I was commissioned to make a Winnie the Pooh themed cake, which had a spilling honey jar, bees, the number 1 and Winnie the Pooh as a topper. It is worth mentioning that all the decoration was edible.
It was a challenge for me to make this cake, because I had never made this kind of decoration before, let alone an edible jar. However, I started researching how to make a jar in fondant, but the information I got did not convince me at all. So I came up with an idea that today I want to share with all my dear #foodiesbeehive community.
I didn't make videos, nor did I take pictures of the process, because to be honest I didn't know if what I had in mind would work, but luckily everything flowed and I was able to make a beautiful honey jar.
At first I thought of making a fondant sphere and from there give it the shape, but I discarded that concept, because I wanted it to be a jar that could be eaten and enjoyed.
After thinking about it for so long, Eureka, I came up with the idea of using Maria cookies and manjar.
Here is the process:
- I crushed 200 gms of cookies. The amount will depend on the size of the jar you want to make.
- Then, I added manjar to the cookies and kneaded until I got a fairly compact dough.
- Once the dough was ready, I proceeded to make a sphere as close to the body of a jar as possible.
- Then, I took it to the refrigerator for about 30 minutes so that it would finish compacting.
- After this time, I took it out of the refrigerator and then I put a thin layer of chocolate ganache, cream with which I covered the cake, but you can also use buttercream (The ganache and buttercream is to glue the fondant). Once this was done, I put it back in the refrigerator for 2 hours.
- In the meantime I stretched brown fondant, cut it to a size that could cover the sphere and placed it on top of the sphere trying to keep the shape of the body of the jar.
- After I covered the sphere with the fondant, I stretched fondant again to make the mouth of the jar.
- With a round cutter I cut the fondant that I had previously stretched and then with another smaller cutter, also round, I made a hole in the center so that it would be in the shape of a donut.
- With a pair of scissors I made a cut from the outside to the center and I was left with a kind of strip with waves that I then glued with a little water on the top of the sphere and thus complete the shape of the jar.
- Finally, I glued a black fondant inside the mouth of the jar to simulate depth.
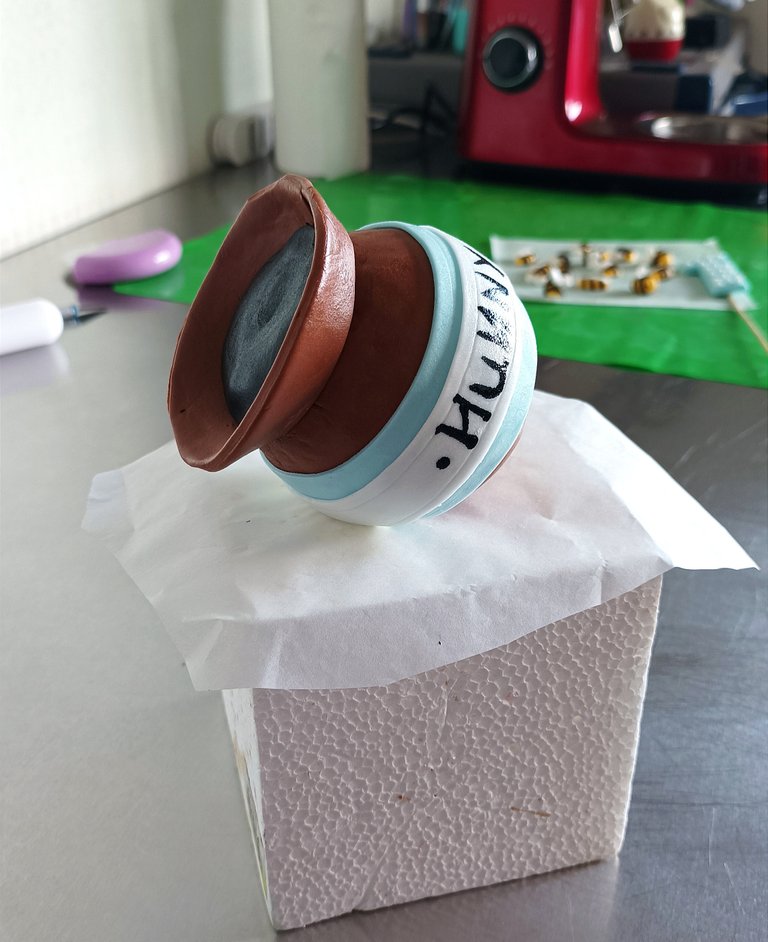
And that's how I made a sweet and delicious Winnie the Pooh honey jar.

As for the drip, I made it as follows:
I boiled 100 gms of milk cream and then I added 100 gms of white chocolate, stirred until all the chocolate was diluted and then I added yellow and orange coloring.
I recommend you to let it rest until it takes the right consistency and do some tests before putting it on the cake. The one I made I let it stand for about 30 minutes approximately.
I hope these tips will be useful in case you decide to make a Winnie the Pooh themed cake one day.
If you have any questions regarding the decoration of this cake, I will be happy to answer them.
Thank you for your valuable time and support!
Your friend, Zuuu!
You can also find me on instagram as: @zu_pasteleria and @tayiitos.
All photos in this post were made with my cell phone Xiaomi Redmi 10.
Resources: Deepl Translator and Gifty.

¡Hola, mi linda gente de @foodiesbeehive en Hive! Espero se encuentren muy bien y dispuestos a disfrutar de un merecido fin de semana.
A veces, se nos presentan retos en la vida que parecen ser muy difíciles o imposibles de realizar, pero la única forma de saberlo es intentándolo y por eso me gusta tanto la repostería, porque en la decoración de cada torta hay un reto que siento que me hace crecer.
El mes pasado, me encargaron una torta con temática de Winnie de Pooh, la cual tenía como topper un tarro de miel derramándose, unas abejitas, el número 1 y a Winnie de Pooh. Cabe destacar que toda la decoración era comestible.
Para mí fue todo un reto hacer esta torta, porque nunca había hecho este tipo de decorado y mucho menos un tarro comestible. Sin embargo, me puse a investigar cómo hacer un tarro en fondant, pero la información que conseguí no me convenció del todo. Así que se me ocurrió una idea que hoy quiero compartir con toda mi querida comunidad de #foodiesbeehive.
No hice videos, ni tomé fotos del proceso, porque para ser sincera no sabía si funcionaría lo que tenía en mente, pero afortunadamente todo fluyó y pude hacer un hermoso tarro de miel.
En un principio pensé en hacer una esfera de fondant y a partir de allí darle la forma, pero descarté ese concepto, pues quería que fuera un tarro que se pudiera comer y disfrutar.
Después de darle tantas vueltas a mi cabeza, ¡Eureka!, se me ocurrió usar galletas tipo María y manjar.
A continuación les explico el proceso:
1.Trituré 200 gms de galletas. La cantidad dependerá del tamaño del tarro que quieras hacer.
2.Luego, le agregué manjar a las galletas y amasé hasta lograr una masa bastante compacta.
3.Al tener la masa lista, procedí a hacer una esfera que quedara lo más parecido al cuerpo de un tarro.
4.Seguidamente, la llevé al refrigerador por unos 30 minutos aproximadamente para que se terminara de compactar.
5.Pasado este tiempo, la saqué del refri y luego le puse una capa delgada de ganache de chocolate, crema con la que cubrí la torta, pero también puedes usar crema de mantequilla (El ganache y la crema de mantequilla es para pegar el fondant). Hecho esto, la volví a llevar al refri por 2 horas.
6.Mientras tanto estiré fondant marrón, lo corté de un tamaño que pudiera cubrir la esfera y lo coloqué encima de la esfera tratando de mantener la forma del cuerpo del tarro.
7.Después que cubrí la esfera con el fondant, volví a estirar fondant para hacer la boca del tarro.
8.Con un cortador redondo corte el fondant que había estirado previamente y luego con otro cortador más pequeño, igualmente redondo, hice un hoyito en el centro de manera que quedara con forma de una dona.
9.Con unas tijeras hice un corte de afuera hacia el centro y me quedó como una especie de tira con ondas que posteriormente fui pegando con un poquito de agua en la parte superior de la esfera y de esta manera completar la forma del tarro.
10.Finalmente, pegué un fondant negro dentro de la boca del tarro para simular profundidad.
Y así fue como hice un dulce y delicioso tarro de miel de Winnie de Pooh.
En cuanto al drip, lo hice de la siguiente manera:
Herví 100 gms de crema de leche y luego se lo agregué a 100 gms de chocolate blanco, removí hasta diluir todo el chocolate y luego le agregué colorante amarillo y anaranjado.
Te recomiendo, dejarlo reposar hasta que tome la consistencia adecuada y hacer unas pruebas antes de ponerlo en la torta. El que hice lo dejé reposar por unos 30 minutos aproximadamente.
Espero estos tips te sean de utilidad por si algún día te animas a hacer una torta con temática de Winnie de Pooh.
Si tienes alguna pregunta en cuanto a la decoración de esta torta, con todo gusto te estaré respondiendo.
¡Gracias por tu valioso tiempo y por todo tu apoyo!
¡Tu amiga, Zuuu!

También me puedes encontrar en instagram como: @zu_pasteleria y @tayiitos.
Todas las fotos de esta publicación fueron realizadas con mi celular Xiaomi Redmi 10.
Recursos: Deepl Translator and Gifty.
That looks amazing! I'm always impressed by the skill some people have in making cakes like this. It's a shame you didn't film the process, as I see a lot of popular videos on Instagram which show this kind of thing. Perhaps next time when you have more confidence you could film it.
Yes, it's really a shame I didn't record the process of how I made the Winnie the Pooh jar.
The learning I got from this experience is to feel more confident about my skills and to film the whole process when I make this kind of decorations regardless of the result.
Thank you so much for reading me and for your valuable appreciation.
Regards!
The rewards earned on this comment will go directly to the people ( edwing357 ) sharing the post on LeoThreads,LikeTu,dBuzz.https://leofinance.io/threads/edwing357/re-leothreads-2lxln2wxs
Join the foodie fun! We've given you a FOODIE boost. Come check it out at @foodiesunite for the latest community updates. Spread your gastronomic delights on and claim your tokens.
Yum! You have been curated by @sirenahippie on behalf of FoodiesUnite.net on #Hive. Thanks for using the #foodie tag. We are a tribe for the Foodie community with a unique approach to content and community and we are here on #Hive.💪💪💪💪💪 una vez más reto superado 💪💪💪💪💪
Aaaaaaaaaaaaaaw siempre, siempre son tan encantadores tus posts, amé esto.
Recuerdo una vez que hice una torta con flores y abejas, estoy tratando de localizar las fotos pero creo que las perdí, recuerdo que me encantó hacer las abejas porque era tan divertido, fácil y quedaban preciosas.
Me estoy animando a comprar fondant, antes lo preparaba desde cero, pero creo que actualmente sale más barato comprarlo, para retomar el hacer figuras con él.
¡Gracias por ser fuente de inspiración dulce Zu, saludos!
Hola, mi bella @eugelys
Bienvenida una vez más!🥰
Sí, hacer las abejitas en fondant realmente es fácil y quedan muy lindas en el decorado de la torta.
Me encanta cuando me cuentas de tus experiencias pasteleras y lo mucho que lo disfrutas.
Una vez quise hacer el fondant desde cero, pero me dí cuanta que era mejor comprarlo. Me ahorro bastante tiempo y dinero. Gracias a Dios conseguí una marca que es de muy buena calidad.
Espero algún día ver tus creaciones en fondant y compartir tips. Jeje!
Gracias por tu grata visita y por tu apreciación!
Saludos y un abrazo cariñoso.
Wow! What a very beautiful cake. Great ideas and design. Winnie the Pooh is so cute too. Perfect blend of colors and I so love the texture, my dear friend. I commend you for being so good at this. More beautiful sweets to bake with love.
Hello, @pinkchic
Welcome to my blog!
Your beautiful words motivate me a lot and make me very happy because it confirms that all the effort was worth it.
Winnie Pooh is really heartwarming. I love him! Hehe!
Thanks for your nice appreciation!
Regards!
Amiga pero de que planeta vienes jejeje es increible el resultado final, me quede super sorprendida apenas vi la foto de portada y luego al leer que hiciste todo comestible me quede mas fascinada ❤️ es increible el talento que tienes para esto, una super pastelera, en verdad desearia que estuvieramos cerca para encargarte tortas, no solo que son hermosas esteticamente, porque realmente son muy prolijas, sino que el sabor que deben tener 😋😋
Buhito y yo admirados con esta belleza, cada dia sorprendes mas, felicitaciones por superar semejante reto.
Abrazos y bendiciones 😍
Hola, Buhito hermoso! Jeje!
Definitivamente, fue un gran reto para mí porque aún sigo aprendiendo de este dulce mundo de la repostería. Lo bueno, es que todo salió como lo tenía en mente y el universo conspiró a mi favor!🥰🙏🏻
Gracias @elbuhito por todo tu apoyo y por tu linda y agradable visita.
Saludos y cariños para ambos!🦉☺️
Yay! 🤗
Your content has been boosted with Ecency Points
Use Ecency daily to boost your growth on platform!
Support Ecency
Vote for new Proposal
Delegate HP and earn more, by @ninaeatshere.
Congratulations @zupasteleria! You have completed the following achievement on the Hive blockchain And have been rewarded with New badge(s)
Your next target is to reach 1000 comments.
You can view your badges on your board and compare yourself to others in the Ranking
If you no longer want to receive notifications, reply to this comment with the word
STOPWhat a very beautiful cake!! This is art, right there! Amazing work! I think if I own this, I wouldn't want to eat it because it just looks so beautiful! 😆