Hello Everyone,
Today things couldn't have gone any worse on the Creality Ender 3 V2 3D printer, but in the end I was able to solve a catastrophic printing failure with relative ease.
First my hot end mod fixture cracked in the worst possible place.
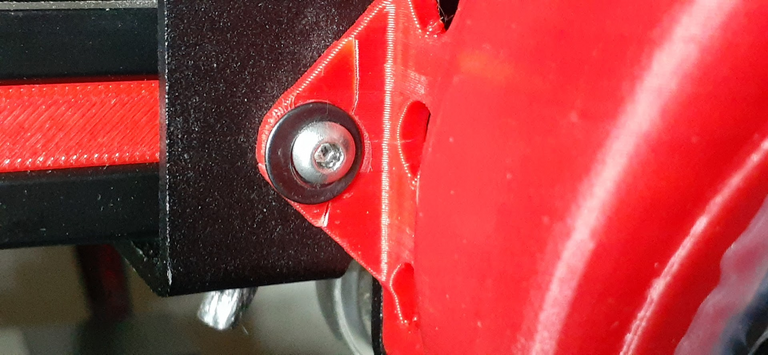
fang for Ender 3 V2 by The_Benz_Master October 22, 2020
This Fang hot end mod has really been great to me, and works well for the intended purpose of housing the extruder and parts fans, with adequate airflow to the intended areas.
One downfall of this model, is the limited anchor/screw points. There is only one, and I knew that over tightening could cause a crack.
I wouldn't call it a design flaw by any means. This thing is nice, and the issue lies more in the mounting bracket than the model. There aren't a lot of points to mount a hot end fixture, so given this aspect, and how nice this hot end mod is, I would say the designer has created one of the best Ender hot end mods there is in existence for this printer.
The problem is that it needs to be relatively snug, or the housing will wobble. So I was always waiting patiently and in no hurry at all... for the day this would happen.
But this wasn't a serious enough problem....
This wasn't even post worthy...
Something worse than this had to happen..
And it did.
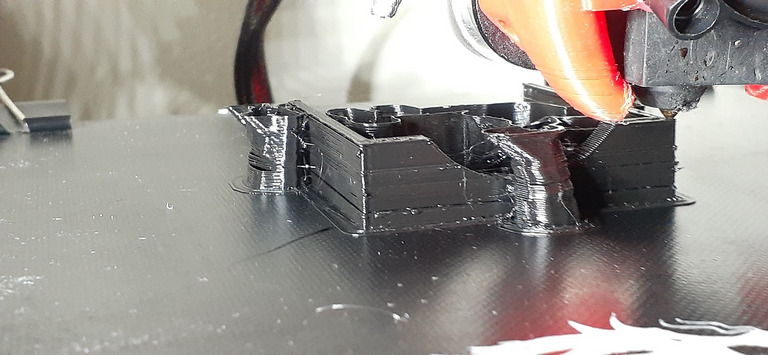
Ender 3 dual 40mm fan hot end cooling shroud with BLTouch mount by neo2478 May 08, 2020
Even with that crack, I can print with the Fang thankfully, or else things would have been further complicated.
I needed to print a new hot end fixture mod, and decided to try something different.
Above you can see what happened.
I was having this exact same issue months ago and ultimately came to the conclusion that my issue was travel speeds and voltage.
That's it, troubleshooting complete, easy peasy.
It just goes to show that sometimes when we start feeling confident and like we have everything under control, a humbling experience might occur.
It was the Cura Ultimaker 3D printing software which humbled me today.
Because it was the 3D printing software that harbored the errors which causes what you see above.
How did I troubleshoot this issue and quickly solve it?
Since replacing so many stock parts on the Creality Ender 3 V2 with upgraded parts, (roller wheels, belts, tensioners, extruder, better bowden tube, hot end modification and more) and gaining an intimate relationship with the machine, I just knew it couldn't be mechanical to have such a wildly drastic unimprovement.
But "just knowing" doesn't mean don't check anyway...
I checked everything mechanically, rather begrudgingly, angrily... because I knew everything was good!
So my mind was already going to either:
Klipper firmware or the Slicer.
I learned this trick when I was young with computers... when things start going wrong, I would just go back and reset settings that I previously messed with. Sometimes this solution would work!
So I applied this simple logic to Cura.
3D printing is very mathematical, and I am not a math genius by any means. The depths of mathematics with 3D printing is rather mind boggling, I've only scratched the surface.
I say this because, when any settings are messed with in a 3D Slicer, you better believe it's affecting many other parameters.
It only takes one incorrect mathematic equation to mess everything up.
I didn't find out what incorrect setting or value I input during tweaking slicer settings, but somewhere along the line I really messed something up badly.
Because after I set Cura back to a stock setting, and then just modified simple parameters that I knew needed adjusting, like speed, everything started looking like:
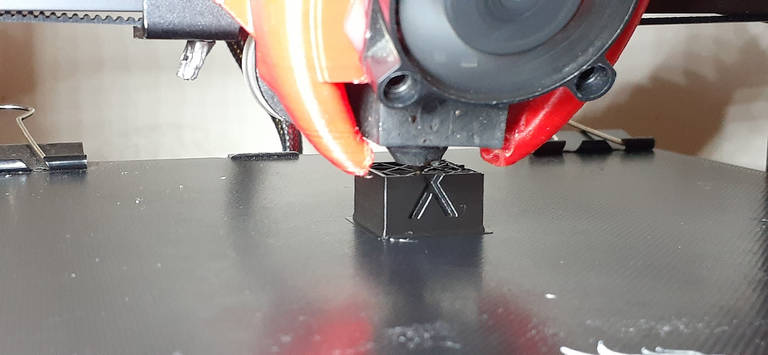
XYZ 20mm Calibration Cube by iDig3Dprinting January 19, 2016
Almost perfect.
Makes me wonder if perhaps I was wrong about the travel speeds. It could be that the print3dpro just likes to tinker with settings too much and maybe should just leave things be :D
What a relief this turned out to be.
In fact my prints are looking better now than ever before.
This was a small bump in the road.
The lesson to be learned, is always keep close tabs on the changes made to the Slicer.
I think I might even start making notes, in some format that is like a log, so I can retrace changes I've made and how they impact the machines performance. This seems common sensical to me now, but it's not easy to always keep logs when doing multiple things around the house, running out to the kitchen to stir some rice while heating up a nozzle, etc, but it wouldn't take too much extra efforts to just log somewhere when I make slicer changes.
And/Or I could save a bunch of Slicer profiles too when I have known good profiles. I tend to click "Save current profile with updated settings."
I personally wouldn't recommend doing that! :)
Making a new one when updating, and keeping the old is best. This will avoid having to go back to stock profiles when these issues start happening.
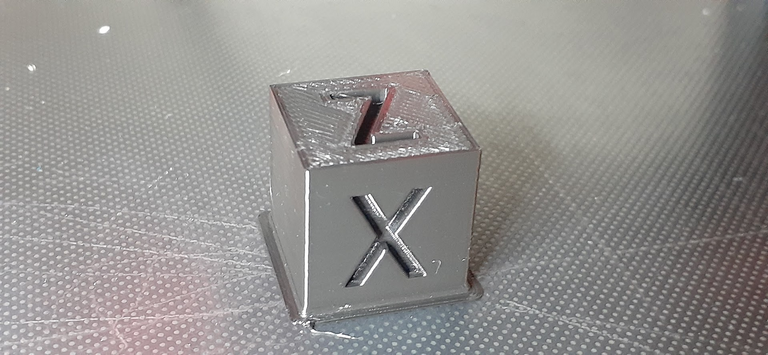
XYZ 20mm Calibration Cube by iDig3Dprinting January 19, 2016
Printing the calibration cube gets old after a while, but it's a very effective print for checking problem areas, and when it comes out this good, it's always a relief, especially after catastrophic print failures.
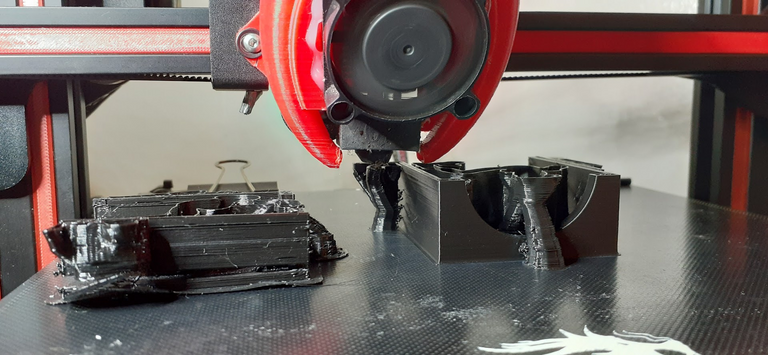
This is the same print side by side while one is printing.
The one with all the separated layers is the last print I was working on before resetting Cura's stock profile.
It doesn't take a trained eye to see the difference.
The model on the left was cancelled early, because we were wasting filament at this point and knew it.
Sometimes there's this denial that comes like "no it's fine, she'll straighten back right."
This is what I would call wishful thinking with a 3D printer.
If there is a problem, things are only likely to get worse if not fixed.
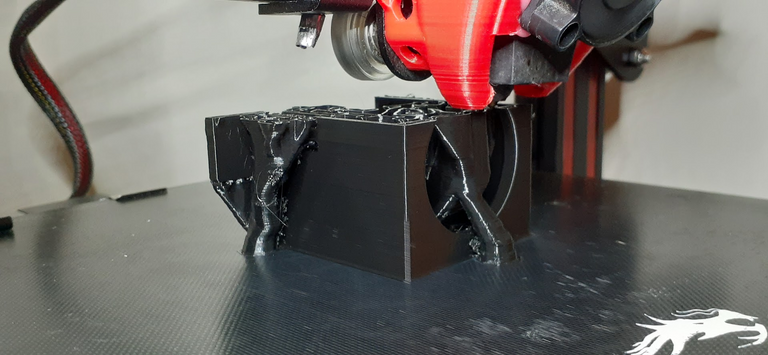
Ender 3 dual 40mm fan hot end cooling shroud with BLTouch mount by neo2478 May 08, 2020
What you see here is a hot end fixture that I just snapped a photo of 30 seconds before typing this.
It's at 53%, a 6 hour print.
I've little doubt that it will be a success.
What are seen on the sides are a type of support structure that I just tried out, called "tree."
This is like a nice nature touch to 3D printing, seriously .. Utilizing natural tree like supports , it's truly brilliant in my opinion.
And since we're talking about the Cura Slicer anyway, let's have a look at these supports in the generated preview:
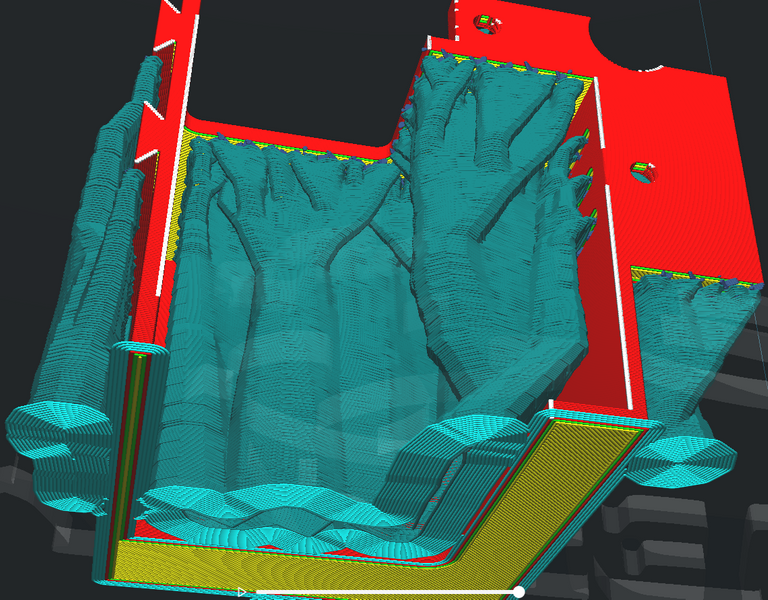
Cura Ultimaker
All of that tree support will be removed after printing. It is just there for "support". Some areas of models will need it, if you just look at it and study it, and think about the fact that 3D printing builds in layers of hot melted plastic like materials, then it become clear that upon reaching the upper layers, we will have a serious problem if nothing is there to support the material which would otherwise be printed in thin air.
That will do it for today, if all goes well then the next post I will have a different hot end fixture on my Ender 3 V2. I'm really gonna miss that red Fang, but I can always print another one in the future if I want to!
Thank you for stopping by, have a great day! ~~@print3dpro
Not a 3D printing guy, but generally, those cracks seems to be unavoidable given the kinetics movement the machine is emitting. The nature of 3D printing business is having the host moving around the printed object. Just like a normal dot matrix printer having cracks on the rollers mounts from what I see. Having said that, making high heat tolerance part could solve the problem? Carbon fibre? But that defeat the purpose of 3D print right? That's like 1 D, human manual work 😂
Very good insight and comment!
The short answer is with faster print moves, this kinetics movement becomes more of an issue. Since my printer is super slow, there's (seems to be) virtually no impact from the movements. Heat could be an issue with certain prints with PLA, but I've been lucky there. Over time I will get more clarity on the long term impacts of these kinetic movements.
This is a paragraph from my newest 3D print post. Your comment here influenced me to talk about it a bit.
Thank you for the great feedback and support as always bro.
Congratulations @print3dpro! You have completed the following achievement on the Hive blockchain and have been rewarded with new badge(s) :
Your next target is to reach 4000 upvotes.
Your next target is to reach 40 posts.
You can view your badges on your board and compare yourself to others in the Ranking
If you no longer want to receive notifications, reply to this comment with the word
STOPTo support your work, I also upvoted your post!