Nota: Este blog esta creado con el fin de orientar y educar en el manejo de la plataforma, tanto a los nuevos usuarios como también a los interesados en ser parte de Hive.Blog.
Note: This blog have been created with the goal of educate and guide in the management of the platform, both at the new user, at the registered, and to the interested in being part of Hive.Blog.
Como crear tu primer post en Hive.blog
How create your first post on Hive.blog
Buenas comunidad de Hive, espero se encuentre excelente, y aprendiendo más de Hive.io hoy veremos cómo postear un blog usando la plataforma Hive.blog.
Good Hive community, I hope you are well, learning more about Hive.io, today I will show you, how create post using the Hive.blog platform
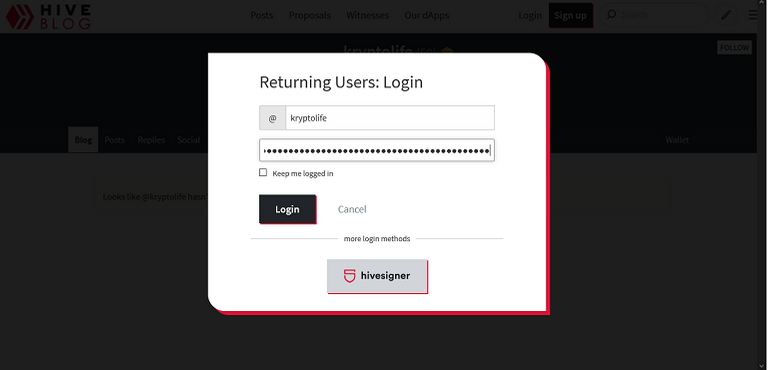
Primero que todo hacemos login en la plataforma e iniciamos sesión con nuestro usuario y la Posting Key.
First of all, we login on the platform using our username and Posting Key.
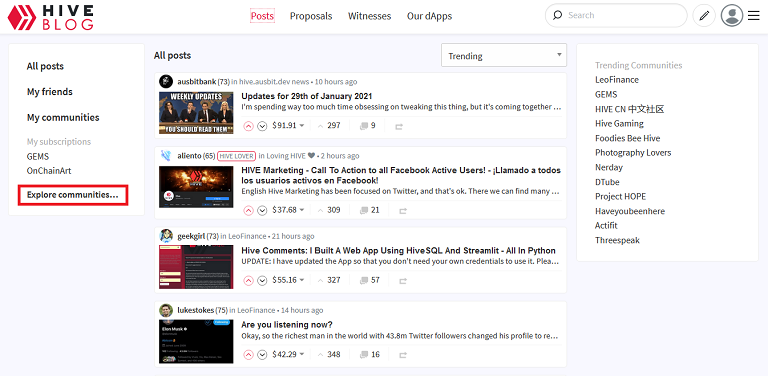
Después de haber iniciado sesión nos dirigimos al área de inicio de Hive.blog, haciendo clic en Post.
After logging, we go to the home area of Hive.blog, clicking on Post.

Estando en el área de inicio, hacemos clic en ¨Explore communities¨
In the home page area, we click on ¨Explore communities¨
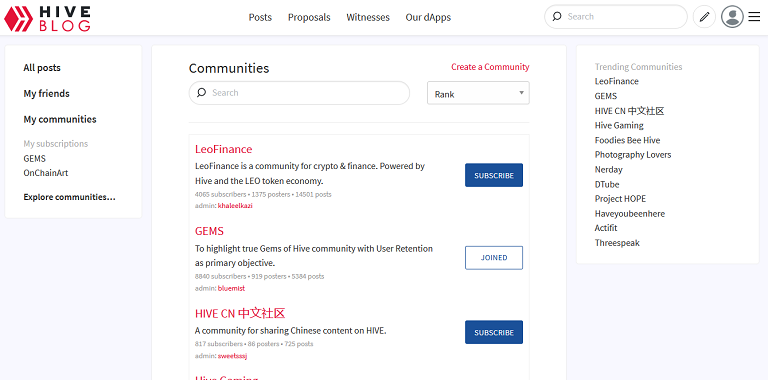
En esta área vamos a buscar una comunidad que maneje el tema, con el que crearemos nuestro Post. Si es tu primer post, te recomiendo empezar con (IntroduceMyself). Si no sabes qué es esto, puedes visitar los siguientes links y tener una idea.
In this area we go to look a community that handles the topic, with which we will create our Post. If it's your first post, I recommend you start with (IntroduceMyself). If you don't know what this is, you can visit the following links and get an ideas.
Habiendo encontrado la comunidad en la que queremos Postear nuestro blog, hacemos clic sobre su nombre en las letras de color Rojo, y se abrirá la comunidad de la siguiente manera.
Having found the community in which we want to Post our blog, we click on its name in the Red letters, and the community will open as follows.
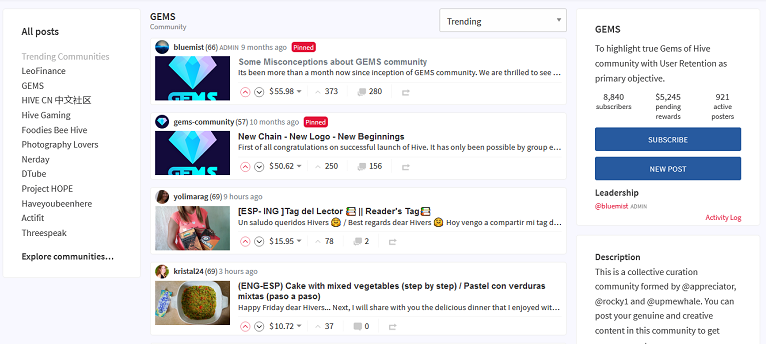
Hacemos clic en SUSCRIBE y para Postear en esta comunidad hacemos clic en NEW POST, al hacer clic en NEW POST, se abrirá la siguiente ventana.
We click on SUBSCRIBE and to Post in this community we click on NEW POST, clicking on NEW POST, the following window will open.
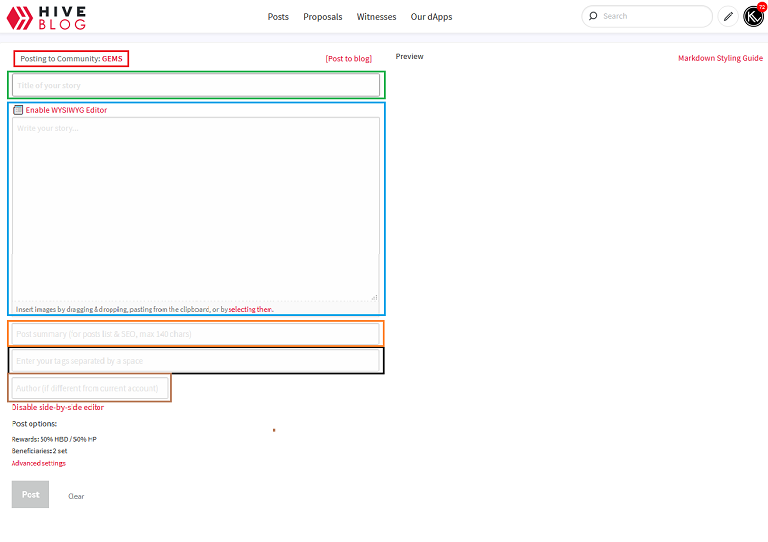
En el área de color rojo como puedes observar, dice (Posting to Community: GEMS), quiere decir que este Blog en especifico se postara en la comunidad GEMS siendo visible también en toda la plataforma Hive.blog.
In the red area as you can see, it says (Posting to Community: GEMS), it means that this specific blog will be posted on the GEMS community and also visible on the entire Hive.blog platform.
En la zona demarcada de color verde es donde debemos colocar el título de nuestro Blog.
In the green área is where will we put the title of our blog.
En el área de color azul es el lugar donde escribiremos el contenido del Blog que crearemos.
In the blue área is the place we while write the content of the blog created.
Escribiremos una pequeña descripción sobre nuestro post en el área demarcada de color anaranjada.
We will write a short description about our post in the orange marked area.
Una vez escrito nuestro blog. En el área con el recuadro negro, escribiremos en el campo de texto, siete (7) Tag, para los cuales queremos que aparezca nuestro blog, los escribiremos solo colocando la palabra separada por un espacio, Ejemplo: (Hive comunidad arte) los escribiremos sin los parentesis.
Once our blog is written. In the area with the black box, we will write in the text field, seven (7) Tags, for which we want our blog to appear, we will write them only by placing the word separated by a space, Example: (Hive art community) we will write them without the parentheses.
Y en el área con el recuadro marrón escribiremos el nombre de un autor, solo y únicamente, si quien lo escribe es otro autor que posee una cuenta de en Hive.
And in the area with the brown box we will write the name of an author, only and only, if the person who writes it is another author who has a Hive account.
Ya que hemos aprendido un poco más sobre el área de posteo de Hive.blog, a continuación, te mostrare un breve ejemplo de cómo se vería la interfaz cuando vas postear un blog. El blog del siguiente ejemplo ya lo puedes leer. Al final de este tutorial te dejare el enlace.
Since we have learned a little more about the posting area of Hive.blog , below, I will show you a brief example of what the interface would look like when you are going to post a blog. You can already read the blog of the following example. At the end of this tutorial I will leave you the link.
Antes que nada debes saber que el lenguaje que se utiliza para darle una buena estructura a los post y se vea de manera ordenada y legible en Hive.blog es “Markdown”, pero te preguntas, ¿Qué es MARKDOWN?. Markdown es un lenguaje de marcado que facilita la aplicación de formato a un texto empleando una serie de caracteres de una forma especial. En principio, fue pensado para elaborar textos cuyo destino iba a ser la web con más rapidez y sencillez que si estuviésemos empleando directamente HTML. Y si bien ese suele ser el mejor uso que podemos darle, también podemos emplearlo para cualquier tipo de texto, independientemente de cual vaya a ser su destino. Para más información acerca de Markdown, está atento a nuestro próximo post en el que hablaremos más de Markdown y te compartiré los códigos básicos para que tus posts tengan un mejor formato.
First of all you should know that the language that is used to give a good structure to the post and to see it in an orderly and readable, in Hive.blog is "Markdown", but you ask yourself, What is MARKDOWN? Markdown is a markup language that makes it easy to format text using a series of characters in a special way. In principle, it was designed to produce texts whose destination would be the web more quickly and easily than if we were directly using HTML. And although that is usually the best use we can give it, we can also use it for any type of text, regardless of its destination. For more information about Markdown, keep attentive for our next post, where we will write more about Markdown and share the basic codes to help you to give format to your posts better.
Ya habiendo creado nuestro post, habiéndolos plasmado en un Word o bloc de notas para tenerlos guardados, si deseamos y siendo lo más recomendable, lo traducimos a inglés, para llegar a más audiencia. Lo pegamos en el área en donde escribiremos nuestros posts y le daremos forma con Markdown. Cada que personalicemos un post, se verá en tiempo real el resultado en el área derecha. Como lo podrás apreciar en la siguiente imagen.
Having already created our post, having plasmed them in a Word or notepad to have them saved, if we wish and being the most recommended, we translate it to English, to reach to more audience. We paste it in the area where we will write our posts and we will format it with Markdown. Every time that you personalize a post, the result will be seen in real time in the right area. As you can see in the following image.
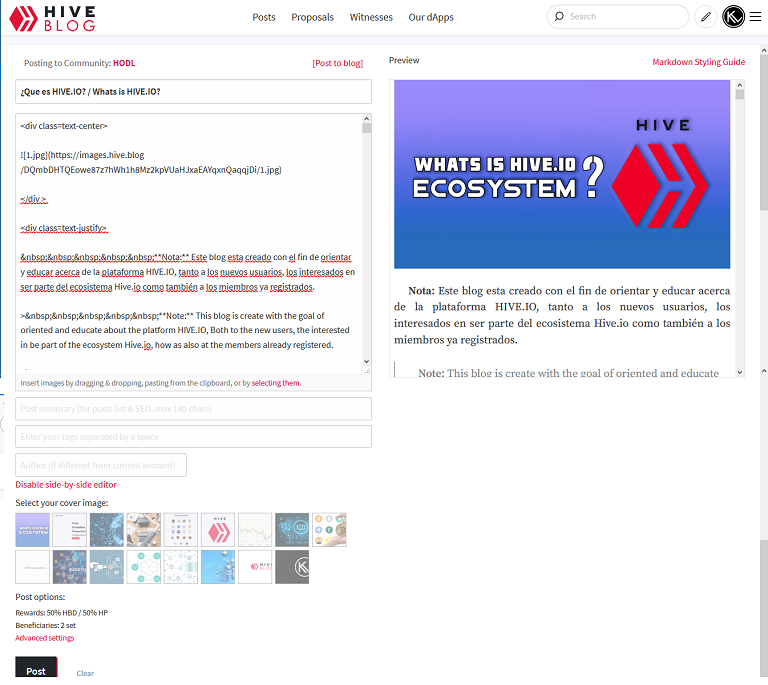
Y finalmente le damos a Post, como lo podrás ver en la siguiente imagen.
And finally we give Post, as you can see in the following image.
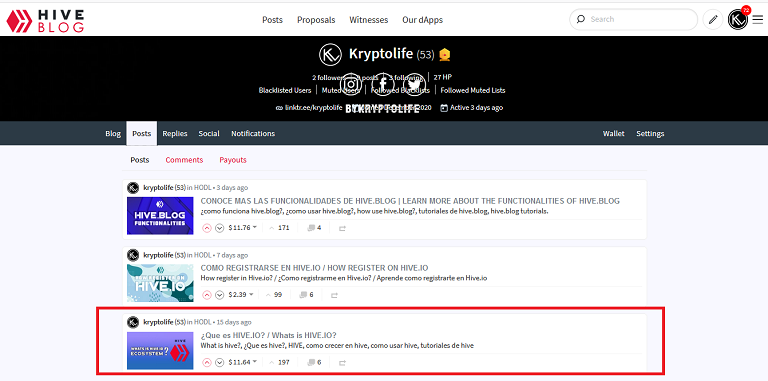
El post lo veremos en nuestro perfil, y también veremos que esta publicado dentro de la comunidad que elegimos, que en este caso es HODL y este también es visible para toda la comunidad de Hive.io . Con nuestro post ya publicado solo nos quedara compartirlo en las diferentes comunidades usando Discord, para así llegar a más lectores, pronto aprenderemos como compartir nuestros post en el Discord de las comunidades de Hive.
We will see the post in our profile, and we will also see that it is published within the community we choose, which in this case is HODL and also this is visible to the entire Hive.io community. With our post already published, we will only have to share it in the different communities using Discord, for reach to more readers, we will soon learn how to share our post in the Discord of the Hive communities.
Sin más que agregar, espero este tutorial te allá servido para conocer un poco más de Hive.blog. Hasta un próximo blog. Escribeme en los comentarios el nombre de tu amigo que está iniciando en el mundo de Hive.
Without further add, I hope this tutorial has served you to learn a little more about Hive.blog. Until a next blog. Write me in the comments the name of your friend who is starting in the world of Hive
Unete a nuestra comunidad Discord en / Join to our Discord community:
https://discord.com/invite/QzzrZuU92q
Kryptolife
Visita nuestra redes sociales en / Visit our social networks:
https://linktr.ee/kryptolife

Congratulations @kryptolife! You have completed the following achievement on the Hive blockchain and have been rewarded with new badge(s) :
Your next target is to reach 20 posts.
You can view your badges on your board and compare yourself to others in the Ranking
If you no longer want to receive notifications, reply to this comment with the word
STOPExcelente amigo buena guia para los que se inician en Hive, muy clara y simple.
Muy instructivo
!discovery 30
This post was shared and voted inside the discord by the curators team of discovery-it
Join our community! hive-193212
Discovery-it is also a Witness, vote for us here
Delegate to us for passive income. Check our 80% fee-back Program