Decorando mis espacios

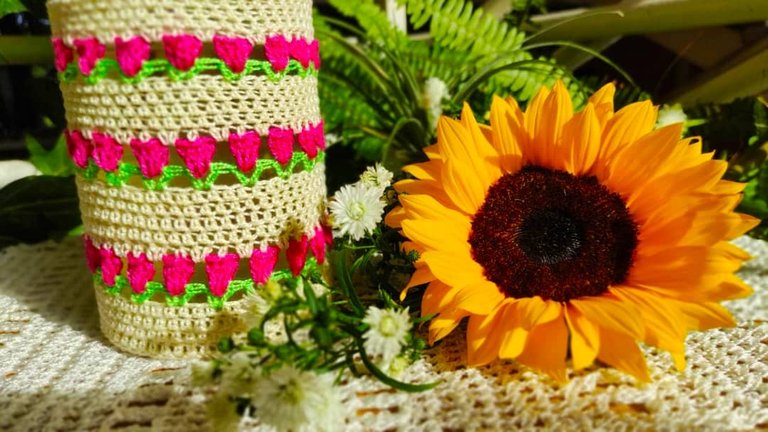
Un saludo a toda mi gente linda y creativa de la comunidad de las agujas. Hoy e he puesto creativa en casa y he decorado un florero con un lindo tejido de tulipanes en crochet.
En verdad que este punto tulipán me encanta, no es la primera vez que me han visto algo así, la primera vez hice un forro para celular y la segunda vez me hice un tapabocas, me parece que es un tejido muy fresco y delicado.
En verdad que no hace falta tener cosas de oro y cristal para que tu casa se vea bella, estos detalles enamoran a cualquiera, si lo haces veras que no estoy mintiendo.


Materiales
- Hilos de crochet para combinar
- Aguja e tejer #2 milímetros.
- florero para tomar la medida.
Paso a paso

Realizamos un aro mágico y dentro tejemos 3 cadenetas que equivalen a nuestro primer punto alto, luego tejemos 11 más para un total de doce puntos altos. Continuamos la segunda vuelta con aumentos, es decir dos puntos altos en cada punto de base, recuerda siempre comenzar cada vuelta con 3 cadenetas que equivalen a nuestro primer punto alto.
En la tercera vuelta tejemos un aumento y un punto alto, cuarta vuelta tejemos dos puntos altos y un aumento u así continuamos aumentando hasta obtener el tamaño de la base de tu florero.

Ahora vamos a comenzar a subir, para eso tejemos una vuelta de medios puntos pero no vamos a tomar las dos hebras de la base sino la que esta atrás, con esto hacemos una especie de quiebre o doblez. Continuamos con 4 vueltas más de medios puntos.

Cambiamos al hilo verde para comenzar a elaborar lo que serían las hojas de los tulipanes, iniciando con 4 cadenetas, un punto alto en el mimo punto de base de las cadenetas. Saltamos dos puntos de base y en el tercero hacemos un punto alto, hacemos una cadeneta y otro punto alto en el mismo punto para realizar un aumento tipo V. Así continuamos por toda la vuelta hasta terminar.
En esta vuelta vamos a realizar los pétalos del tulipán, para ello levantamos 3 cadenetas luego nos metemos en la V de la vuelta anterior tejiendo 5 puntos altos sin terminar y agarramos hebra y los sacamos a todos juntos de una vez, hacemos 2 cadenetas y vamos repitiendo el mismo paso.
Vamos a repetir todo el proceso las veces que desees o según sea el tamaño de tu florero.

Resultado final

yo estoy encantada con este resultado y más aún porque mi hijo Israel me sorprendió con esta bella flor el día domingo y de ahí es que nace la idea de decorar este florero.
Espero haberles sacado una sonrisa con esta manualidad y que la hagan ya sea para sus casas, para su suegra, para una amiga. Los tulipanes son hermosos pero también en internet puedes conseguir más modelos de forros que te pueden interesar; definitivamente todo queda a la imaginación de cada quien.
Me despido hasta una próxima manualidad "Hecho con AMOR", les quiero mucho y recuerden amigos "Pónganle una sonrisa a la vida"


Decorating my spaces

Greetings to all my beautiful and creative people of the needlework community. Today I got creative at home and decorated a vase with a beautiful tulip crochet stitch.
I really love this tulip stitch, it's not the first time you've seen something like this, the first time I made a mobile phone cover and the second time I made a mouth piece, I think it's a very fresh and delicate fabric.
You really don't need to have gold and crystal things to make your house look beautiful, these details will make anyone fall in love, if you do it you will see that I'm not lying.


Materials
- Crochet threads to match
- Knitting needle #2 millimetre.
- vase to take the measurement.
Step by step

We make a magic hoop and inside we knit 3 chain stitches which equals our first high stitch, then we knit 11 more for a total of twelve high stitches. We continue the second round with increases, i.e. two double crochets in each base stitch, always remember to start each round with 3 chains that are equivalent to our first double crochet.
In the third row we knit an increase and a double crochet, in the fourth row we knit two double crochets and an increase and so on until we get the size of the base of your vase.

Now we are going to start to go up, for that we knit a row of half stitches but we are not going to take the two strands of the base but the one that is at the back, with this we make a kind of break or fold. We continue with 4 more rows of stockinette stitches.

We change to the green yarn to start making what would be the leaves of the tulips, starting with 4 chain stitches, a single crochet in the same stitch as the base stitch of the chain stitches. We skip two base stitches and in the third one we make a single crochet, we make a chain stitch and another single crochet in the same stitch to make a V type increase. We continue in this way for the whole round until the end.
In this row we are going to make the petals of the tulip, for this we raise 3 chains then we get into the V of the previous row knitting 5 high stitches without finishing and we grab the yarn and we pull them all together at once, we make 2 chains and we repeat the same step.
We will repeat the whole process as many times as you want or according to the size of your vase.

Finish result

I am delighted with this result and even more so because my son Israel surprised me with this beautiful flower on Sunday and that's where the idea of decorating this vase came from.
I hope I have made you smile with this craft and that you will do it for your home, for your mother-in-law or for a friend. The tulips are beautiful but also on the internet you can get more models of liners that may interest you; definitely everything is up to the imagination of each person.
I say goodbye until the next "Made with LOVE" craft, I love you very much and remember friends "Put a smile to life".

Your DIY is so cool
Thank you meorow
The rewards earned on this comment will go directly to the person sharing the post on Twitter as long as they are registered with @poshtoken. Sign up at https://hiveposh.com.
Thank you for sharing this amazing post on HIVE!
non-profit curation initiative!Your content got selected by our fellow curator @stevenson7 & you just received a little thank you via an upvote from our
You will be featured in one of our recurring curation compilations and on our pinterest boards! Both are aiming to offer you a stage to widen your audience within and outside of the DIY scene of hive.
Join the official DIYHub community on HIVE and show us more of your amazing work and feel free to connect with us and other DIYers via our discord server: https://discord.gg/mY5uCfQ !
If you want to support our goal to motivate other DIY/art/music/homesteading/... creators just delegate to us and earn 100% of your curation rewards!
Stay creative & hive on!
Muchas gracias a todos por su apoyo, Dios les bendiga y consolide sus proyectos.
esto es sumamente hermoso, arte en las manos. Gracias por compartir. 😊
Gracias amiga, que bueno que te gustó. Feliz día.
Que hermoso te ha quedado. Dios bendiga tus manos.
¡Muy lindos colores!. Me encantó la idea de tejer flores para el florero. ¡Buenas vibras!.