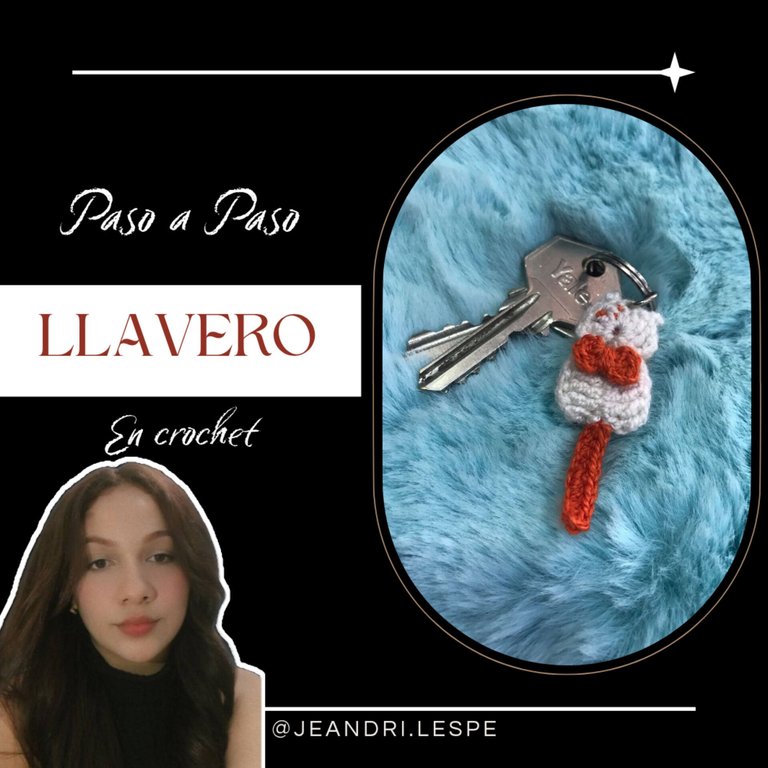
Hola mi gente linda, espero se encuentren muy bien, el dia de hoy les traigo algo que para mi es muy nuevo, pero que ame hacer y mas porque es representativo de mi gatito lunito, el cual ya lleva en mi vida mas de dos años y ha sido de las mejores cosas que me han pasado, asi que, como ya me hacia falta un llavero, decidi que haria uno de gatito y que se asemejara a lunito, al mismo tiempo fotografié cada paso para poder compartirlo con ustedes, asi que, sin mas, vamos con los materiales y el paso a paso.
Hello my lovely people, I hope you are all doing well. Today I am bringing you something that is very new to me, but that I love to do, especially because it is representative of my kitten, Lunito, who has been in my life for more than two years and has been one of the best things that has ever happened to me. So, since I needed a keychain, I decided to make one of a kitten that would look like Lunito. At the same time, I photographed each step so I could share it with you. So, without further ado, let's go with the materials and the step by step.
Materiales / Materials 🧡✨
Hilo coral / Coral thread ✨
Aguja (Numero 3) / Needle (Number 3) ✨
Argolla / Ring ✨
Paso 1️⃣ / Step 1️⃣
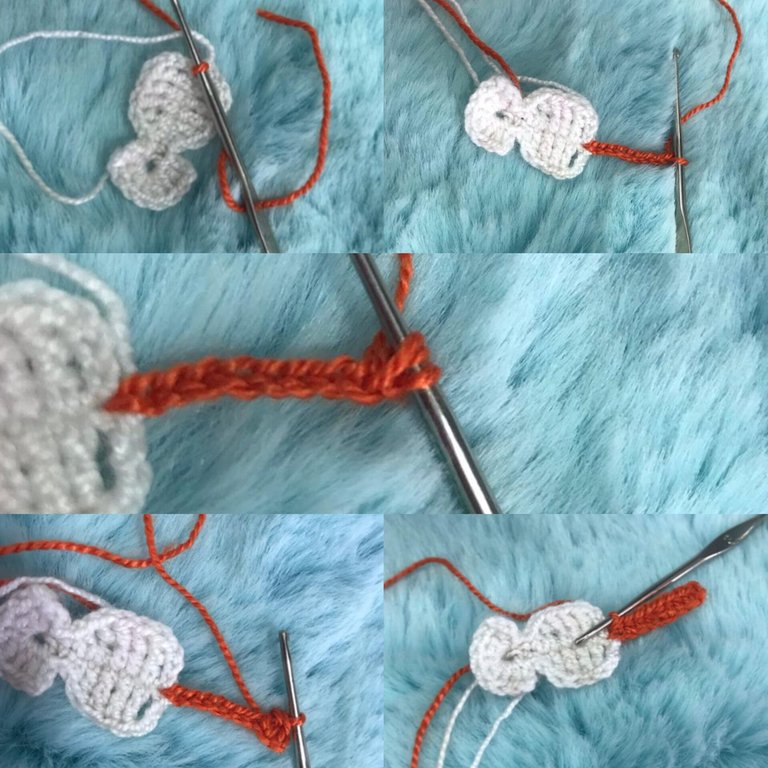
Lo primero que haremos será el lazo de nuestro llavero, para esto vamos a utilizar un hilo de diferente color al que tendrá el gato, para que resalte mucho más, comenzamos haciendo un anillo mágico y subimos 3 cadenas que van a contar como un punto alto, enlazamos y vamos a hacer dos puntos altos pasando por el anillo, subimos dos cadenas y vamos a hacer un punto deslizado pasando por el anillo, esto nos daría nuestro primer extremo del lazo y volvemos a repetir exactamente lo mismo, 3 cadenas, 2 puntos altos y 3 cadenas cerrando con un punto deslizado, cerramos el anillo, cortamos la hebra, lo suficientemente larga para pasarla por el centro de nuestro lazo y así darle la forma que necesitamos, amarramos por la parte de atrás y queda liso nuestro lazo.
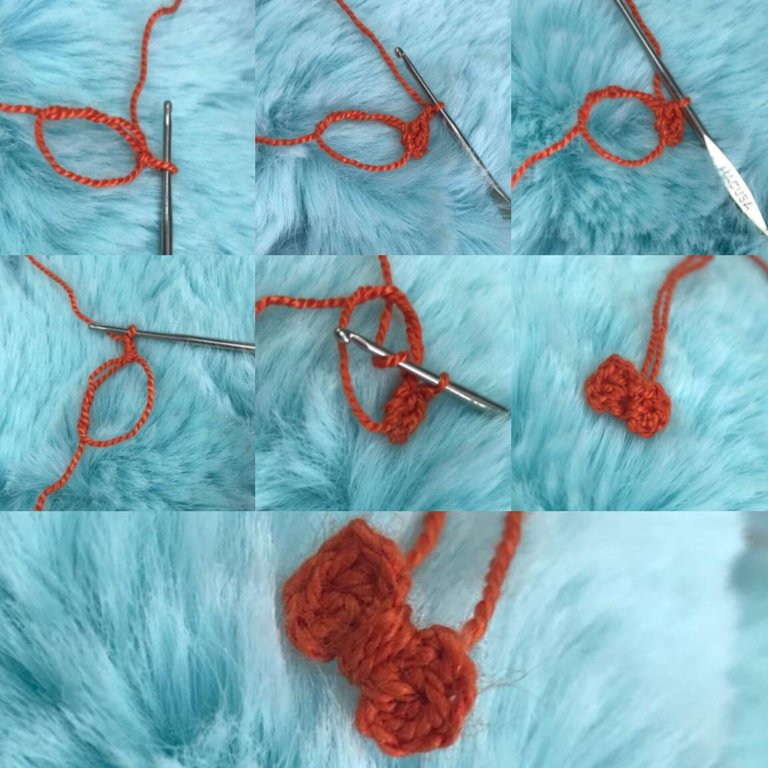
The first thing we will do is the bow of our keychain, for this we are going to use a thread of a different color than the one the cat will have, so that it stands out much more, we start by making a magic ring and we go up 3 chains that will count as a double crochet, we link it and we are going to make two double crochets passing through the ring, we go up two chains and we are going to make a slip stitch passing through the ring, this would give us our first end of the bow and we repeat exactly the same thing again, 3 chains, 2 double crochets and 3 chains closing with a slip stitch, we close the ring, we cut the thread, long enough to pass it through the center of our bow and thus give it the shape we need, we tie it at the back and our bow is smooth.
Paso 2️⃣ / Step 2️⃣
Ahora vamos a proceder a realizar la primera pieza del llavero, hacemos un anillo mágico y levantamos 10 cadenas, ahora vamos a ubicar la quinta cadena, enlazamos dos veces y haremos un punto alto doble y en las siguientes 3 cadenas haremos puntos altos dobles, dándonos un total de 4 puntos altos dobles, en la siguiente cadena haremos un medio punto bajo y en la última cadena vamos a hacer un punto bajo, ahora en el anillo hacemos un punto deslizado, subimos 3 cadenas y procedemos a hacer 7 puntos altos, seguidamente hacemos 3 cadenas y cerramos en el anillo mágico con un punto deslizado, cerramos el anillo y nos ubicamos en el otro extremo del tejido donde repetiremos exactamente la misma secuencia de el primer extremo, y cerramos en la cadena base del comienzo, cortamos la hebra y la escondemos.
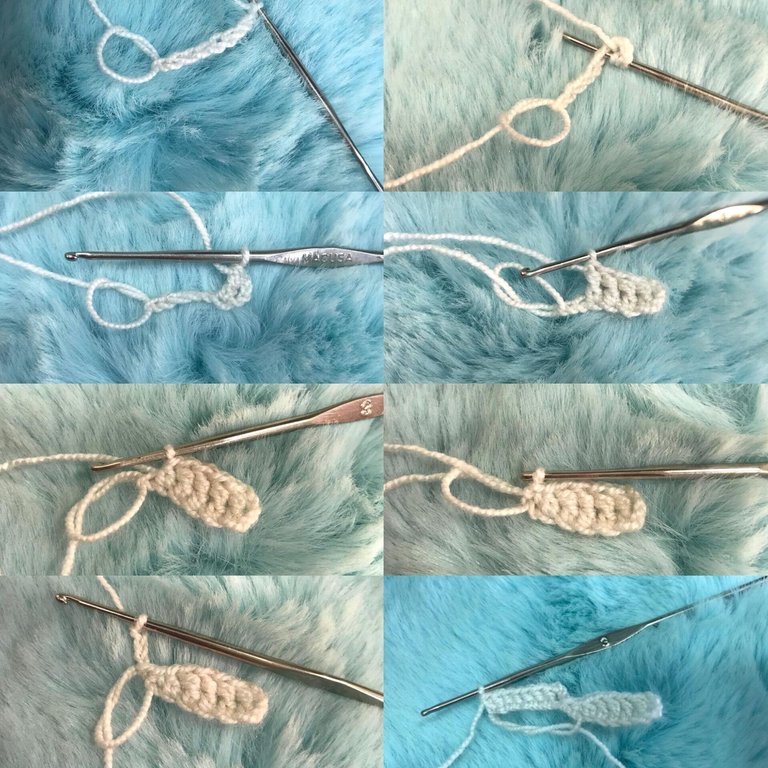
Now we are going to proceed to make the first piece of the keychain, we make a magic ring and we lift 10 chains, now we are going to locate the fifth chain, we link twice and we will make a double crochet and in the next 3 chains we will make double crochets, giving us a total of 4 double crochets, in the next chain we will make a half low crochet and in the last chain we are going to make a low crochet, now in the ring we make a slip stitch, we go up 3 chains and we proceed to make 7 high crochets, then we make 3 chains and we close in the magic ring with a slip stitch, we close the ring and we place ourselves at the other end of the fabric where we will repeat exactly the same sequence of the first end, and we close in the base chain of the beginning, we cut the thread and we hide it.
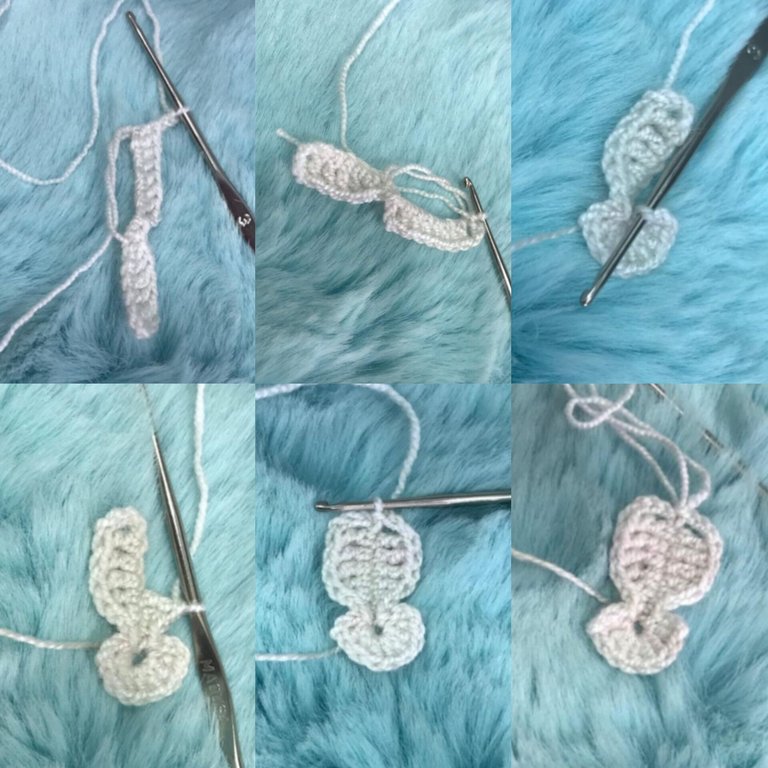
Paso 3️⃣ / Step 3️⃣
Lo que haremos ahora será elaborar una pieza idéntica a la que hicimos en el paso anterior, pero cuando llegamos al final del tejido, en vez de cortar la hebra, vamos a hacer lo que será la cola de nuestro gato, en mi caso como les dije anteriormente el llavero es inspirado en mi gatito así que hice cambio de color de hilo y luego levanté 9 cadenas, ahora vamos a enlazar el hilo, nos saltamos una cadena y en la siguiente haremos dos medios puntos bajos justo en el mismo espacio, saltamos a la siguiente cadena y hacemos un medio punto bajo, en la siguiente cadena hacemos nuevamente dos medios puntos bajos y en las restantes hacemos un medio punto bajo sobre cada una al llegar al comienzo de la cola, en mi caso que hice cambio de color, cerré con un punto deslizado y luego procedi a esconder la hebras.
What we will do now is make a piece identical to the one we made in the previous step, but when we get to the end of the weaving, instead of cutting the thread, we are going to make what will be the tail of our cat, in my case as I told you before the keychain is inspired by my kitten so I changed the color of the thread and then I picked up 9 chains, now we are going to link the thread, we skip a chain and in the next one we will make two half low stitches right in the same space, we skip to the next chain and make a half low stitch, in the next chain we make two half low stitches again and in the remaining ones we make a half low stitch over each one when we get to the beginning of the tail, in my case I made a color change, I closed with a slip stitch and then I proceeded to hide the threads.
Paso 4️⃣ / Step 4️⃣
Ahora vamos a unir el lazo a la pieza que lleva la cola, ubicamos el lugar donde lo pondremos, pasamos las hebras hacia la parte de atrás y aseguramos con un nudo, con esas hebras yo decidí hacer 3 puntitos en la cabeza del gato porque mi gato tiene esas manchitas también.
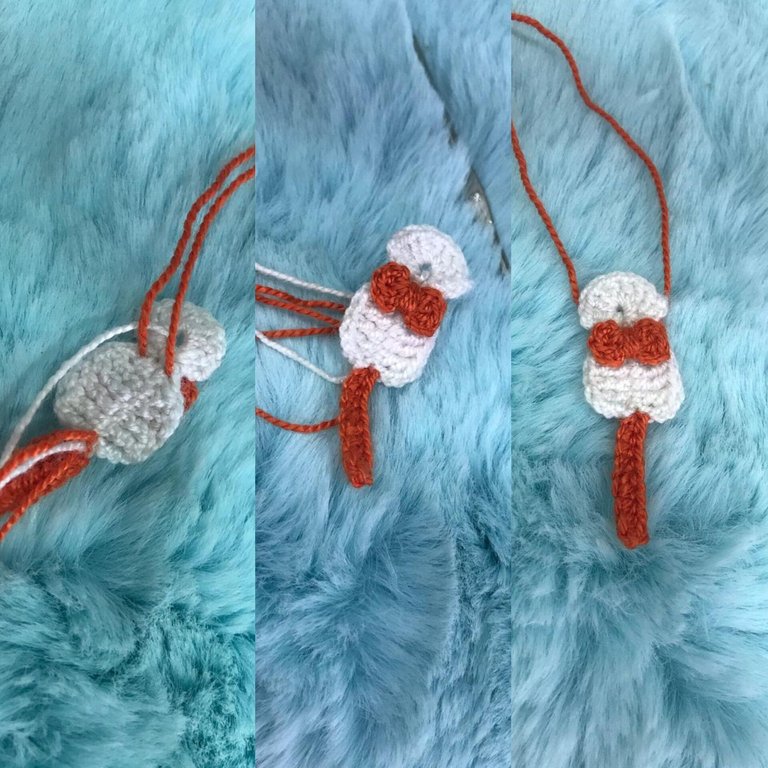
Now we are going to attach the bow to the piece that has the tail, we locate the place where we will put it, we pass the strands to the back and secure with a knot, with those strands I decided to make 3 dots on the cat's head because my cat has those spots too.
Paso 5️⃣ / Step 5️⃣
como último paso vamos a unir ambas piezas y esto lo haremos con puntos deslizados por el borde de ambas piezas, hasta que llegamos a la cabeza y vamos a hacer las orejitas, ubicamos el lugar y levantamos 3 cadenas, cerramos en la primera cadena y listo, hacemos la separación con puntos deslizados y elaboración la siguiente oreja, seguimos haciendo los puntos deslizados hasta llegar al final donde cerraremos con un punto deslizado, sacamos suficiente hebra y cortamos, escondemos cada una de las hebras, ponemos la argolla y la unimos a nuestras llaves y es así como queda listo nuestro llavero de gatito.

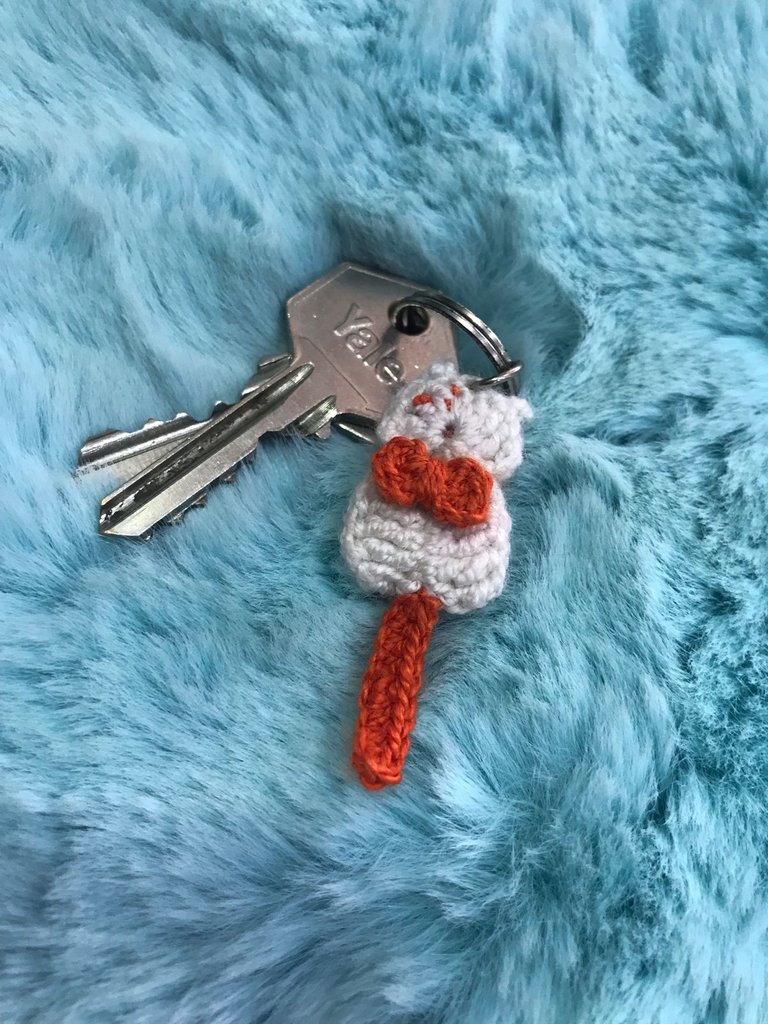
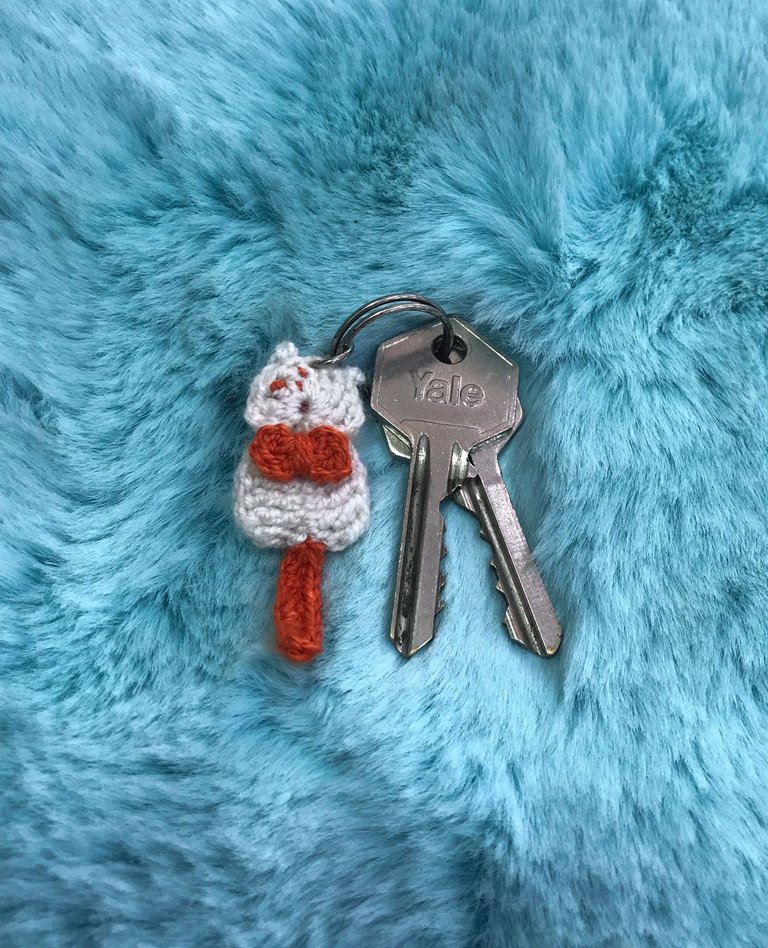
As a last step we are going to join both pieces and we will do this with slip stitches along the edge of both pieces, until we get to the head and we are going to make the little ears, we locate the place and we lift 3 chains, we close in the first chain and that's it, we make the separation with slip stitches and make the next ear, we continue making the slip stitches until we reach the end where we will close with a slip stitch, we take out enough thread and cut it, we hide each of the strands, we put the ring and we attach it to our keys and that's how our kitty keychain is ready.
Ustedes lo pueden personalizar como quieran y estoy segura que el resultado será igual de hermoso, espero les haya gustado, les mando un fuerte abrazo y nos vemos en un nuevo post ❤️✨
You can customize it as you want and I'm sure the result will be just as beautiful, I hope you liked it, I send you a big hug and see you in a new post ❤️✨
This kitten is really beautiful and cute. Your crochet looks very neat on you.