
Cómo lo prometido es deuda vamos a ir paso a paso iniciando en la costura para ser profesionales.
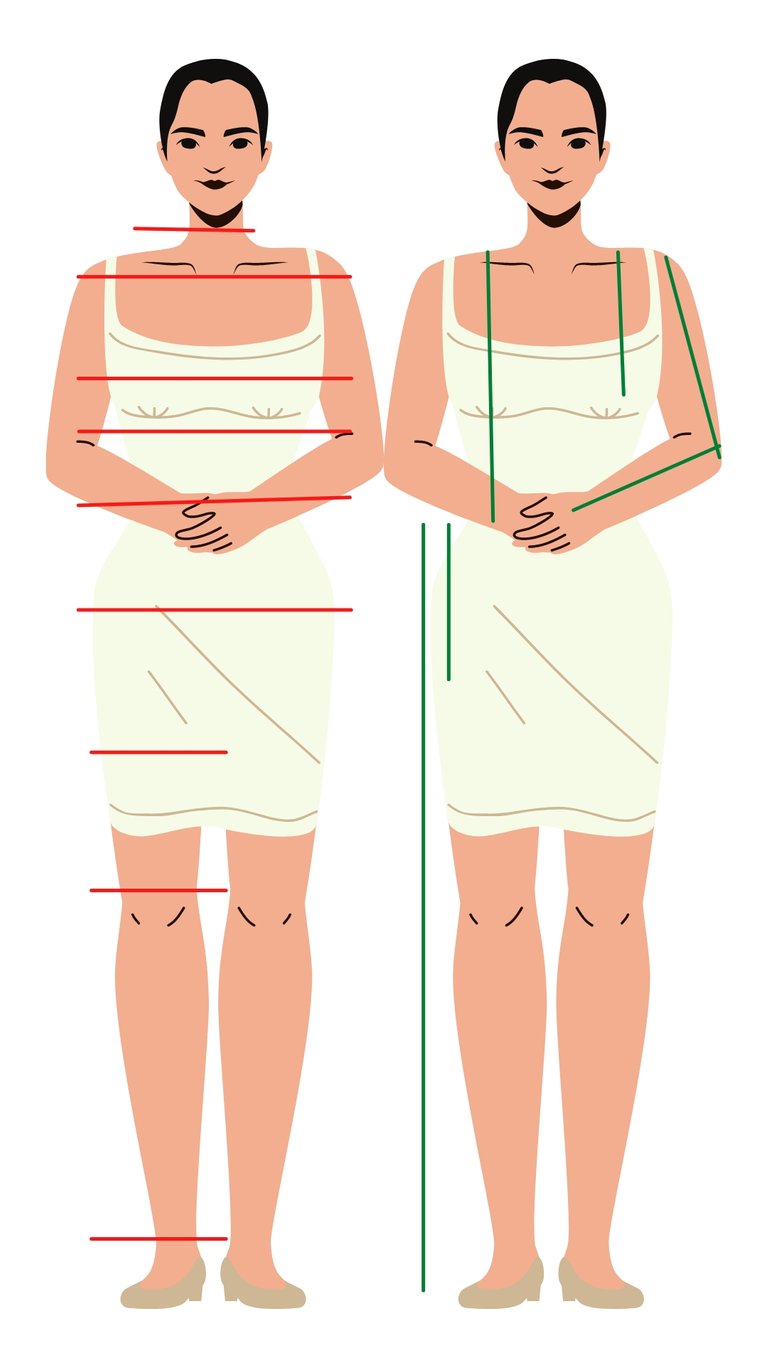
En la imagen se detalla con líneas las medidas a tomar para cada trabajo de costura, sin embargo medidas como tiro, profundidad de busto, separación de bustoa usaremos en trabajos más avanzados
Las líneas rojas son LAS MEDIDAS HORIZONTALES
Las medidas horizontales siempre se dividen, bien en 4 partes o en 2 partes.
Pero hay unas excepciones donde se dividen y luego se les suma cm, esto se hace con el fin de agregar las pinzas para su ajuste de la prenda.
Estas medidas que se les sumarán cm serán.
-Contorno de cintura + 3cm
se que ahorita suena un poco raro pero no lo es.
Estudiemos las imagen de arriba hacia abajo se tomarán las medidas así iremos con el siguiente orden y no se nos olvidarán ninguna
1.Cuello: se toma alrededor del cuello introdiciendo un dedo entre la cinta y la piel para que de aire a la prenda.
2.Busto' la persona debe usar el sostén o sujetador que más cómodo tenga, se tomará alrededor del busto pasando siempre por la parte las prominente.
3.Bajo busto: es una medida opcional que sirve para prendas como el crop top.
4.Cintura: alrededor del cuerpo de la persona y 1 dedo arriba del ombligo. A ésta medida después de dividir en 4 partes se le agregaran 3cm.
5.Caderas: contornos de caderas por la parte más ancha de la cadera, si la modelo o la persona tiene jeans se le restarán 1.5cm dependiendo del grosor del Jean.
6.Tobillos y rodillas estás medidas se toman en las partes correspondientes y solo se dividen en 2.
Medidas verticales, las medidas del largo de las prendas
En la imagen están marcadas en verde.
Aunque son menos medidas son de las más importantes pues te dan el largo de la prenda.
Volvemos a tomar de arriba hacia abajo.
1.Alto de busto: desde el nacimiento del cuello hasta el pezon. Como se dijo antes que se use un buen sostén, corpiño o sujetador es necesario para que la altura de busto quede idónea.
- Largo de talle Acá tenemos 2 talles uno delantero y uno de espalda, el delantero se toma desde el cuello pasando por el busto hasta la cintura.
Y el talle de espalda desde el nacimiento del cuello pasando por la espalda hasta la cintura.
3.Alto de cadera: el alto de cadera nos indica donde quedará el ancho de la cadera. Se toma desde la cintura hasta el dobles de la pierna.
4.largo total: el largo total es la suma del talle delantero más el largo de falda que va desde la cintura hasta el piso o el largo deseado.
¿CÓMO SE USAN EN UN PATRON
La estrategia de uso de las medidas hará que sea fácil o difícil realizar tu patrón, nosotros lo haremos *súper fácil. *
Este es un ejemplo claro de uso de medidas en un patrón básico de falda, este será otro post explicado paso a paso.
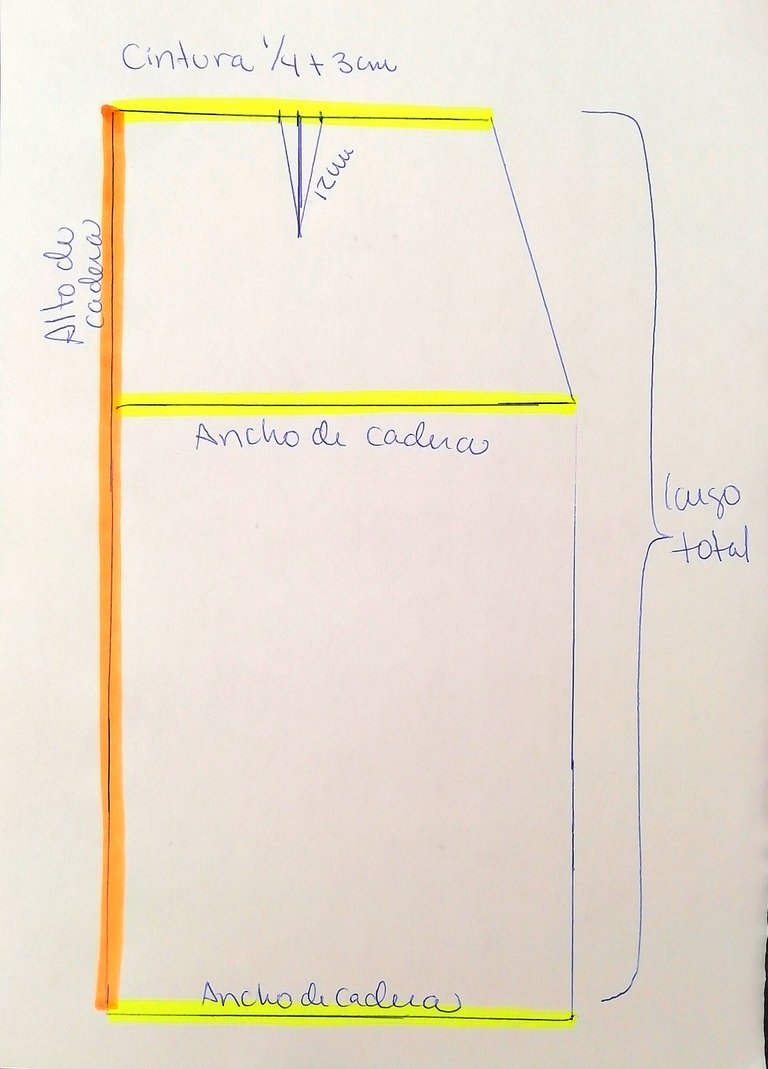
Cómo ven es simple su uso y como ir lanzando las medidas de verticales a horizontales.
Y finalmente les dejo los materiales que vamos a usar para hacer el patrón de falda.
-Papel.
-Lapiz.
-Escuadra.
Feliz de verlos por acá nos vemos la próxima.

How the promised is a debt, we are going to go step by step starting in sewing to be professionals.
In the image the measurements to be taken for each sewing job are detailed with lines, however measurements such as throw, bust depth, bust separation will be used in more advanced work.
The red lines are THE HORIZONTAL MEASUREMENTS
Horizontal measurements are always divided into either 4 parts or 2 parts.
But there are some exceptions where they are divided and then cm is added to them, this is done in order to add the darts for its adjustment of the garment.
These measurements that will be added cm will be. -Waist contour + 3cm I know it sounds a bit weird right now but it isn't.
Let's study the images from top to bottom, the measurements will be taken so we will go with the following order and we will not forget any
- Neck: it is taken around the neck by inserting a finger between the tape and the skin to give air to the garment.
- Bust 'The person must use the most comfortable bra or bra, it will be taken around the bust always passing through the prominent part. 3. Under bust: it is an optional measure that is used for garments such as the crop top.
- Waist: around the person's body and 1 finger above the navel. To this measure after dividing into 4 parts 3cm will be added.
- Hips: hips contours at the widest part of the hips, if the model or the person has jeans, 1.5cm will be subtracted depending on the thickness of the Jean.
- Ankles and knees These measurements are taken in the corresponding parts and are only divided into 2.
Vertical measurements, the measurements of the length of the garments
In the image they are marked in green.
Although they are fewer measures, they are the most important because they give you the length of the garment.
We go back to taking from top to bottom.
- Bust height: from the birth of the neck to the nipple. As it was said before that a good bra, bodice or bra is used, it is necessary for the bust height to be ideal.
- Waist length Here we have 2 sizes, one front and one back, the front is taken from the neck through the bust to the waist. And the back size from the neckline through the back to the waist.
- Hip height: the hip height indicates where the hip width will be. It is taken from the waist to the double of the leg.
- total length: the total length is the sum of the front waist plus the skirt length that goes from the waist to the floor or the desired length.
HOW ARE THEY USED IN A PATTERN
The strategy of using the measures will make it easy or difficult to make your pattern, we will make it super easy.
This is a clear example of using measurements in a basic skirt pattern, this will be another post explained step by step.
How they see it, its use is simple and how to launch the measurements from vertical to horizontal.
And finally I leave you with the materials that we are going to use to make the skirt pattern.
-Paper.
-Pencil.
-Squad.
Happy to see you here. See you next time.

Imágenes hechas con canva.
Picture made with canva.
Your content has been voted as a part of Encouragement program. Keep up the good work!
Use Ecency daily to boost your growth on platform!
Support Ecency
Vote for Proposal
Delegate HP and earn more
Thanks Ecency
Congratulations @karenconk! You have completed the following achievement on the Hive blockchain and have been rewarded with new badge(s) :
Your next target is to reach 40 posts.
You can view your badges on your board and compare yourself to others in the Ranking
If you no longer want to receive notifications, reply to this comment with the word
STOP