¡Hola, hola! Hivers y hermosa comunidad de NeedleWorkMonday, espero todos se encuentren súper bien, animados e inspirados 💟
🎉🎄 FELIZ lUNES DE AGUJAS!!!! 🎄🎉
No quiero quedarme sin participara en el concurso del mes de esta linda comunidad, así que aquí me tienen presentándoles mi entrada al NeedleWork Your Christmas CONTEST
Mi plan era presentar mi entrada el día de ayer pero como los planes de Dios van primero, ayer no se pudo pero el proyecto esta listo y se los presento.... Hermosos Imanes Navideños! (Edición Adornos)
La inspiración de crear imanes navideños surgió al darme cuenta que casi todos decoramos nuestros hogares muy lindos en estas fechas, pero dejamos la habitación mas usada de nuestras casas sin nada o casi nada de decoración... LA COCINA!
Asi que decidí que mis manualidades navideñas de este año serian dedicadas a este lugar donde se preparan los deliciosos platillos acostumbrados en estas fechas, y donde al menos en estas fechas pasamos un buen rato en familia y creando recuerdos y tradiciones maravillosas. O al menos asi ha sido para mi y mi familia 😊😍
Hello, hello! Hivers and beautiful NeedleWorkMonday community, I hope everyone is feeling super well, encouraged and inspired 💟
🎉🎄 HAPPY NEEDLE MONDAY!!!! 🎄🎉
I don't want to be left out of participating in this cute community's contest of the month, so here I am submitting my entry to the NeedleWork Your Christmas CONTEST.
My plan was to submit my entry yesterday but as God's plans come first, yesterday didn't work out but the project is ready and I present it to you.... Beautiful Christmas Magnets (Ornaments Edition).
The inspiration to create Christmas magnets came when I realized that almost all of us decorate our homes very nice in these dates, but we leave the most used room of our homes with nothing or almost nothing of decoration .... THE KITCHEN!
So I decided that my Christmas crafts this year would be dedicated to this place where the delicious dishes are prepared, and where at least at this time of the year we spend a good time with our families and create wonderful memories and traditions. Or at least that's how it has been for me and my family 😊😍
<center
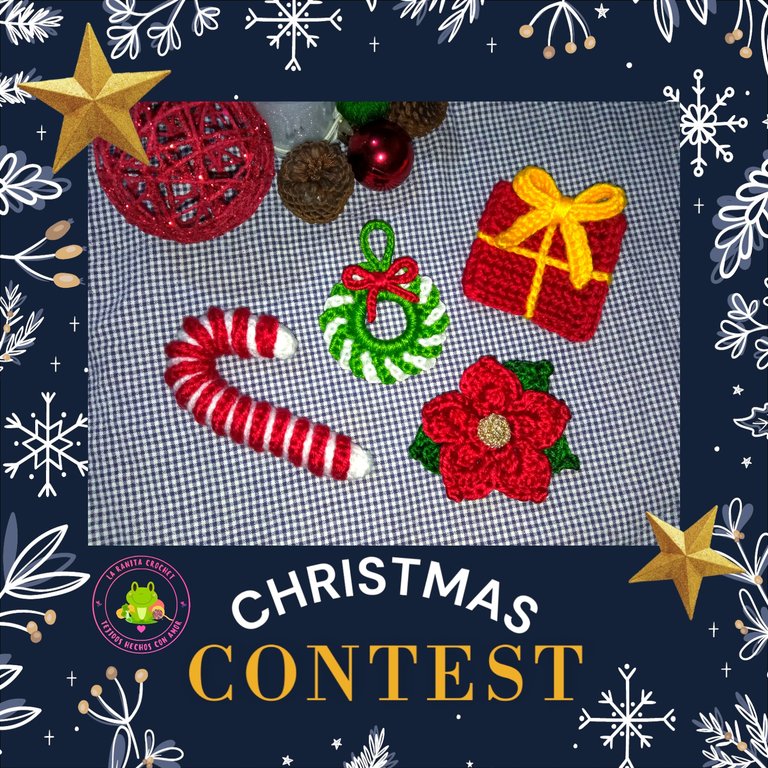
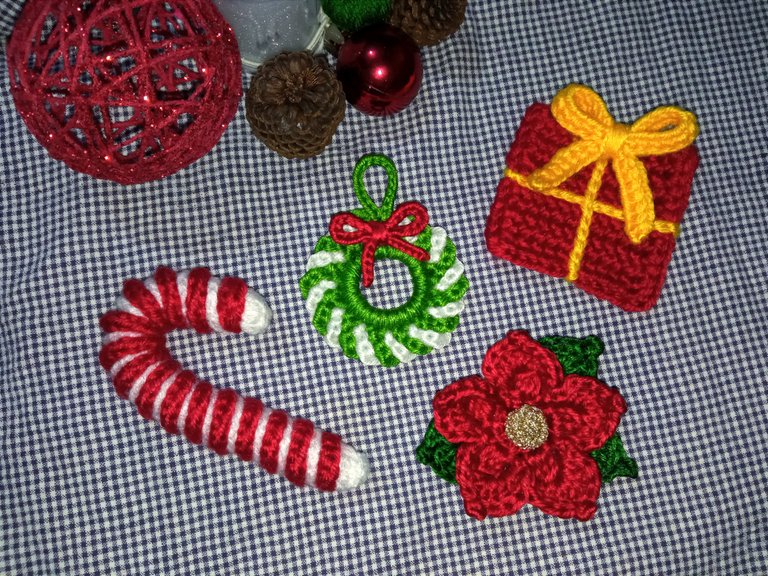
Por ahora son solo 4 tipos de adornitos versión imanes, pero pronto serán mas jajaja... es que de verdad me encanto el resultado y cabe destacar que las fotos no le hacen justicia a lo lindos que se ven pegados en la nevera.

🎉🎄🎁MATERIALES 🎁 🎄🎉
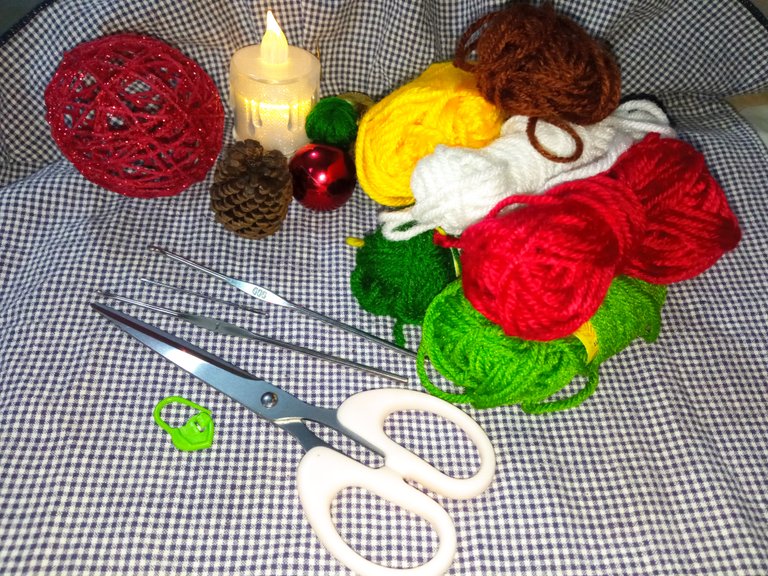
🎁 Estambres en color rojo, verde, amarillo, blanco.
🎁Ganchillo #000.
🎁Aguja lanera.
🎁Tijeras.
🎁Marcador de puntos.
🎁Silicón caliente.
🎁Imanes.
For now there are only 4 types of magnets, but soon there will be more hahaha... I really love the result and it should be noted that the photos do not do justice to how cute they look stuck on the fridge.

🎉🎄🎁MATERIALS 🎁 🎄🎉.
🎁 Stamens in red, green, yellow, yellow, white.
🎁 Crochet hook #000.
🎁 Wool needle.
🎁 Scissors.
🎁 Stitch marker.
🎁 Hot glue.
🎁 Magnets.
🎉🎄🎁 PROCESO DE CREACION 🎁 🎄🎉
Para los patrones de estos adornitos tejidos a crochet hay muchísimos tutoriales y diagramas en internet y cada diseño es de un canal diferente de you tube, y estas creadoras son ecelentes maestras crocheteras.
Bastón de caramelo:
Del canal de Hablemos de Magia Crochet
Corona: Canal de Vichy Handmade
Flor de pascua:
Del canal Katitas Crochet
Y la caja de regalo 🎁 de uno de mis favoritos... El canal de Crochetlove
Igual les dejo mi resumen del proceso de tejido de cada uno:
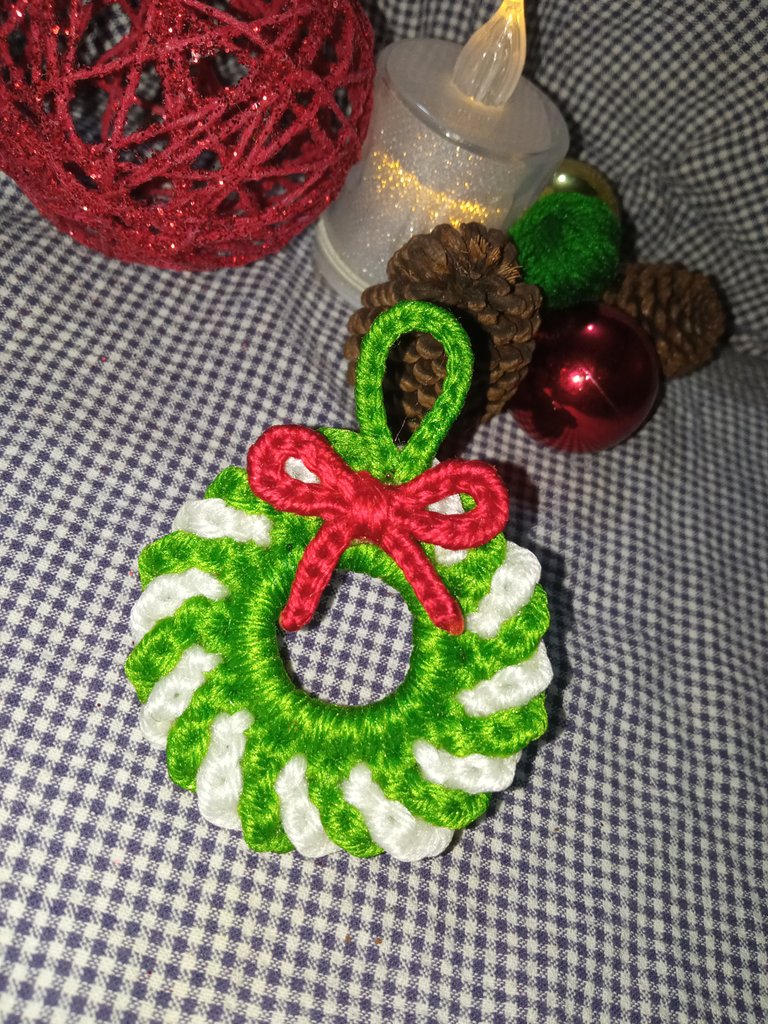
🎀Corona🎀
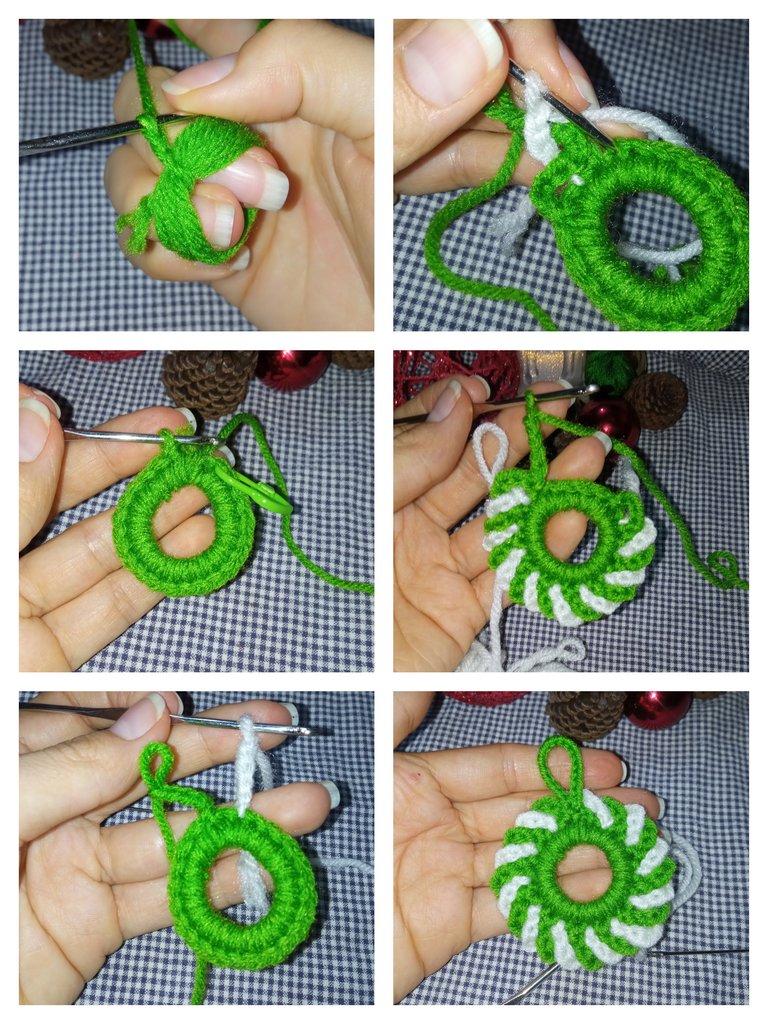
Inicie haciendo un anillo de hilo de 8 vueltas, y sobre este teji una primera vuelta 23 puntos bajos cerrada con un punto deslizado.
Para la siguiente vuelta se teje intercalando cadenetas de 5 puntos en color verde y blanco, y uniéndolas con punto deslizado en cada punto de la vuelta anterior.
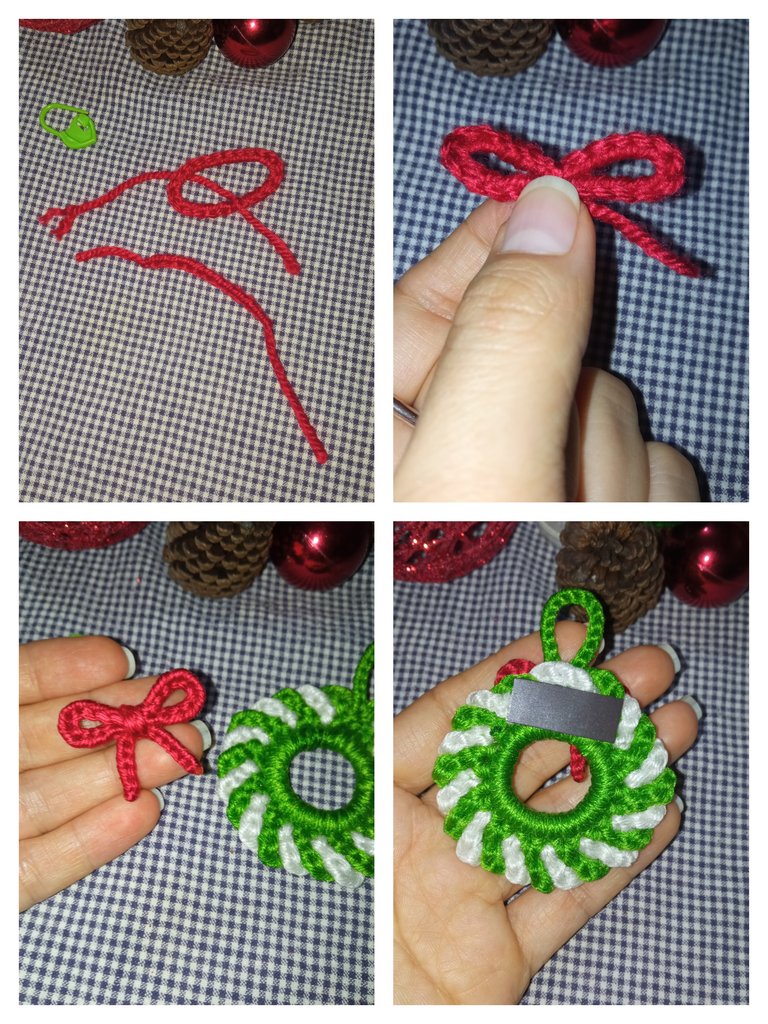
Y el pequeño lazo lo realice tejiendo un aro de 24 puntos cadena y una tira de 12 puntos cadena, uniéndolas enrollando un trozo de estambre del mismo color, y dando la forma de lazo.
Y luego simplemente pegue el lazo en su lugar y también pegue un pedacito de imán en la parte trasera.
🎉🎄🎁 CREATION PROCESS 🎁 🎄🎉🎄🎉
For the patterns of these crocheted ornaments there are lots and lots of tutorials and diagrams on the internet and each design is from a different you tube channel, and these creators are excellent crochet masters.
Candy cane:
From Let's Talk Crochet Magic channel
Wreath: Vichy Handmade channel
Poinsettia:
From the Katitas Crochet channel
And the gift box 🎁 From one of my favorites.... The Crochetlove channel.
I'll still leave you with my summary of the knitting process for each one:
🎀Crown🎀
I started by making a ring of yarn of 8 rounds, and over this I knitted a first round 23 low stitches closed with a slip stitch.
For the next round I knitted interlocking chains of 5 stitches in green and white color, and joining them with slipped stitch in each stitch of the previous round.
And the small loop I made by knitting a ring of 24 chain stitches and a strip of 12 chain stitches, joining them by rolling a piece of yarn of the same color, and giving the loop shape.
And then simply glue the loop in place and also glue a little piece of magnet on the back.
🍬 Bastón de Caramelo🍭
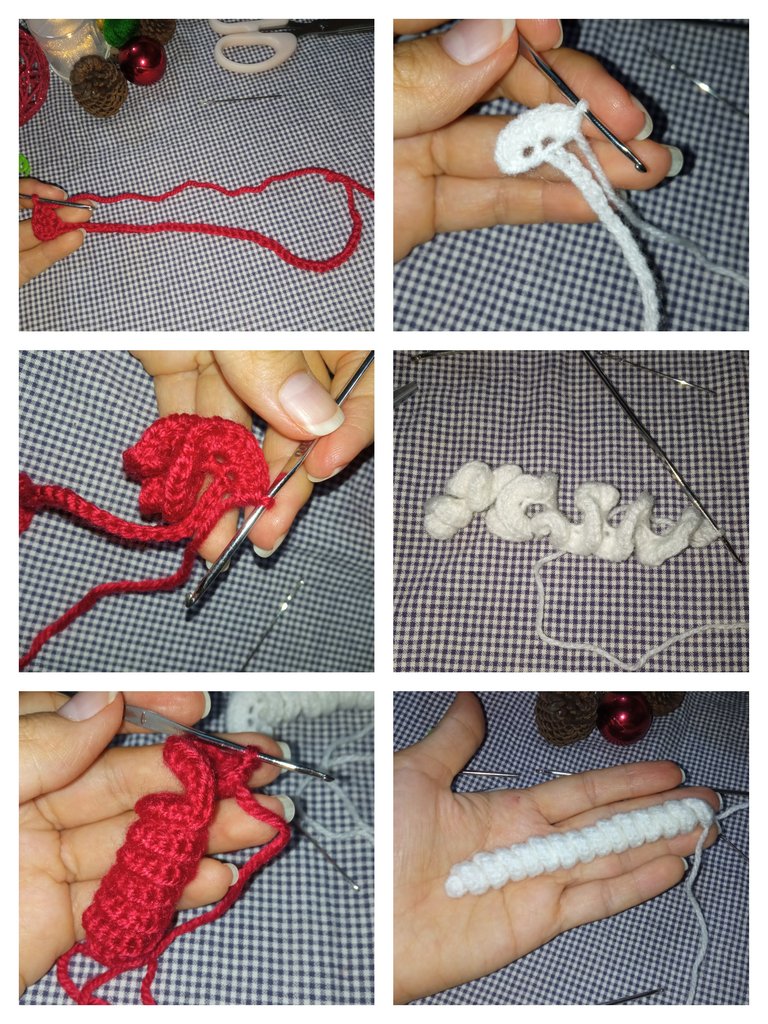
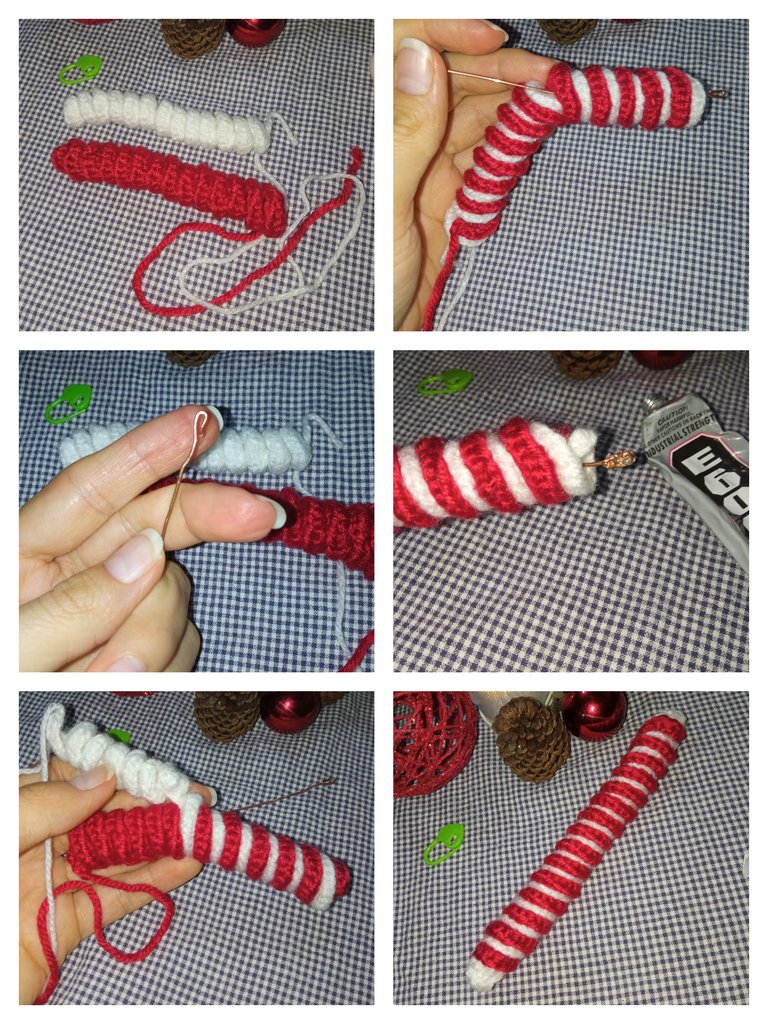
Este fue el patron mas facil de seguir, ya que simplemente debemos tejer una cadeneta de 45 puntos y luego tejer 4Pa en cada punto; y repetir este proceso con ambos colores.
La complicación que se me presento fue que el estambre rojo y blanco no tenían el mismo grosor, pues el estambre rojo era mas grueso así que hice varios intentos cambiando el tipo de punto, y combinando un hilo lame rojo con uno crochet rojo para intentar dar con el grosor del estambre blanco y que todo quedara parejo, este proceso me canso bastante las manos y me dolían los dedo, pero igual no deje de tejer jajaja...
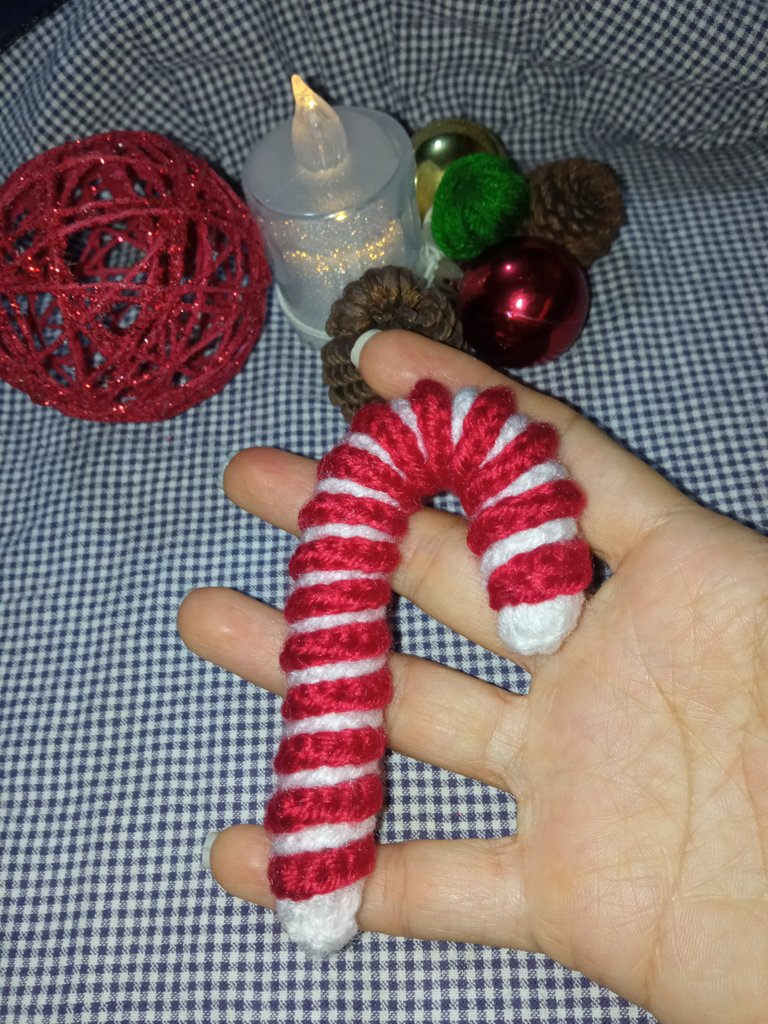
Al final termine tejiendo con los estambres iniciales y a pesar de la diferencia de espesor el resultado me gusto y continué con el armado del caramelo, una vez listo el tejido se entrelazan las dos piezas y seguido a esto se enrolla en un alambre para poder darle forma al caramelo, y para finalizar le pequé 2 piezas de imán el la parte posterior.
🍬 Candy Cane🍭
This was the easiest pattern to follow, as we simply knit a chain of 45 stitches and then knit 4Pa in each stitch; and repeat this process with both colors.
The complication I had was that the red and white yarn did not have the same thickness, because the red yarn was thicker so I made several attempts changing the type of stitch, and combining a red lame yarn with a red crochet one to try to find the thickness of the white yarn and that everything would be even, this process made my hands quite tired and my fingers hurt, but still I did not stop knitting hahaha ....
In the end I ended up weaving with the initial stamens and despite the difference in thickness I liked the result and continued with the assembly of the candy, once the fabric is ready the two pieces are intertwined and followed this is wound on a wire to shape the candy, and finally I stuck 2 pieces of magnet on the back.
🎁 Regalo 🎁
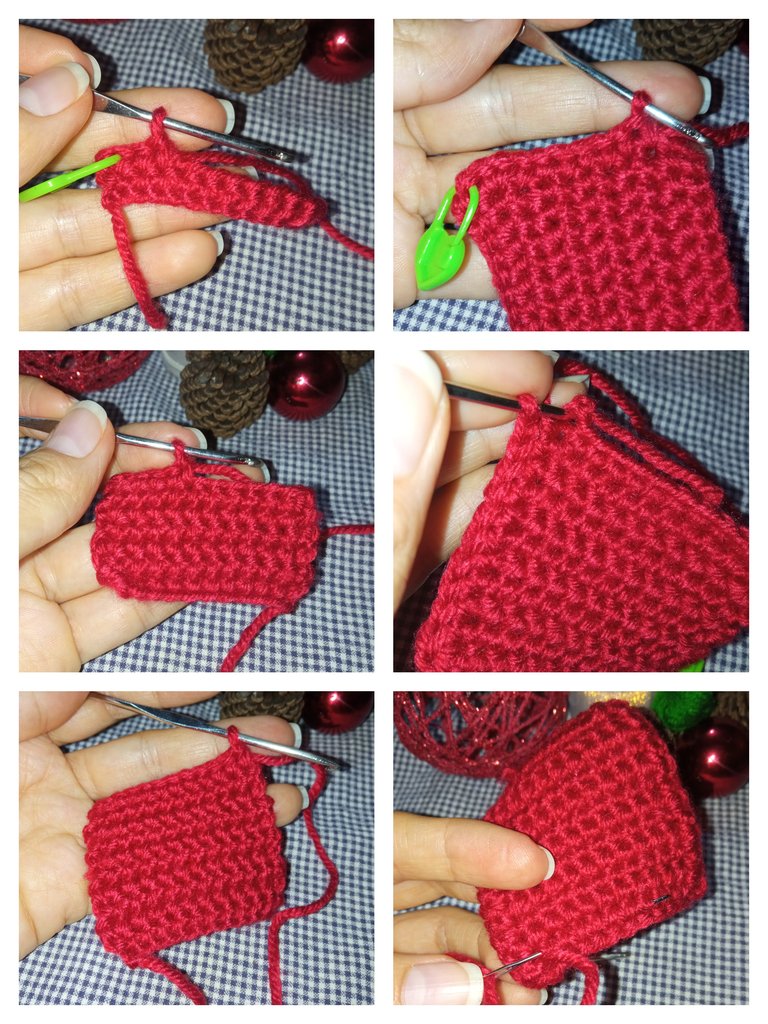
Este fue el mas rápido de tejer para mi, ya que el tejido es plano, se inicia tejiendo una cadena base de 12 puntos, y luego se tejen 11Pb, y así continuamos tejiendo 11Pb hasta tener 10 vueltas, luego se tejen puntos bajos por todos los bordes del cuadrado y para que las esquinas queden bien formadas en se teje una secuencia de (1Pb, 1mpa, 1Pb) en cada punto de esquina mientras se teje el borde.
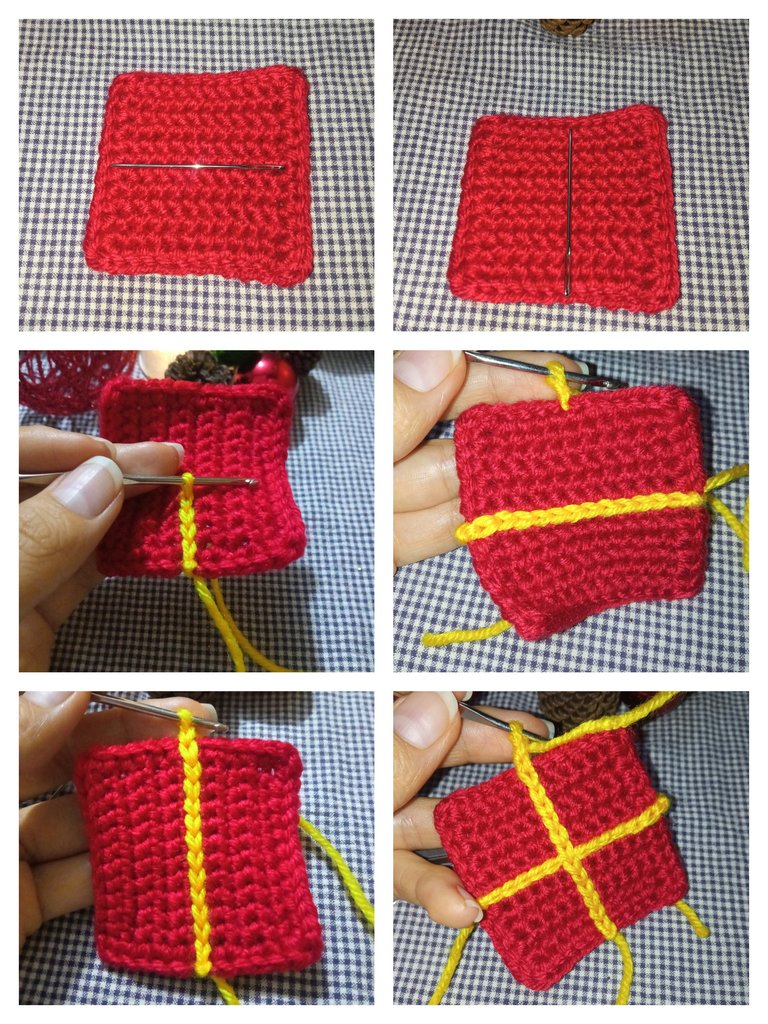
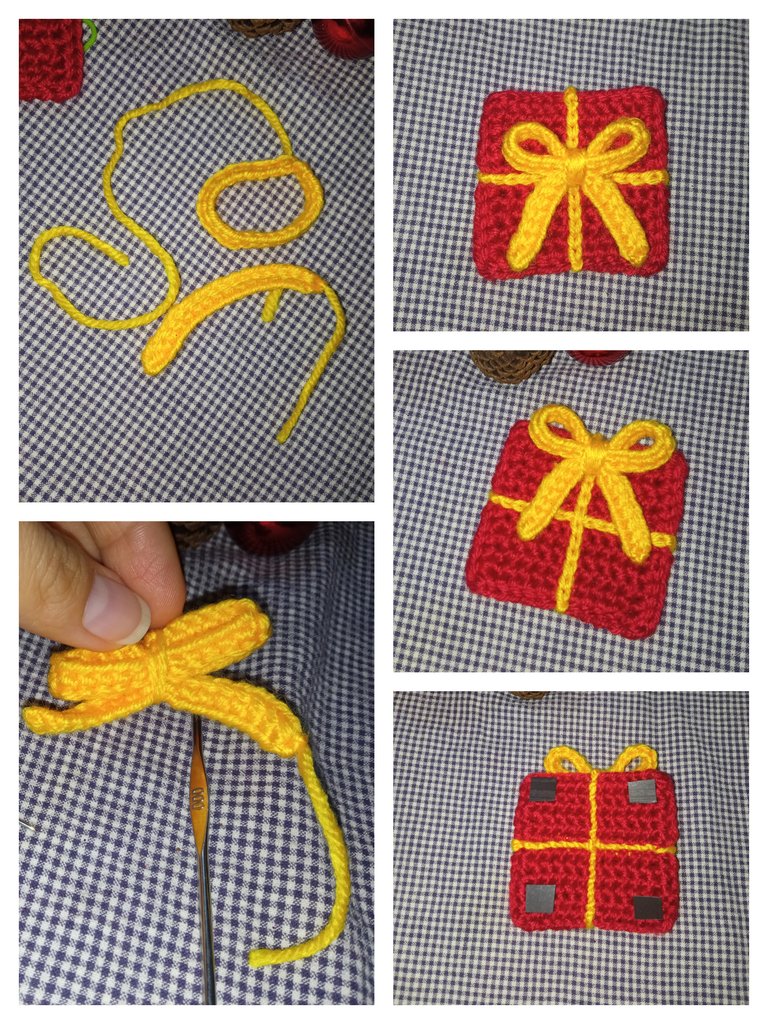
Luego se teje una línea de puntos deslizados de manera que simulen una cinta sujetando la envoltura de la caja y se teje y se pega el lazo.
A este adorno le peque un cuadradito de imán en cada esquina para asegurarme de que no se deformara cuando este pegado en la nevera.
🎁 Gift 🎁
This was the quickest one for me to knit, since the knitting is flat, you start by knitting a base chain of 12 stitches, and then knit 11Pb, and so we continue knitting 11Pb until we have 10 rounds, then you knit low stitches all around the edges of the square and to get the corners nicely shaped in you knit a sequence of (1Pb, 1mpa, 1Pb) in each corner stitch while knitting the edge.
Then knit a line of slipped stitches so that they simulate a ribbon holding the box wrapper and knit and glue the loop.
I attached a small square magnet to each corner of this ornament to make sure it wouldn't warp when it was stuck on the fridge.
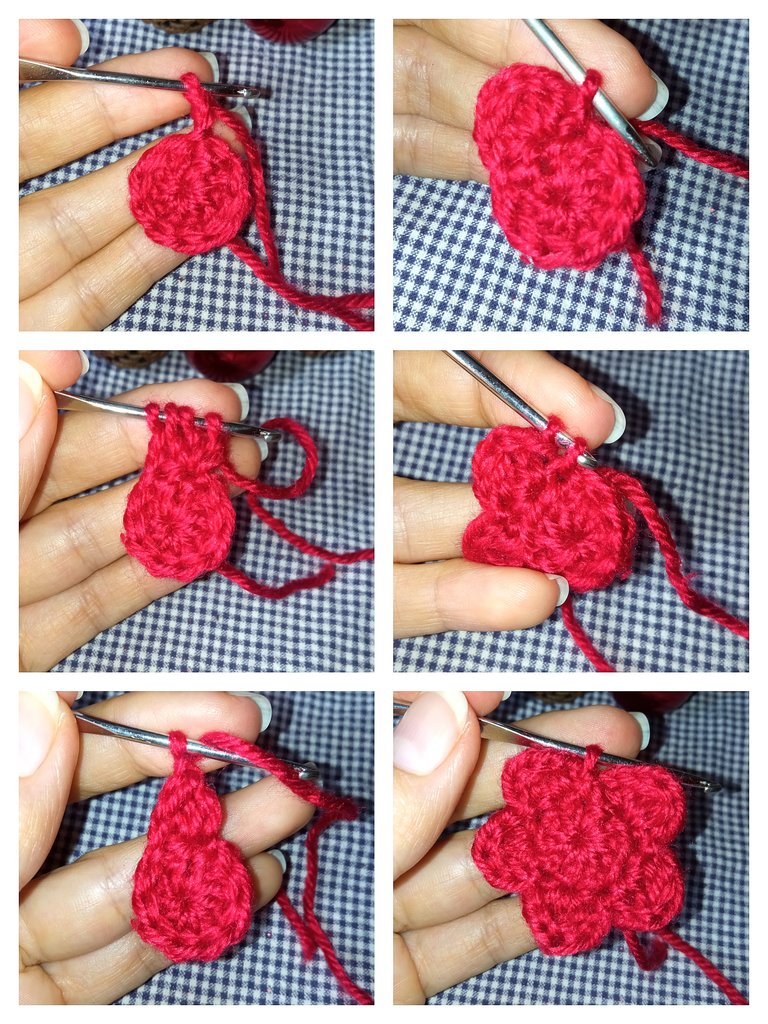
🌟 Flor de Navidad 🎄
Este fue mi adorno favorito y tambien el de mi mama, ella ama las flores de navidad, asi que al mostrarcela lista quedo enamorada jajaja...
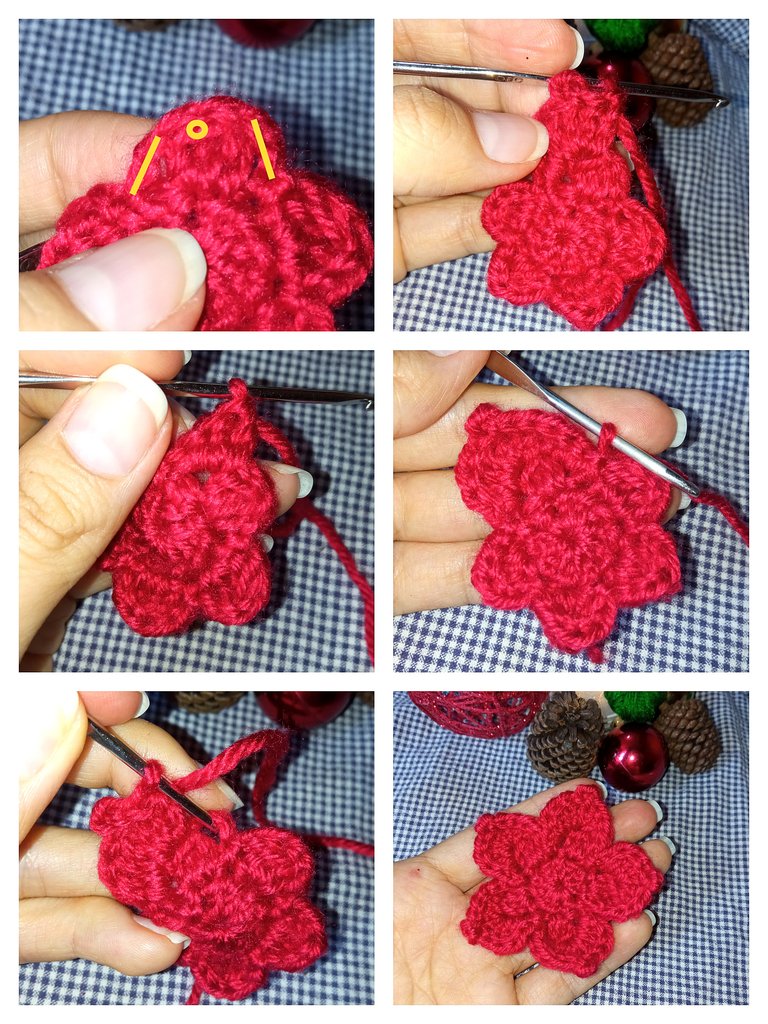
Para tejerla se inicia con un circulo base de 10Pb sobre un anillo mágico, luego se teje la base de los pétalos tejiendo la siguiente secuencia (2cad, 3Pa cerrados juntos, 2cad, Pd)x 5 veces.
Y la ultima vuelta que es donde le damos la forma a los petalos de la flor tejemos de la siguiente manera sobre cada base de petalo, sobre la primera cadeneta de 2 puntos se teje (1Pb, 2Pa), sobre el punto que se forma al unir los 3Pa cerrados juntos tejemos la siguiente secuencia, ( 2Pa, picot de 2 cad, 2Pa), y sobre la cadeneta que sigue hacemos ( 2Pa, 1Pb) y para finalizar el petalo se teje 1Pd en el mismo punto donde hicimos el Pd de la vuelta anterior.
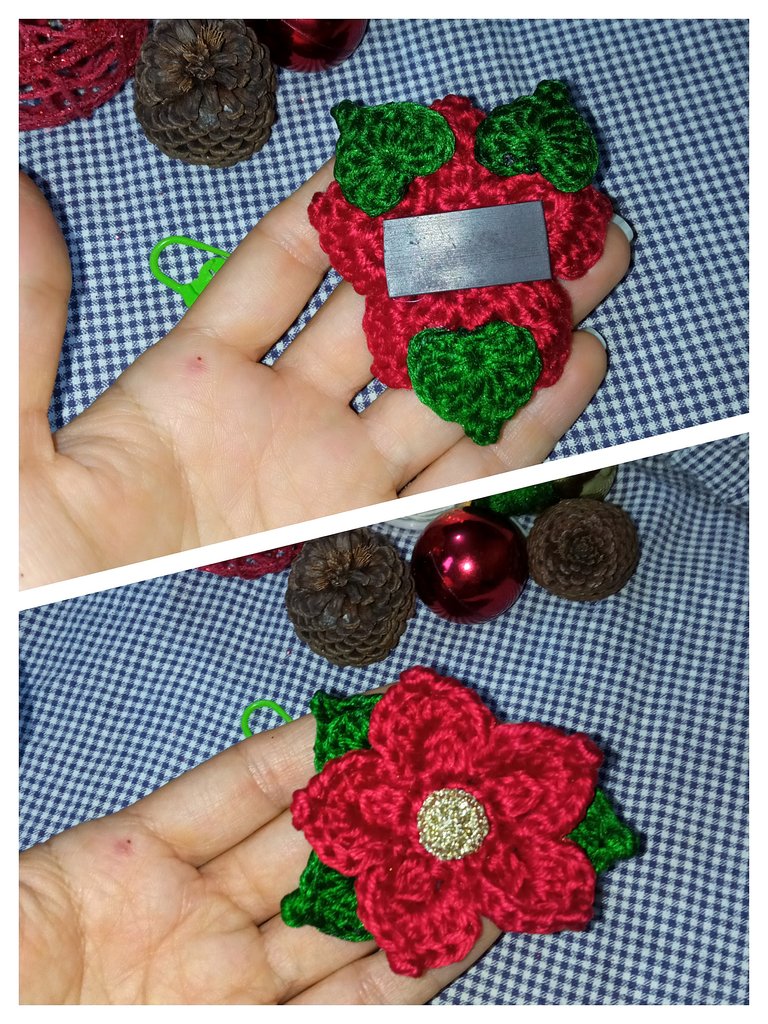
Para las hojas, que en mi caso decidí que fueran 3, lo que hacemos es tejer dentro de un anillo mágico lo siguiente: 3cad, 5Pa, picot de 2cad, 5Pa, 2cad, y un punto deslizado, cerramos el anillo mágico y ya tenemos lista la hoja de nuestra flor.
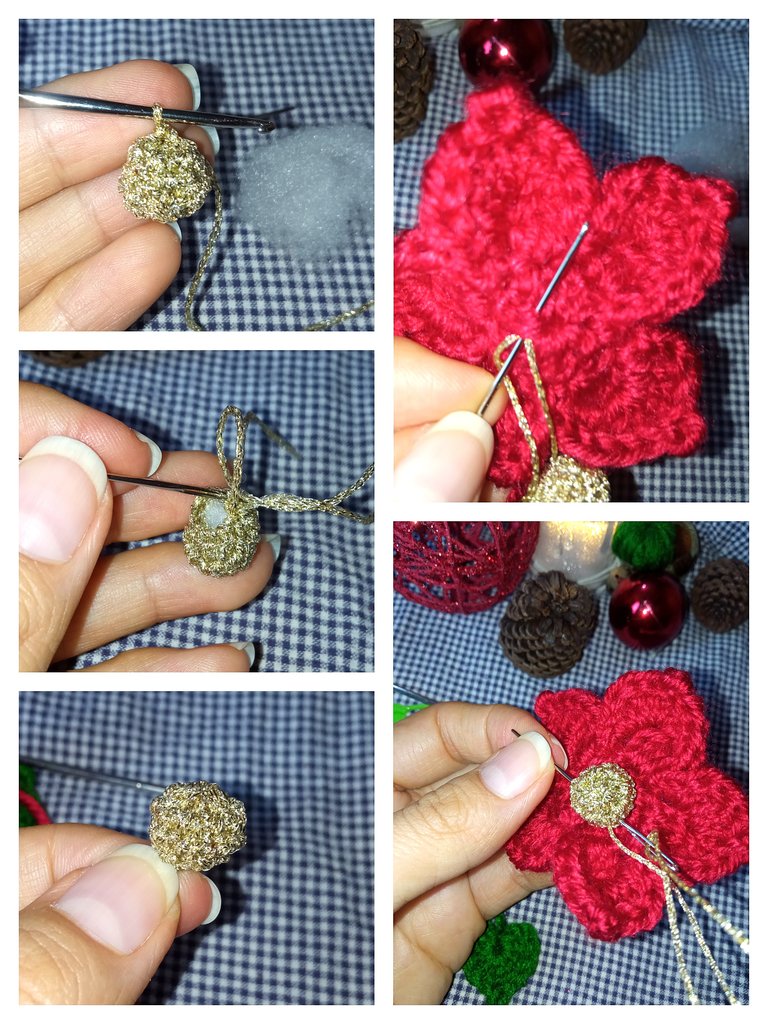
Y también tejí una pequeña esfera con hilo lame dorado para colocarla en el cetro de la flor.
🌟 Christmas flower 🎄
This was my favorite ornament and also my mom's, she loves Christmas flowers, so when I showed it ready she was in love hahaha....
To knit it you start with a 10Pb base circle over a magic ring, then you knit the base of the petals by knitting the following sequence (2cad, 3Pa closed together, 2cad, Pd)x 5 times.
And the last row, which is where we give the shape to the petals of the flower, we knit as follows on each petal base, on the first chain of 2 stitches we knit (1Pb, 2Pa), over the stitch formed by joining the 3Pa closed together we knit the following sequence, ( 2Pa, picot of 2 cad, 2Pa), and over the next chain we knit ( 2Pa, 1Pb) and to finish the petal we knit 1Pd in the same stitch where we knit the Pd of the previous row.
For the leaves, which in my case I decided to make 3, what we do is knit inside a magic ring the following: 3cad, 5Pa, picot of 2cad, 5Pa, 2cad, and a slipped stitch, close the magic ring and we have the leaf of our flower ready.
And I also wove a small sphere with gold lame thread to place on the flower's scepter.
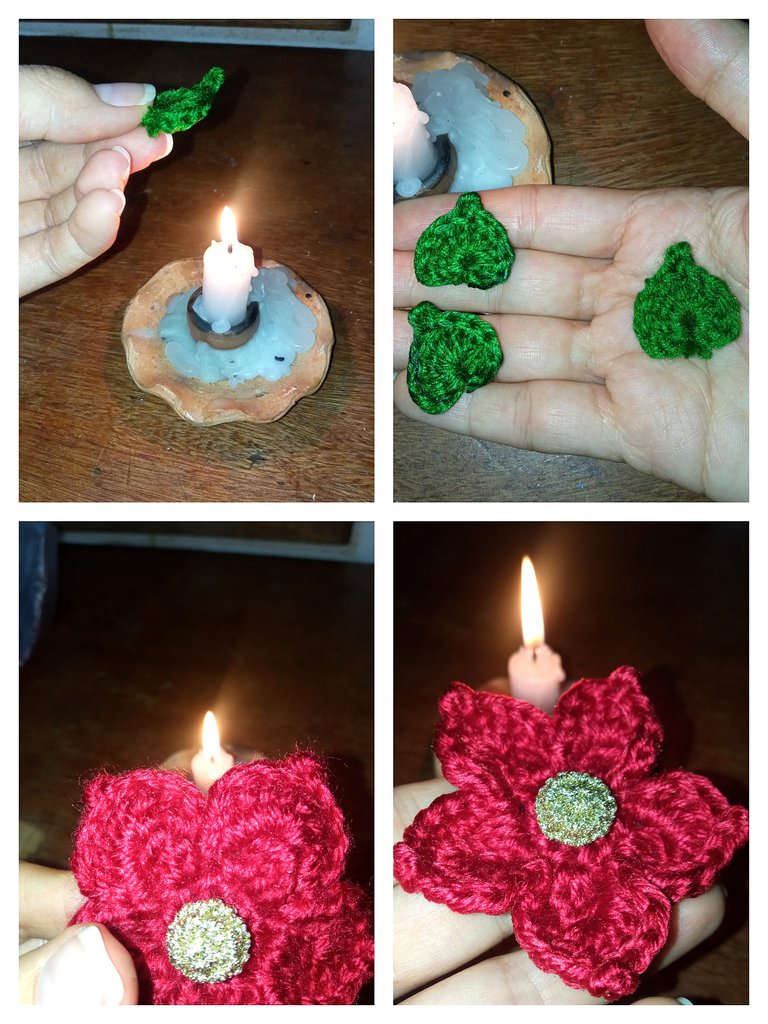
Al finalizar cada adornito tejido y antes de armarlos y pegarles el imán, los pasaba por la llama de una vela para eliminar la pelusa del hilo y se puede apreciar la diferencia del antes y después en la siguiente fotografía, hacer esto le da un mejor acabado al producto tejido con estambre, y le da un hermoso brillo.
At the end of each woven ornament and before assembling and gluing the magnet, I passed them through the flame of a candle to remove the lint from the yarn and you can see the difference before and after in the following picture, doing this gives a better finish to the product woven with yarn, and gives it a beautiful shine.
REALMENTE DESEO LES HAYA GUSTADO TANTO COMO A MI Y EL PROCESO DE CREACION Y EL RESULTADO FINAL DE ESTOS HERMOSOS IMANES NAVIDEÑOS TEJIDOS A CROCHET Y LES MOTIVE A TAMBIEN DECORAR SUS COCINAS CON ALGUN DETALLITO DE NAVIDAD.
I REALLY HOPE YOU LIKED AS MUCH AS I DID THE CREATION PROCESS AND THE FINAL RESULT OF THESE BEAUTIFUL CROCHETED CHRISTMAS MAGNETS AND THAT IT WILL MOTIVATE YOU TO ALSO DECORATE YOUR KITCHEN WITH A LITTLE CHRISTMAS DETAIL.
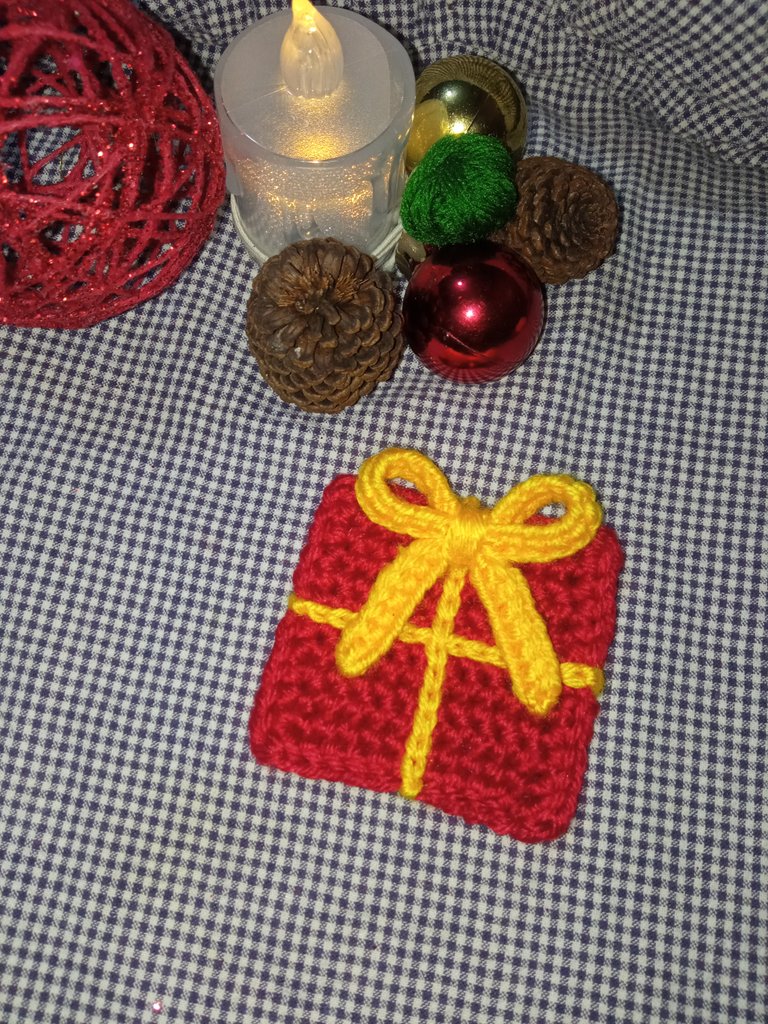
Resultado Final / Final Result
ESPERO SUS BONITOS COMENTARIOS Y/O VOTOS, ASÍ ME MOTIVAN PARA SEGUIR COMPARTIENDO MIS CREACIONES CON USTEDES, YO ESTARÉ FELIZ DE RESPONDER TODOS SUS COMENTARIOS, ¡SEAN FELICES Y QUE LA MUSA DE LA CREATIVIDAD NUNCA LOS ABANDONE!
¡GRACIAS POR VISITAR MI BLOG!
Se despide de ustedes con mucho cariño su amiga Nathalie @laranitacrochet
I LOOK FORWARD TO YOUR NICE COMMENTS AND/OR VOTES, THIS WAY YOU MOTIVATE ME TO KEEP SHARING MY CREATIONS WITH YOU, I WILL BE HAPPY TO ANSWER ALL YOUR COMMENTS, BE HAPPY AND MAY THE MUSE OF CREATIVITY NEVER LEAVE YOU!
THANK YOU FOR VISITING MY BLOG!
Your friend Nathalie @laranitacrochet bids you a fond farewell.
*Todas las fotografías utilizadas en la publicación son propiedad de la autora.
*Las fotografías fueron tomadas y editadas con mi REDMI 9 y con la App FotoRoom.
*La traducción la hice en https://www.deepl.com/es/translator
*All photographs used in this publication are property of the author.
*The pictures were taken and edited with my REDMI 9 and the FotoRoom App.
*The translation was done at https://www.deepl.com/es/translator
Hola.
Todos están muy lindos. Pensé en hacer unos para mí nevera, pero no sé si me de tiempo.
Te deseo mucha suerte 🍀 en este bello concurso 🙋🏽♀️
Muchas gracias Lelys 😊🤗 bueno si te animas estoy segura que en un solo día los tienes listos
What a beautiful Craft, they look nice, thanks for sharing.
Thank you very much ☺️🎄
Discord Felicitaciones, su publicación ha sido votada por @ dsc-r2cornell. Puedes usar el tag #R2cornell. También, nos puedes encontrar en
Te quedaron muy lindos, tu nevera es de admirar con estas bellezas decorativas.
Muchas gracias @lauracratf , la verdad si se ve muy hermosa 😁🤩
Gracias a ti también por compartir tu trabajo.🙂
¿ᴺᵉᶜᵉˢᶦᵗᵃˢ ᴴᴮᴰ? ᵀᵉ ˡᵒ ᵖʳᵉˢᵗᵃᵐᵒˢ ᶜᵒⁿ
Congratulations @laranitacrochet! You have completed the following achievement on the Hive blockchain And have been rewarded with New badge(s)
Your next target is to reach 1000 replies.
You can view your badges on your board and compare yourself to others in the Ranking
If you no longer want to receive notifications, reply to this comment with the word
STOP