Hola, mi gente linda de @needleworkmonday, un gusto visitarlos y ver sus lindas creaciones. Espero que estén pasando una estupenda semana. Por aquí todo bien gracias a Dios.
Mientras les escribo, voy en la vía a otro municipio a sacarle la cédula de identidad a mi hija @ariannamc. Luego les estaré contando en mi blog cómo nos fue. Vamos tarde, porque mi esposo estaba en la cola de la gasolina, pero creo que sí nos da tiempo llegar.
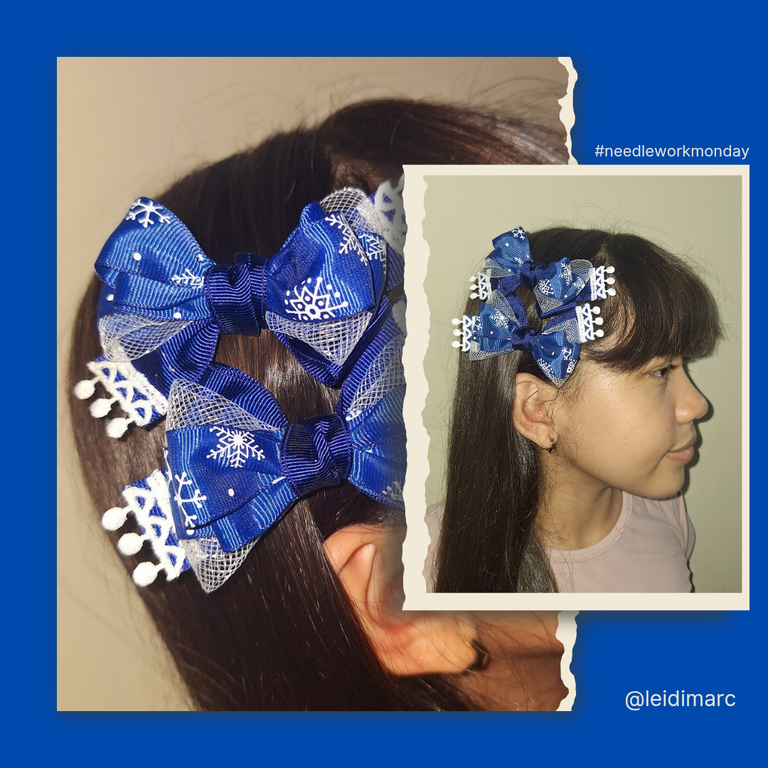
Por otro lado, vengo a mostrarles cómo estuve realizando estos mini lazos para el cabello, un accesorio muy lindo para las niñas. Estos son para usarlos con el uniforme escolar, pero bien se pueden usar con cualquier tipo de ropa y también se puede realizar de otros colores.
Materiales
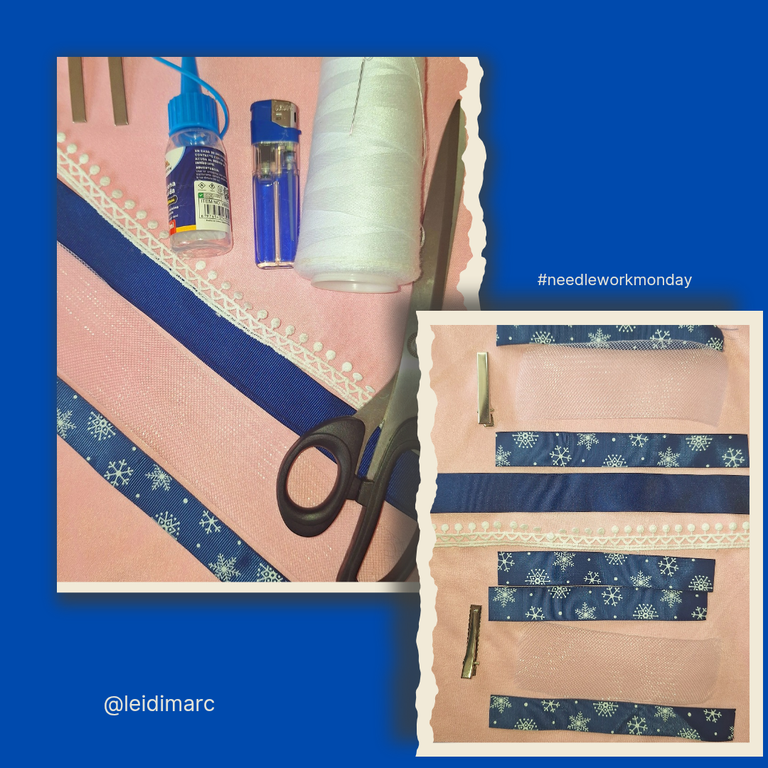
Para este bonito proyecto estuve usando los siguientes materiales:
Cinta de gros estampada de 2,5 cm.
Cinta de gros unicolor de 2,5 cm.
Una malla doble o en forma de tubo de 4 cm de ancho.
Pinzas.
Encaje bordado.
Hilo y aguja.
Tijera y regla.
Encendedor y silicona.
Medidas de las cintas
A continuación les dejo las medidas de las cintas Para la elaboración de 1 solo lazo. Hay que cortar el doble de piezas para hacer el par.
1 malla de 15 cm por 4 cm.
1 cinta estampada de 2,5 cm por 15 cm.
2 cintas estampadas de 2,5 cm por 14 cm.
1 cinta unicolor de 2,5 cm por 26 cm.
1 cinta unicolor de 2,5 cm por 8 cm.

Estos lazos son muy sencillos de hacer con solo ver las imágenes; puede realizarlos paso a paso.
Lo primero que hice fue el lazo de malla, doblándola a la mitad y luego uniendo los extremos hacia el centro y le pasé costura. De este mismo modo lo hice con la cinta estampada que abrazaba la maya.
Luego con la cinta unicolor hice otro lazo, marcando la mitad y luego sus extremos los llevé hacia el centro, pero dejando unos 2 cm hacia sus lados opuestos. Finalmente pasé costura.
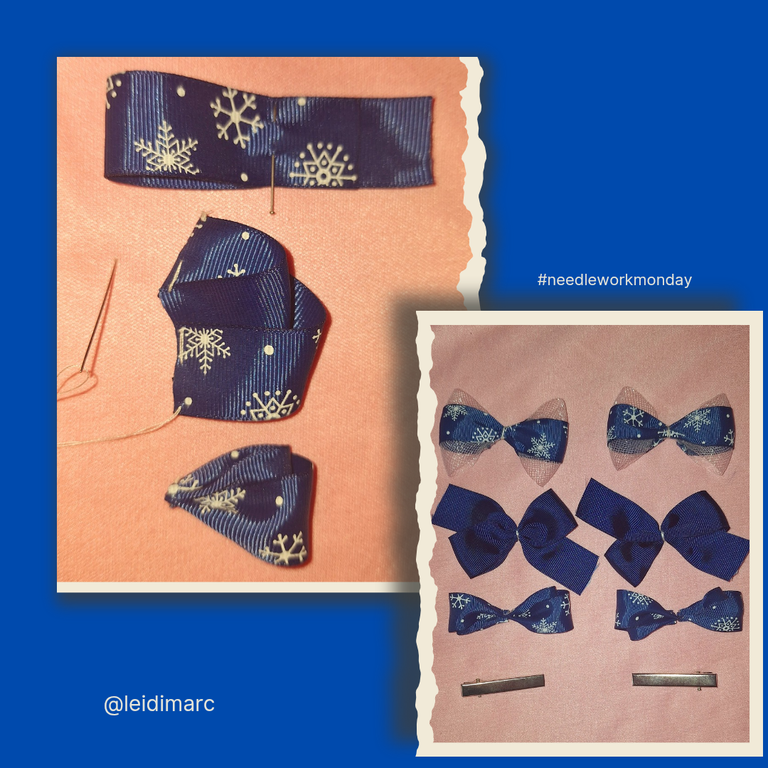
Ya teniendo esos dos lazos básicos, es hora de hacer otro que le dará ese toque especial a esos accesorios y que también es muy fácil de hacer.
Este lo haremos con las 2 piezas de cinta estampada de 14 cm. La doblamos hacia un extremo dejando 2 cm, luego el extremo que quedo más corto lo llevamos hacia el centro, como se muestra en la imagen, luego hacemos lo mismo con el otro extremo.
Así mismo hacemos con el otro lado del lazo, pero poniendo la cinta del otro lado, a cómo hiciste el primero. Después se cosen en el centro.
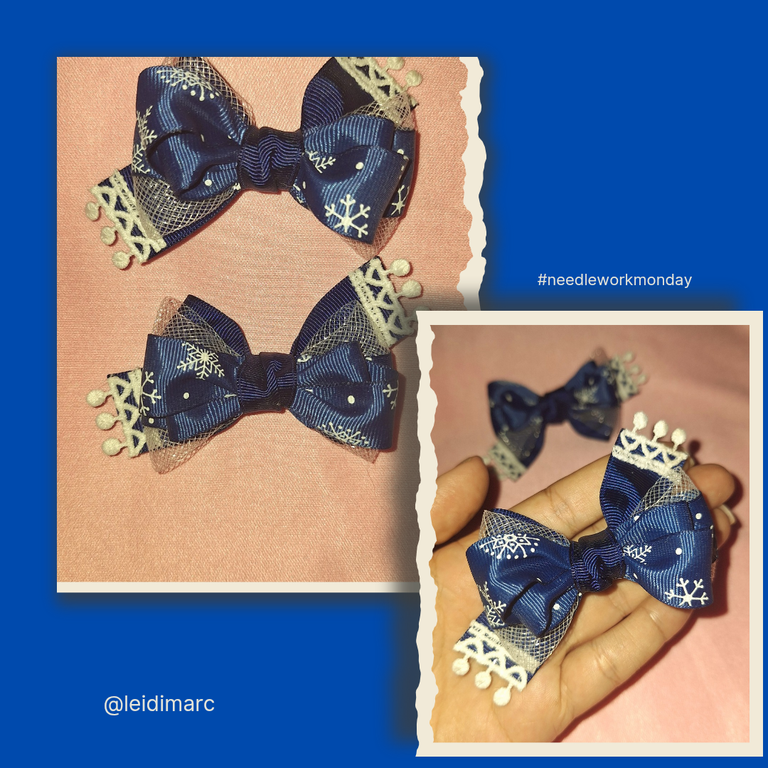
Ya teniendo todo listo, viene el ensamblado de todas las piezas y pegamos una encima de la otra, colocamos más cinta en el medio y decoramos los extremos con el encaje bordado. Ah, por supuesto, le pegamos la pinza.
A mí me gustaron mucho, quedé de hacer más para mis princesas, aunque estos los modelo mi princesa Arianna, no eran para ella. Estos los hice para mi sobrina, ya les había mostrado otros que le hice y me quedaba por mostrarles estos, que fueron de mis favoritos.
Espero les gusten y si tienen oportunidad lo puedan hacer para sus niñas o para regalar a una linda princesa.
Esto ha sido todo por hoy, muchas gracias por la visita. Dios les bendiga sus manos para que sigan creando.

Mini school bows
Hello, my beautiful people from @needleworkmonday, nice to visit you and see your cute creations. I hope you are having a great week. All is well here thank goodness.
As I write, I'm on my way to another town to get my daughter @ariannamc her ID card. Later I will be telling you in my blog how it went. We are running late, because my husband was in the gas line, but I think we have time to get there.
On the other hand, I'm here to show you how I've been making these mini hair bows, a very cute accessory for little girls. These are to be used with the school uniform, but they can be used with any kind of clothes and can also be made in other colors.
Materials
For this cute project I was using the following materials:
2.5 cm printed grosgrain ribbon.
2.5 cm unicolor grosgrain ribbon.
A double or tube-shaped mesh 4 cm wide.
Clips.
Embroidered lace.
Thread and needle.
Scissors and ruler.
Lighter and silicone.
Measurements of the ribbons
Here are the measurements of the ribbons for the elaboration of 1 loop. It is necessary to cut twice as many pieces to make the pair.
1 mesh of 15 cm by 4 cm.
1 printed ribbon of 2.5 cm by 15 cm.
2 printed ribbons of 2.5 cm by 14 cm.
1 unicolor ribbon of 2.5 cm by 26 cm.
1 unicolor ribbon of 2.5 cm by 8 cm.
These bows are very easy to make just by looking at the pictures; you can make them step by step.
The first thing I made was the mesh loop, folding it in half and then joining the ends towards the center and sewing it. In the same way I did it with the printed ribbon that embraced the mesh.
Then with the unicolor ribbon I made another loop, marking the middle and then bringing the ends towards the center, but leaving about 2 cm towards the opposite sides. Finally I sewed the seam.
Now that we have these two basic bows, it's time to make another one that will give that special touch to these accessories and that is also very easy to make.
This one will be made with the 2 pieces of 14 cm printed ribbon. We fold it towards one end leaving 2 cm, then the end that is shorter we take it towards the center, as shown in the image, then we do the same with the other end.
We do the same with the other side of the loop, but putting the ribbon on the other side, as you did the first one. Then sew in the center.
Once everything is ready, we assemble all the pieces and glue one on top of the other, place more ribbon in the middle and decorate the ends with the embroidered lace. Ah, of course, we glue the clip.
I liked them very much, I decided to make more for my princesses, although these were made for my princess Arianna, they were not for her. These I made for my niece, I had already shown you others I made for her and I had to show you these, which were one of my favorites.
I hope you like them and if you have the opportunity you can make them for your little girls or to give to a pretty princess.
That's all for today, thank you very much for your visit. God bless your hands to continue creating.
Mi blog es familiar, de mi día a día, en donde puedo subir fotos de niños u otras personas de mi entorno, NO autorizo a usar mis fotografías sin mi autorización.
My blog is a family blog, of my daily life, where I can upload photos of children or other people around me, I do NOT authorize you to use my photos without my authorization.
Dispositivo | Device | Samsung Galaxy A54
Fotos editadas en: |Photos edited in | CC Express for Picsart / Canva
Separadores hechos en | Separators made in | CC Express for Samsung
Traducción con | Translation with| DeepL
Te quedaron bellos mami, a ver cuando me haces uno.
Que cuchituras amigas, quedaron lindos, todo tiene que ver con la creatividad, y le diste tu toque. Quedaron hermosos, tienes un don maravilloso.
Y bueno ojalá las cosas salieran como la esperabas en el Saime, yo creo que cuando Dariana cumplió 9 años, a la semana ya la estaba llevando a sacarse la cédula, Jejeje, corri con suerte, porque a los 15 días las pusieron por citas. Igual suerte amiga🤗🤗🤗
Gracias amiga bella, si se ven muy cuchis estos lacitos.
Y su gracias a Dios se la sacamos.
Y bueno así hice yo con mi hija mayor. Pero con esa citas era un fastidio y tenía problemas con mi correo Hotmail que no me habría y lo fui dejando.
Hasta que fui al saime y cambie de correo y pude sacar la cita fácil pero estaban para abril, por aquí cerca así que tuve que pedirle para otro municipio.
Hola bella, que lindos lazos, las cintas tienen lindos colores y estampados.
Saludos!
Peque bellos quedaron Ami bella! Espero el trámite de lap cédula haya salido bien 💕
Son perfectos para el uniforme, pues tienen el toque de elegancia y formalidad sin olvidar lo femenino.
Te quedaron preciosos.
Saludos.
Gracias amiga bella, es así, dándole vida a sus outfits.