WELCOME TO MY BLOG!
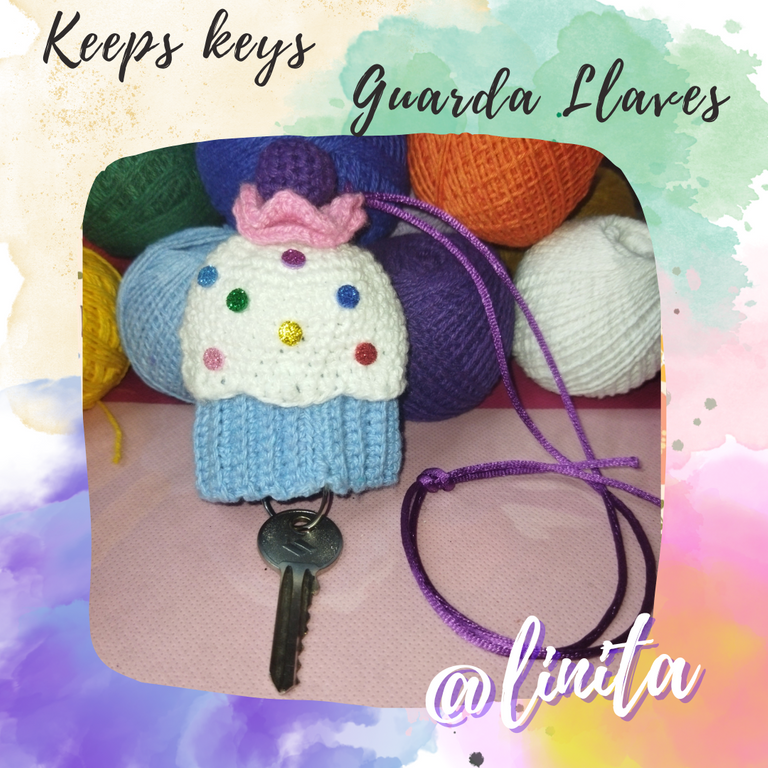
Hello, hello, back in these parts. My mother is still in recovery, it has been hard months for us, however we continue in the fight for her recovery. Today I will share with you how I made a key holder that I felt the need to make because in one of my mom's therapy outings I lost them, the truth is I have no idea how it happened, I suppose that one of the times we went up or We get off public transport. This task is difficult for us to carry out because we have to help her gain momentum to go up and hold her to go down, since her condition does not allow much physical effort. The fact is that I lost the keys and to prevent it from happening again I made this beautiful crochet key holder, which I will hang as a necklace to keep them visible and facilitate extraction when opening the doors of the house. I hope you like it and that if you have gone through a similar situation with this tutorial you can make one just like it so you don't lose them. Without further ado, let's begin.
¡BIENVENIDOS A MI BLOG!
Hooooolaaaaaa, hoooolaaaaa, de regreso por estos lares. Mi madre aún en recuperación, han sido meses duros para nosotras sin embargo seguimos en la lucha por su recuperación. Hoy les compartiré cómo realicé un guarda llaves que me vi en la necesidad de realizar porque en una de las salidas a las terapias de mi mamá las perdí, la verdad no tengo idea de cómo sucedió, supongo que en unas de las veces que subimos o bajamos del transporte público. Esta tarea nos cuesta realizarla porque tenemos que ayudarla a coger impulso para subir y sujetarla para bajar, ya que su condición no permite realizar mucho esfuerzo físico. El caso es que perdí las llaves y para evitar que ocurra nuevamente realicé este bellísimo guarda llaves a crochet, que me guindaré como collar para tenerlas visibles y facilitar la extracción al momento de abrir las puertas de casa. Espero les guste y que si han pasado por una situación igual con este tutorial puedas elaborar uno igual para que no las `pierdas. Sin más, comencemos.
MATERIALS
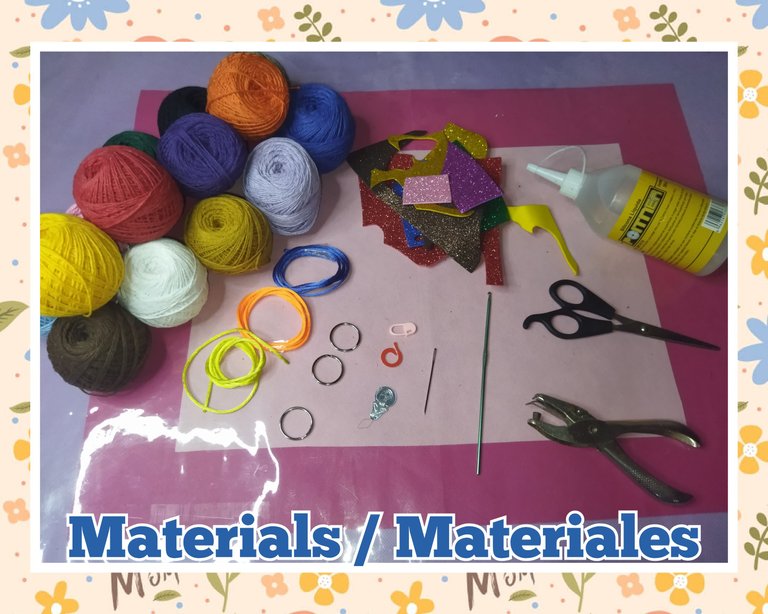
To make this key holder, I selected brightly colored wick threads, which can be seen from a long distance in case if they fall they can be easily seen.
- Wick threads, light blue, pink, purple, white colors)
- Needle 2.5 mm
- Blunt tip needle
- Fabric marker
- Ring for keys
- Wadding or synthetic cotton
- 50 cm of mouse tail cord
- Scissors
- Scraps of frosted foami
- Perforator
- Liquid silicone
MATERIALES
Para realizar este guarda llaves seleccioné hilos pabilos de colores llamativos, que puedan ser vistos a larga distancia en caso de que si se caen se puedan visualizar fácilmente.
- Hilos pabilos, colores azul claro, rosado, morado, blanco)
- Aguja 2.5 mm
- Aguja punta roma
- Marcador para tejido
- Argolla para llaves
- Guata o algodón sintético
- 50 cm de cordón cola de ratón
- Tijera
- Retazos de foami escarchado
- Perforador
- Silicón líquido
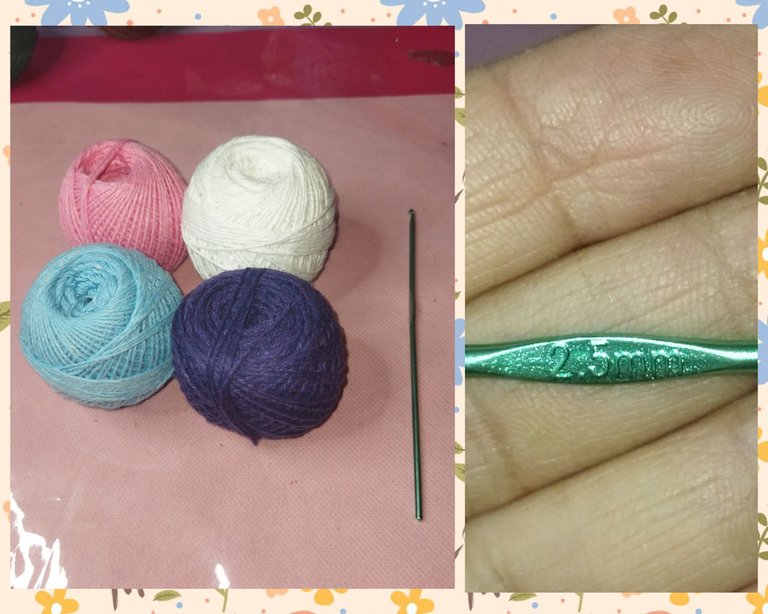
Cotton threads and needle Nº 2.5 // Hilos de algodón y aguja Nº 2,5
HOW TO MAKE THE CHERRY // CÓMO HACER LA CEREZA
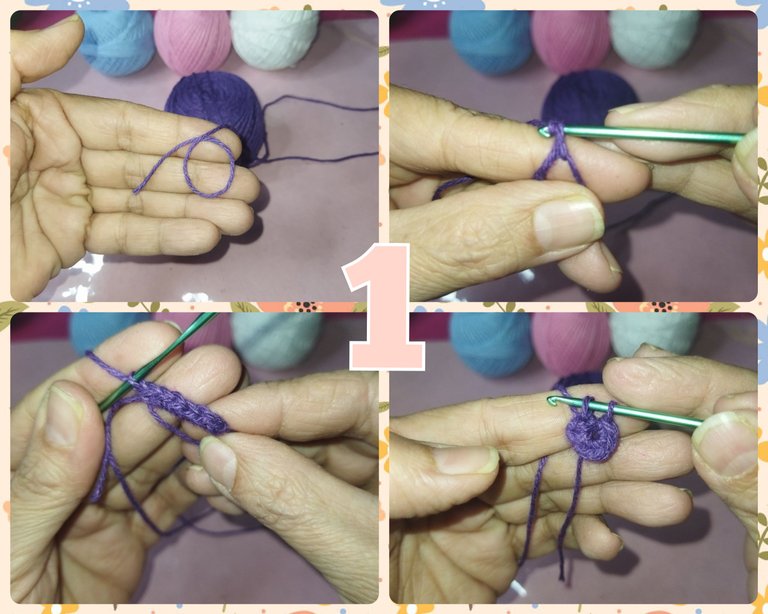
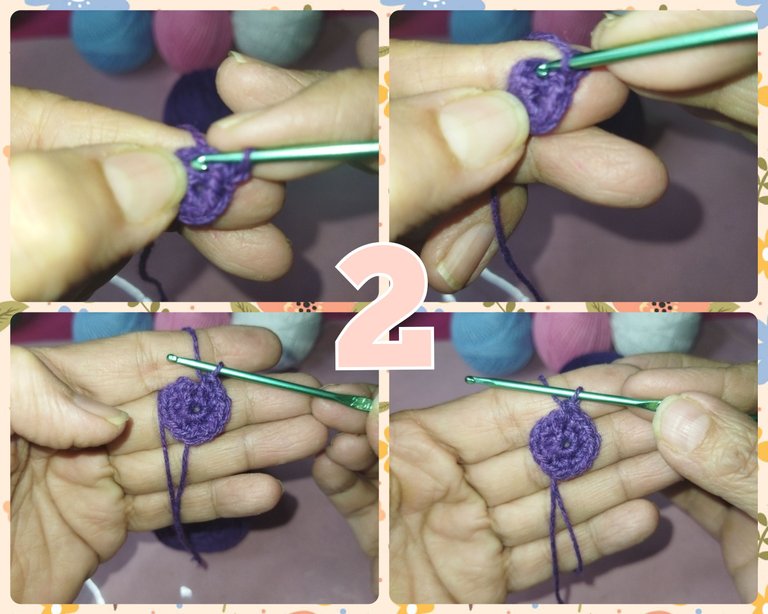
STEP Nº1
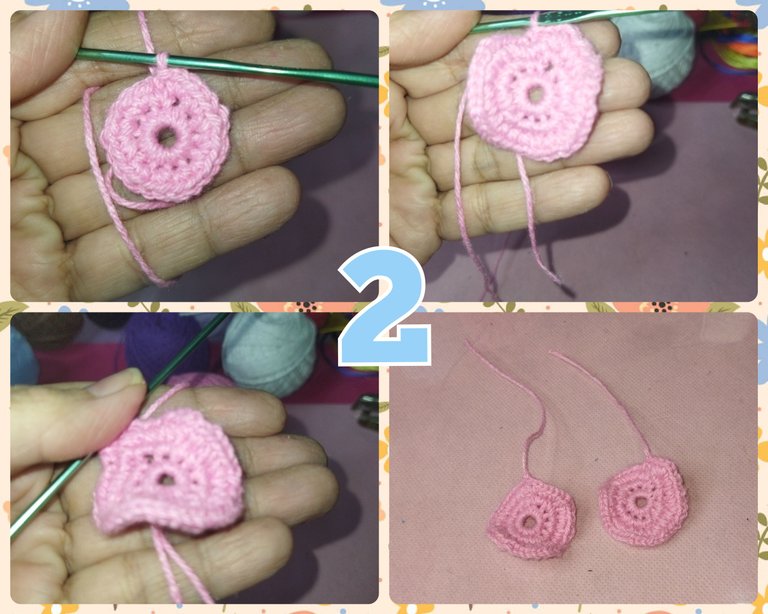
For the cherry I used deep purple cotton yarn. We start by making a magic ring in which we will make 6 single crochet that we will link with a slip stitch to start our cherry.
PASO Nº1
Para la cereza utilicé hilo de algodón color morado intenso. Comenzamos realizando un anillo mágico en el cual haremos 6 puntos bajos que enlazaremos con un punto deslizado para dar comienzo a nuestra cereza.
STEP Nº2
On this round we will make an increase of two single crochets in the first stitch of the previous round and on the next we will make a single crochet, and repeat until the end of the round for a total of 12 single crochets.
PASO Nº2
En esta vuelta realizaremos un aumento de dos puntos bajos en el primer punto de la vuelta anterior y en el siguiente haremos un punto bajo,y repetimos hasta finalizar la vuelta para un total de 12 puntos bajos.
STEP Nº3
- From round 3 to 5, we will repeat the previous round, an increase of two single crochets in the previous stitch and one single crochet in the next one.
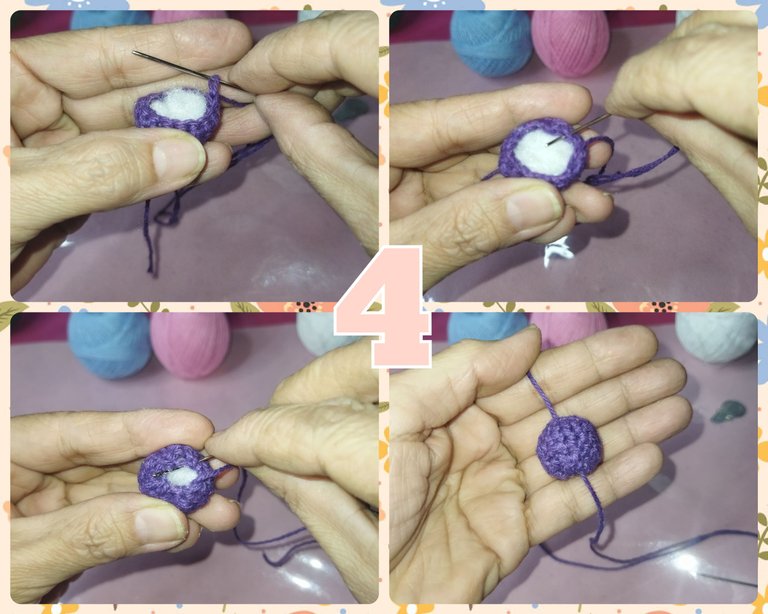
- Once the ball shape is achieved, fill with wadding or synthetic cotton.
- Cut the thread leaving approximately 15 cm. We thread the blunt tip needle to finish.
PASO Nº3
- Desde la vuelta 3 hasta la 5, repetiremos la vuelta anterior, un aumento de dos puntos bajos en el punto anterior y un punto bajo en el siguiente.
- Una vez conseguida la forma de bolita, rellenamos con guata o algodón sintético.
- Cortamos el hilo dejando aproximadamente 15 cm. Ensartamos la aguja punta roma para terminar.
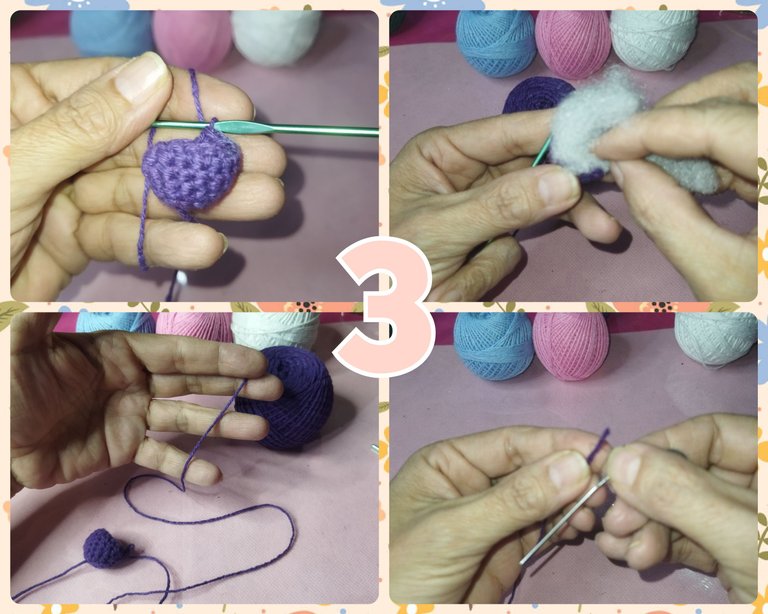
STEP Nº4
With the blunt needle we make stitches in each single crochet of the previous round and we adjust until it is completely closed.
PASO Nº4
Con la aguja punta roma realizamos puntadas en cada punto bajo de la vuelta anterior y vamos ajustando hasta cerrar completamente.
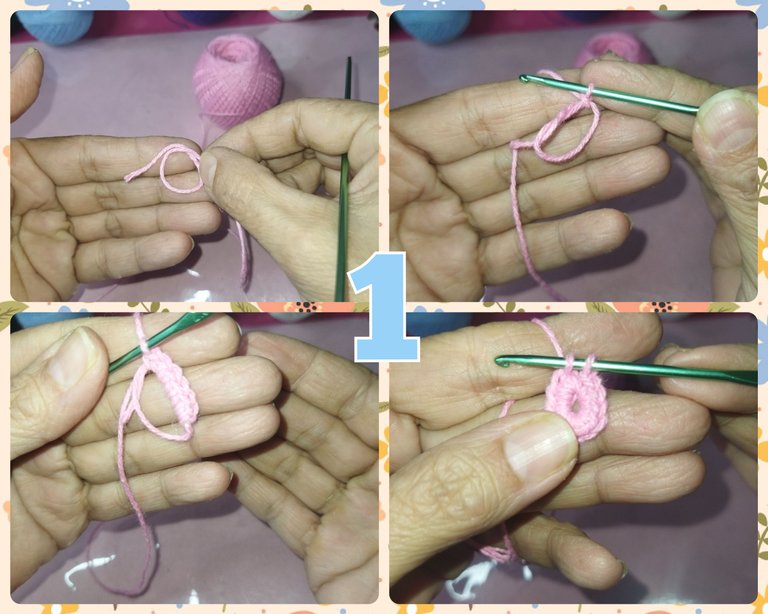
** PINK TOPPING // CUBIERTA ROSA**
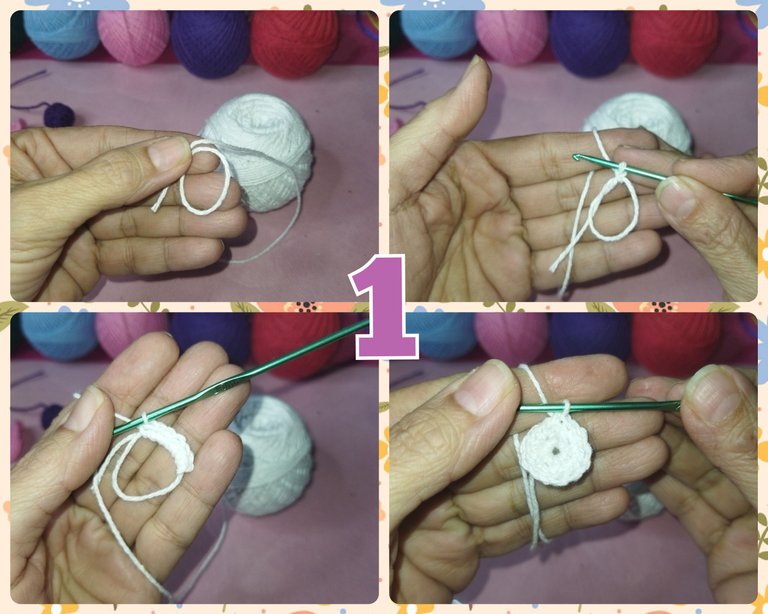
STEP Nº 1
To make the cover of the woven cupcake I chose pink thread. Starting with a magic ring in which we will make 12 single crochet, close the ring and link with a slip stitch.
PASO Nº1
Para realizar la cobertura del pastelito tejido escogí hilo color rosado. Realizaremos dos partes iguales, comenzando con un anillo mágico en la que haremos 12 puntos bajos, cerramos el anillo y enlazamos con un punto deslizado.
STEP Nº 2
On round Nº2, we will make an increase of two single crochets in the first point of the previous round and in the next one we will make a single crochet, and repeat until the end of the round for a total of 24 single crochets.
On round No. 3 we will repeat the same procedure as on round number two, an increase of two single crochets and on the next one single crochet until we finish the round to reach 48 single crochets.
We close the round with a slip stitch and tighten and make another one to obtain the covering pair.
PASO Nº2
En la vuelta Nº2, realizaremos un aumento de dos puntos bajos en el primer punto de la vuelta anterior y en el siguiente haremos un punto bajo,y repetimos hasta finalizar la vuelta para un total de 24 puntos bajos.
En la vuelta Nº 3 repetiremos el mismo procedimiento de la vuelta nro dos, un aumento de dos puntos bajos y en la siguiente un punto bajo hasta terminar la vuelta para alcanzar 48 puntos bajos.
Cerramos la vuelta con un punto deslizado y apretamos y realizamos otro igual para obtener el par de cobertura.
HOW TO MAKE THE CAKE // CÓMO HACER EL PASTELITO
STEP Nº1
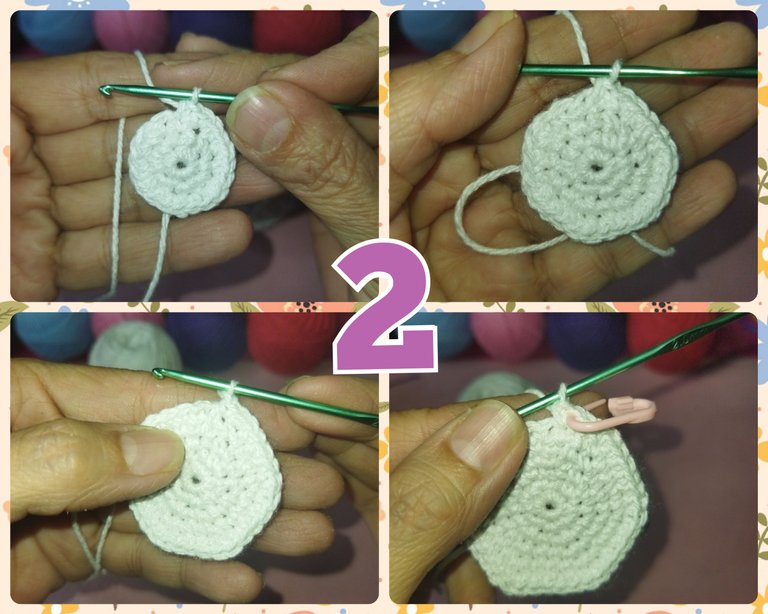
STEP Nº1
To make the part of the cupcake I used white thread, we will start with a magic ring in which we will make 6 single crochet, close the ring and link with a slip stitch.
On round 2 we make an increase and a single crochet to obtain 12 stitches at the end of the round.
PASO Nº1
Para realizar la parte del ponqué o pastelito utilicé hilo color blánco, comenzaremos con un anillo mágico en el que realizaremos 6 puntos bajos, cerramos el anillo y enlazamos con un punto deslizado.
En la vuelta nro 2 realizamos un aumento y un punto bajo para obtener 12 puntos al final de la vuelta.
STEP Nº2
On round number 3, we make a single crochet and an increase, we repeat this until the end of the round and we close with a slip stitch.
On round 4, we make two single crochet and an increase until the end of the round. We can help ourselves not to miss the start of each round by using the knitting marker.
On round number 5, we make 3 single crochet and an increase and repeat until the end of the round.
On round 6, we make 4 single crochets and an increase until the end of the round.
PASO Nº2
En la vuelta nro 3, realizamos un punto bajo y un aumento, esto lo repetimos hasta el final de la vuelta y cerramos con un punt deslizado.
En la vuelta nro 4, realizamos dos puntos bajos y un aumento hasta finalizar la vuelta. Podemos ayudarnos a no perder el inicio de cada vuelta utilizando el marcador de tejido.
En la vuelta nro 5, realizamos 3 puntos bajos y un aumento y repetimos hasta finalizar la vuelta.
En la vuelta nro 6, realizamos 4 puntos bajos y un aumento hasta el final de la vuelta.
STEP Nº3
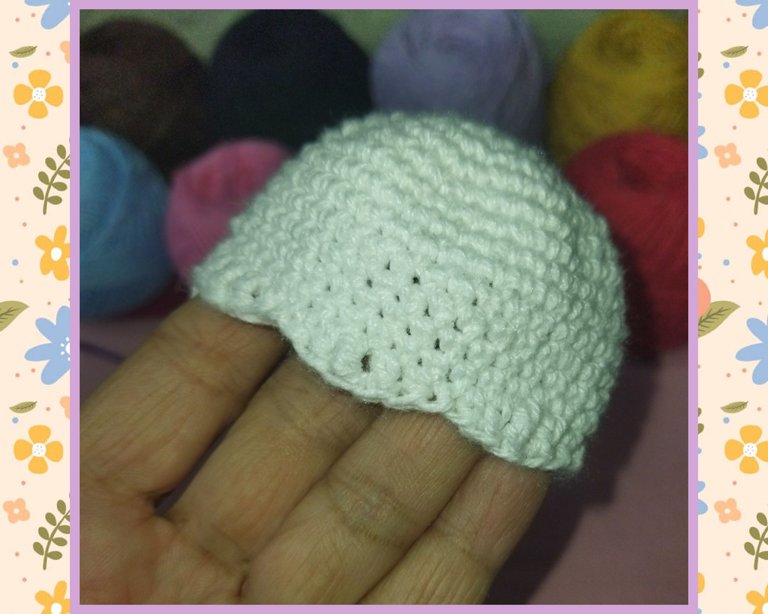
From round number 7 to round number 14 we will make a single crochet in each point of the previous round, to get 36 stitches in each round.
PASO Nº3
A partir de la vuelta nro 7 hasta la vuelta nro 14 realizaremos un punto bajo en cada punto de la vuelta anterior, para conseguir 36 puntos en cada vuelta.

STEP Nº4
Now we will make the crescent edges to the cupcake, which would be our 15th round. We start with a half double crochet in the first stitch of the previous round, then a double crochet in the next stitch, and then a double double crochet and we repeat the two previous points, a double crochet, a half double crochet and we close the crescent with a slip. We carry out this process 6 more times until the end of the round.
PASO Nº4
Ahora realizaremos los bordes con medias lunas al pastelito, en la que sería nuestra vuelta nro 15. Comenzamos con un punto medio alto en el primer punto de la vuelta anterior, luego un punto alto en el punto siguiente, y a continuación un punto doble alto y repetimos los dos puntos anteriores, un punto alto, un punto medio alto y cerramos la media luna con un deslizado. Realizamos este proceso 6 veces mas hasta finalizar la vuelta.

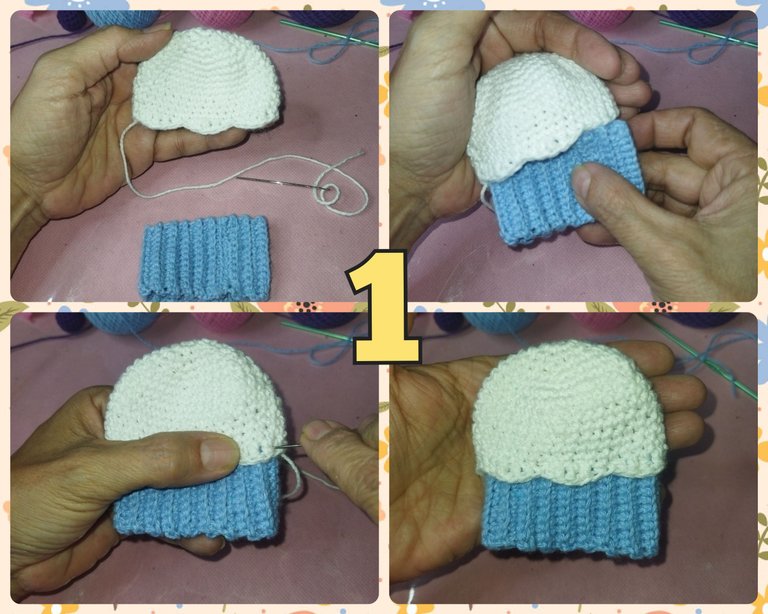
CAKE BASE // BASE DEL PASTELITO
STEP Nº3
For the base of the cupcake I chose a light blue yarn. We start with a chain of 13 stitches.
Then on row 2 we will make a single crochet leaving a chain at the beginning to obtain 12 single crochet.
From round number 3 to round number 40 we will make single crochets in each stitch making each stitch taking only the back of each one, we will do this every time we turn the fabric to start the next round.
PASO Nº1
Para la base del pastelito escogí un hilo azul claro. Comenzamos con una cadeneta de 13 puntos.
Luego en la vuelta nro 2 realizaremos un punto bajo dejando una cadena al comienzo para obtener 12 puntos bajos.
Desde la vuelta nro 3 hasta la vuelta nro 40 realizaremos puntos bajos en cada punto realizando cada punto tomando únicamente la parte de atrás de cada uno, esto lo haremos cada vez que giremos el tejido para comenzar la vuelta siguiente.

STEP Nº2
The number of turns depends on the size of our cupcake (the one we made in white thread), we must take the measurement when we have the fabric somewhat advanced. Once we reach the measurement, we double the fabric, cut a strand and with the blunt needle we join the ends of the piece making stitches between each point of both ends.
PASO Nº2
La cantidad de vueltas depende de la medida de nuestro pastelito (el que realizamos en hilo blanco), debemos ir tomando la medida cuando llevemos el tejido algo avanzado. Una vez que alcanzamos la medida, doblamos el tejido, cortamos una hebra y con la aguja punta roma unimos los extremos de la pieza realizando puntadas entre cada punto de ambos extremos.

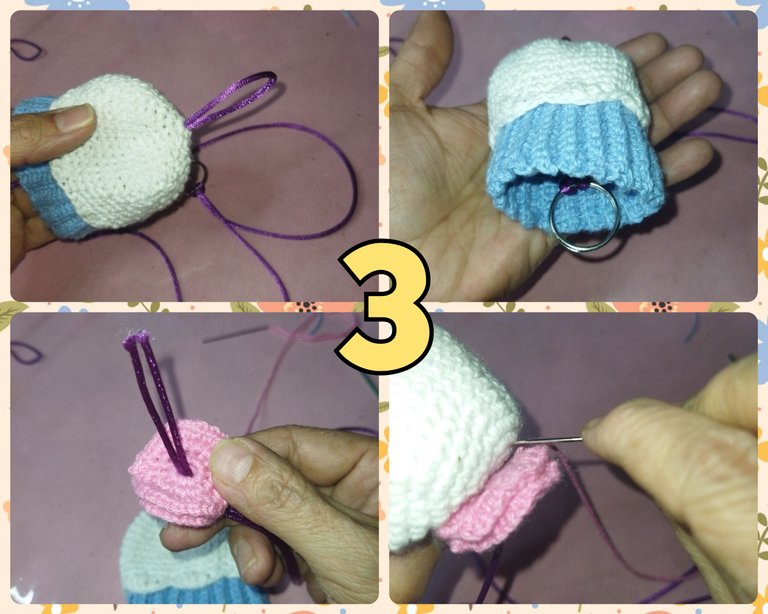
JOINING THE PIECES // UNIENDO LAS PIEZAS
For the assembly of our pieces we will use the blunt point needle with threads of the color of the piece that protrudes.
We will start by joining the cupcake with the base using the strand that stands out, in this case the white thread, making the stitches along the contour of the fabric.
Para el ensamblaje de nuestras piezas utilizaremos la aguja punta roma con hilos de la tonalidad de la pieza que sobresalga.
Comenzaremos uniendo el pastelito con la base utilizan la hebra que sobresalga, en este caso el hilo blanco, realizando las puntadas por el contorno del tejido.
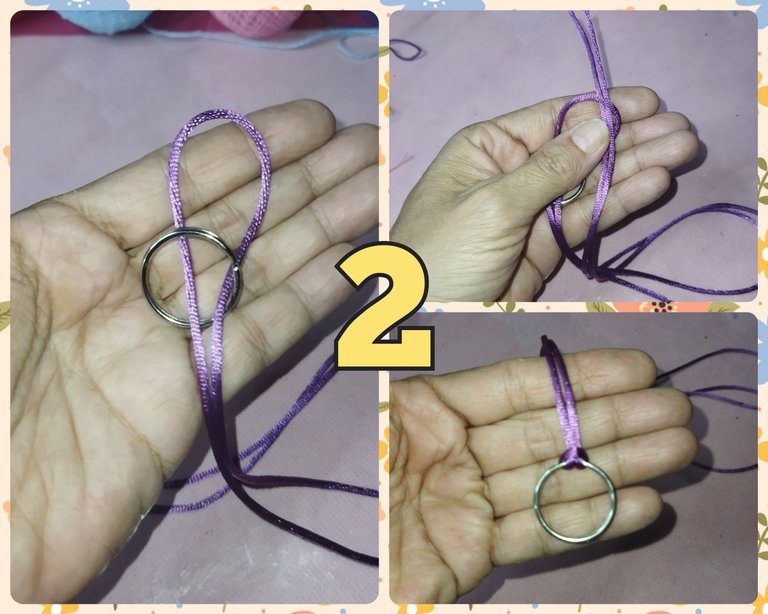
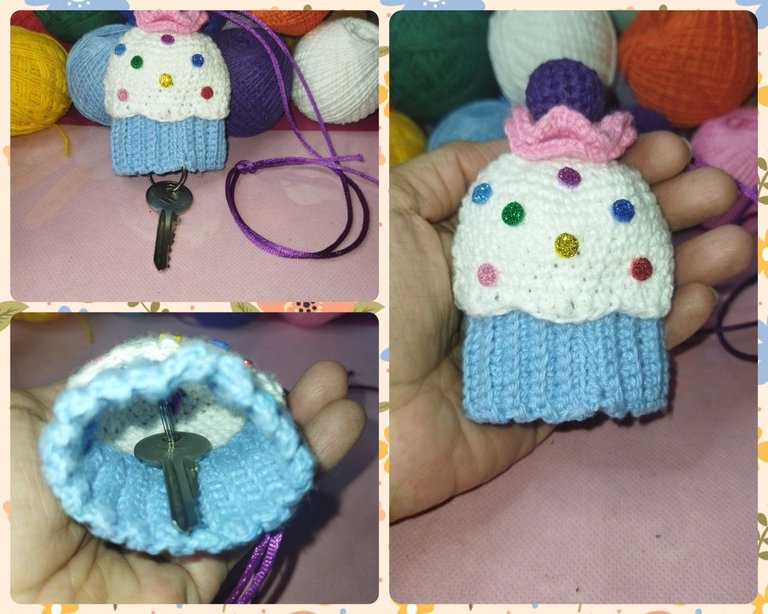
We take the key ring and the cord and make a knot in the ring.
Tomamos la argolla para llaves y el cordón y realizamos un nudo en la argolla.
We introduce the cord inside the pieces and extract through the center of the cupcake. We place the two pieces of pink cover also in the center and with the strand of pink thread we make stitches to fix it to the white piece on the inside, between both pieces.
Introducimos el cordón por dentro de las piezas y extraemos por el centro del pastelito. Colocamos las dos piezas de cubierta rosa también por el centro y con la hebra de hilo rosa realizamos puntadas para fijarlo a la pieza blanca por la parte interna, entre ambas piezas.
Finally, the icing on the cake. We place the cherry and sew in such a way that we do not tighten the cord so that it does not interfere when we stretch to remove the keys.
Por último, la guinda del pastelito. Colocamos la cereza y cosemos de manera que no apretemos el cordón para que no interfiera cuando estiramos para sacar las llaves.
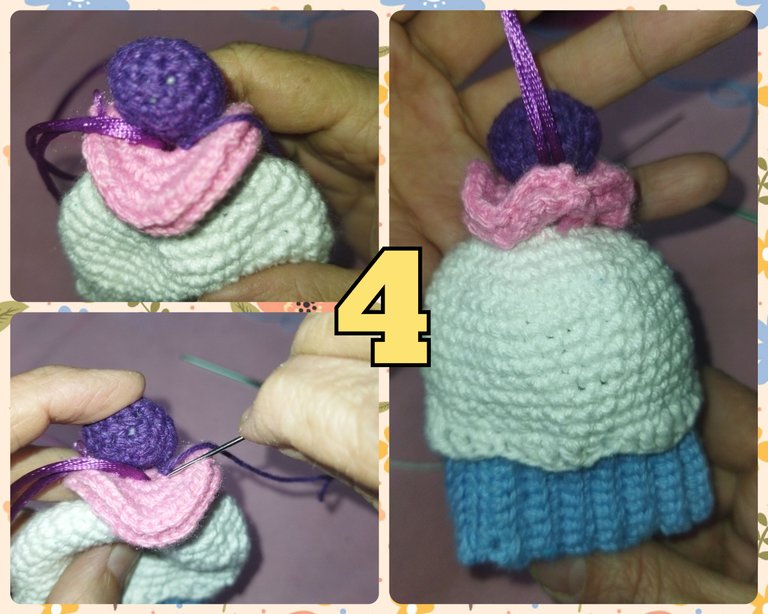
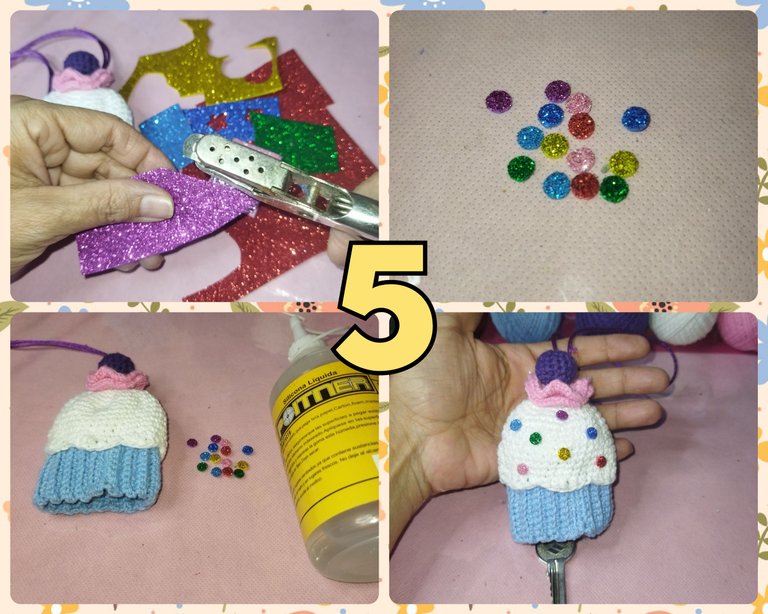
And to give the cupcake that striking touch, we make dots of different colors that we will place around the cupcake. With the frosted foami and the perforator we get many points and hit with the liquid silicone.
Y para darle ese toque llamativo al pastelito, realizamos puntos de diferentes colores que colocaremos por alrededor del pastelido. Con el foami escarchado y el perforador sacamos muchos puntos y pegamos con el silicón líquido.
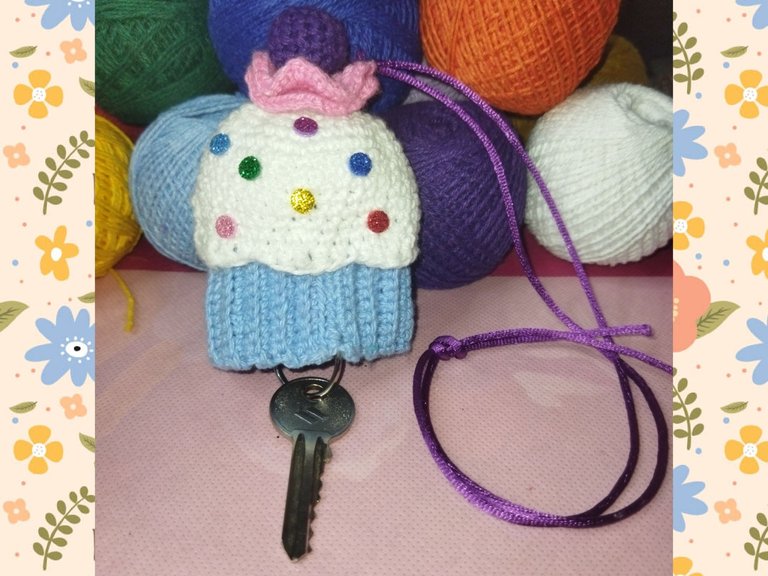
And this is how my key holder has remained, hoping that with this beautiful accessory I won't lose them anymore and that it will be useful for everyone. At home, each of us has our own. My daughters and I were delighted with these keychains. Later I will share the models that each of them chose. This is mine personally, hahahaha. I hope you liked it. For any questions, I am at your disposal. See you next time.
Y así ha quedado mi guarda llaves, esperando que con este bello accesorio no las extravíe más y que sea de utilidad para todas. Ya en casa cada una de nosotras tenemos las nuestras. Mis hijas y yo quedamos encantadas con estos llaveros. Más adelante les compartiré los modelos que cada uno de ellas escogió. Este es el mio personal, jajajaja. Espero les haya gustado. Para cualquier duda, estoy a su disposición. Nos vemos en la próxima.
Te felicito. Estás tejiendo bellísimo hermana. Impecable tu labor. Me encantó este guarda llaves, los colores y la decoración es muy llamativa. 👆👏🥳🙋
Muchas gracias, aprendiendo de la maestra 😁
Que bonito trabajo, el ponquecito provoca comerlo.
En una ocasión tejí un llavero parecido a este, en esa oportunidad tejí la carita de un León, se lo regalé a mi hermana para que cargara sus llaves.
Deseando tu mamá se recupere pronto.
Gracias por compartir con nosotros tu contenido creativo.
Saludos
Si, son muy prácticos y seguros,me alegro que te haya gustado. Ah y gracias por tus buenos deseos 😁
@creacioneslelys y tu hacen que tejer se vea tan fácil ajajajja, encantada con tu tutorial esto es todo un arte. Saludos!
Holaaaaa @jennyzer, tejer es muy fácil cuando le ponemos empeño y corazón, además de ojos y concentración jejejejeje. En serio, la verdad es que si es fácil cuando usamos patrones, una vez que aprendes lo esencial, lo demás es pan comido. espero que te entusiasme y nos enseñes algo realizado de tus excelentes manos que también han sido bendecidas con el don de la creación. Saludos.
Me encantó que pusieras con mucho detalle cada punto, así aprendo mejor!!! te ha quedado super cute.
I love the way you break down your steps of you tutorial you make it very simple to understand. Keep it up ma
¡Felicidades! Esta publicación obtuvo upvote y fue compartido por @la-colmena, un proyecto de Curación Manual para la comunidad hispana de Hive que cuenta con el respaldo de @curie.
Si te gusta el trabajo que hacemos, te invitamos a darle tu voto a este comentario y a votar como testigo por Curie.
Si quieres saber más sobre nuestro proyecto, acompáñanos en Discord: La Colmena.
Que lindo te quedó amiga 😍
Your content has been voted as a part of Encouragement program. Keep up the good work!
Use Ecency daily to boost your growth on platform!
Support Ecency
Vote for new Proposal
Delegate HP and earn more