
Hola a todos los miembros de esta bella comunidad, les saludo con mucho cariño, deseando que hayan tenido un excelente fin de semana, y que la semana que inicia sea de muchas bendiciones para todos.
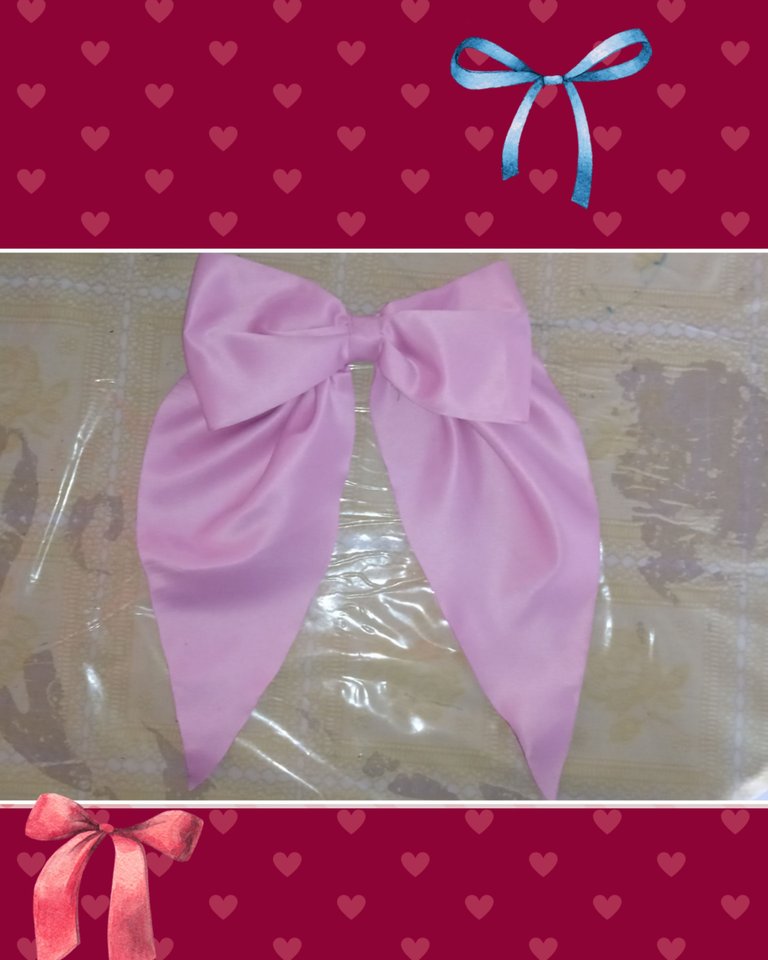
Estoy bastante emocionada de volver a compartir con ustedes, en esta oportunidad les traigo un hermoso lazo 🎀 coquett. A mí niña le gustan mucho los lazos grandes y extravagantes, suelo bromear con ella y decirle la niña de los lazos y las flores 💐 porque son 2 cosas que le gustan.
Así que fuí con ella al centro textil y ella eligió una hermosa tela rosada Razo Di Fidanzata, así que manos a la obra a elaborar este hermoso lazo.

Hello to all the members of this beautiful community, I greet you with much affection, wishing you had an excellent weekend, and that the week that begins is of many blessings for all.
I am quite excited to share with you again, this time I bring you a beautiful bow 🎀 coquett . My little girl really likes big and extravagant bows, I dream to joke with her and call her the bow and flower girl 💐 because they are 2 things she likes.
So I went with her to the textile center and she chose a beautiful pink fabric Razo Of Girlfriend, so let's get to work making this beautiful bow.


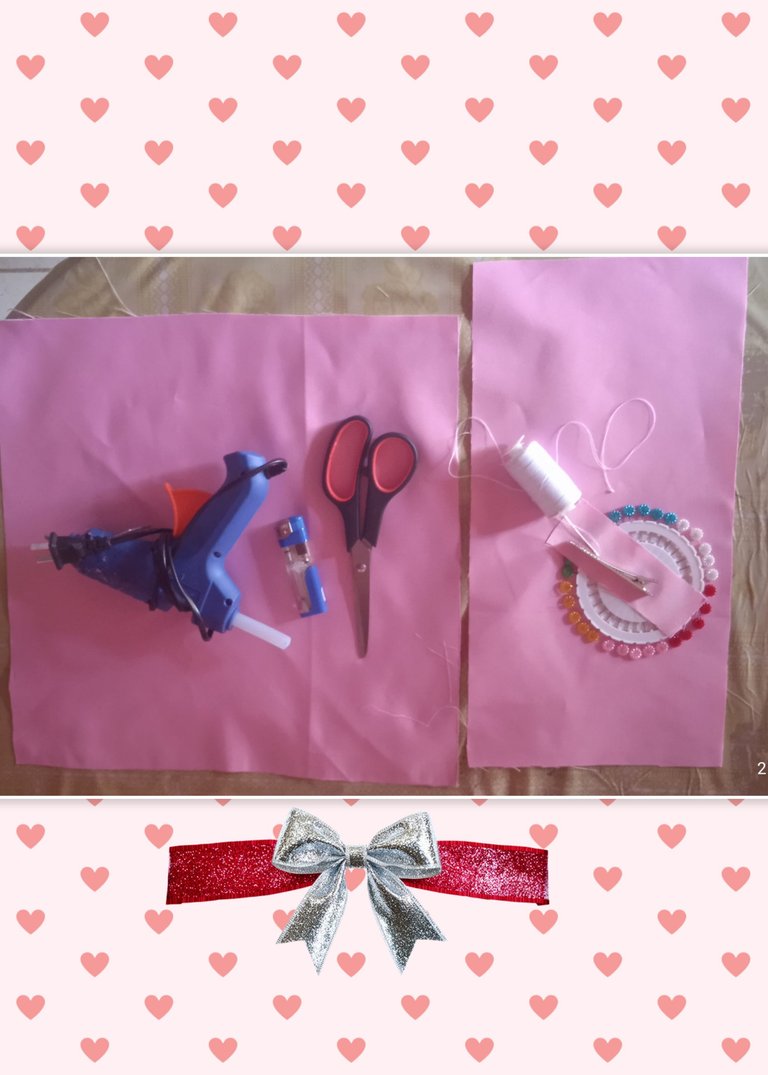
1 cuadrado de tela de 40cm x 40cm
1 Rectángulo de tela de 20cm x 40cm
1 Tira de tela de 4cm x 12cm
Encendedor
Hilo
Aguja
Alfileres
Pistola de silicón
1 barra de silicón
1 pinza caimán
Máquina de coser (opcional)

1 fabric square of 40cm x 40cm
1 Rectangle of fabric 20cm x 40cm
1 strip of fabric of 4cm x 12cm
Lighter
Thread
Needle
Alfileres
Silicone gun
1 silicone stick
1 alligator clip
Sewing machine (optional)
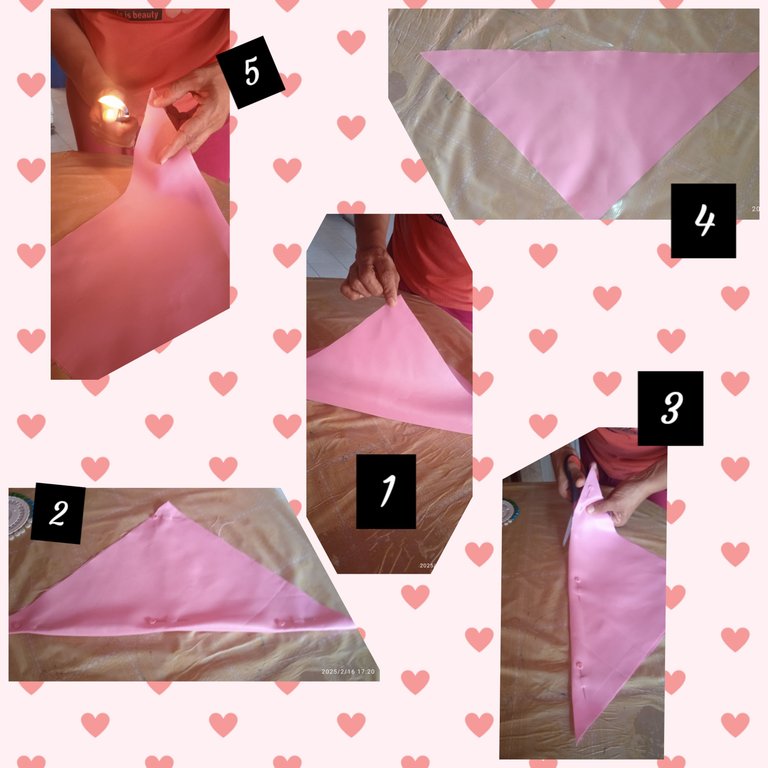
El procedimiento es súper sencillo, y se puede realizar todo a mano, pero yo me ayudé un poco con la máquina de coser.
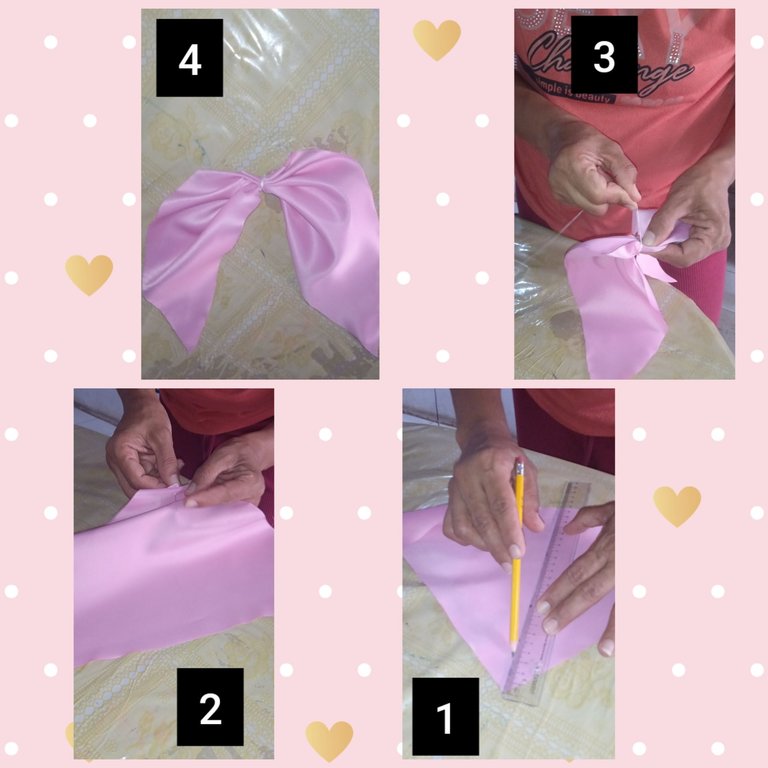
Iniciamos doblando el cuadrado de 40cm x 40cm en forma triángulo, de modo que todas las puntas coincidan muy bien, fijamos con alfileres y cortamos en el doblez de la tela, pues vamos a utilizar un solo triángulo, pasamos el encendedor por todas las orillas, esto es para que la tela no se deshilache. El otro triángulo lo podemos utilizar para elaborar otro lazo, que fue lo que yo hice.
ELABORATION
The procedure is super simple, and you can do everything by hand, but I helped myself a little with the sewing machine.
We start by folding the 40cm x 40cm square in a triangle shape, so that all the ends match very well, we fix with pins and cut in the fold of the fabric, as we are going to use a single triangle, we pass the lighter along all the edges, this is so that the fabric does not fray. The other triangle can be used to make another bow, which is what I did.
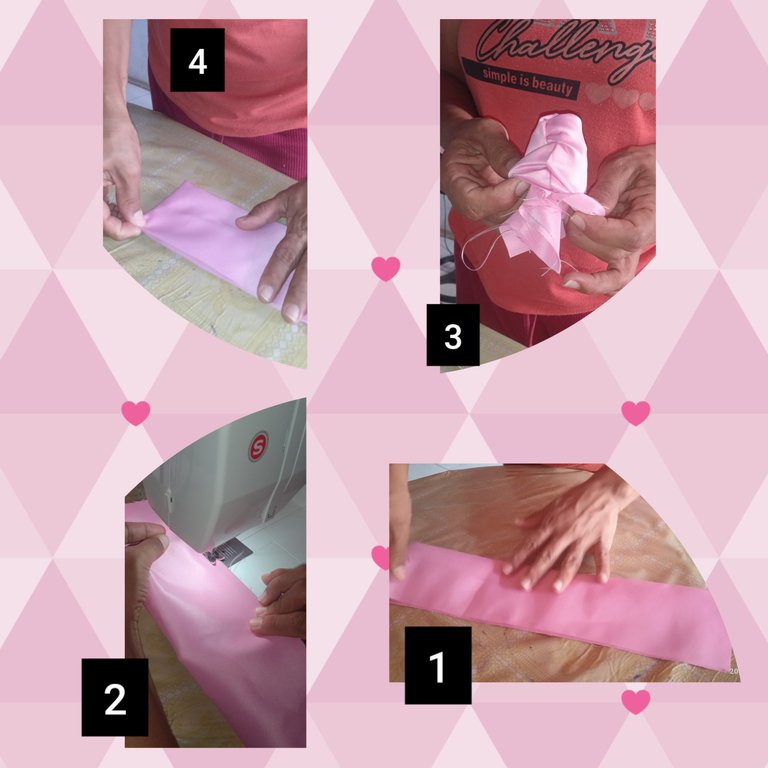
Seguimos con el rectángulo que vamos a doblar a la mitad dejando hacia adentro el lado brillante de la tela, cosemos a mano o máquina por toda la orilla, luego volteamos la tela para dejar la costura por dentro, acomodamos muy bien de modo que la costura quede justo en el centro. Ahora doblamos el rectángulo justo a la mitad y hacemos una pequeña marca, esto para determinar muy bien el centro al cual vamos a llevar ambos laterales, posicionamos uno ligeramente sobre el otro y cosemos, pasando varias vuelta de hilo alrededor del centro, esto para hacer la forma de lazo.
We continue with the rectangle that we are going to fold in half, leaving the shiny side of the fabric inside, we sew by hand or machine along the entire edge, then we turn the fabric over to leave the seam inside, we arrange it very well so that the seam is right in the center. Now fold the rectangle right in the middle and make a small mark, this to determine the center to which we are going to bring both sides, position one slightly over the other and sew, passing several turns of thread around the center, this to make the loop shape.
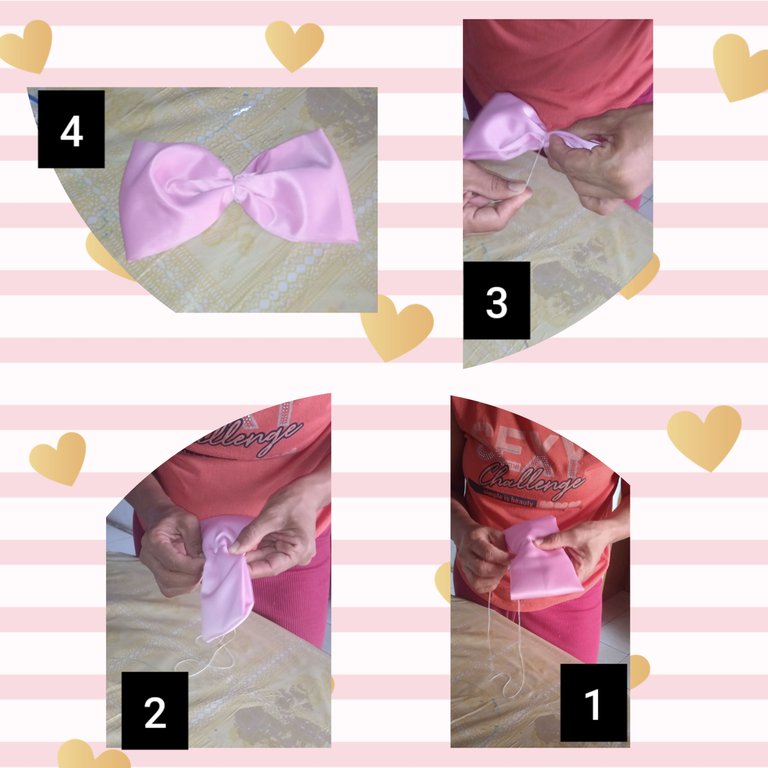
Volvemos con el triángulo que ya habíamos cortado, marcamos justo en la mitad, y partiendo de la punta del medio, pasamos con aguja unas puntadas largas hasta llegar al borde, allí halamos fuerte el hilo y damos algunas vueltas de hulo alrededor, anudamos bien, esto para también formar el lazo. Con los dos lazos ya listos, procedemos a unirlos, colocando debajo el lazo que hicimos con el cuadrado, unimos con varias vueltas de hilo y anudamos muy bien.
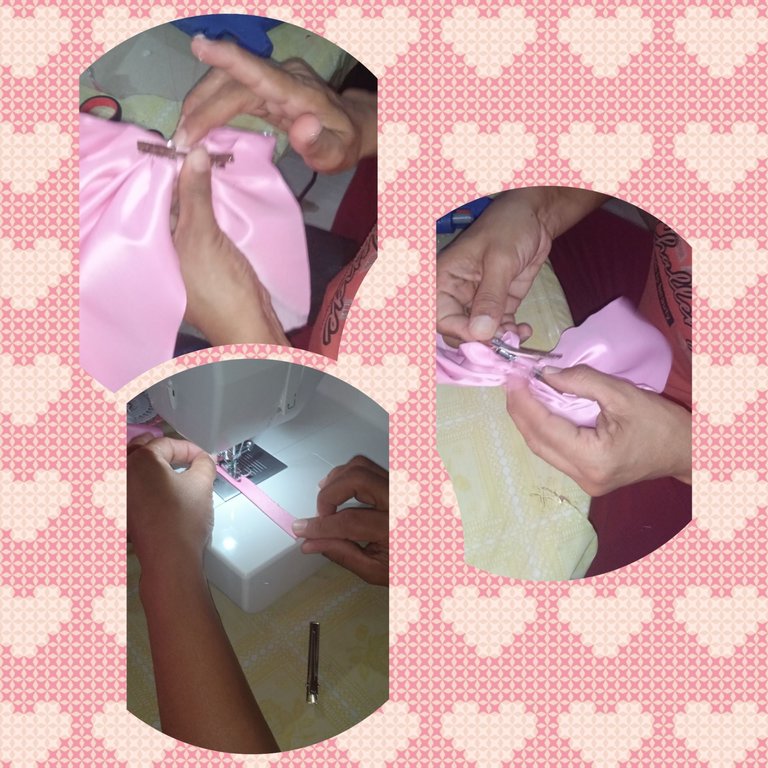
En el centro del lado posterior del lazo, pegamos con silicón caliente la pinza caimán.
We go back to the triangle that we had already cut, we mark right in the middle, and starting from the middle point, we pass with needle a few long stitches until we reach the edge, there we pull the thread tightly and make some turns around it, we knot it well, this to also form the loop. With the two loops ready, we proceed to join them, placing underneath the loop we made with the square, we join with several turns of thread and knot very well.
In the center of the back side of the bow, we glue the alligator clip with hot silicone.
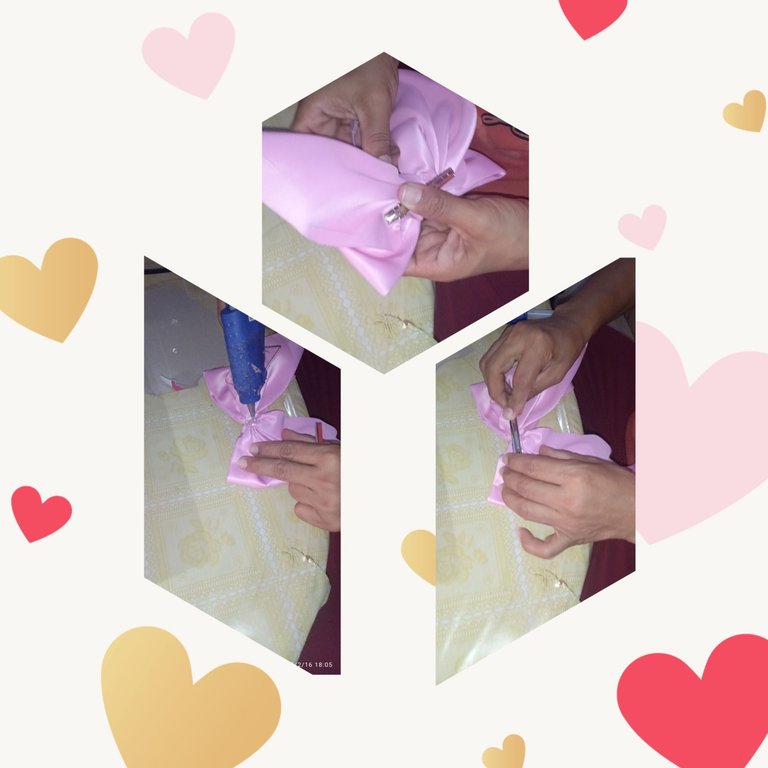
Por último, tomamos la tira de tela y doblamos ambas orillas hacia el centro, las pegamos con silicón o las cosemos, este listón lo vamos a comenzar desde adentro de la pinza caimán con silicón y rodeamos toda la parte centro del lazo y nuevamente lo pegamos con silicón, y ya está listo nuestro hermoso lazo coquett sencillo.
Yo hice dos lazos iguales para que mi hija use el par.
Esto ha sido todo por hoy, espero sea de su agrado.
Les deseo muchas bendiciones
Los leo en los comentarios.
**I wish you many blessings
I read you in the comments.

     Todas las imágenes son de mi autoría

      All the images are of my authorship
Que hermosos lazos, tu nena debe estar muy feliz con estos accesorios hechos con mucho amor. 😍
Saludos!
Gracias por pasar.
Saludos!Así es @belkyscabrera ella se emociona con sus lazos.
Te quedó hermoso🎉👏 @llovizna28 saludos y bendiciones 🙏
Saludos.Gracias @theleader07 por pasar y comentar.