
Hola, Feliz y bendecido para el tutorial del día de hoy e realizado una flor bordada a mano y su proceso lo explicare paso a paso yo e tardado unos días en hacerlo estoy aprendiendo espero que les guste, yo me entretuve al hacerlo y eso me ayuda mucho en estos días de cuarentena. Espero que les guste y lo intentes creo que te quedara hermoso y sera una buena manera de pasar el tiempo!
Hello, Happy and blessed for today's tutorial and I made a hand-embroidered flower and its process I will explain it step by step I have taken a few days to do it I'm learning I hope you like it , I amused myself doing it and that helps me a lot in these days of quarantine. I hope you like it and try it I think it will be beautiful and it will be a good way to pass the time!
"Believe in yourself and who you are. Be aware that there is something inside you that is bigger than any obstacle ”, Christian D. Larson.

Materiales:
Mostacillas
Aguja e Hilo
tela fina o POP
cuero o tela gruesa
Tijera
Silicon liquido
Materials:
Beads
Needle and thread
fine fabric or POP
leather or thick fabric
Scissors
Liquid silicone

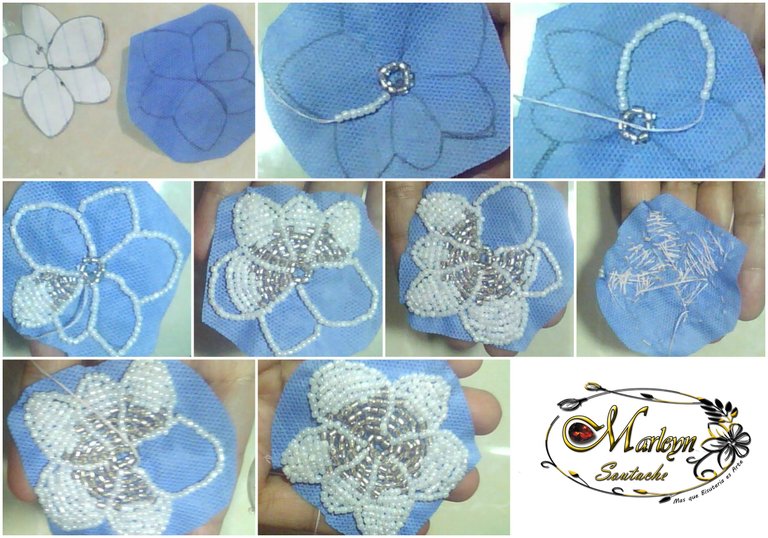
PASO 1: Dibujar en una hoja de papel la flor o pieza de su elección para bordar, yo seleccione una orquídea me gusta muchísimo esa flor, pasa tu patrón a la tela finita o POP, lo ideal es que la tela sea del color de mostacilla que vas a utilizar o el tono mas parecido posible pero bueno no tengo en otro color y aquí en Venezuela no es tan fácil comprar. Bueno para comenzar ensartamos la aguja con el hilo y coceremos un circulo con 7 mostacillas en el centro de nuestra flor al terminar vamos a empezar a coser por toda la orilla de los pétalos es fácil puedes introducir dos mostacillas y luego devolverte y sacar la aguja por la segunda mostacilla colocar dos mostacillas mas, devolverte y sacar la aguja por la mostacilla que quedo de segunda nuevamente y asi sucesivamente, hasta terminar de bordar toda la orilla, y ahora comienzas a rellenar los petalos comienza de abajo hacia arriba hasta rellenar la flor por completo.
STEP 1: Draw on a sheet of paper the flower or piece of your choice to embroider, I select an orchid I really like that flower, pass your pattern to the finite fabric or POP, what Ideally, the fabric should be the mustard color you are going to use or the closest possible tone, but I don't have another color and here in Venezuela it is not so easy to buy. Well to start we thread the needle with the thread and we will cook a circle with 7 beads in the center of our flower when we finish we are going to start sewing all over the edge of the petals it is easy you can insert two beads and then return and remove the needle by the second bead place two more beads, go back and remove the needle through the bead that was second again and so on, until you finish embroidering the entire edge, and now you begin to fill the petals begins from the bottom up to fill the flower by complete.
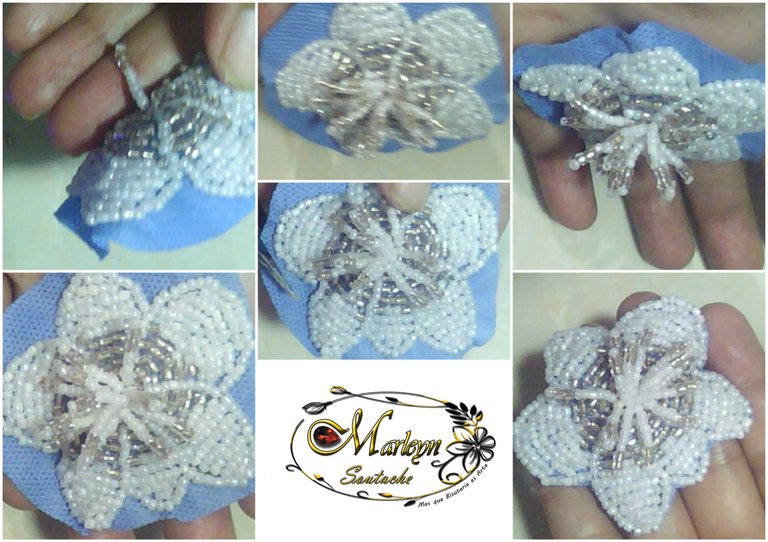
paso 2: Al terminar de rellenar la flor vamos a coser unos palitos en el centro para que se vea lo mas parecido a una flor real, lo que debes hacer es introducir 9 mostacillas y devolver la aguja por la mostacilla 8 de manera que regresemos por dentro de todas las mostacillas menos la 9 que quedara como doblada y de esta manera mantendrá atrapada las mostacillas, realiza este proceso unas 15 o 13 veces para rellenar todo el espacio central, al terminar recorta la tela sobrante con cuidado para que no cortes los
step 2: When we finish filling the flower, we are going to sew some sticks in the center so that it looks the closest thing to a real flower, what you must do is insert 9 beads and return the needle through the bead 8 so that we return inside all the beads except the 9 that will be folded and in this way will keep the beads trapped, carry out this process about 15 or 13 times to fill the entire central space, when finished cut the leftover fabric carefully so you don't cut the
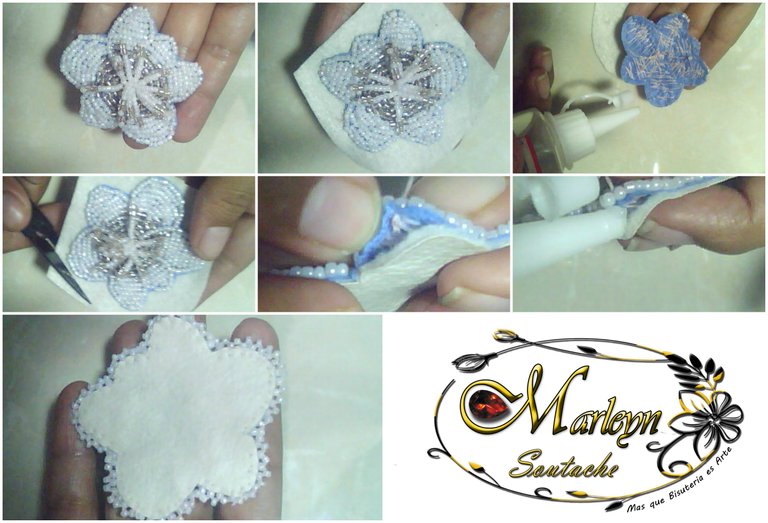
PASO 3: Luego de cortar y verificar la flor vamos a pegarla en una tela gruesa o cuero, solo debemos untar silicon liquido por a parte de atrás de la flor y pegarla ejerciendo un poco de presión para que se fije en el cuero, después que se ha pegado recortar toda la orilla con mucho cuidado, ensartar la aguja y con cuidado despega un poquito la flor mete la aguja coloca mas silicon y vuelve a pegar la flor la intención es esconder el nudo del hilo, ahora vamos a coser toda la orilla de nuestra flor para empezar introducir 3 mostacillas y volver a meter la aguja dejando un espacio de una mostacilla ahora mete la aguja por la ultima mostacilla y halar ahora meter solo 2 mostacillas volver a coser un punto dejando una distancia de una mostacilla y al sacar la aguja meterla por la ultima mostacilla y así sucesivamente para terminar meterás solo una mostacilla y la aguja la regresaras por la primera mostacilla que metiste cuando comenzamos, coser y cerrar al terminar tratando de ocultar el hilo
STEP 3: After cutting and verifying the flower we are going to glue it on a thick cloth or leather, we just have to smear liquid silicone on the back of the flower and glue it with a little pressure so that it is fixed to the leather, after it has been glued, trim the entire edge very carefully, thread the needle and carefully take off a little bit the flower put the needle put more silicone and glue the flower again the intention is to hide the knot of the thread, now we are going to sew the entire edge of our flower to start introducing 3 beads and put the needle back leaving a space for a bead now put the needle through the last bead and pull now put only 2 beads to sew a point leaving a distance of one bead and when removing the needle put it through the last bead and so on to finish you will put only one bead and the needle will return it for the first bead that you put when we started, sew and close at the end ar trying to hide the thread
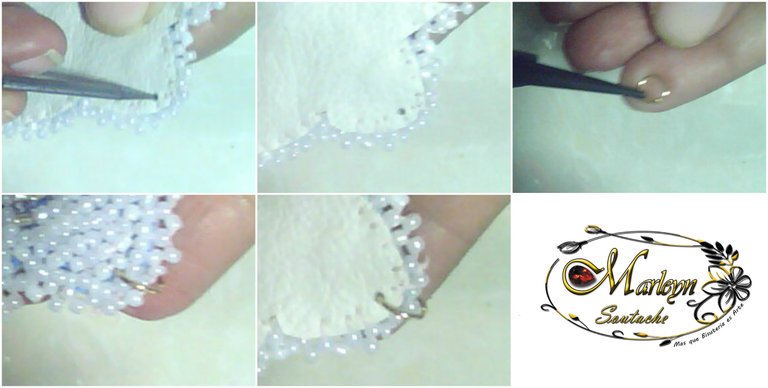
PASO 4: Cuando termines con la ayuda de algo punzante vas a abrir un hueco pequeño casi imperceptible en el cuero y tela, y con ayuda de una pinza de bisutería vas a introducir un aro de 0.5 milímetros de esta manera hemos finalizado nuestro hermoso dije bordado a mano. Atrévete a hacerlo te aseguro que con paciencia y amor todo es mas fácil
STEP 4: When you finish with the help of something sharp you are going to open a small almost imperceptible hole in the leather and fabric, and with the help of a jewelery clip you are going to introduce a ring of 0.5 millimeters in this way we have finished our beautiful hand-embroidered charm. Dare to do it I assure you that with patience and love everything is easier
Mas Tutoriales paso a paso para ti: More step-by-step tutorials for you:




Siempre me ha parecido admirable el trabajo manual que representa el bordado. Me encanta como tarea y me desestresa pero soy un poco torpe si no tengo instrucciones. Gracias por compartirlo.
Gracias a ti por leerme, es grandioso si lo intentas paso a paso sin apuros de seguro quedara hermoso
Que hermosa orquídea hecha en bordado y bisuteria. soy amante de las orquídeas.
Gracias por leerme me encanta saber que ha gustado
I have never worked with leather or beads so far. Your explanation is very thorough and your brooches look beautiful
Thanks for your words, I hope you try it is easy and very entertaining