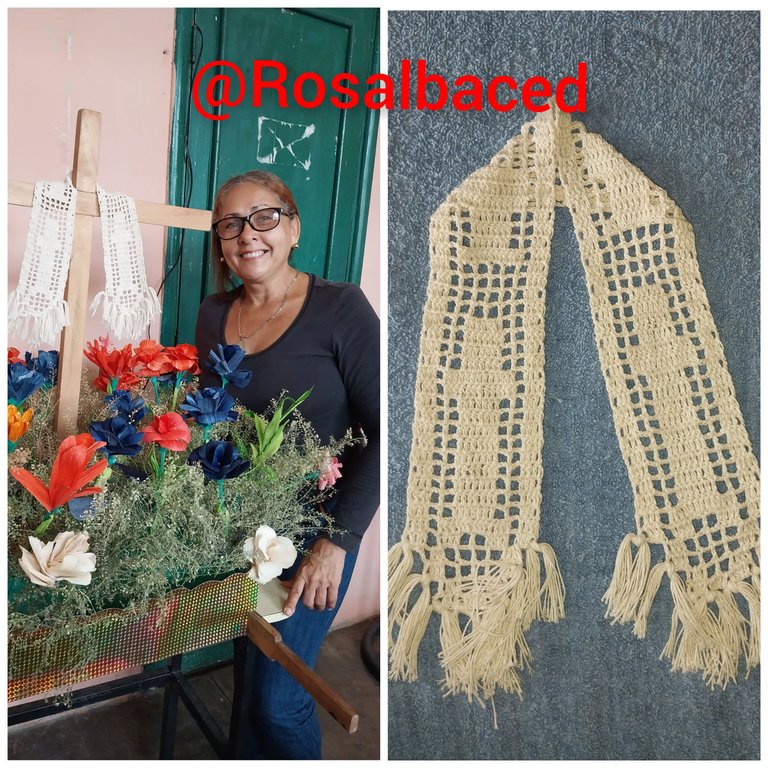
Hola mis queridos amigos de hive, aqui estoy de vuelta con este maravilloso grupo, para seguir Compartiendo con ustedes mi maravilloso arte. Estaba un poco ausente motivado a que mi celular se me había dañado, pero gracias a Dios ya solucioné, para continuar compartiendo todas estas experiencias realizadas. Qué nuestro padre celestial nos permita seguir terminando un bendecido y excelente dia.
Hello, hello my dear friends of hive, here I am back with this wonderful group, to continue sharing with you my wonderful art. I was a little absent because my cell phone had been damaged, but thank God I solved it, to continue sharing all these experiences. May our heavenly father allow us to continue finishing a blessed and excellent day.
En esta ocasión les mostraré este tutorial para Los Amantes del hilo, les compartiré este post de un sudario para la celebración del Día de la cruz de Mayo, Qué se celebra en Venezuela los 3 de Mayo de cada año.
This time I will show you this tutorial for Los Amantes del hilo, I will share with you this post of a shroud for the celebration of the Day of the Cross of May, which is celebrated in Venezuela on May 3 of each year.
El motivo principal de esta fiesta es rendir a la naturaleza un homenaje por ser el mes de mayo el inicio de la temporada de cosecha, se le rinde homenaje con cantos y galerones alusivo a la cruz, bailes y se comparten bebidas y dulces típicos de la localidad donde se realice este homenaje a la cruz. Esto es una cultura religiosa que se ha celebrado durante décadas. Es por esto que en las instituciones educativas de cada región se celebra este homenaje a la cruz.
The main reason for this celebration is to pay homage to nature, since May is the beginning of the harvest season. Homage is paid with songs and galerones allusive to the cross, dances and sharing of drinks and sweets typical of the locality where this homage to the cross takes place. This is a religious culture that has been celebrated for decades. That is why in the educational institutions of each region this tribute to the cross is celebrated.
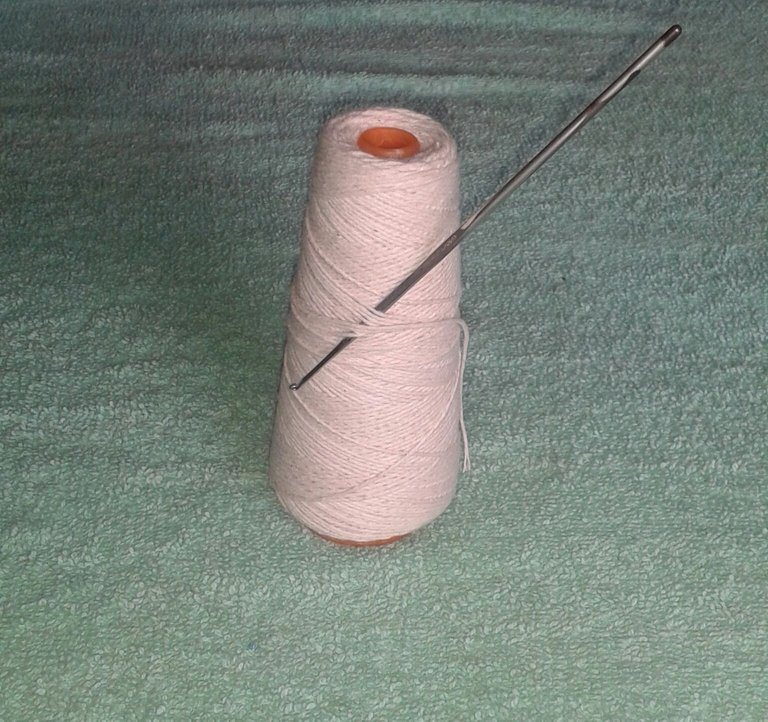
-hilo.
-Tijera.
-Crochet N° 02.
Materials:
-thread.
-Scissors.
-Crochet N° 02.
Paso 1
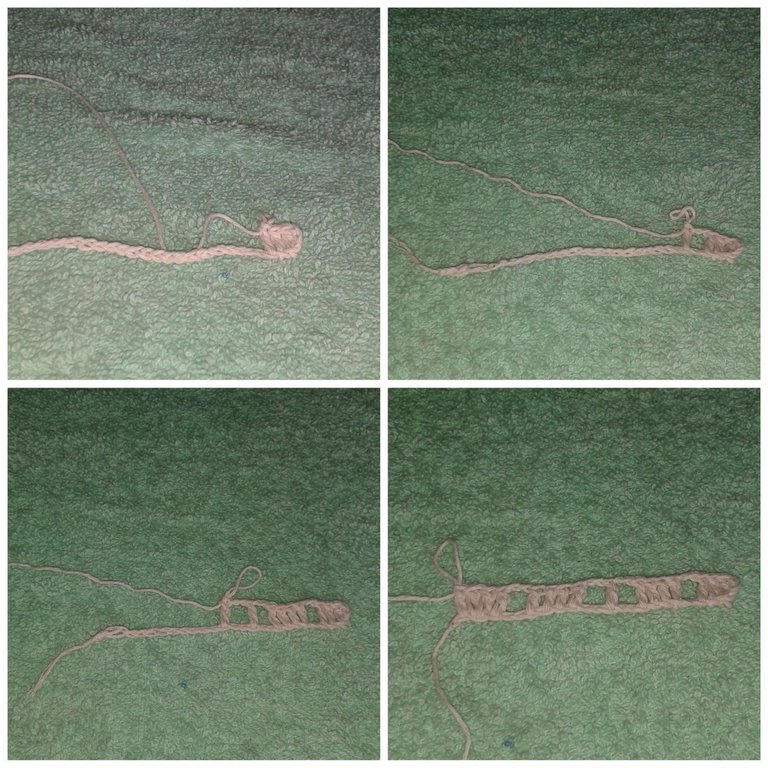
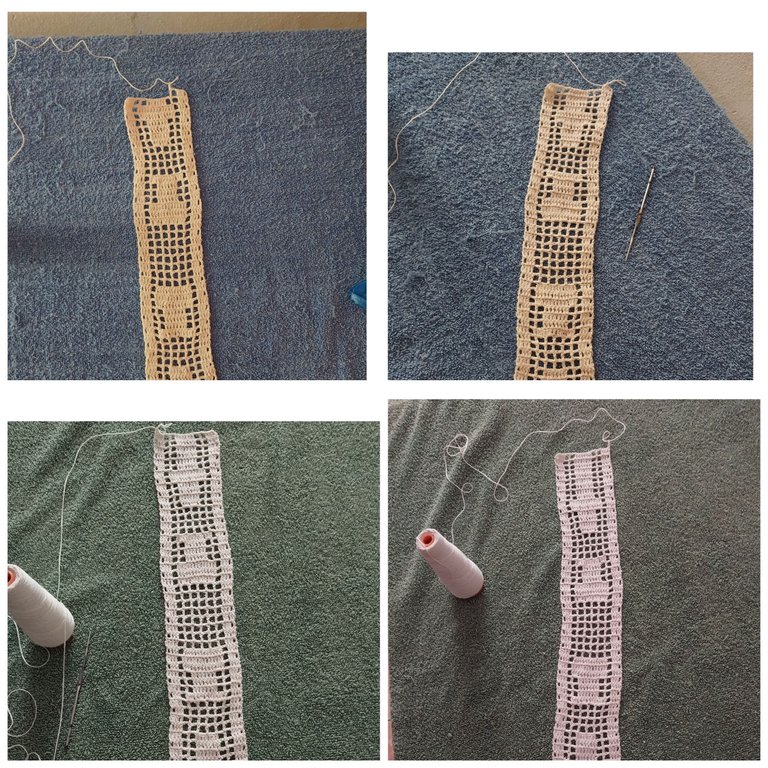
Se toma la punta del hilo y se hace un aro, para comenzar a tejer una cadena de 25 puntos.
Step 1
Take the end of the yarn and make a ring, to start knitting a chain of 25 stitches.

Paso 2
Tejemos tres cadenas hacia arriba para comenzar a tejer 4 puntos altos cada uno en una cadeneta, luego seguimos la misma vuelta con dos cadenas y volvemos a colocar otro punto alto en la tercera cadena de la base, Y así seguimos tejiendo como decimos a veces uno lleno, dos vacíos, uno lleno, uno vacío y terminamos la vuelta con un lleno o sea cuatro puntos altos.
Step 2
We knit three chains upwards to start knitting 4 double crochet stitches each one in a chain, then we continue the same row with two chains and we return to place another double crochet in the third chain of the base, and so we continue knitting as we say sometimes one full, two empty, one full, one empty and we finish the row with one full or four double crochet stitches.
Paso 3
Para continuar Tejiendo la próxima vuelta volteamos el tejido y se realiza tres cadenas hacia arriba y seguimos con 3 puntos altos, porque siempre vamos a comenzar y a terminar la vuelta así, luego tejemos un tachón vacío y cuatro espacios llenos con tachones, después otro vacío y para culminar la vuelta un espacio lleno.
Step 3
To continue knitting the next round we turn the fabric over and knit three chains upwards and continue with 3 high stitches, because we will always start and end the round like this, then we knit an empty stud and four spaces filled with studs, then another empty and to finish the round a filled space.

Paso 4
Le damos la vuelta al tejido y comenzamos con 3 cadenas hacia arriba y tejemos los tres tachones Y así seguimos el lleno y luego dos vacíos, y terminamos la vuelta siempre con un lleno.
Step 4
We turn the weave over and start with 3 chains upwards and we weave the three studs. And so we follow the full and then two empty ones, and we finish the turn always with a full.

Paso 5
Seguimos Tejiendo la próxima vuelta cómo les dije antes siempre con tres cadenas hacia arriba y tres tachones en cada una de la vuelta anterior, luego dos vacíos, dos llenos, dos vacíos y cerramos la vuelta con Uno lleno.
Step 5
We continue knitting the next row as I told you before, always with three chains up and three strands in each of the previous row, then two empty, two full, two empty and we close the row with one full.
Paso 6
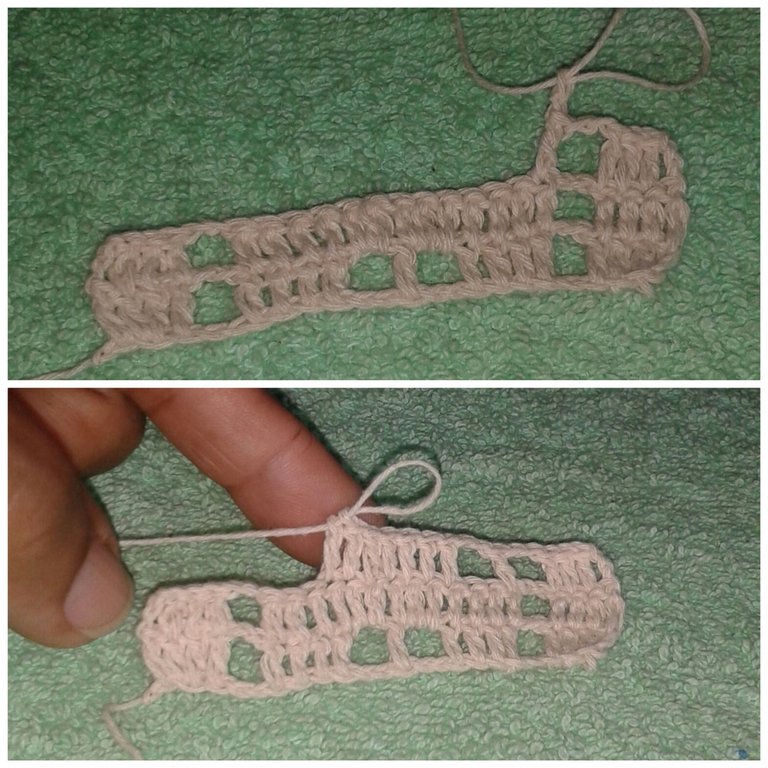
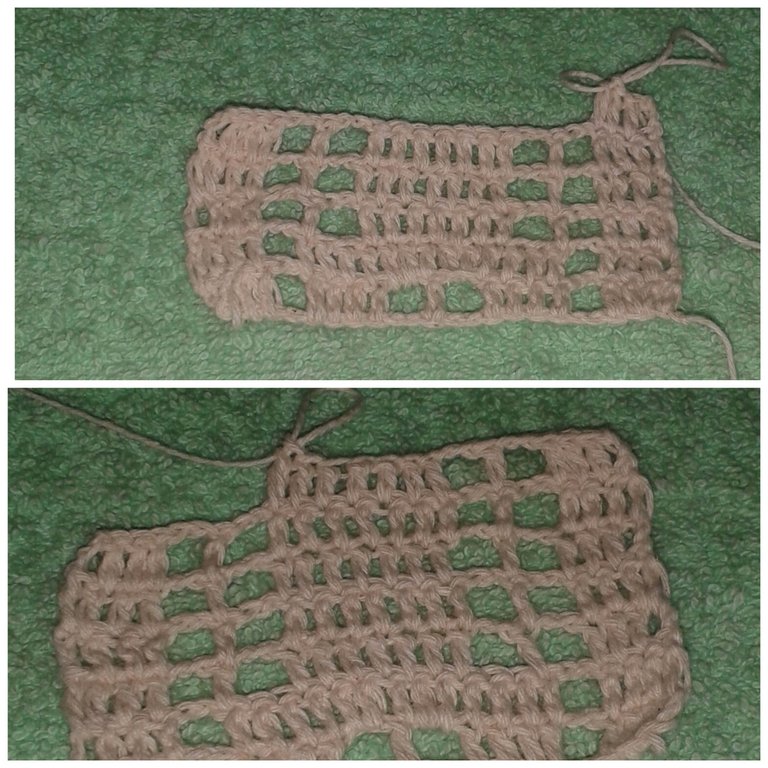
Vamos a realizar 9 vueltas iguales Para irle dando forma de base ( o del palo) de una cruz esto depende del tamaño que desees el sudario.
Step 6
We are going to make 9 equal laps to give it the shape of the base (or stick) of a cross, this depends on the size you want the shroud.
Paso 7
Comenzamos a tejer la parte del centro de la Cruz, le damos la vuelta al tejido y subimos con 3 cadena y seguimos con 3 puntos altos un vacío,4 llenos, un vacío y terminamos con el lleno. Luego realizamos otra vuelta igual a la anterior. Y volteamos el tejido para comenzar la otra vuelta.
Step 7
We begin to knit the center part of the cross, we turn the fabric over and go up with 3 chain and continue with 3 high stitches, one empty, 4 full, one empty and finish with the full. Then we make another round the same as the previous one. And we turn the fabric to start the other round.
Paso 8
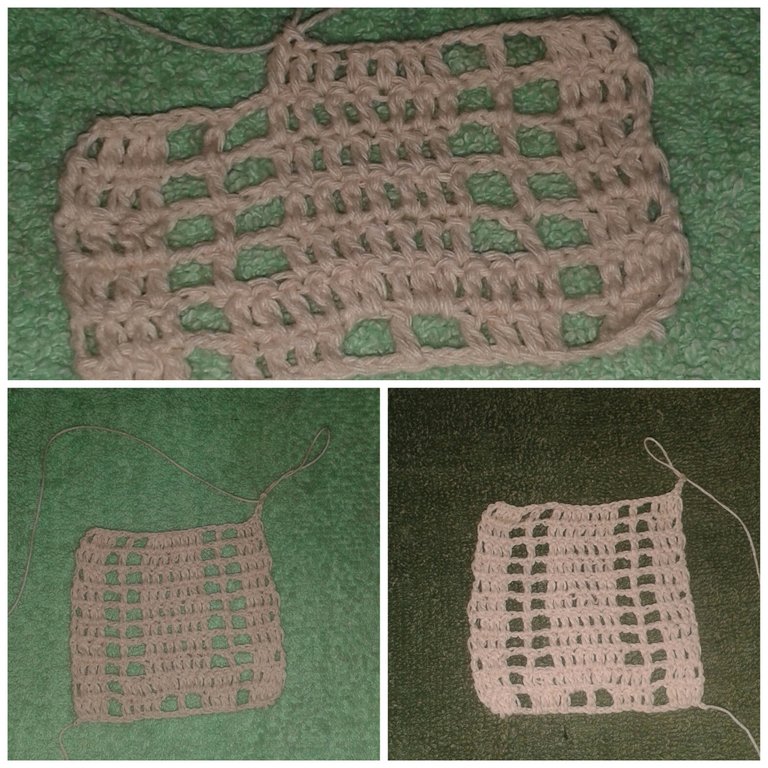
Seguimos con el Tachon lleno, dos vacíos, 2 llenos, dos vacios y para culminar con el lleno. Y así vamos a seguir Tejiendo 4 vueltas iguales para terminar de darle la forma de arriba a la cruz.
Step 8
We continue with the full tachon, two empty ones, 2 full ones, two empty ones and to finish with the full one. And so we will continue knitting 4 equal rows to finish giving the top shape to the cross.
Paso 9
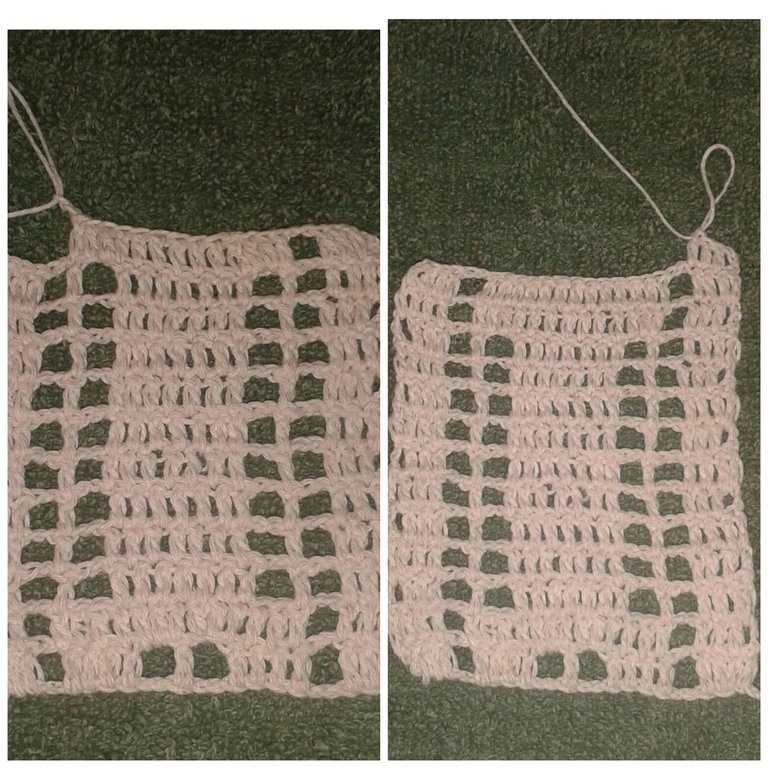
Continuamos Tejiendo 4 vueltas iguales,que son Uno lleno, seis vacío y se termina la vuelta con Uno lleno. para separar la figura de la cruz con la que viene a continuación.
Step 9
We continue knitting 4 equal rows, which are one full, six empty and we end the row with a full one to separate the figure of the cross with the one that comes next.
Paso 10
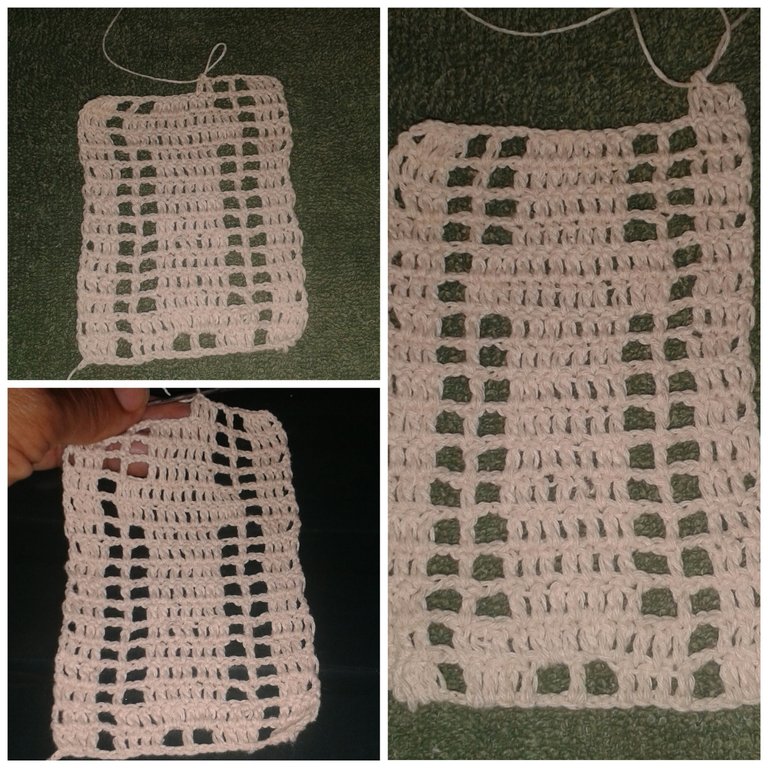
Seguimos Tejiendo un lleno, un vacío, 4 lleno,un vacío y terminamos la vuelta con un lleno. luego comenzamos volteando el tejido y con un lleno, dos vacíos, dos lleno, dos vacíos y un lleno así tejemos tres vueltas iguales.
Step 10
We continue knitting one full, one empty, 4 full, one empty and finish the round with one full. then we start by turning the fabric over and knit one full, two empty, two full, two empty and one full, so we knit three equal rounds.

Paso 11
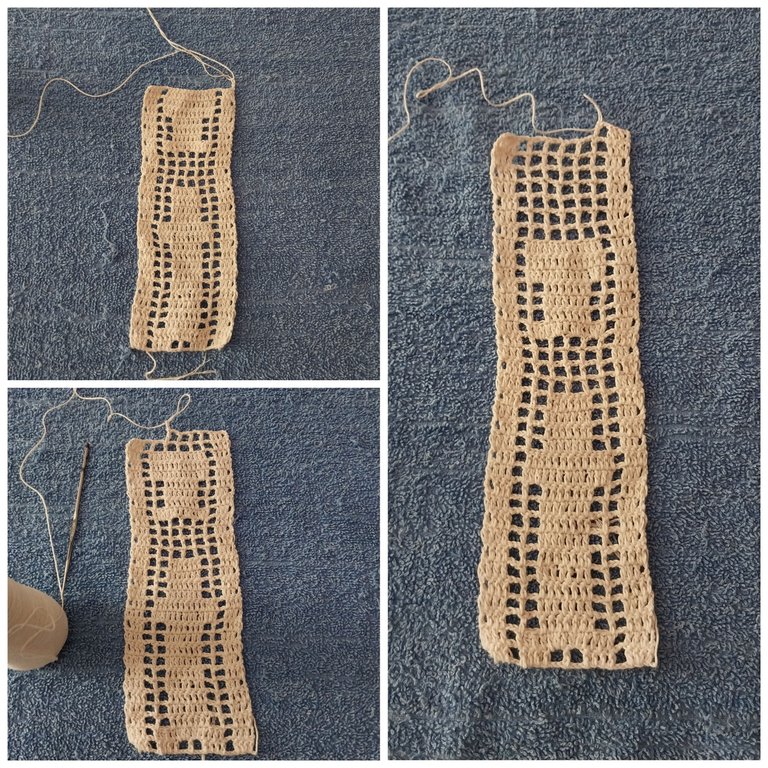
Continuamos con un lleno, un vacío 4 lleno, un vacío y terminamos con un lleno. luego se tejen 3 vueltas iguales para darle la forma de la Copa. separamos con un lleno, 6 vacíos y un lleno, así le repetimos 9 vueltas iguales para separar la figura de la copa y empezar a realizar la otra figura.
Step 11
We continue with one full, one empty, 4 full, one empty and finish with one full. then we knit 3 equal rows to give it the shape of the cup. we separate with one full, 6 empty and one full, so we repeat 9 equal rows to separate the figure of the cup and begin to make the other figure.

Paso 12
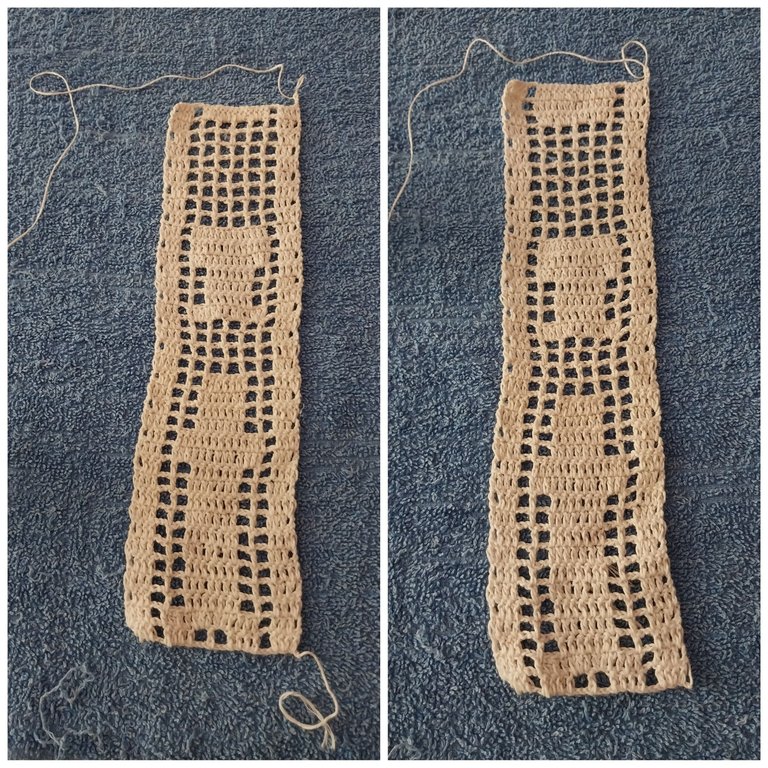
Se comienza tejer un lleno, un vacío, 4 llenos, un vacío y para terminar con un lleno, se voltea el tejido y se teje tres vueltas iguales para comenzar a realizar la figura de la Copa pero de arriba hacia abajo.
Step 12
Start knitting a full, a void, 4 fulls, a void and finish with a full, turn the fabric over and knit three equal rows to start knitting the cup shape but from the top down.
Paso 13
Seguimos Tejiendo el motivo de la copa con un lleno,dos vacíos, dos llenos, dos vacíos y terminamos la vuelta con un lleno, y así repetimos la misma vuelta dos veces para realizar la base de la copa.
Step 13
We continue knitting the motif of the cup with one full, two empty, two full, two empty and finish the row with one full, and so we repeat the same row twice to make the base of the cup.
Paso 14
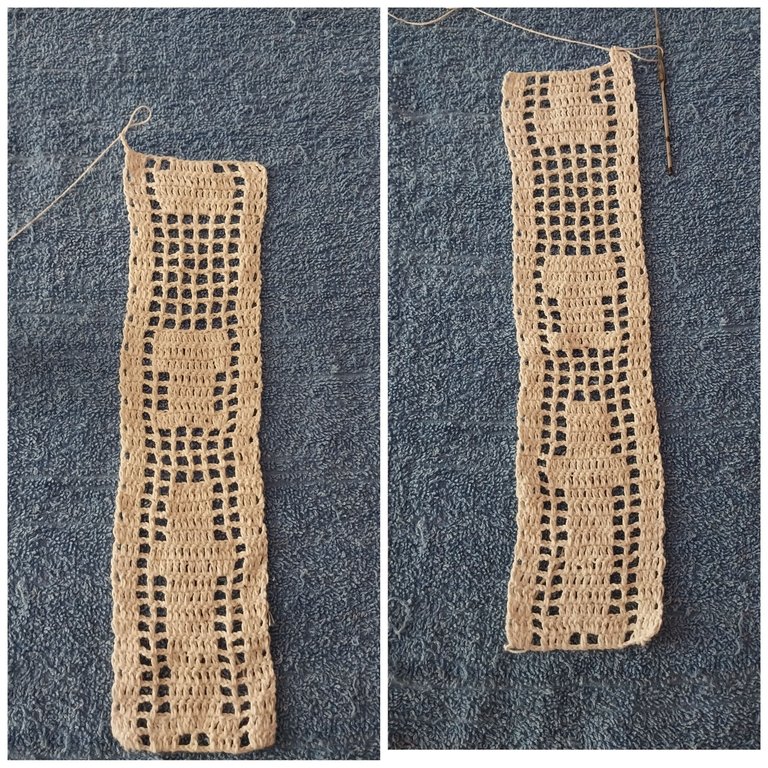
Siempre volteamos el tejido para devolvernos tejiendo un lleno, un vacío, 4 llenos, un vacío y terminamos la vuelta con un lleno. luego tejemos 4 vueltas iguales para separar la copa de la Cruz, qué comenzamos con un lleno, 6 vacío, y terminamos siempre con un lleno.
Step 14
We always turn the knitting to return by knitting a full, a void, 4 fulls, a void and finish the round with a full. Then we knit 4 equal rounds to separate the cup from the Cross, which we start with a full, 6 voids, and always finish with a full.
Paso 15
Volteamos el tejido y continuamos Tejiendo la cruz igual a la anterior, cuatro vueltas iguales, después realizamos dos vueltas para hacer el compartimiento de la cruz, Uno lleno,uno vacio,cuatro lleno, un vacío y un lleno.
Step 15
We turn the fabric over and continue weaving the cross the same as the previous one, four equal rows, then we make two rows to make the compartment of the cross, one full, one empty, four full, one empty and one full.

Paso 16
Seguimos teniendo 9 vueltas iguales un lleno, un vacío, dos llenos, dos vacíos y Uno lleno. luego tejemos la siguiente vuelta un lleno, un vacío, 4 lleno y Un vacio y uno lleno.
Step 16
We continue having 9 equal rows one full, one empty, two full, two empty and one full. then we knit the next row one full, one empty, 4 full and one empty and one full.
Paso 17
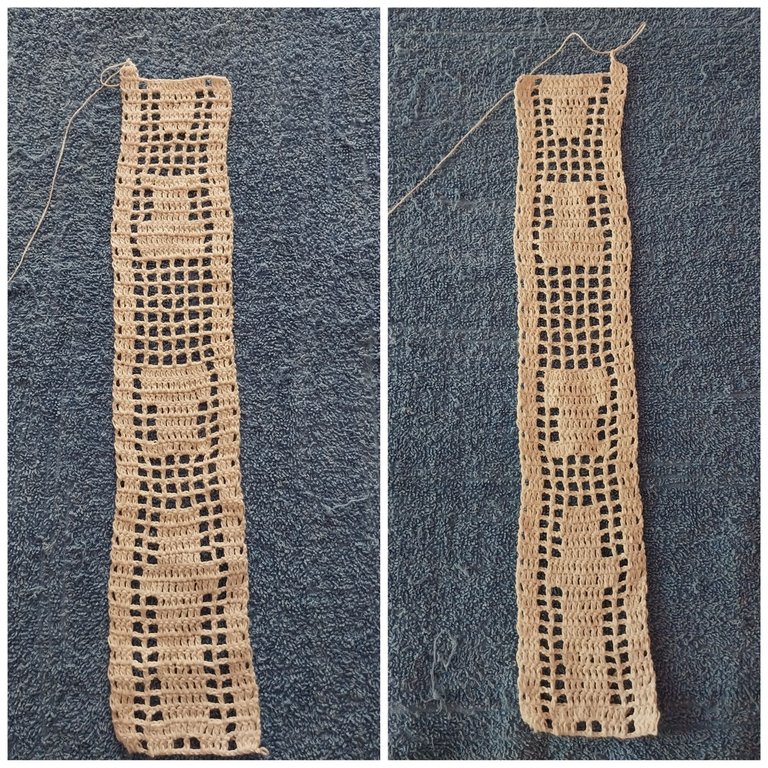
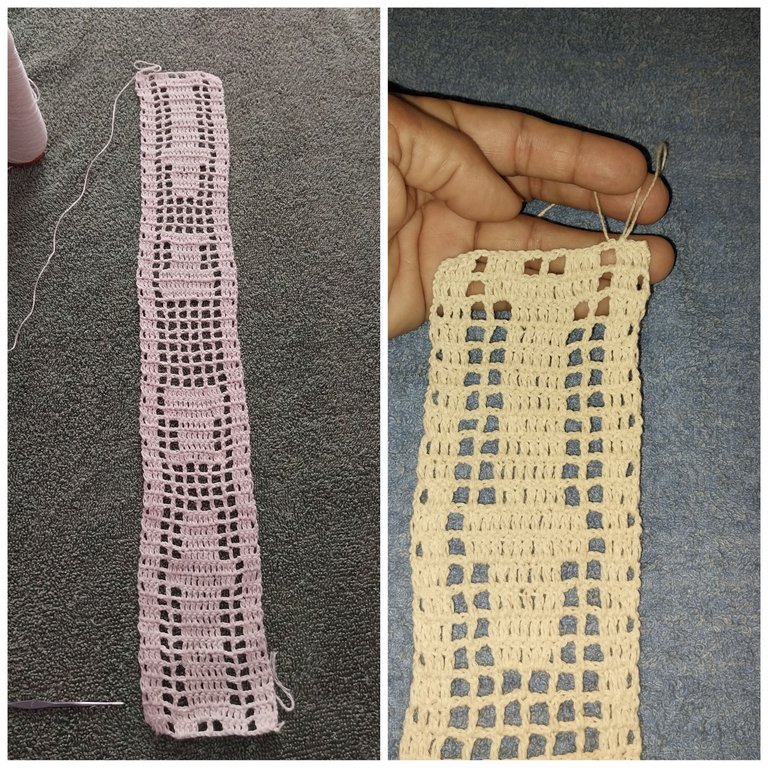
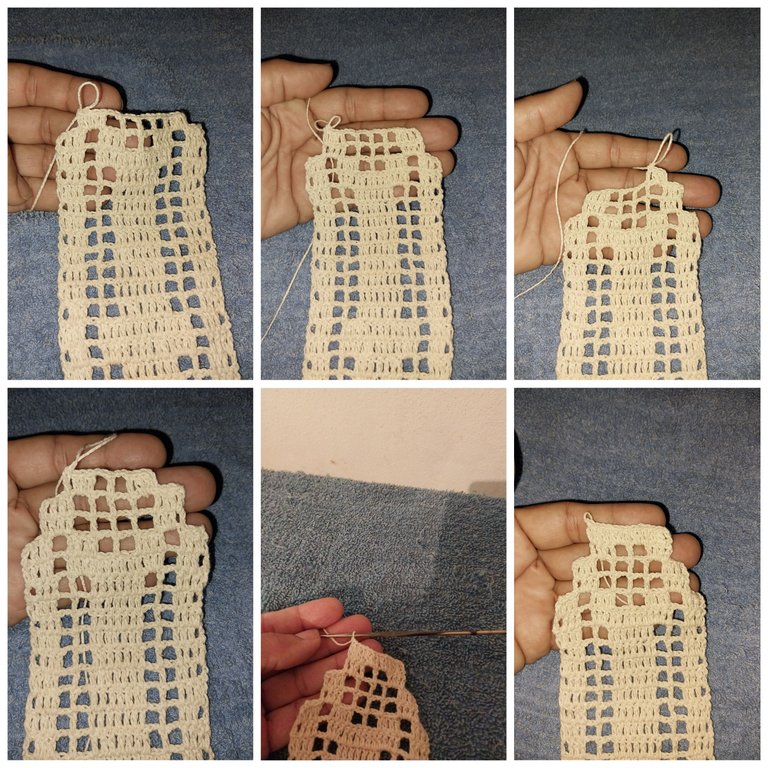
Continuamos con la siguiente vuelta con un lleno, un vacío, un lleno, dos vacíos, un lleno, un vacío y finalizamos la vuelta con un lleno. luego corrímos el tejido con medio punto hasta llegar a la cadena del cuadrito vacío y subimos con 3 puntos altos para comenzar a tejer los tachones para realizar un lleno y seguimos con cuatro vacíos y finalizamos con un lleno, volteamos el sudario y repetimos la misma vuelta.
Step 17
We continue with the next round with a full, a void, a full, a full, two voids, a full, a void and finish the round with a full. Then we run the knitting with a half stitch until we reach the chain of the empty square and go up with 3 high stitches to start knitting the studs to make a full and we continue with four voids and finish with a full, we turn the shroud and repeat the same round.
Paso 18
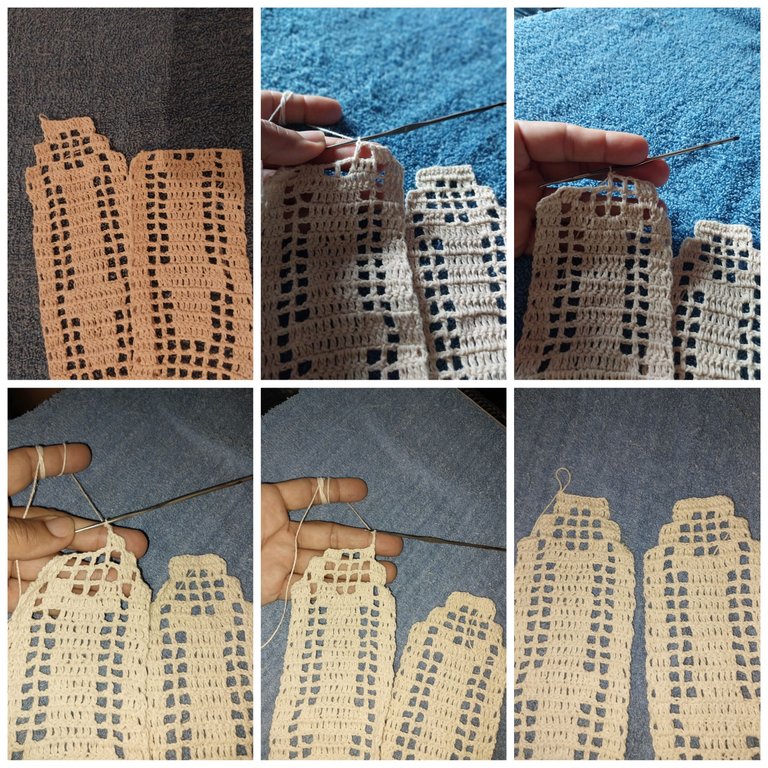
Se le da la vuelta al tejido y nos vamos con 4 medios puntos hasta el cuadro vacío para comenzar con un lleno, dos vacíos, un lleno, y así hemos culminado el sudario de un lado. tomamos una hebra de hilo y le realizamos un nudo para asegurarlo y le comenzamos a tejer de la misma manera que hicimos el lado anterior.
Step 18
We turn the fabric over and go with 4 half stitches to the empty square to start with one full, two empty ones, one full, and thus we have completed the shroud on one side. We take a strand of yarn and tie a knot to secure it and we start weaving in the same way as we did the previous side.
Paso 19
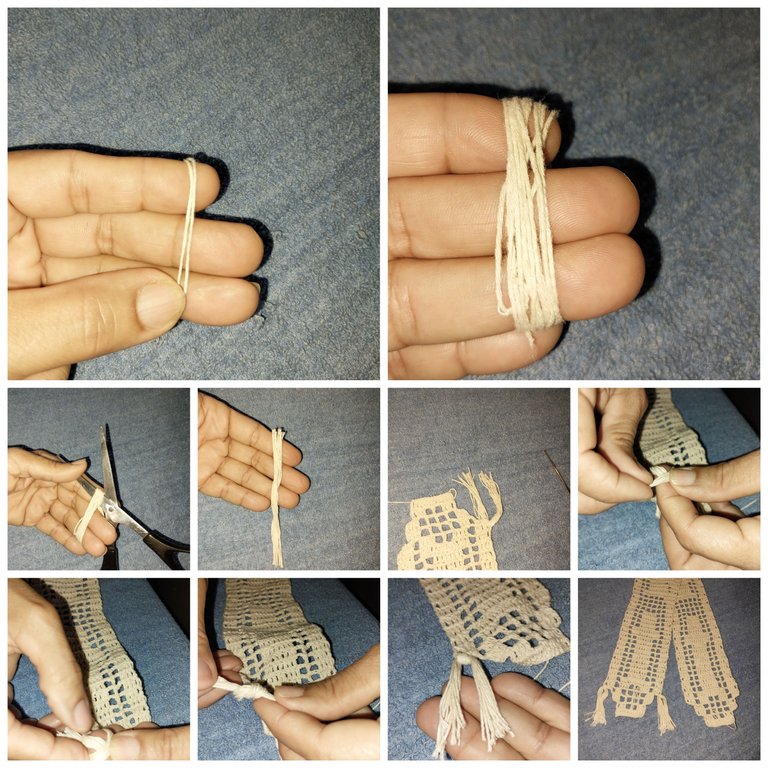
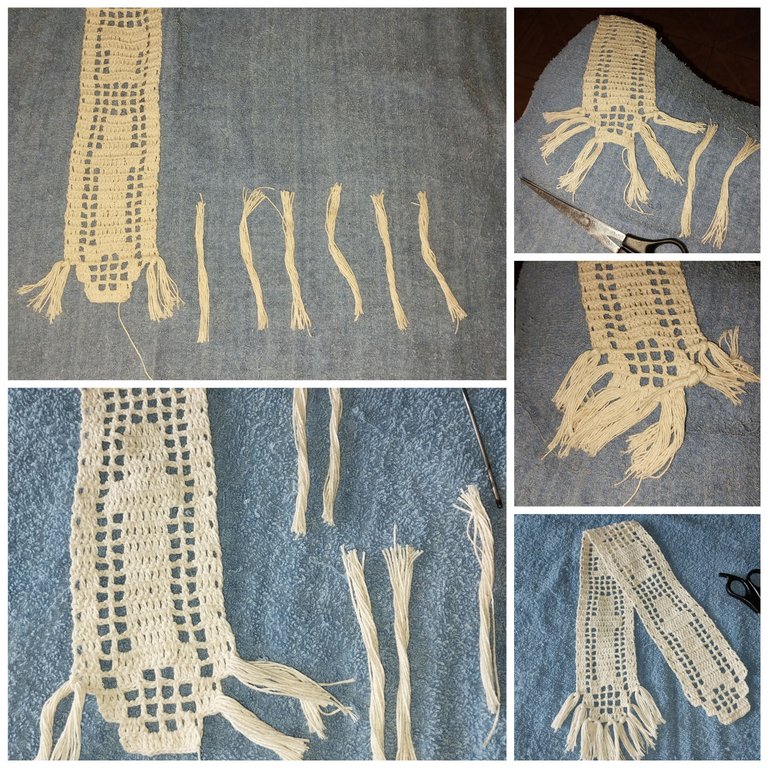
Colocamos tres dedos de nuestra mano y con él hilo empezamos a envolver, asi le hice 12 vueltas, luego con la tijera lo cortamos de un lado y así da el largo, tomamos una de las puntas del sudario Itzel y se lo colocamos en una esquina, con un nudo lo aseguramos para que no se desate. asímismo continuamos cortando los hilos para colocárselo en las puntas de cada lado del sudario.
Step 19
We place three fingers of our hand and with it we begin to wrap the thread, so I made 12 turns, then with the scissors we cut it on one side and thus gives the length, we take one of the ends of the Itzel shroud and we place it in a corner, with a knot we secure it so that it does not untie. likewise we continue cutting the threads to place it on the ends of each side of the shroud.
Paso 20
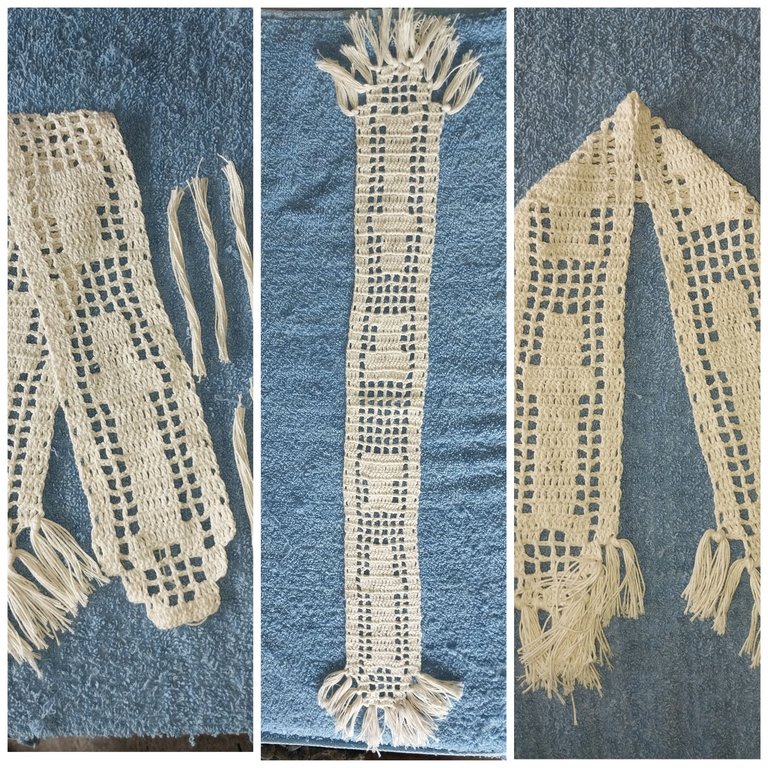
Culminando un lado se continúa con el otro lado haciendo el mismo procedimiento, ya queda de nuestra parte hacerle sobresaltar la cruz tejida de cada lado con cualquier cinta o lencería qué desees.
Para así darle culminación a nuestro sudario.
Step 20
Once one side is finished, continue with the other side doing the same procedure, it is up to us to make the woven cross on each side stand out with any ribbon or lingerie you wish.
In this way we can complete our shroud.
This is an amazing one.. you are too good I am proud of your work.
Thank you, greetings and blessings.
You are welcome
Thank you
Que lindo proyecto amiga, se nota cuanto amor tienes por Dios, espero que te vaya bien en tu publicaciòn. Dios te bendiga.
Amen amiga, asi sera con un Dios primero. Feliz tarde.
Quedo muy bonito!! felicidades, gracias por compartirlo.
Graciassss amiga, me encanta compartir con tod@s ustedes. Bendiciones.
Wow these is pure masterpiece.
Keep up the good work.
I am very pleased that you love my work. Thank you.
You're welcome.
Wow beautiful thanks for sharing
Thank you for liking my work. Happy afternoon.
Thank you for sharing this amazing post on HIVE!
non-profit curation initiative!Your content got selected by our fellow curator @rezoanulvibes & you just received a little thank you via an upvote from our
You will be featured in one of our recurring curation compilations and on our pinterest boards! Both are aiming to offer you a stage to widen your audience within and outside of the DIY scene of hive.
Join the official DIYHub community on HIVE and show us more of your amazing work and feel free to connect with us and other DIYers via our discord server: https://discord.gg/mY5uCfQ !
If you want to support our goal to motivate other DIY/art/music/homesteading/... creators just delegate to us and earn 100% of your curation rewards!
Stay creative & hive on!
Thank you, I will continue to share with you. Blessings.
Me encantó. Todo lo tejido queda precioso. Los flecos le dan un toque muy especial al Sudario. Gracias por dejarnos el paso a paso con detalle. Suerte ☘️