
ENGLISH
Hello everyone!
I wanted to participate but unfortunately I could not have my project ready in time.
But hey, it's never too late so I present it now. Here is my work: A RECYCLED JEANS BANDOLIER BAG.
Quite a challenge for me. It wasn't easy, it took me some work because there are many sewing tips that I don't know, but I managed to do it, and believe me, I had fun! And I'm satisfied with what I did.
How are you doing? I hope you are very well and attentive to all the wonderful things happening in #HIVE.
I take this opportunity to congratulate the winners in the #OCD sponsored #NeedleWorkMonday contest.
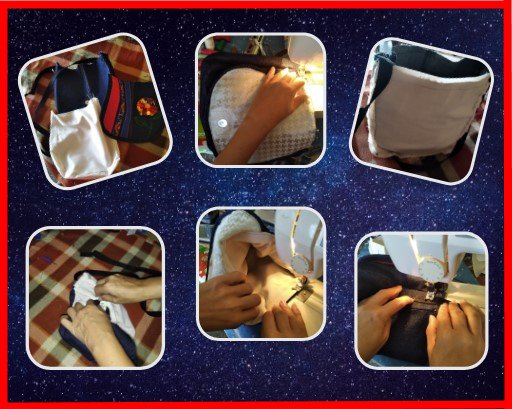
So, without further ado, I show you the elaboration process...here we go!
SPANISH
¡Hola a todos!
Quería participar pero lamentablemente no pude tener listo a tiempo mi proyecto.
Pero bueno, nunca es tarde así que lo presento ahora. Aquí está mi trabajo: UN BOLSO BANDOLERO DE JEANS RECICLADO.
Todo un reto para mí. No fué fácil, me costó un poco de trabajo porque hay muchos tips de costura que desconozco, pero logré hacerlo. ¡Y créanme, me divertí! Y estoy satisfecha con lo que hice..
¿Cómo están? Espero que muy bien y atentos a todo lo maravilloso que pasa en #HIVE.
Aprovecho la oportunidad para felicitar a los ganadores en el concurso patrocinado por #OCD en #NeedleWorkMonday.
Así que, sin mas , les muestro el proceso de elaboración...aquí vamos!
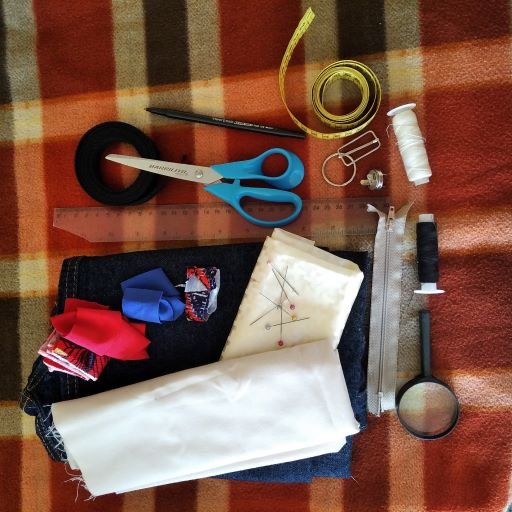
MATERIALS TO BE USED:
⦁ Old or worn-out jeans
⦁ Fabric scraps
⦁ Closure (I reused a 16 cms)
⦁ Tape for the hanger (I used 1.35 cms)
⦁ Magnetic brooch
⦁ 1 slide
⦁ 1 ring or half moon
⦁ Without fail; needles, threads, scissors, pins, chalk, pencil, tape measure and ruler.
⦁ Sewing machine (if not, by hand)
⦁ Lupa...hahaha...I can't see well.😀😆
MATERIALES A UTILIZAR:
- Jeans viejos o en desuso
- Retazos de tela
- Cierre (reutilicé uno de 16 cms)
- Cinta para el colgadero (utilicé 1.35 cms)
- Broche magnético
- 1 corredera
- 1 argolla o media luna
- Sin falta; agujas, hilos, tijeras, alfileres, tiza, lápiz, cinta métrica y regla.
- Máquina de coser (si no, a manito)
- Lupa...jajaja...es que yo no veo bien😀😆
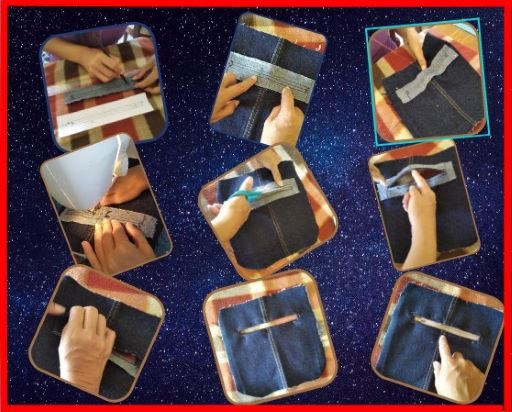
PATTERNS AND CUTTING:
Once I decided how I wanted it and watching some tutorials on You Tube, I made the patterns, transferred them to the fabrics and cut: two pieces of the body (measuring 21x21), one of the flap or cover (measuring 17x21) and two sides (measuring 5x36). I did this in both the jeans fabric and the unicolor fabric for the lining, leaving one centimeter for the seam allowance.
PATRONES Y CORTE:
Una vez que decidí cómo lo quería y viendo algunos tutoriales en You Tube, hice los patrones, los pasé a las telas y corté: dos piezas del cuerpo (miden 21x21), una de la solapa o tapa (mide 17x21) y dos laterales (miden 5x36). Lo hice tanto en la tela de Jeans como en la unicolor que es para el forro, dejando un centímetro para la costura.
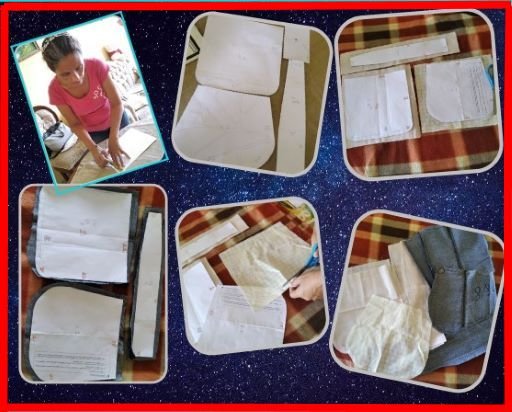
FLAP OR COVER:
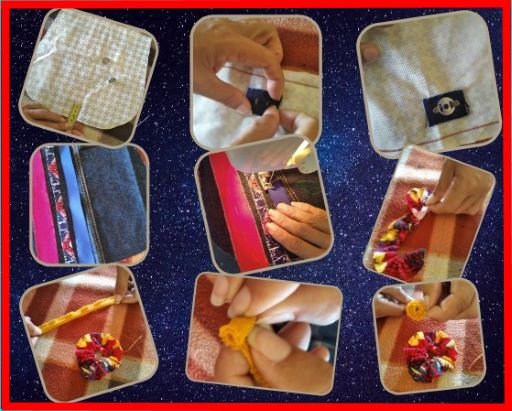
- On the rounded unicolor piece, calculate the place where the clasp should go to close the bag (I did it wrong and then I had to fix it), putting a square of jeans as a reinforcement (tip I saw on the web). This is the inner part of the flap.
- On the rounded piece of jeans that will be the outer part of the cover, I added three strips of blue, red and printed patchwork with zigzag stitching on the left side. I made a flower with a strip of printed fabric (also patchwork) which I gathered and then joined the ends. I rolled a thin strip of fabric to make the center of the flower. Once ready, I sewed it on the right side of the ta fabric. There I drew the stem and leaves with chalk and also sewed it in zigzag stitch. I don't know how to machine embroider so I made a first stitch and on top of that another one to give it a little thickness.
- Then I sewed the one-color piece to the denim piece. To finish off the top, I sewed a strip of jeans fabric around it like a bias binding: I faced right sides together from the inside of the top and then turned it towards the flower part. I could have also left it plain, but I liked it better this way.😎
SOLAPA O TAPA:
- En la pieza unicolor redondeada, calculas el lugar donde debería ir el broche para cerrar el bolso (yo lo hice mal y luego tuve que arreglarlo), poniéndole un cuadrito de jeans como refuerzo (tip que vi en la web). Esta es la parte interna de la tapa.
- En la pieza de jeans redondeada y que será la parte externa de la tapa añadí del lado izquierdo tres tiras de retazos en colores azul, rojo y estampado con costura zigzag. Hice una flor con una tira de tela estampada (también retazo) la cual fruncí y luego uní los extremos. Enrollé una tira delgada de tela para hacer el centro de la flor. Una vez lista, la cosí en el lado derecho de la tela en puntada zigzag. Yo no sé bordar en máquina así que realicé una primera costura y sobre esa otra para darle un poco de grosor.
- Luego cosí la pieza unicolor a la de jeans. Para rematar la tapa, con una tira de tela de jeans le hice alrededor como un bies: enfrenté los derechos desde la parte interior de la tapa y luego voltee hacia la parte de la flor. También la pude haber dejado simple, pero me gustó más así.😎
BACK WITH POCKET
- The two pieces of jeans are the same size, so I took one as the back where I would place the pocket zipper.
- On a rectangle of paper 5 cm wide by 18 cm long, I drew in the center a horizontal line of 16 cm (this is the size of the zipper). On this line I drew a bottom and a top line with a distance of 0.5 cm and then I closed my little square. I made a small triangle at each end. I copied this pattern on a piece of jeans with the same measurements and sewed it by hand (in case I had to take it off...hahaha) to the piece that would now be the back of the bag. As I saw it well I proceeded to sew it by machine. Afterwards, I cut on the center line (the first one I made), up to the beginning of the marked triangle. (this one is not cut)
- Once open, flip that rectangle to the inside of the jeans fabric, and flatten the seams with the iron. I presented the zipper, pinned first with hand stitching and pin, and then machine stitched.
- The pocket I made with two scraps of the same fabric as the lining (I had cut wrong so I took advantage of them). I sewed one on the top of the zipper flap and one on the bottom and then sewed around both to join them together.
PARTE POSTERIOR CON BOLSILLO
- Las dos piezas de jeans tienen la misma medida, así que tomé una como parte trasera en la cual colocaría el cierre del bolsillo.
- En un rectángulo de papel de 5cm de ancho por 18 cms de largo, dibujé en el centro una línea horizontal de 16 cms (es lo que mide el cierre). Sobre ésta tracé una abajo y otra arriba con una distancia de 0.5 cms y luego cerré mi cuadrito. Hice un pequeño triángulo en cada uno de los extremos. Este patrón lo copié en un pedazo de jeans con las mismas medidas y lo cosí a mano (por si tenía que despegar...jajaja) a la pieza que sería ahora la parte trasera del bolso. Cómo lo vi bien procedí a coser a máquina. Posteriormente, corté en la línea central (la primera que hice), hasta el inicio del triangulito marcado. (éste no se corta).
- Una vez abierto, voltee ese rectángulo hacia el interior de la tela de jeans, y aplane las costuras con la plancha. Presenté el cierre, fijé primero con costura manual y alfiler y luego cosí a máquina.
- El bolsillo lo hice con dos retazos de la misma tela del forro (había cortado mal así que los aproveché). Cosí uno en la parte superior de la solapa del cierre y otro en la inferior y luego cosí alrededor de ambos para unirlos.
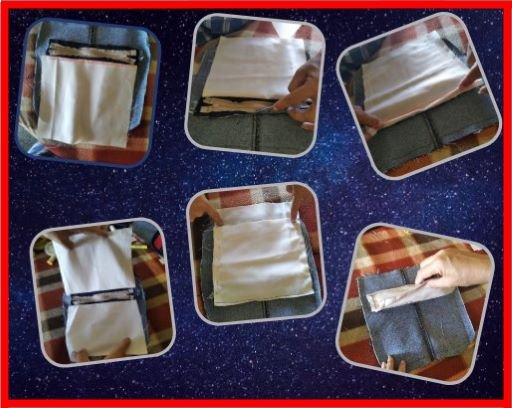
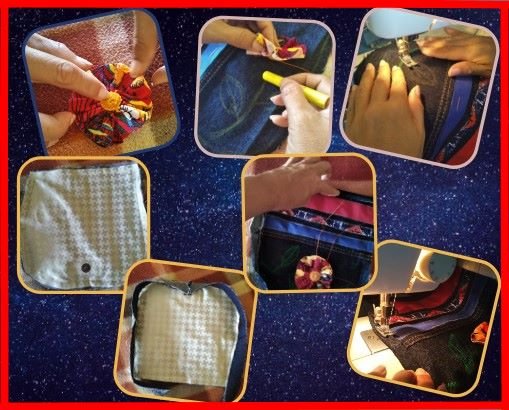
BODY OF THE BAG:
- To the remaining piece of jeans that would be the front of the bag, I attached the other part of the magnetic clasp, in the same way as I did on the flap.
- I sewed the side pieces at their thickest part and placed them on the front of the bag so that they were facing each other and sewed. I did the same with the back piece, so that when I turned the seams were on the inside.
CUERPO DEL BOLSO:
- A la pieza de jeans que quedaba y que dejaría como el frente del bolso le coloqué la otra parte del cierre magnético, de la misma manera que lo hice en la tapa o solapa.
- Las piezas laterales las cosí en su parte más gruesa y las puse sobre la parte frontal del bolso de forma que quedaran frente con frente y cosí. Lo mismo hice con la pieza trasera, de manera que al voltear las costuras quedasen por dentro.
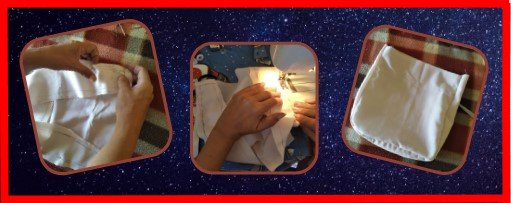
I made the lining with the unicolor fabric in the same way I made the body of the bag...no more, no less; joining the sides with the front and back.
Honestly, this was the easiest part of the whole project.🙄
El forro lo elaboré con la tela unicolor de la misma forma que hice el cuerpo del bolso...ni más ni menos; uniendo laterales con frontal y trasero.
Sinceramente, esto fue lo más fácil de todo el proyecto.🙄
Now... TO PUT EVERYTHING TOGETHER AND FORM THE BAG!
I sewed the cover to the back side facing the fabrics. I flipped the lining over (seams facing out) and inserted the bag right side out. I sewed around both pieces.
Here I had to unpick the lining on one side because I didn't know how to flip it over to get the jeans parts out...😂😂
Anyway, I took out the bag through that opening, then I sewed it. I flattened the seams with the iron and finished with another seam all around with the lining inside the bag as it should be ... hahaha.
Finally, I sewed the ends of the hanger on both sides.
Ahora sí... ¡A UNIR TODO Y FORMAR EL BOLSO!
La tapa la cosí a la parte trasera frente con frente de las telas. Volteé el forro (las costuras quedan hacia afuera) e introduje el bolso por el lado derecho. Cosí alrededor de ambas piezas.
Aquí tuve que descoser el forro por un lado porque no sabía cómo voltearlo para sacar las partes de jeans...😂😂
En fin; saqué el bolso por esa abertura, posteriormente la cosí. Aplané las costuras con la plancha y rematé con otra costura alrededor ya con el forro dentro del bolso como debe ser...jajaja
Finalmente, cosí a ambos lados los extremos del colgadero.
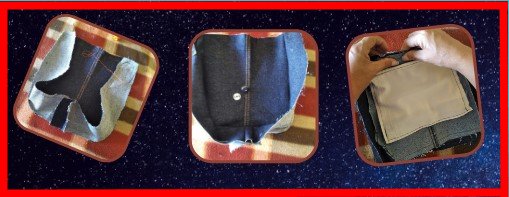
And so... MY JEANS BANDOLERO IS READY!
Y así... MI BANDOLERO DE JEANS ESTA LISTO!
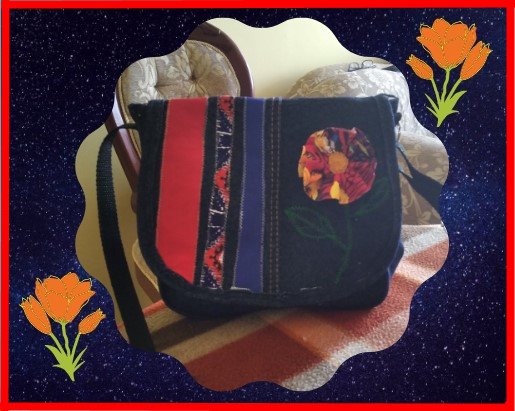
And that's all friends. I am delighted with what I achieved, I suffered a little bit, but it was worth it...now brand new...jajajaja.
As the song says: "Toy contenta yo no se que es lo que es lo que siento..." hahaha.
And you, did you like it? If you liked my work, please give me an Upvote or your comment and share, I will thank you with my heart.
Thanks for reading!
Y eso es todo amigos. Yo estoy encantada con lo que logré, sufrí un poquito, pero valió la pena...ahora a estrenar...jajajaja.
Cómo dice la canción: "Toy contenta yo no se que es lo que siento..." jajaja.
¿Y a Ti, te gusto? Si ha sido de tu agrado mi trabajo , por favor regálame un Upvote o tu comentario y comparte, que con el corazón te lo agradeceré.
¡Gracias por tu lectura!

Fotos de mi galeria personal editadas en Canva
Traducción al Inglés realizada con DeepL translate version gratuita
Photos from my personal gallery edited in Canva
English translation made with DeepL translate free version
Que bonito tu trabajo, haces un arte que requiere mucho amor y paciencia te felicito, nunca me ha gustado coser ni a mano jajajaja mi madre realiza unas costuras a mano espectaculares, por eso admiro a quienes realizan está hermosa labor. 💞 @sindetalles
Me gusta coser y lo poco que se lo aplico tratando de que quede lo mejor posible. A mano es mas laborioso. Me alegro que te haya gustado el resultado. Gracias por comentar.
Your post has been voted as a part of Encouragement program. Keep up the good work!
Use Ecency daily to boost your growth on platform!
Support Ecency
Vote for Proposal
Delegate HP and earn more
Te quedo precioso!!!
Me encantan la confección de todo tipo de bolsos, con cualquier material. Este me encanto.
Muchas gracias por compartir tu linda creación. Bienvenida a #needleworkmonday.
Gracias. Trataré de mostrar siempre lo que vaya haciendo. Creo que me servirá de práctica, además de que en #needleworkmonday he visto unos trabajos excelentes. Eso también me incentiva.
Si amiga, te encantará la interacción en la comunidad. estaré atenta para aprender de tus creaciones. Saludos.