Good afternoon my dear friends in today's tutorial I will show you how to make a nice and comfortable shoe rack for children.
Los siguientes materiales usados son:
Un metro de corino o cuero sintético unicolor
Dos tiros de corino de un metro 20 de ancho por 30 cm de alto cada tira de diferente estampado
Dos tiras de corino del mismo estampado de 90 cm de ancho por 30 de alto.
Una tira de corino unicolor de 7 cm de ancho por 2,40 metro de alto
Un cierre de 80 cm de largo.
Hilo
Tijera
Dos ganchos para colgar
Máquina de coser
Nota. La cantidad de corino o cuero sintético que vamos a comprar es muy relativa según el ancho del material ya que este material puede ser trabajado de forma que el ancho sea el largo o el largo sea el ancho.
The following materials used are:
One meter of corino or unicolor synthetic leather.
Two strips of corino of one meter 20 cm wide by 30 cm high each strip of different pattern.
Two corin strips of the same pattern 90 cm wide by 30 cm high.
A strip of unicolor corino 7 cm wide by 2.40 meters high.
A zipper 80 cm long.
Thread
Scissors
Two hooks for hanging
Sewing machine
Note: The amount of corino or synthetic leather that we are going to buy is very relative according to the width of the material since this material can be worked in such a way that the width is the length or the length is the width.
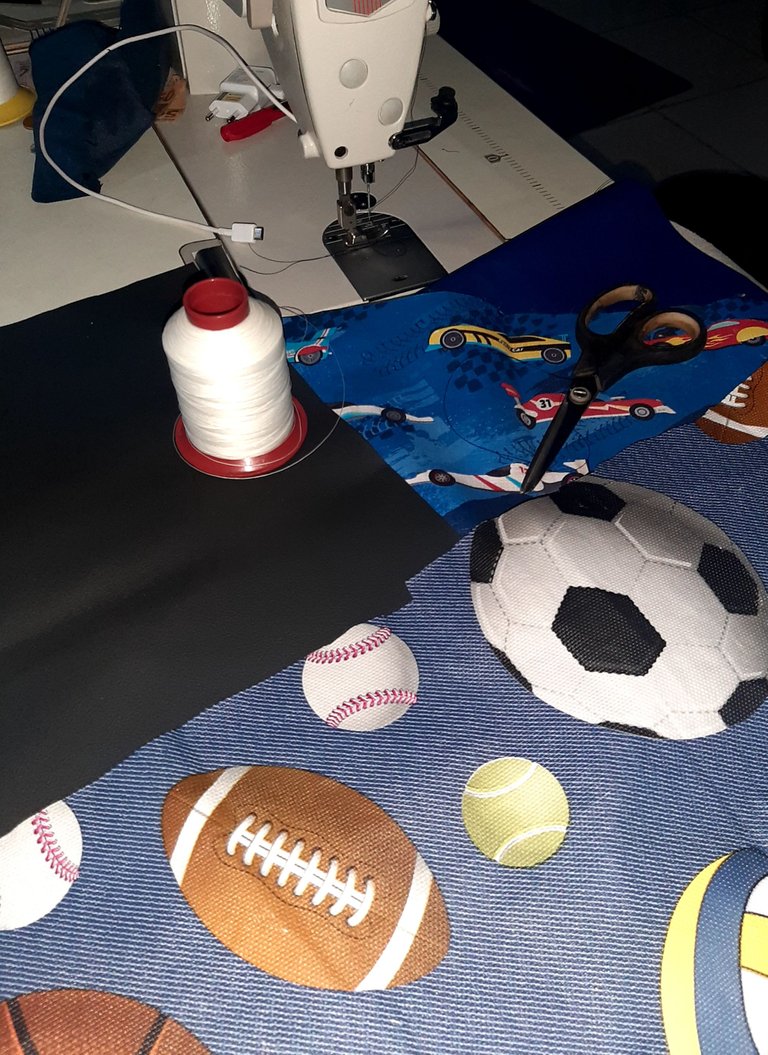
paso 1 / Step 1
Con el corino unicolor cortaremos un rectángulo de un metro 10 de alto por 85 de ancho. Luego cortamos dos tiras de 1,30 m de ancho por 30 cm de alto de igual modo cortamos dos tiras de 90 cm de ancho por 30 de alto del mismo modo portaremos una tira de 7 cm de alto x 2,40 metros de largo.
With the unicolor corino we will cut a rectangle of one meter 10 high by 85 wide. Then we cut two strips of 1.30 m wide by 30 cm high in the same way we cut two strips of 90 cm wide by 30 cm high in the same way we will carry a strip of 7 cm high x 2.40 meters long.

Paso 2 / Step 2
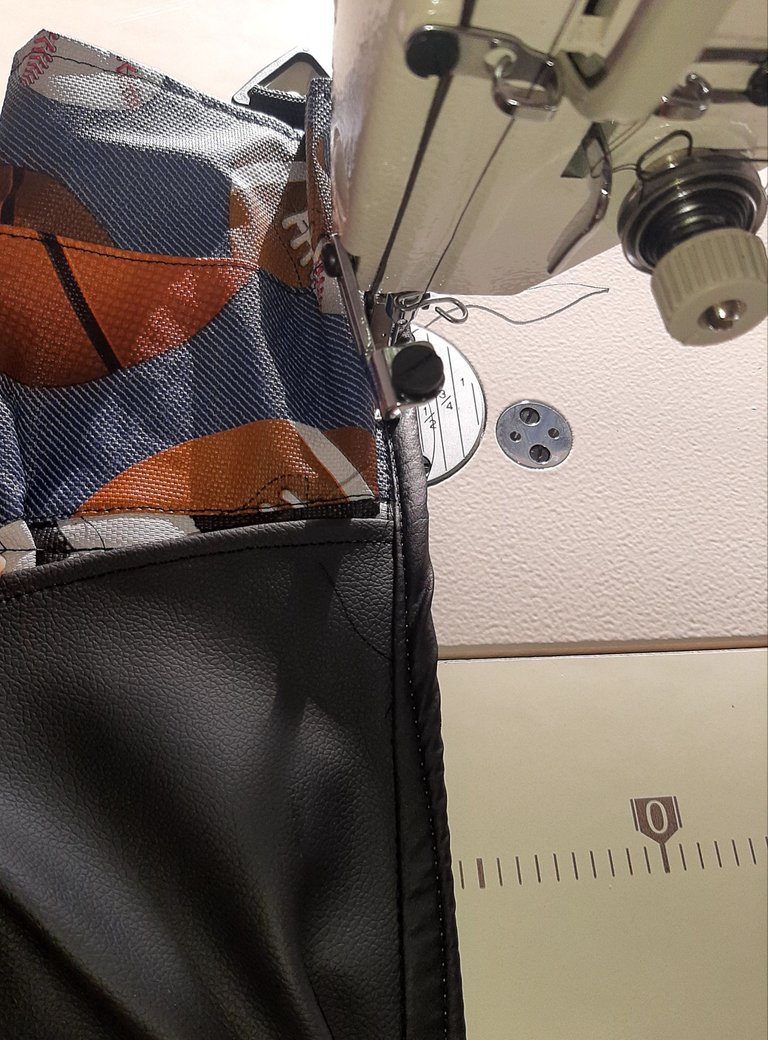
A nuestro primer rectángulo unicolor es decir el cuerpo de la zapatera que le haremos orilla de 2 cm por sus cuatro lados. Lo mismo haremos con las demás tira a excepción de las que miden 90 x 30 de alto ya que es la que á uniremos con el cierre luego le pegaremos por todo su contorno rematando en las esquinas la cinta que mide 2,40 metros de largo de forma que está de volumen al unirla al cuerpo de la zapatera.
To our first unicolor rectangle, that is to say the body of the shoe rack, we will make a 2 cm border on all four sides. We will do the same with the other strips except for those measuring 90 x 30 in height since it is the one that we will join with the zipper, then we will glue all around it, finishing in the corners the ribbon measuring 2.40 meters long so that it is of volume when we join it to the body of the shoe rack.
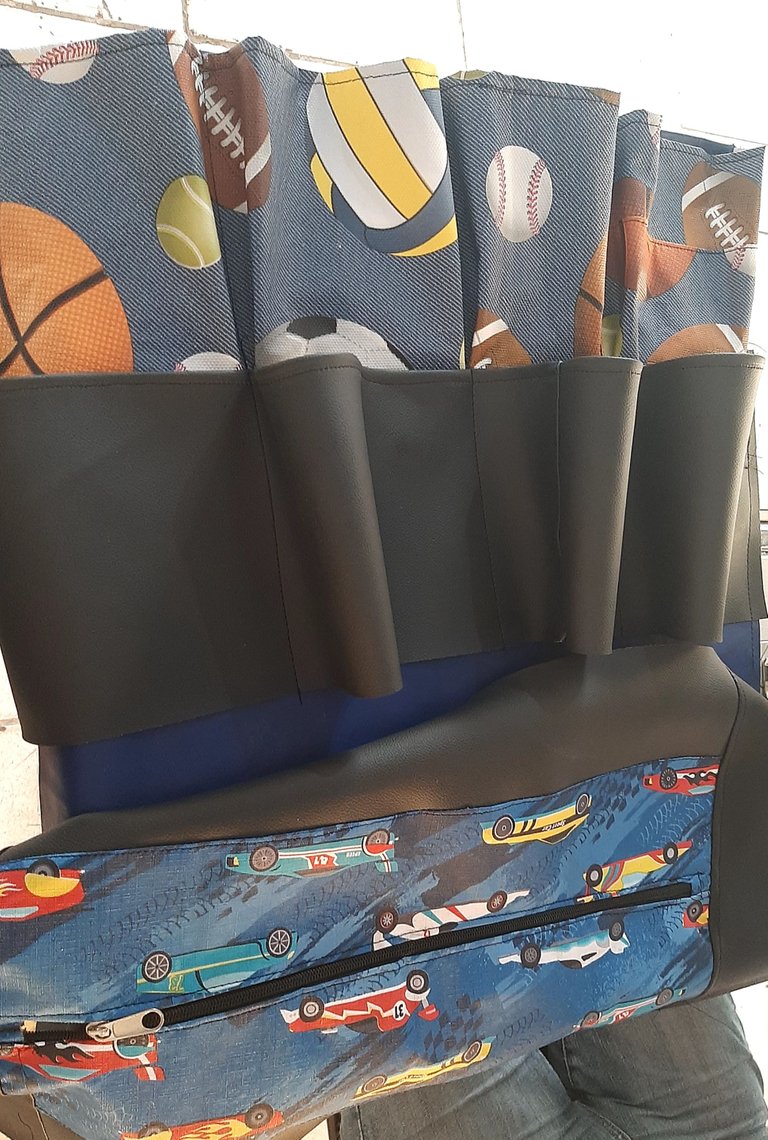
Paso 3 /Step 3
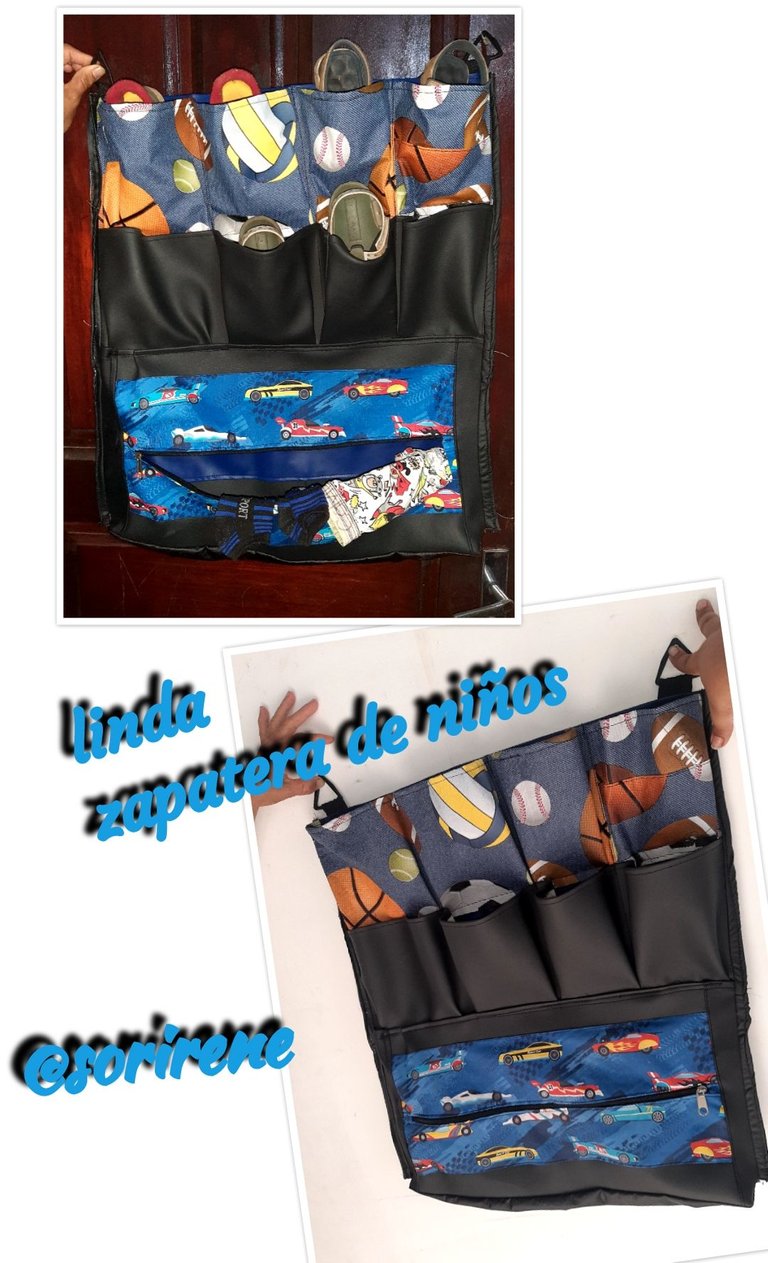
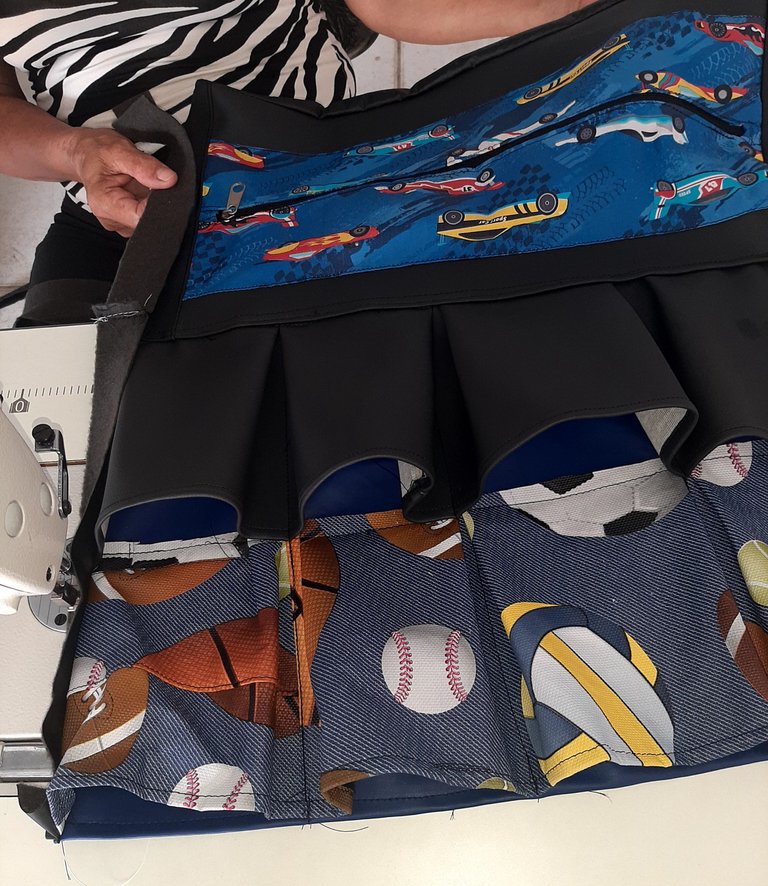
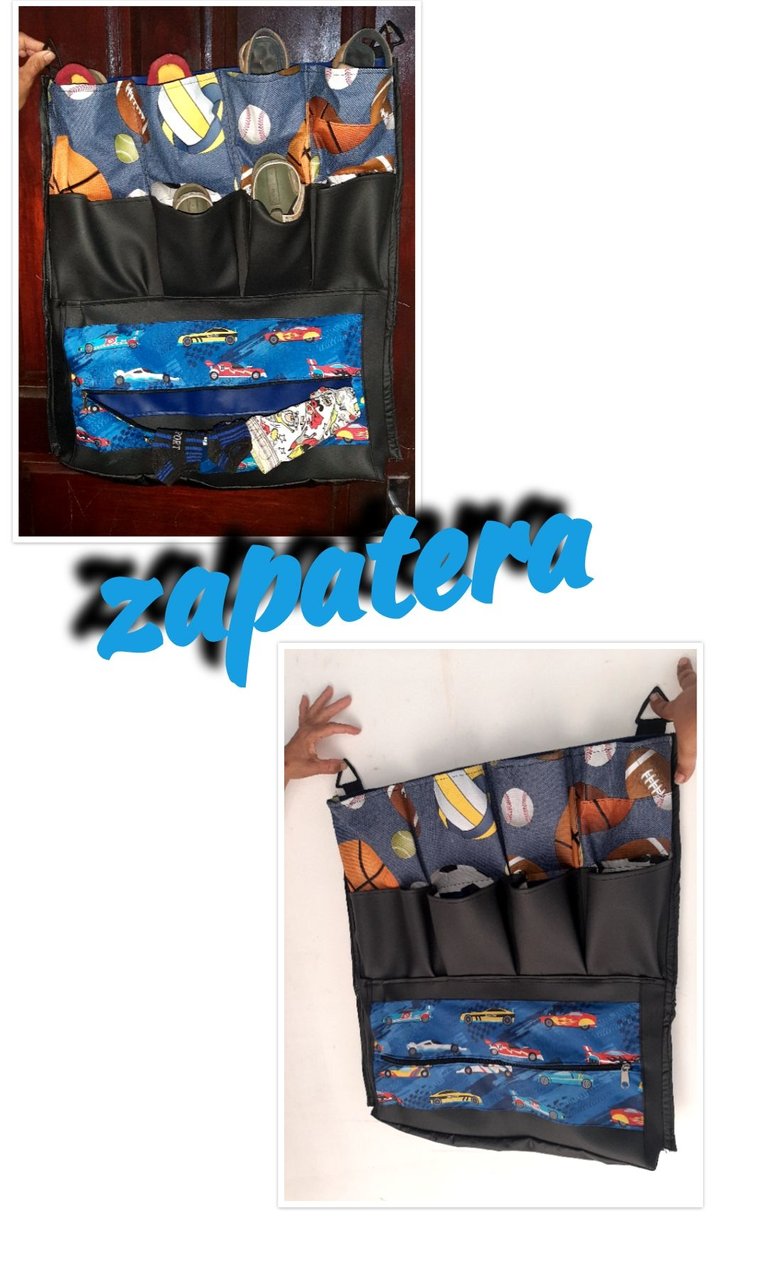
A la base o cuerpo de la zapatera en su parte inferior dejando 5 cm a los lados le pegaremos la parte que tiene el cierre de modo que quede abultada gracias a la tira que pegamos en su contorno cortamos el exceso y listo esa parte seguidamente y dejando 5 cm de separación de la orilla unimos una de las tiras de 1,30 de ancho haciendo un arruche de 5 cm cocemos aproximadamente 20cm hacemos otro arruche cocemos hacia arriba bajamos hacemos otro arruche de 5 cm cosemos 20cm hacemosotro arruche y así sucesivamente hasta hacer cuatro espacios con arruche en cada esquina, de esta manera un espacio de 30cm se reduce a 20 luego dejamos 5 cm por encima y en la orilla y en la parte superior pegamos la otra tira del mismo modo formando una hilera de 4 espacios más donde se introducirán cada par de zapatos infantil continuamente se unen las tiras por la parte inferior se colocan los ganchos en cada esquina de la parte superior y ya tenemos realizada nuestra cómoda y portátil zapatera infantil Dónde se pueden introducir ocho pares de zapatos más tiene una bolsa para guardar las medias o cualquier otra prenda
To the base or the body of the shoe bag in its lower part leaving 5 cm to the sides we will glue the part that has the zipper so that it is bulging thanks to the strip that we glued in its contour we cut the excess and ready that part then and leaving 5 cm of separation from the edge we join one of the strips of 1, 30 wide making a ruche of 5 cm we sew approximately 20cm we make another ruche we sew upwards we make another ruche of 5 cm we sew 20cm we make another ruche and so on until we make four spaces with ruche in each corner, in this way a space of 30cm is reduced to 20 then we leave 5 cm above and at the edge and at the top we glue the other strip in the same way forming a row of 4 more spaces where each pair of children's shoes will be inserted continuously we join the strips at the bottom we place the hooks in each corner of the top and we have made our comfortable and portable children's shoe rack Where you can insert eight pairs of shoes plus has a bag to store socks or any other garment.
Esto fue todo mi tutorial de hoy espero les guste sea de mucho provecho nos vemos hasta otro nuevo tutorial
That was all my tutorial for today, I hope you like it and I hope you find it very useful.
Congratulations @sorirene! You have completed the following achievement on the Hive blockchain and have been rewarded with new badge(s) :
Your next target is to reach 20 posts.
You can view your badges on your board and compare yourself to others in the Ranking
If you no longer want to receive notifications, reply to this comment with the word
STOPTo support your work, I also upvoted your post!
Check out the last post from @hivebuzz:
Nice so nice 👍