Version en español
Hola a todos mis queridos hiveamigos. Hoy les presento un maravilloso proyecto que realicé en una semana, El tejido a crochet requiere de técnica, tiempo, paciencia y amor. Si no aplicamos estos aspectos a nuestro trabajo cualquiera que sea, el resultado quizá no sea satisfactorio al 100% o como esperamos.
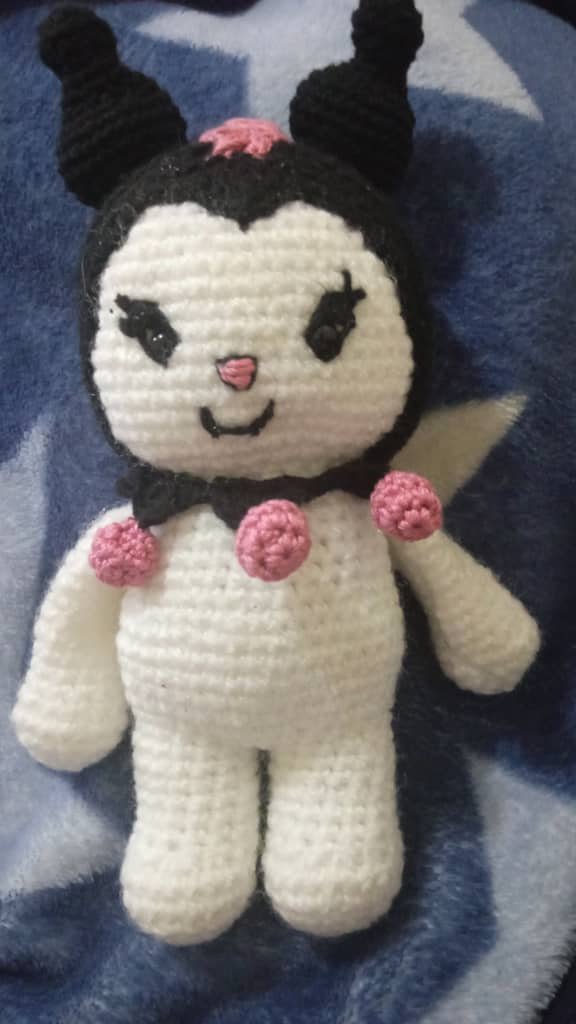
En esta actividad en particular que he escogido para mostrarles he puesto todo mi esfuerzo y espero que les guste. Entre los personajes de Hello Kitty, me llamó la atención Kuromi, es una conejita hermana de My Melody pero en sus aventuras ella es su rival. Para ser la antagonista de My Melody,que viste una capucha rosa hace del mundo todo feliz, Kuromi viste una capucha negra de arlequín con una calavera en la frente, y quiere invocar el espíritu oscuro para que la conejita rosa no consiga hacer feliz a los humanos.
Día 1 y 2
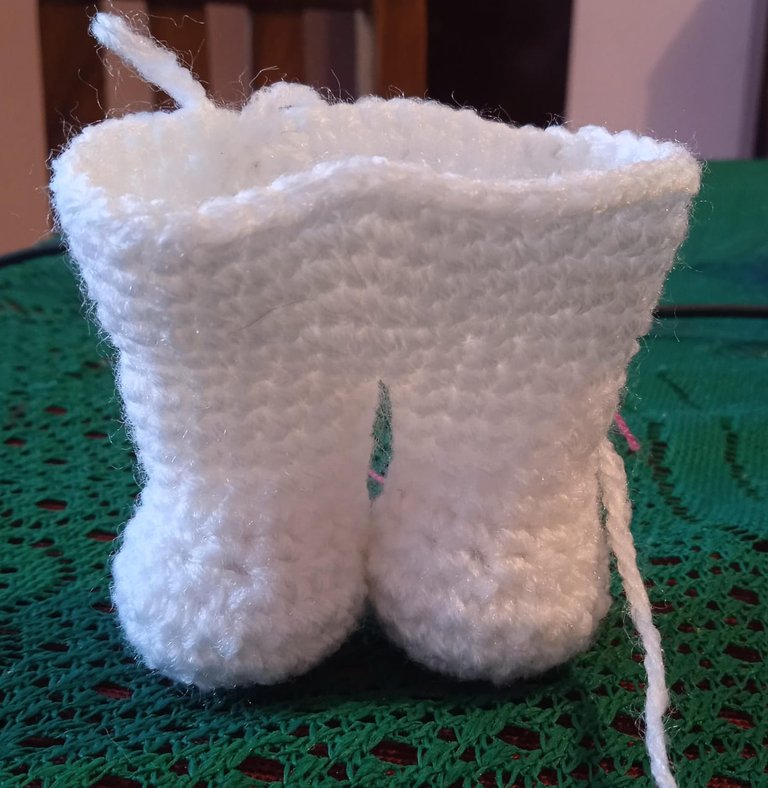
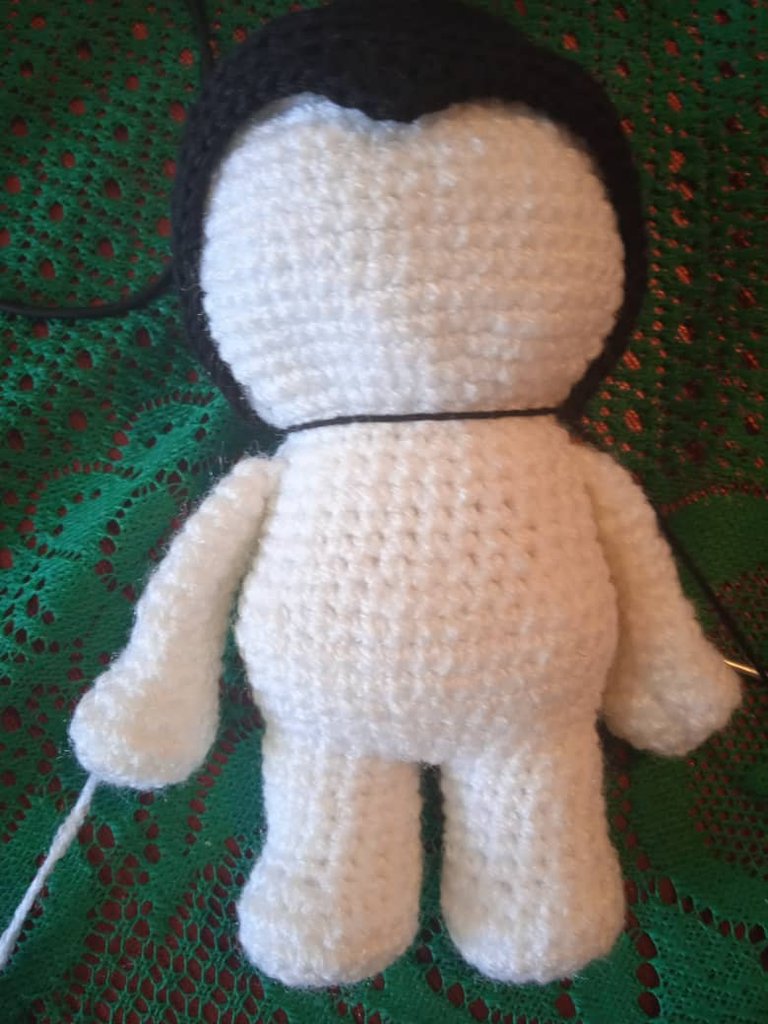
La figura de Kuromi la comencé a realizar por los pies, con hilo estambre blanco tejí el pie y la pierna dos veces. Rellené cada pierna con algodón sintético. Al obtener las dos piernas hice tres cadenetas y las empaté en una sola pieza para continuar con el cuerpo. Desde allí comencé a hacer los aumentos en cada ronda para hacer el tronco gordito de la conejita. Rellené el tronco con algodón dando la forma al tejido y un poco de arroz encima del algodón para darle consistencia y se pueda utilizar como terapia para el estrés. Pueden colocar piedras pequeñas, pero como es blanco el Kuromi lo rellené con arroz y funciona como relajante al tocarlo.
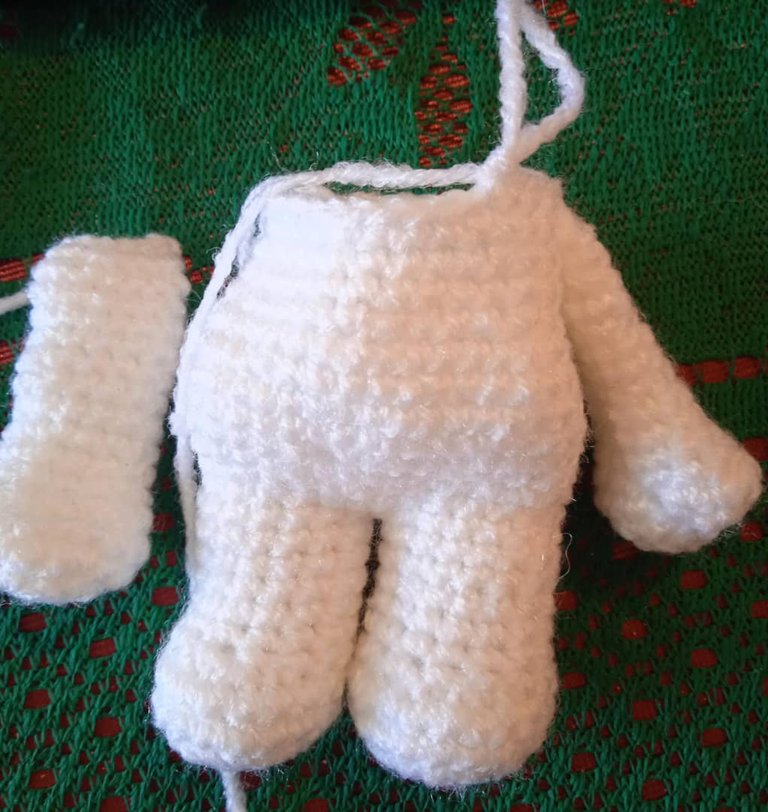
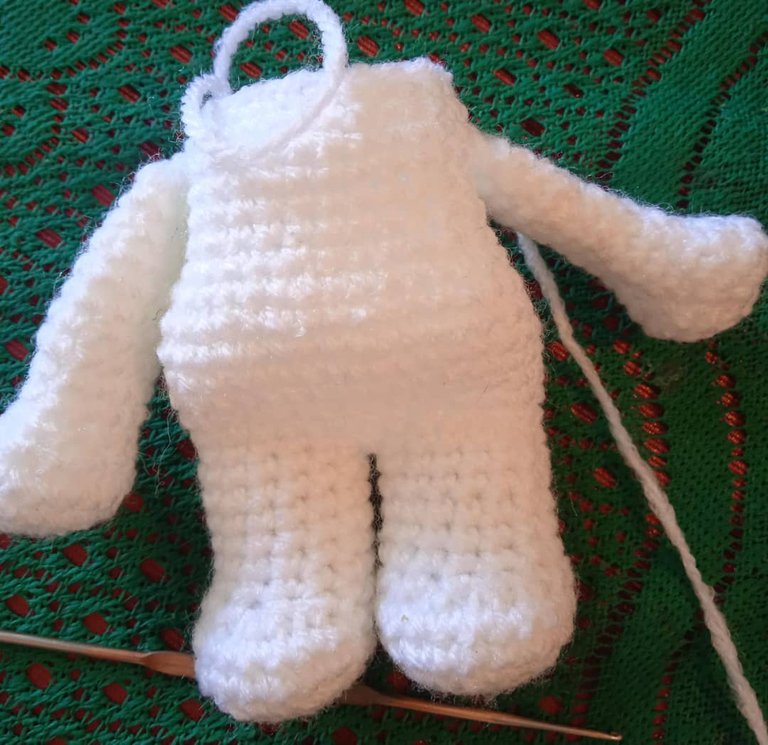
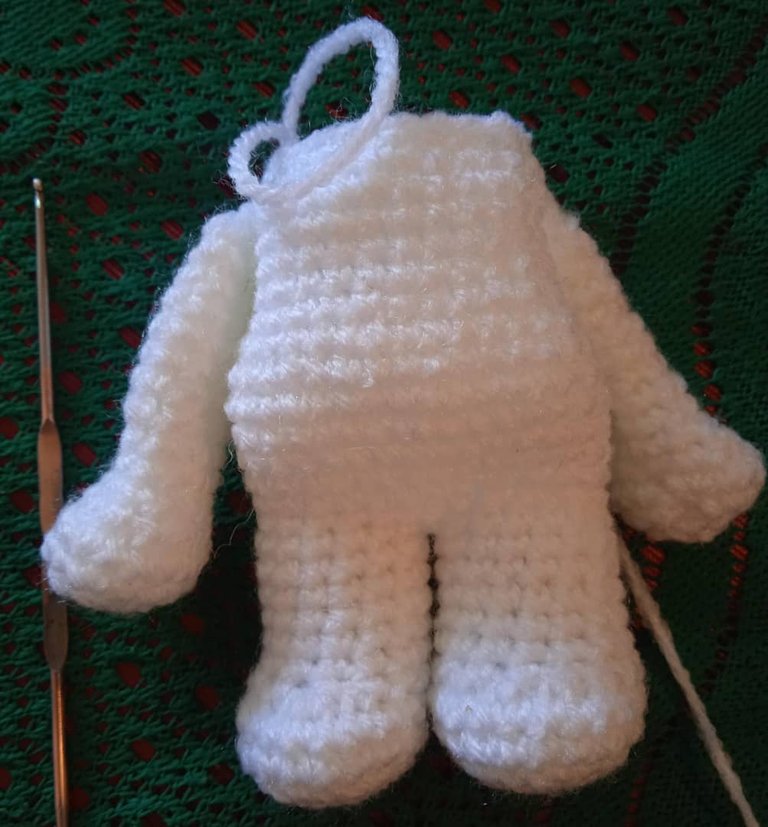
Luego tejí los brazos, aún con estambre blanco, según la figura del anime. Los brazos se colocaron a los lados del tórax tejidos con el ganchillo, en posición de cuerpo humano, siempre siguiendo el modelo del Kuromi. El dolor de las manos y de la espalda me hicieron detener el trabajo. Posiblemente crean que hacer un proyecto tejido es fácil y lo encuentran caro, pero los invito a hacerlo para que valoren más a los artesanos.
Día 3
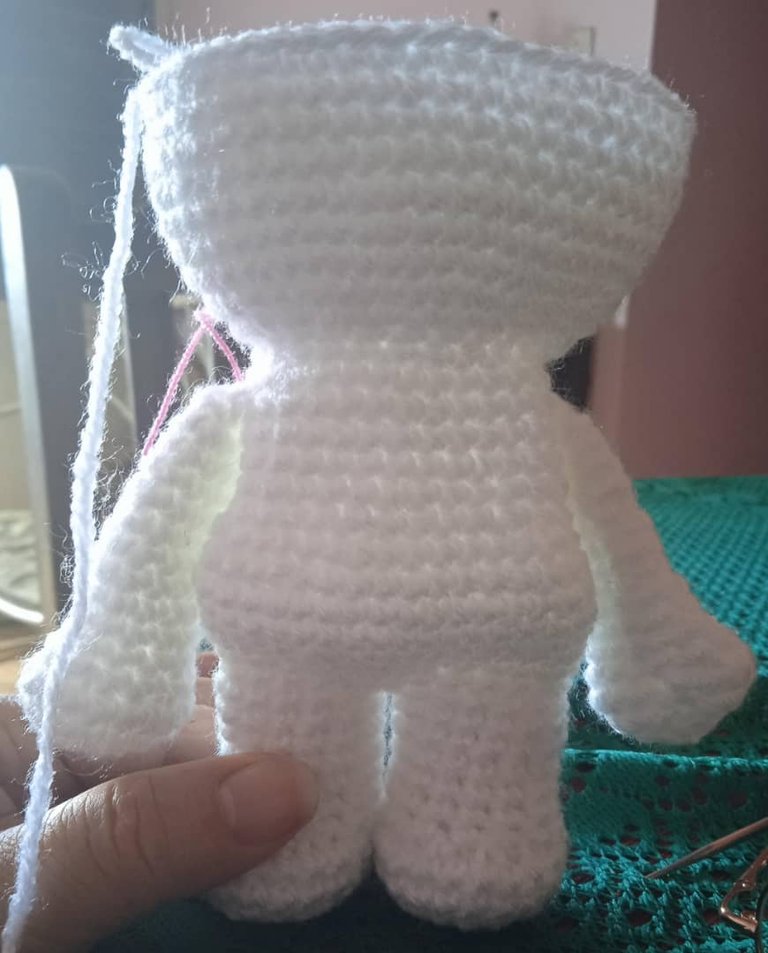
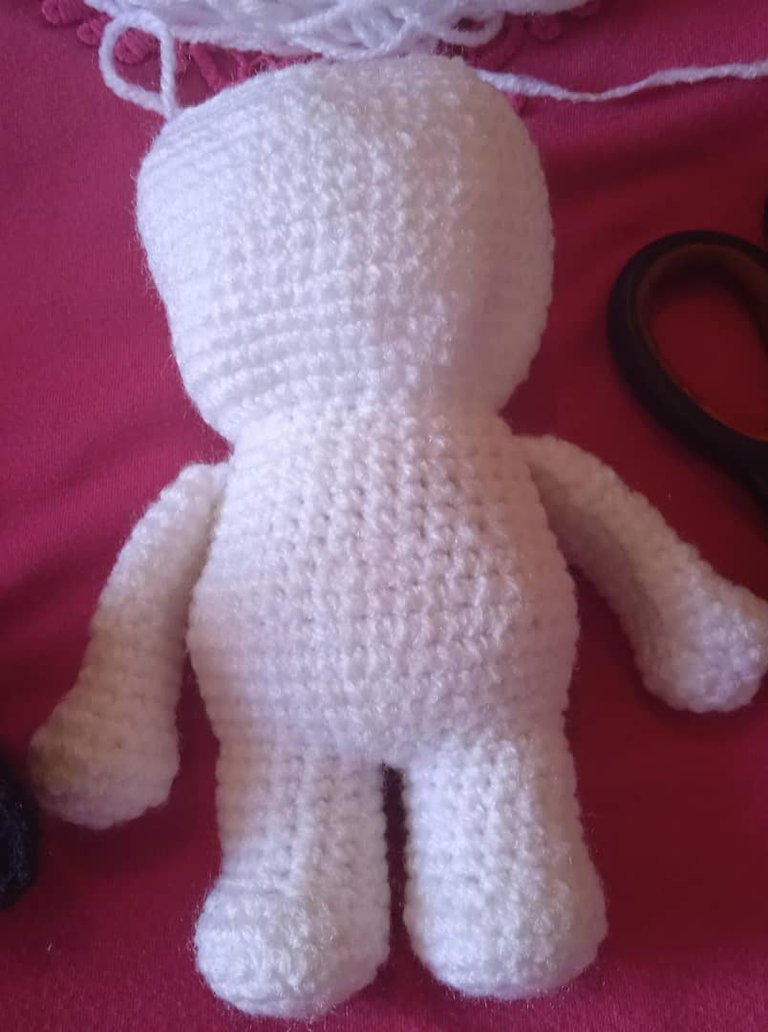
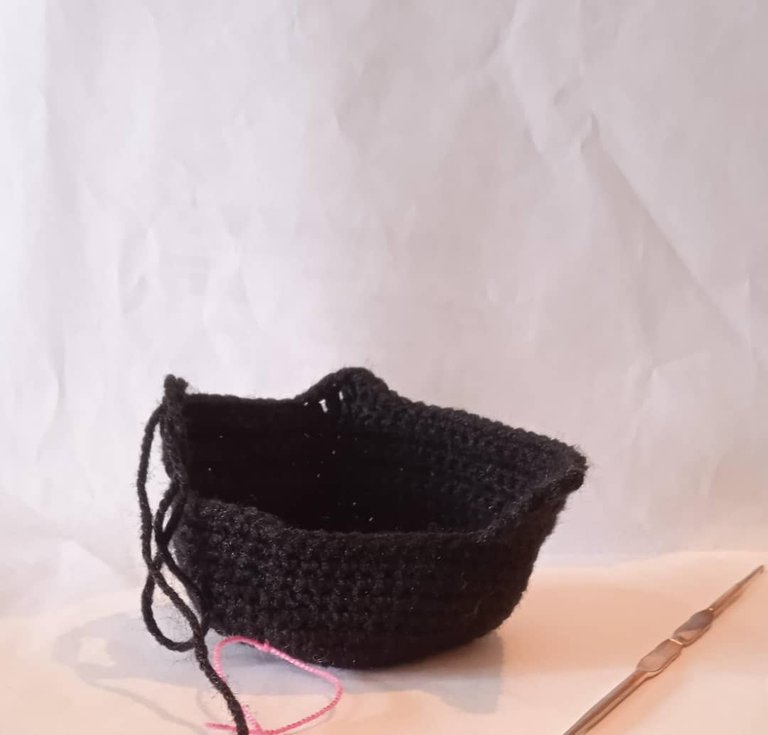
A partir de allí seguí haciendo rondas con aumentos para formar la cabeza de la conejita en hilo blanco. En total fueron 16 rondas tejidas para formar la cabeza. Rellené con algodón y arroz hasta quedar apretado y con aguja lanera cosí arriba de la cabeza para cerrar el hoyo. Con hilo de algodón negro procedí a realizar la capucha utilizando la misma cantidad de puntos que hice en la cabeza. Al finalizar esta parte continué con 15 cadenetas y tejí el adorno alrededor del cuello simulando el traje del arlequín.
Día 4

Realicé el adorno del gorro, una calavera rosa bordada en la frente. Luego hice las borlas de arlequín que cuelgan de la capucha, en hilo rosa, rellenandolas un poco. Además tejí las dos orejas en hilo negro y al final, la cola que según el anime es su talón de Aquiles, pues se debilita si se la pisan.
Día 5
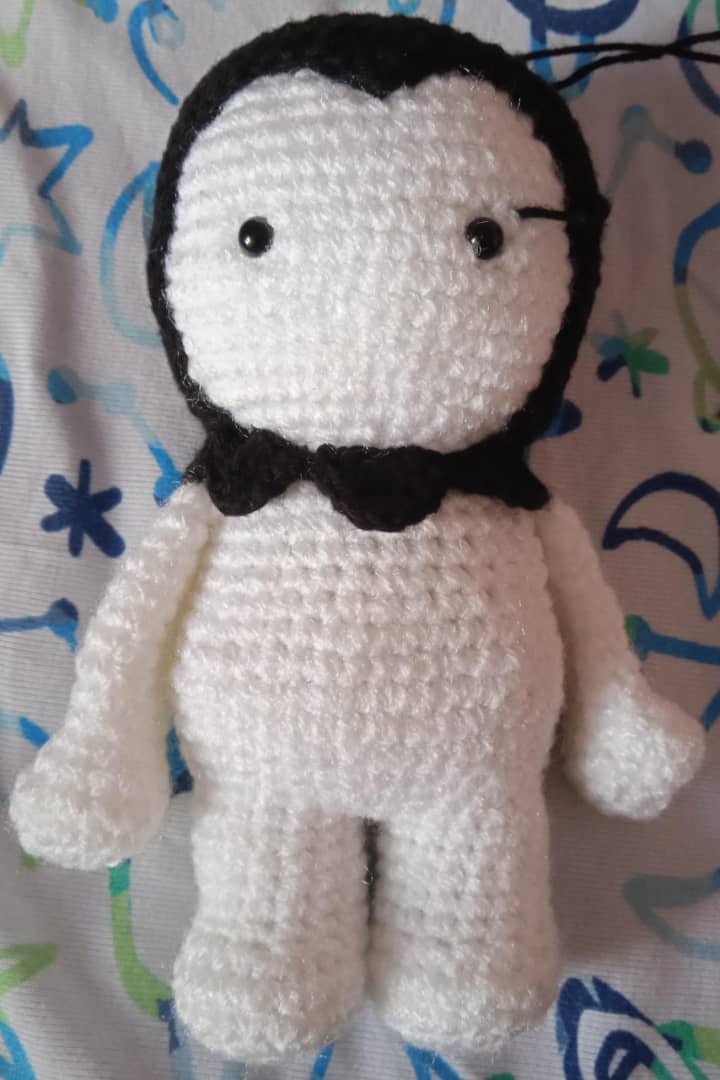
Llegó el momento del armado. Lo primero es colocar el gorro en posición que quede el pico superior centrado y los tres picos inferiores en el centro. Con la aguja lanera e hilo negro cosí la capucha a la cabeza cuidando que no pierda la forma. Luego cerrar el hoyo de las bolitas rosadas y coserlas en los tres picos inferiores para formar la capucha de arlequín.Luego bordar los ojitos con hilo negro y las pestañas, la nariz y la boca. Rellenar con hilo rosado la nariz y rematar. Ya quedó listo.
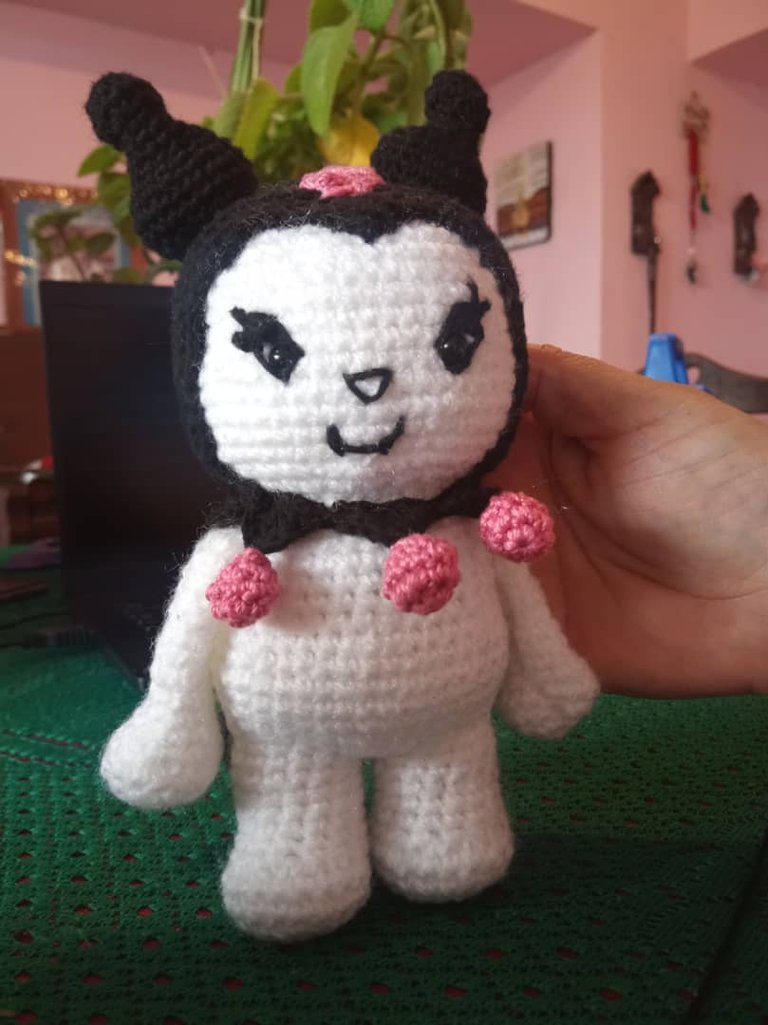
Fue un proyecto hermoso que al principio pensé que no iba a lograr, pero finalmente lo conseguí, aunque podría mejorarlo la próxima vez y con más tiempo. Porque una niña lo vio el último día de elaboración, le gustó y quiso llevárselo rápido. Me siento conforme y feliz al ver que gusta lo que hago. Hasta la próxima entrega de proyectos que ya están en proceso de elaboración.
Todas las fotos son de mi cámara
traducido al ingles en DeepL
English Version
Hello to all my dear hivefriends. Today I present to you a wonderful project that I made in a week. Crochet knitting requires technique, time, patience and love. If we don't apply these aspects to our work whatever it is, the result may not be 100% satisfactory or as we expect.
In this particular activity I have chosen to show you I have put all my effort and I hope you like it. Among the Hello Kitty characters, Kuromi caught my attention, she is a bunny sister of My Melody but in her adventures she is her rival. To be the antagonist of My Melody, who wears a pink hood and makes the world happy, Kuromi wears a black harlequin hood with a skull on her forehead, and wants to invoke the dark spirit so that the pink bunny can't make humans happy.
Day 1 and 2
I started to make Kuromi's figure from the feet, with white worsted yarn I knitted the foot and the leg twice. I stuffed each leg with synthetic cotton. When I got the two legs I made three chain stitches and tied them into one piece to continue with the body. From there I started making increases in each round to make the chubby trunk of the bunny. I filled the trunk with cotton wool to shape the fabric and a little rice on top of the cotton wool to give it consistency so it can be used as stress therapy. You can place small stones, but as the Kuromi is white I filled it with rice and it works as a relaxant when you touch it.
Then I knitted the arms, still with white yarn, according to the anime figure. The arms were placed on the sides of the crocheted thorax, in human body position, always following the Kuromi pattern. The pain in my hands and back made me stop the work. You may think that making a knitted project is easy and expensive, but I invite you to do it so that you can appreciate the artisans more.
Day 3
From there I continued making rounds with increases to form the bunny's head in white yarn. In total 16 rounds were knitted to form the head. I stuffed it with cotton and rice until it was tight and with a wool needle I sewed on top of the head to close the hole. With black cotton thread I proceeded to make the hood using the same amount of stitches as I did on the head. When I finished this part I continued with 15 chain stitches and knitted the ornament around the neck simulating the harlequin's costume.
Day 4
I made the hat ornament, a pink skull embroidered on the forehead. Then I made the harlequin tassels hanging from the hood, in pink thread, filling them in a little. I also knitted the two ears in black thread and at the end, the tail, which according to the anime is his Achilles heel, as it weakens if it is stepped on.
Day 5
Now it's time to assemble. The first thing to do is to position the hat so that the upper peak is centred and the three lower peaks are in the centre. With the wool needle and black thread I sewed the hood to the head, taking care not to lose its shape. Then close the hole of the pink balls and sew them on the three lower peaks to form the harlequin hood, embroider the eyes with black thread and the eyelashes, nose and mouth. Fill in the nose with pink thread and finish off. Now it's ready.
It was a beautiful project that at first I thought I wasn't going to make, but finally I did it, although I might improve it next time and with more time. Because a girl saw it on the last day of making, she liked it and wanted to take it quickly. I feel satisfied and happy to see that she likes what I do. Until the next delivery of projects that are already in the process of elaboration.
All photos are from my camera
translated into English at DeepL
This is so much work and you are totally right, we need alot of patience to be able to knit..
This is nice dear well done.
Hello, thank you for your comments. It's hard work, but enjoyable because I love making amigurumis. I am happy for the reception you have given to my projects. Thank you. Regards.
Ha quedado cuchi, los amigurrumis son expertos en hacer derretir a los niños y a los adultos también. Me quedó con el tip de agregar arroz para que el amigurrumi quede mas consistente y a la vez ese efecto terapéutico.
Tejer amigurrumi es agotador para las manos y espada cuando duras altas jornadas dedicado a ello, es que en el amigurrumi se hace diferente que otra pieza, ya que el tejido debe ser muy cerrado, esos puntos bajos deben quedar ajustaditos, de allí que se imprime fuerza especial y es parte del agotamiento. Siempre es bueno tomar descanso y hacer ejercicios para evitar lesionar cualquier parte de nuestro cuerpo.
Gracias por compartir tu contenido creativo con nosotros.
Gracias jajajaja también lo vi cuchi y con el relleno de arroz quedó magnífico para liberar el estres. Casi siempre a mis trabajos a ganchillo les coloco arroz en los pies o en la pancita. De verdad me encantó realizar este proyecto pues es tan lindo y con el crochet que me apasiona.
Es agotador y no pensé que estaría tantos días elaborando esta pieza, es más, necesitaba otro día para hacerle un mejor acabado, pero la niña se antojó y yo feliz que le gustara, se lo entregué. Gracias por tus lindas palabras que me incentivan a seguir.
Me encanta Kuromi y este amigurumi quedo muy bello. Saludos
Gracias amiga. Sí, me fascinó. Saludos.
excelente :D
Excelente trabajo, adore el resultado, le mostré la foto a mi hija y se enamoro, ella le encanta ese personaje, te felicito quedo hermoso, saludos 🥰
Congratulations @yannira! You have completed the following achievement on the Hive blockchain And have been rewarded with New badge(s)
Your next target is to reach 100 replies.
You can view your badges on your board and compare yourself to others in the Ranking
If you no longer want to receive notifications, reply to this comment with the word
STOPCheck out our last posts:
Hermoso trabajo. Los amigurumis son muy tiernos y es una técnica muy bonita, pero requiere de más tiempo y más dedicación que otros tejidos, yo también me tardo cuando hago amigurumis, pero me encantan. Felicidades por este proyecto. Gracias por compartir.
Super bonito, es bueno aprender, me gusta la tecnica del macrame, de hace tiempo lo he realizado, solo que ya no tengo tanto tiempo, y estos amigrumi quisiera intentar hacerlos, son muy lindo. excelente que realices estas cosas hechas con amor. El tejido ayuda mucho a evitar olvidar cosas, te ayuda a distraer y motivar a seguir a mejorar, al ver tan hermoso trabajo.
Gracias amiga por tu comentario. Me parece excelente que lo hagas pronto y así te diviertes tejiendo y rellenando hasta que obtienes el resultado bonito y bien acabado.Siempre se puede aprender más y mejorar los resultados al hacer el proyecto. Saludos 😘
This look exactly like the one I bought for my baby and she really love it. This look beautiful. Weldone
Gracias, es un bonito proyecto dedicado a los niños. Saludos.
Wooow oAo hace mucho tiempo que no veía un amigurimi de Sanrio! Crees en un futuro hacer a PomPomPurin o Cinnamon Roll? Son mis favoritos 😳 Te quedo hermosa esta Kuromi ! ! !
Gracias amiga por sugerirme carcaturas .Los voy a buscar para hacerlos a ver que tal me salen. Gracias por valorar lo que hago. Saludos.