BIENVENIDOS A MI BLOG 💖
WELCOME TO MY BLOG 💖


Hola mis queridos amigos de Hive.blog espero siempre se encuentren bien.
Hello my dear friends from Hive.blog I hope you are always well.
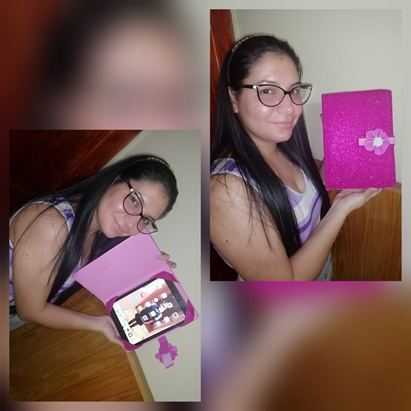
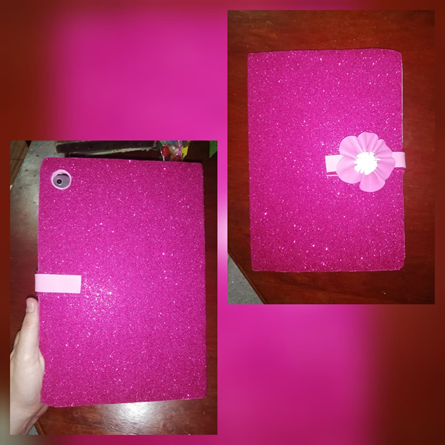
Hoy realizaremos una funda para tabletas.
Te encantara el resultado.
Today we will make a sleeve for tablets.
You will love the result.
Lo mejor de este trabajo es que son muy pocos los materiales que debemos usar.
The best thing about this work is that there are very few materials that we must use.
Sin más preámbulos ven, acompáñame en este paso a paso.
Without further ado, come join me in this step by step.

1.- Tijeras.
1.- Scissors .
2.- Pistola y barra de silicón.
2.- Gun and silicone stick.
3.- Goma eva.
3.- Eva rubber.
4.-Carton fino.
4.-Thin cardboard.
5.-Lápiz.
5.- Pencil.
6.- Corta cartón.
6.-Cuts paperboard.
7.- Velcro.
7.- Velcro.

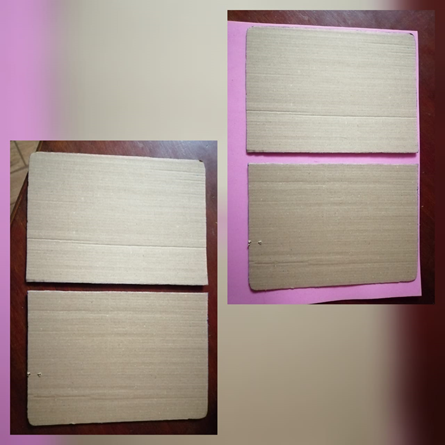
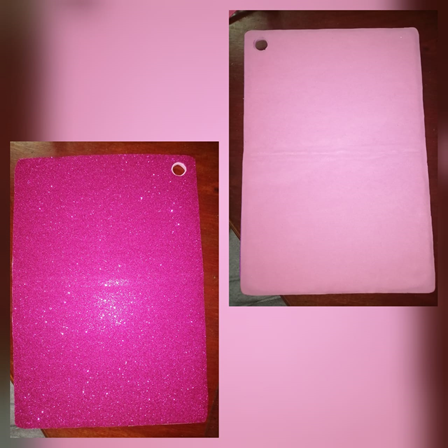
PRIMER PASO: Tomamos la funda vieja de nuestra tableta y la calcamos en un cartón fino, lo más fino posible. Luego la recortamos, haciendo también los respectivos cortes de la cámara. Pegamos estas caras de cartón en la goma eva; debe haber una separación entre cada una de 2 cm. Después recortamos todo el borde dejando 5mm de separación de las tapas de cartón.
FIRST STEP: We take the old sleeve of our tablet and trace it on a thin cardboard, as thin as possible. Then we cut it, making the respective camera cuts as well. We glue these cardboard faces on the eva rubber; there should be a separation between each of 2 cm. then we cut the entire edge leaving 5mm of separation from the cardboard covers.
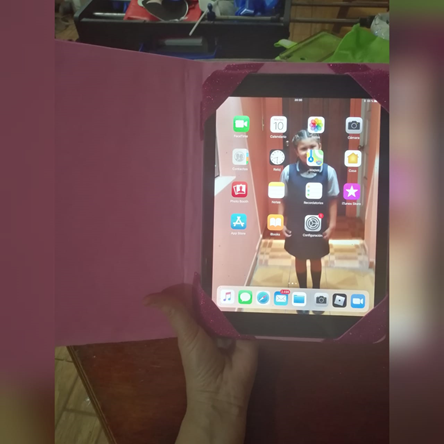
SEGUNDO PASO: Una vez forradas las tapas de cartón por ambos lados, realizamos unas tiras de goma eva para sujetar nuestra tableta. Cada tira tiene una medida de 2,5 cm de ancho.
SECOND STEP: Once the cardboard covers are lined on both sides, we make some strips of eva rubber to hold our tablet. Each strip is 2.5 cm wide.
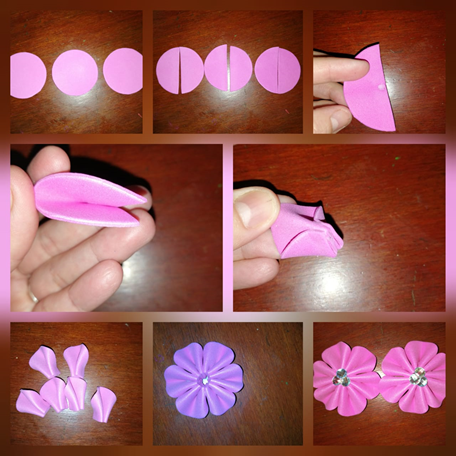
TERCER PASO: En este paso realizamos las flores, son muy sencillas y bastante bonitas. Se recortan 3 círculos el tamaño es a tu gusto, luego las cortamos a las mitad y cada una de estas la pegamos con un punto de silicón en el centro, una vez bien seca aplicamos otros puntos en cada lado de las puntas y las pegamos al centro. Observar las imágenes si de pronto ves que no me explico bien. Así haríamos cada pétalo, para después unirlas una a una y en el centro decorar según tus posibilidades y creatividad, yo le coloque unas piedras brillantes.
THIRD STEP: In this step we make the flowers, they are very simple and quite beautiful.3 circles are cut out, the size is to your liking, then we cut them in half and each of these we stick with a point of silicone in the center, once well dry we apply other points on each side of the tips and stick them to the center. Observe the images if suddenly I do not explain myself well. This is how we would make each petal, then join them one by one and decorate in the center according to your possibilities and creativity, I placed some shiny stones.
CUARTO PASO: Realizamos dos rectángulos uno de 2 cm y el otro de 3 cm de ancho pegamos uno sobre el otro y colocamos también el velcro .Este será nuestro cierre para la funda.
FOURTH STEP: We make two rectangles, one of 2 cm and the other of 3 cm wide, stick one on top of the other and also place the velcro. This will be our closure for the cover.
Todas las fotos son de mi autoria/ All photos are my authorship
Nos vemos en un próximo post, me despido con amor 😍 @jayoxaju.
See you in a next post, I say goodbye with love 😍 @jayoxaju.

👍👍👍👍👏👏👏👏 Tarde pero me levanto de la silla para aplaudir tu trabajo creativo. Muy profesional. Más éxitos y espero siga compartiendo esos conocimientos crafts.
Jejeje tan lindo, muchas gracias por tus palabras ❤️ besitos 😘😘😘
Hola amiga manualista, me ha encantado tu blog, esta lleno de cosas bellas, no soy de trabajar mucho el foami pero aveces lo intento, jejjeje, siempre he querido hacerle algo a mi laptop pero como dicen, en casa de herrero cuchillo de palo. ¡¡Arriba la comunidad de manualistas!!
Hola mi estimada, jejeje es muy cierto el dicho aunque siendo honesta en mi no aplica jajaja ya que hago de todo para mi casa y los objetos de mi casa😍 soy una fanática de las manualidades. Espero le sirvan mis post y se anime a realizar las manualidades 😉 gracias por la visita amiga, muy feliz de que le hayan gustado mis trabajos.
Congratulations @jayoxaju! You have completed the following achievement on the Hive blockchain and have been rewarded with new badge(s) :
You can view your badges on your board and compare yourself to others in the Ranking
If you no longer want to receive notifications, reply to this comment with the word
STOP