Bienvenidos a mi blog 💓
Welcome to my blog 💓


Saludos mi amada familia, espero todos se encuentren muy bien.
Greetings my beloved family, I hope everyone is very well.
Hoy haremos un espectacular organizador de escritorio con material reciclable.
Today we will make a spectacular desk organizer with recyclable material.
Son muy pocas las cosas que debemos usar, hace falta es que activemos nuestra creatividad y manos a la obra.
There are very few things that we must use, it is necessary that we activate our creativity and get to work.

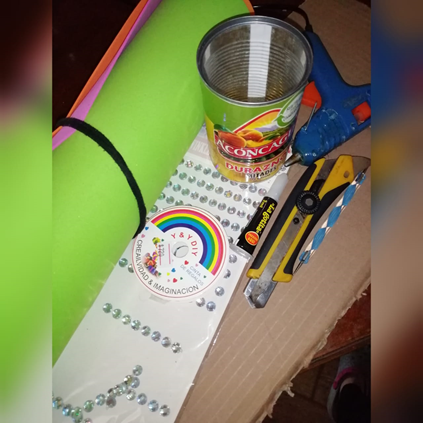
1.- Goma eva.
1.- Eva rubber.
2.-Pegamento instantáneo.
2.- Instant glue.
3.- Pistola y barra de Silicón.
3.- Silicone gun and bar.
4.- Cartón.
4.- Cardboard.
5.- Una lata.
5.- A can.
6.- Tijeras.
6.- Scissors.
7.- Regla.
7.- Rule.
8.- Corta cartón.
8.- Cut cardboard.

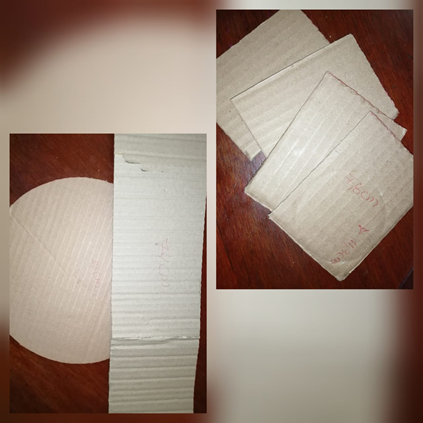
PASO #1: Primeramente debemos realizar un circulo de cartón de 23 cm, un rectángulo de 74 cm de largo por 11,3 cm de ancho y 4 rectángulos mas pequeños de 7,8 cm de ancho por 11,3 cm de largo.
STEP #1: First we must make a cardboard circle of 23 cm, a rectangle 74 cm long by 11.3 cm wide and 4 smaller rectangles of 7.8 cm wide by 11.3 cm long.
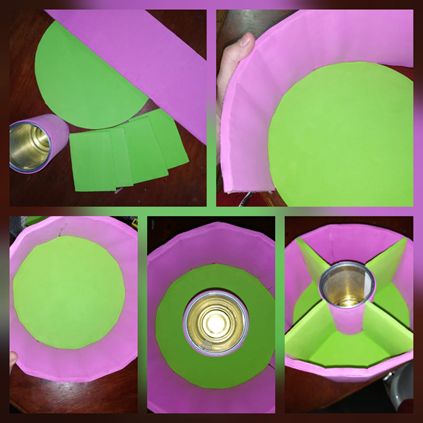
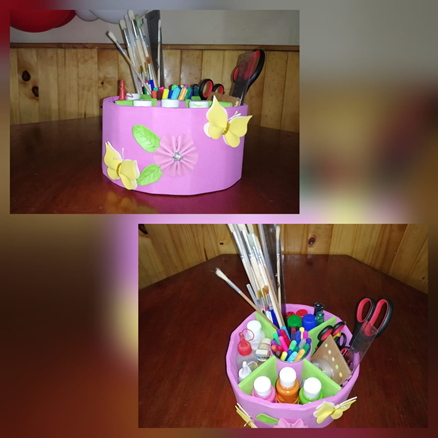
PASO #2: En este paso con la goma eva debemos cubrir las piezas de cartón antes mencionadas y la lata. Los colores son a su preferencia, yo use verde y rosa. Una vez listas nuestras piezas de cartón, empezamos a armar el organizador. Pegamos el rectángulo mas grande al rededor del circulo, luego pegamos la lata y por ultimo los rectángulos pequeños. Favor observar la imagen.
STEP #2: In this step with the eva rubber we must cover the cardboard pieces mentioned above and the can. The colors are your preference, I used green and pink. Once our cardboard pieces are ready, we begin to assemble the organizer. We paste the largest rectangle around the circle, then we paste the can and finally the small rectangles. Please observe the image.
PASO #3: En este momento haremos la decoración, porque el organizador ya esta armado.
STEP #3: At this time we will do the decoration, because the organizer is already assembled.
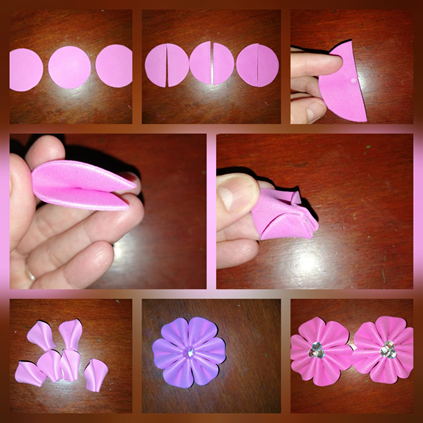
En este paso realizamos las flores, son muy sencillas y bastante bonitas. Se recortan 3 círculos el tamaño es a tu gusto, luego las cortamos a las mitad y cada una de estas la pegamos con un punto de silicón en el centro, una vez bien seca aplicamos otros puntos en cada lado de las puntas y las pegamos al centro. Observar las imágenes si de ponto vez que no me explico bien. Así haríamos cada pétalo, para después unirlas una a una y en el centro decorar según tus posibilidades y creatividad, yo le coloque unas piedras brillantes.
In this step we make the flowers, they are very simple and quite beautiful.3 circles are cut out, the size is to your liking, then we cut them in half and each of these we stick with a point of silicone in the center, once well dry we apply other points on each side of the tips and stick them to the center. Observe the images if suddenly I do not explain myself well. This is how we would make each petal, then join them one by one and decorate in the center according to your possibilities and creativity, I placed some shiny stones.
PASO #4: En realidad este paso es opcional, yo iba a adornar solo con flores pero después quise colocarle unas mariposas, así que tu puedes hacerlo solo con flores, solo mariposas o ambas como yo hice.
STEP #4: Actually this step is optional, I was going to decorate only with flowers but then I wanted to put some butterflies on it, so you can do it only with flowers, only butterflies or both as I did.
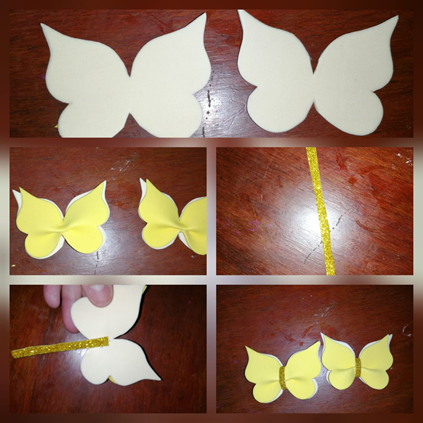
Primeramente realizamos nuestra mariposa en una cartulina blanca la recortamos y luego la calcamos en la goma eva. Estuve usando los colores color hueso y amarillo.
Debemos realizar dos piezas de cada color, luego las amarillas en el centro la doblamos y le aplicamos un punto de silicon, por la parte de atrás hacemos el mismo procedimiento para que queden de esta forma. Observar las imágenes.
In this step we make the flowers, they are very simple and quite beautiful.3 circles are cut out, the size is to your liking, then we cut them in half and each of these we stick with a point of silicone in the center, once well dry we apply other points on each side of the tips and stick them to the center. Observe the images if suddenly I do not explain myself well. This is how we would make each petal, then join them one by one and decorate in the center according to your possibilities and creativity, I placed some shiny stones.

Una vez lista las amarillas tomamos la de color hueso y recortamos un poco mas en los centros haciendo que sea vea un corte en V. Estas serian la base y le pegamos arriba las amarillas.
Recortamos una tira de goma eva con escarcha de 5 mm y la pegamos por todo el centro de la mariposa.
Once the yellow ones are ready, we take the bone-colored one and cut a little more in the centers making it look like a V cut. These would be the base and we glue the yellow ones on top.
We cut out a 5 mm strip of eva foam with frosting and glue it all over the center of the butterfly.
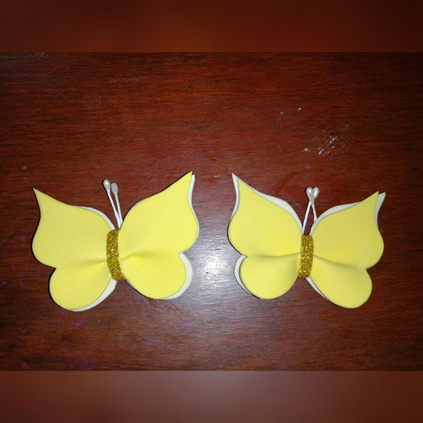
Por ultimo le coloqué unas antenas que yo tenia de perleria en forma de gota. Tu puedes usar lo que tengas en casa. Quedando asi las mariposas 😍
Finally I put some antennas that I had of pearl drop-shaped. You can use what you have at home. Thus leaving the butterflies 😍
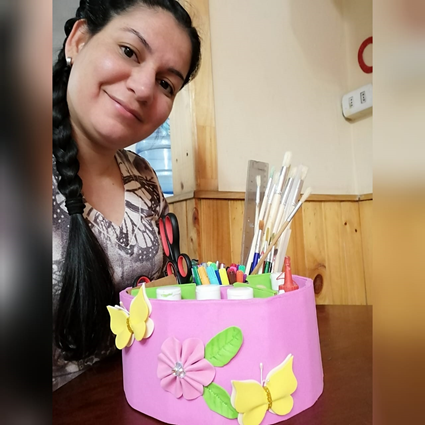
PASO #5: Pusimos las mariposas y las flores en el organizador, terminé poniendo solo una flor. El resultado es este hermoso y práctico organizador de escritorio.
STEP #5: We put the butterflies and flowers in the organizer, I ended up putting only one flower. Resulting in this beautiful and practical desktop organizer.
Todas las fotos son de mi autoria/ All photos are my authorship
Nos vemos en un próximo post, me despido con amor 😍 @jayoxaju.
See you in a next post, I say goodbye with love 😍 @jayoxaju.

Me parece hermosa tu publicación, lo mejor de todo es que estas reutilizando materiales creas algo hermoso y reciclas. Deberías unirte al Reciclaje Creativo Challenge
Gracias mi bella, me alegra que te haya gustado.
Considero esto es lo hermoso de reciclar, crear cosas hermosas.