BIENVENIDOS A MI BLOG 💖
WELCOME TO MY BLOG 💖


Hola mis queridos amigos de Hive.blog espero siempre se encuentren bien.
Hello my dear friends from Hive.blog I hope you are always well.
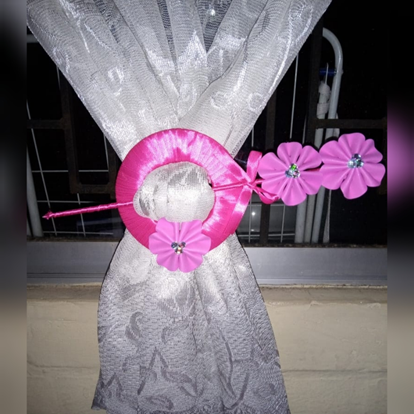
En este día les traigo un bonito trabajo para embellecer aún más nuestro hogar. En esta oportunidad haremos un sujetador de cortina.
On this day I bring you a nice job to beautify our home even more. This time we will make a curtain bra.
Lo mejor de este trabajo es que son muy pocos los materiales que debemos usar.
The best thing about this work is that there are very few materials that we must use.
Sin más preámbulos ven, acompáñame en este paso a paso.
Without further ado, come join me in this step by step.

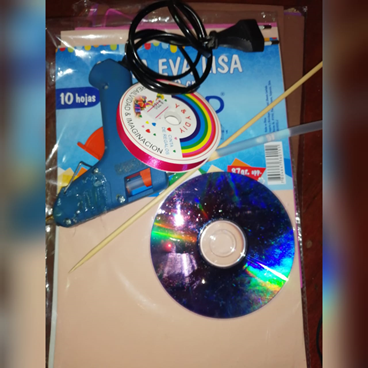
1.- Un CD.
1.- A CD.
2.- Pistola y barra de silicón.
2.- Gun and silicone stick.
3.- Goma eva.
3.- Eva rubber.
4.- Una brocheta.
4.- A skewer.
5.- Cinta.
5.- Tape.
6.- Perlería o lo que tengan a mano.
6.- Pearl or whatever they have on hand.
7.- Tijeras.
7.- Scissors .

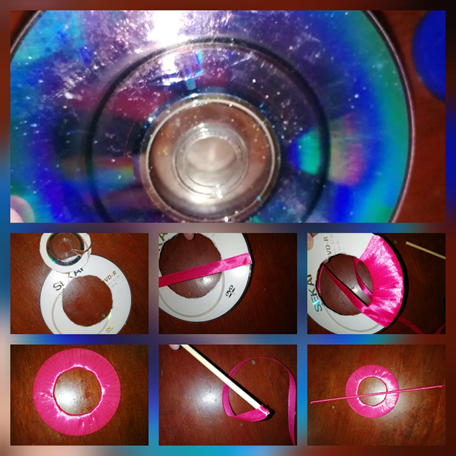
PASO #1: Realizamos un círculo dentro del CD, este tiene una medida desde el inicio a lo marcado de 3cm. Luego recortamos el círculo pequeño. Yo lo hice con un cuchillo caliente porque en ocasiones el CD tiende a romperse con facilidad cuando se recorta con unas tijeras.
STEP # 1: We make a circle inside the CD, this has a measurement from the beginning to the marked of 3cm. Then we cut out the small circle. I did it with a hot knife because CDs sometimes tend to break easily when trimmed with scissors
Después tomamos la cinta forramos el CD, este paso debe hacerse con paciencia y se debe ir ajustando muy bien para que no se afloje la cinta, valga la redundancia. El mismo paso realizamos con la brocheta.
Then we take the tape and cover the CD, this step must be done with patience and it must be adjusted very well so that the tape does not loosen, worth the redundancy. We carry out the same step with the skewer.
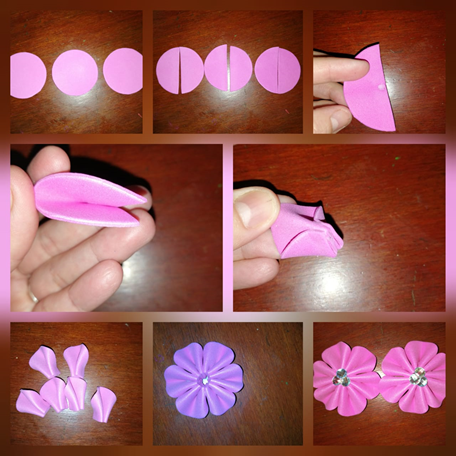
PASO #2: En este paso realizamos las flores, son muy sencillas y bastante bonitas. Se recortan 3 círculos el tamaño es a tu gusto, luego las cortamos a las mitad y cada una de estas la pegamos con un punto de silicón en el centro, una vez bien seca aplicamos otros puntos en cada lado de las puntas y las pegamos al centro. Observar las imágenes si de ponto vez que no me explico bien. Así haríamos cada pétalo, para después unirlas una a una y en el centro decorar según tus posibilidades y creatividad, yo le coloque unas piedras brillantes.
STEP # 2: In this step we make the flowers, they are very simple and quite beautiful.3 circles are cut out, the size is to your liking, then we cut them in half and each of these we stick with a point of silicone in the center, once well dry we apply other points on each side of the tips and stick them to the center. Observe the images if suddenly I do not explain myself well. This is how we would make each petal, then join them one by one and decorate in the center according to your possibilities and creativity, I placed some shiny stones.
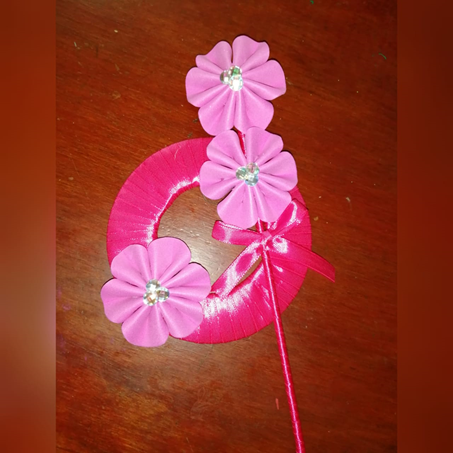
PASO #3: Una vez listo el CD, la brocheta y las flores procedemos a adornar. En el CD coloque una flor y en la brocheta dos más un lazo. Espero les guste el resultado, yo quede totalmente encantada, honestamente se ve hermoso y sujeta muy bien.
STEP # 3: Once the CD, the skewer and the flowers are ready, we proceed to decorate. On the CD put a flower and on the skewer two plus a bow. I hope you like the result, I was totally delighted, honestly it looks beautiful and holds very well.
Todas las fotos son de mi autoria/ All photos are my authorship
Nos vemos en un próximo post, me despido con amor 😍 @jayoxaju.
See you in a next post, I say goodbye with love 😍 @jayoxaju.

Hive Community Page This article will be passed to other curation projects for more votes support. Keep up the good works!Hi @jayoxaju! Thank you for posting through our
Siempre muy agradecida por el apoyo. Abrazos🤗