Tengan un bendecido día mis amigos lectores y seguidores aficionados a las manualidades. Materialicé el proyecto que dije que tenía en mente, acércate más y mira.
Have a blessed day my fellow crafting readers and followers. I materialized the project I said I had in mind, come closer and see.
Vengo trabajando la cestería de papel desde hace algunos días, la verdad estoy encantada con este tejido. Hace días boté un montón de libros viejos que ya tenían las hojas débiles, marrones y olían mal, solamente dejé los que me podían servir para tejer. Las hojas blancas son mucho más pero me da lástima usarlas; sin embargo trabajaré con ellas hasta dónde puedo.
I have been working with paper basketry for a few days now, the truth is that I am delighted with this weaving. A few days ago I threw away a lot of old books that already had weak, brown and smelly leaves, I only left the ones that I could use for weaving. The white leaves are much more but I am sorry to use them; however I will work with them as far as I can.
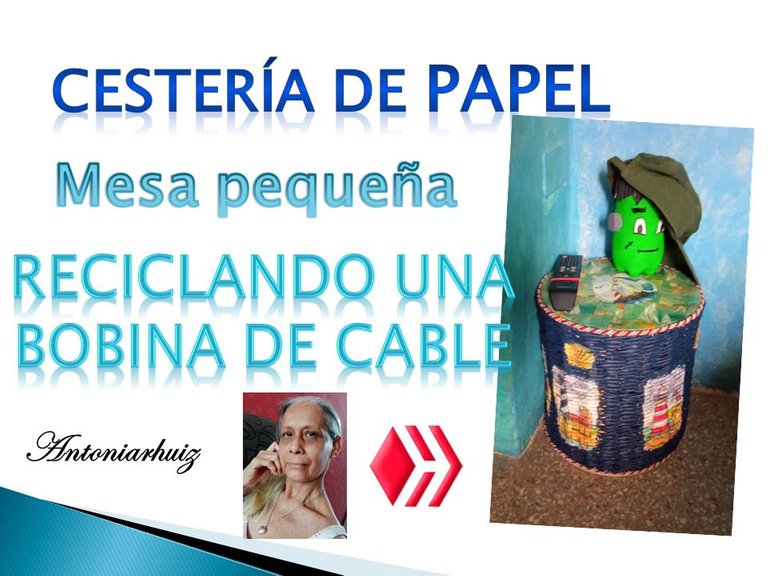
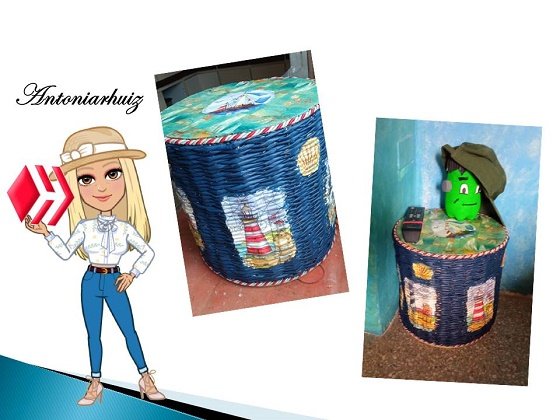
Tenía dos bobinas, una más pequeña que la otra. La bobina pequeña la usé para hacer un asiento acolchado y la más grande es la que utilicé para hacer una mesita destinada a la habitación de mi hijo menor que estudia en la Academia Naval. A continuación la elaboración de la mencionada mesa que por cierto también sirve de asiento.
I had two bobbins, one smaller than the other. The smaller bobbin I used to make a padded seat and the larger one is the one I used to make a little table intended for the room of my youngest son who is studying at the Naval Academy. The following is the elaboration of the mentioned table which by the way also serves as a seat.

Mesa pequeña hecha con papel tejido / Small table made with woven paper
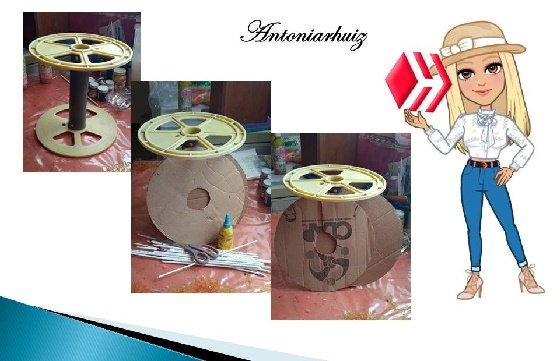
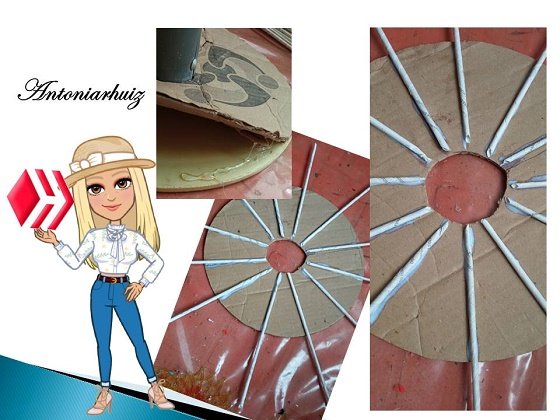
Los materiales básicos son: varillas de papel, pega y engrudo, silicón caliente y 3 círculos de cartón (dos con una circunferencia pequeña en el centro); para decorar en este caso usé pintura y servilleta con la técnica Decoupage.
The basic materials are: paper rods, glue and paste, hot silicone and 3 cardboard circles (two with a small circumference in the center); to decorate in this case I used paint and napkin with the Decoupage technique.
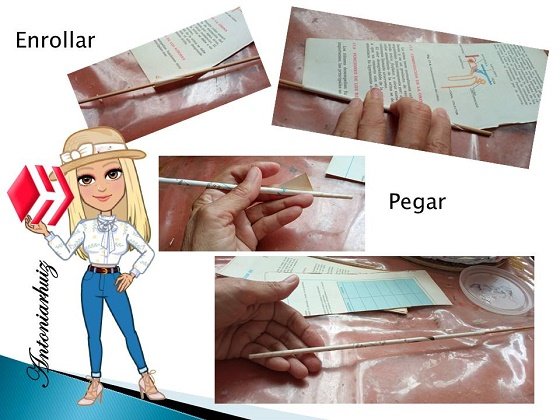
Aquí les recuerdo cómo hacer las varillas.Here I remind you how to make the rods.
Procedimiento / Procedure

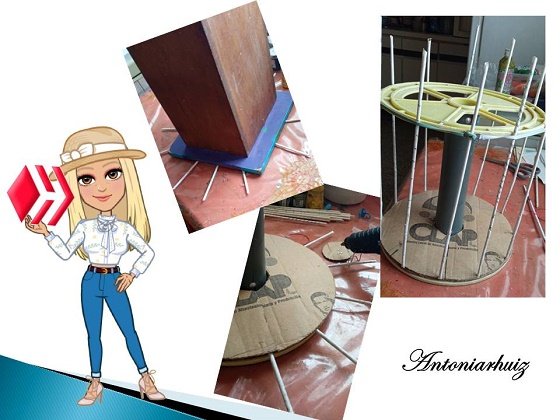
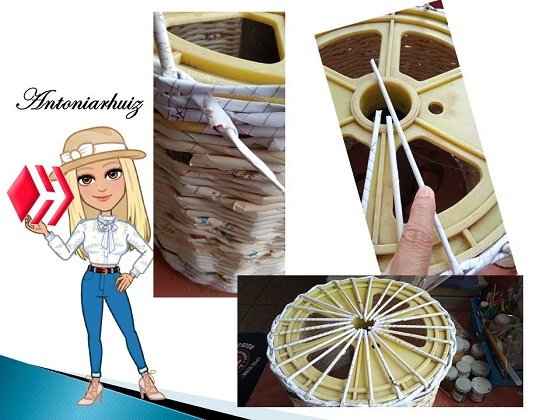
- Pegar el primer círculo ahuecado en la base de la bobina. Pegar las varillas en el otro círculo. Las pegué casi completas para darle una mayor seguridad a las varillas.
- Glue the first hollowed out circle to the base of the coil. Glue the rods to the other circle. I glued them almost complete to give the rods more security.

- Puse algo pesado encima para que se pegaran bien y luego pegué el círculo con las varillas sobre la circunferencia que ya estaba fija en la bobina. Subir las varillas y sujetarlas con un cordón elástico.
- I put something heavy on top to make them stick well and then glued the circle with the rods on the circumference that was already fixed on the coil. Bring the rods up and secure them with a bungee cord.

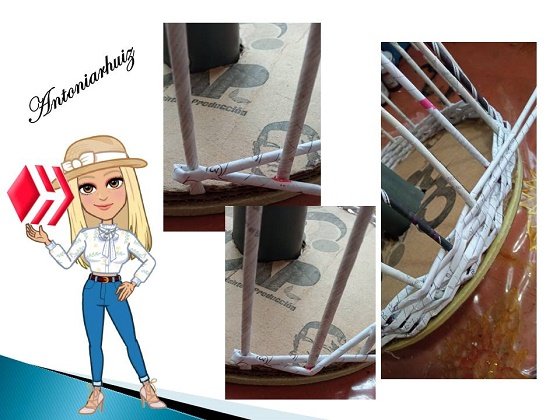
- Colocar una varilla doblada por la mitad, alrededor de una varilla vertical para comenzar el tejido el cual se realiza en forma de “X”, abrazando la varilla siguiente.
- Place a rod folded in half around a vertical rod to begin the weaving, which is done in the shape of an "X", embracing the next rod.

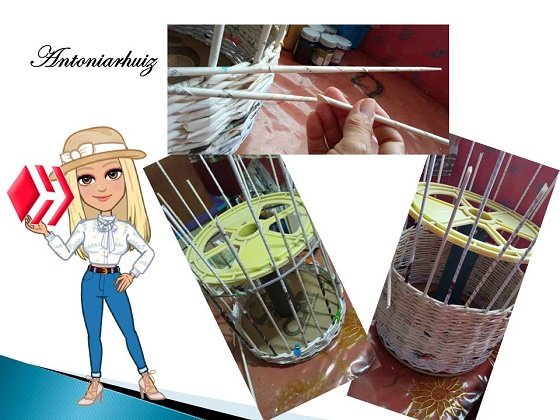
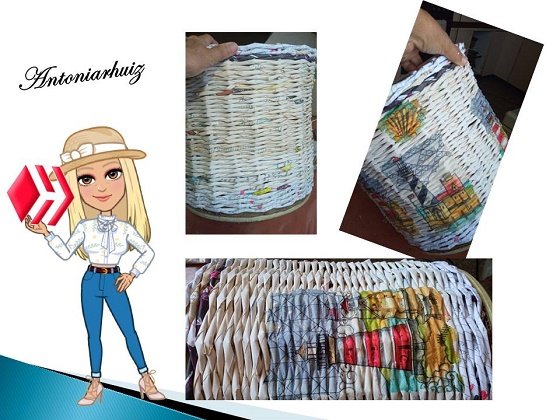
- Continuar el tejido sumando varillas. Cuando las varillas verticales se sostengan solas, se quita el cordón elástico.
- Continue weaving by adding rods. When the vertical rods support themselves, remove the elastic cord.

- Al llegar arriba, pegamos las dos puntas; si queda una larga, la cortamos. Después pegamos todas las varillas hacia el centro.
- When we reach the top, we glue the two ends together; if a long one remains, we cut it off. Then glue all the rods towards the center.

- Pintar de blanco. Sacar los dibujos de la servilleta y pegarlos. Pinté el resto de la mesa con el color azul oscuro.
- Paint white. Remove the drawings from the napkin and glue them. I painted the rest of the table with the dark blue color.

- Pintar la tapa de color blanco para pegar la servilleta decorativa. Al secar, pinté de blanco un pequeño espacio en el centro donde pegué un dibujo de otra servilleta.
- Paint the top white to glue the decorative napkin. When dry, I painted white a small space in the center where I glued a drawing of another napkin.

- Pegué la tapa con silicón caliente y por las bordes puse un cordón para terminar la decoración.
- I hot glued the lid with hot silicone and put a string around the edges to finish the decoration.
Ok, si llegaste hasta aquí, te lo agradezco. Espero que haya logrado despertar tu motivación y tu creatividad.
Ok, if you made it this far, I thank you. I hope I have managed to awaken your motivation and creativity.

Las fotos son de mi autoría con un teléfono Redmi 9, editadas en Power Point. La traducción en Traductor Deepl. Avatar de Avatoon.
The photos are of my authorship with a Redmi 9 phone, edited in Power Point. Avatar of Avatoon. Translated with www.DeepL.com/Translator (free version)

The rewards earned on this comment will go directly to the person sharing the post on Twitter as long as they are registered with @poshtoken. Sign up at https://hiveposh.com.
Que trabajo tan espectacular amiga <3
Gracias amiga bella. Espero que te encuentres en perfecto estado de armonía saludable. Te cuento que la había pintado en color mostaza pero encontré mi color favorito y fue lo que puse finalmente.😘
¡Felicidades! Esta publicación obtuvo upvote y fue compartido por @la-colmena, un proyecto de Curación Manual para la comunidad hispana de Hive que cuenta con el respaldo de @curie.
Si te gusta el trabajo que hacemos, te invitamos a darle tu voto a este comentario y a votar como testigo por Curie.
Si quieres saber más sobre nuestro proyecto, acompáñanos en Discord: La Colmena.
Honrada con la visita. Muchas gracias por el apoyo @la-colmena
Your content has been voted as a part of Encouragement program. Keep up the good work!
Use Ecency daily to boost your growth on platform!
Support Ecency
Vote for new Proposal
Delegate HP and earn more
Te quedó estupendo, es algo realmente útil, felicidades. Saludos.
Bastante útil para mí porque hacía falta en la habitación de mi hijo. Gracias por visitar.
Que linda creación amiga, gracias por compartir.
Gracias a ti por comentar. Un abrazo
Está genial! Que proyecto más creativo y útil...me encanta.💜♻️💜♻️💜♻️💜
🤗😉😃😀👍🏼😊🙂😁
Gracias por compartir tu trabajo
🌻🏵️🌺🌷🌸💐🌹
Me alegra que te guste. Gracias amiga hermosa.😘