

Saludos, hermosa y creativa comunidad. Comparto en esta ocasión una creación que realicé con una rama seca que encontré en una plaza de mi ciudad, mientras hacía una de mis caminatas. Cuando la vi, la tomé y pensé, inmediatamente, en que era apropiada para hacer un detalle decorativo para el jardín, recreando uno que había visto en la web y cuyas protagonistas eran unas hojitas en macramé. He visto que estos adornos están en tendencia, así que me inspiré y realicé este, que es el primero, pero no será el último porque me gusta mucho tejer en macramé. Además, con la intención permanente de cuidar el ambiente, me pareció oportuno reciclar esta ramita seca y crear este hermoso detalle.
Greetings, beautiful and creative community. I share on this occasion a creation that I made with a dry branch that I found in a square in my city, while I was doing one of my walks. When I saw it, I took it and immediately thought that it was appropriate to make a decorative detail for the garden, recreating one that I had seen on the web and whose protagonists were some leaves in macramé. I have seen that these ornaments are in trend, so I got inspired and made this one, which is the first one, but it will not be the last one because I really like macramé weaving. In addition, with the permanent intention of caring for the environment, it seemed appropriate to recycle this dry twig and create this beautiful detail.
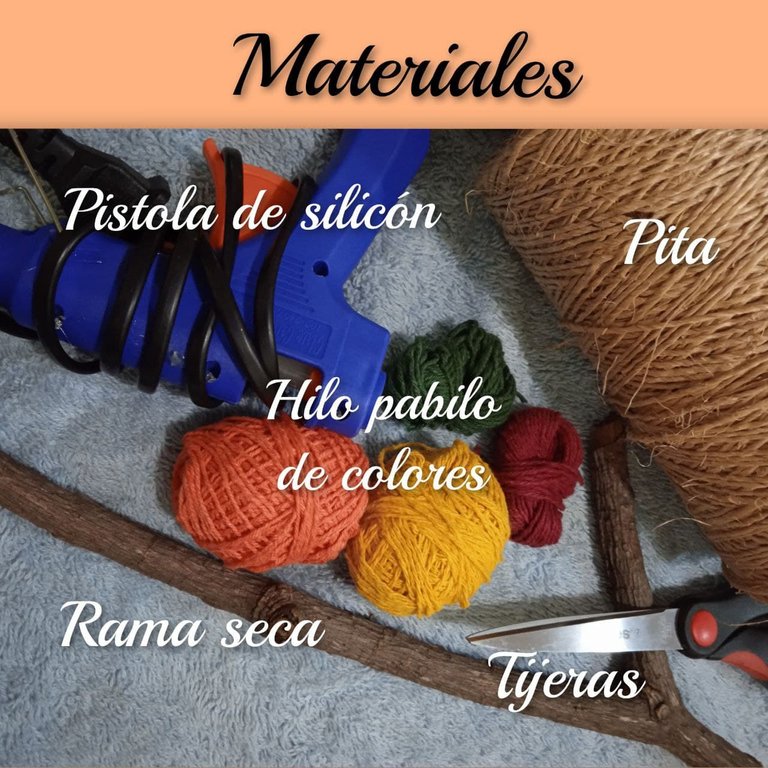
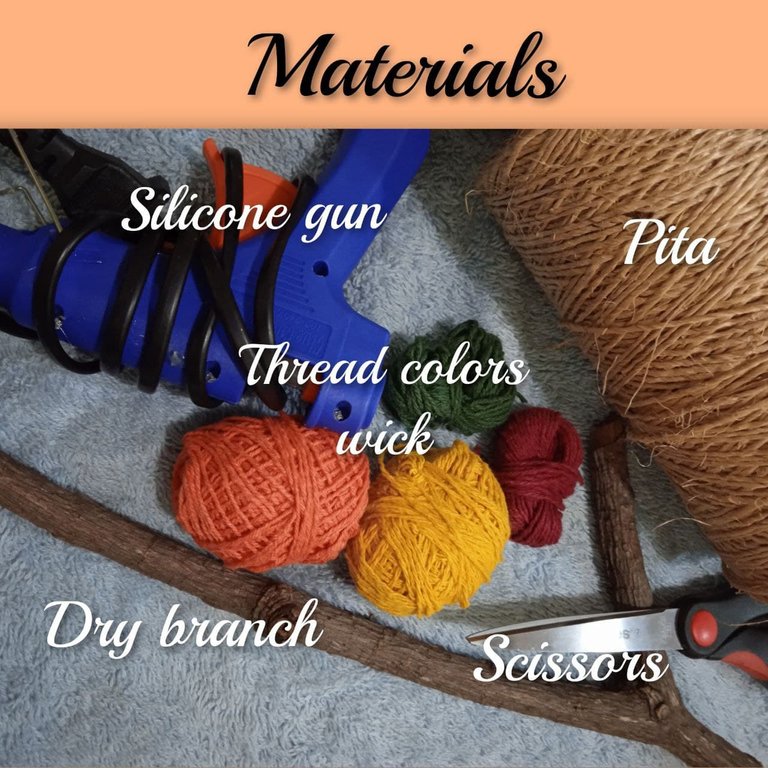
Como ven en la fotografía, los materiales son pocos y básicos. En casa tenemos la mayoría. Ahora bien para adornar tienen que buscar abalorios, botones u otros detalles como los que usé yo, o con los que ustedes tengan a mano. En estos momentos, estoy tratando de usar la mayoría de los materiales que tenía guardados desde hace tiempo porque estaba en una pausa con las manualidades, pero ahora, en esta comunidad, estoy súper motivada.
As you can see in the picture, the materials are few and basic. We have most of them at home. Now to decorate you have to look for beads, buttons, or other details like the ones I used, or with the ones you have at hand. Right now, I am trying to use most of the materials that I had saved for a long time because I was in a pause with the crafts, but now, in this community, I am super motivated.
 |  |
|---|
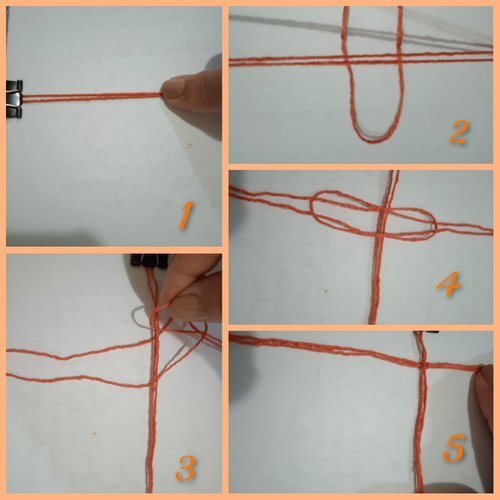
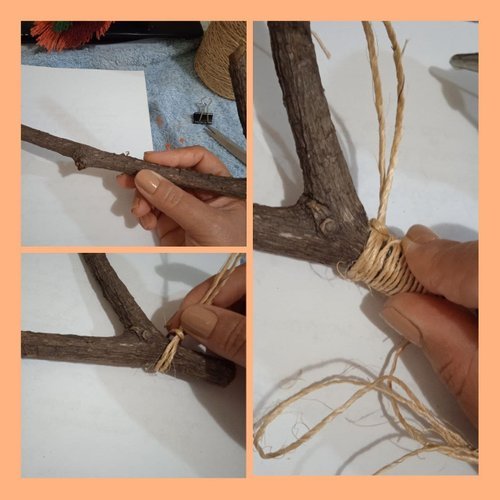
En estas fotografías, les comparto el paso a paso para tejer las hojas en macramé.
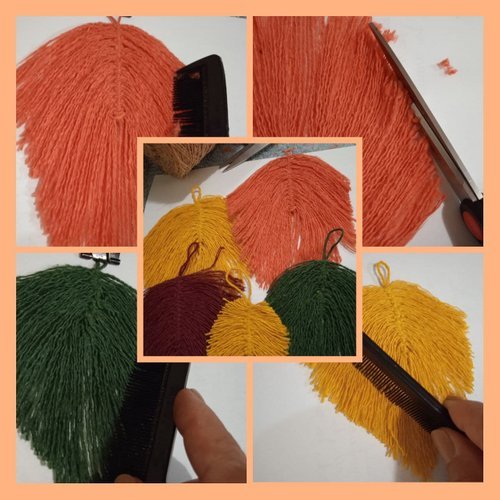
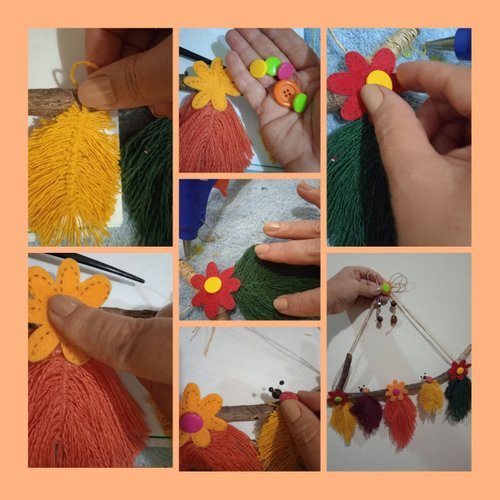
El primer paso es cortar un pedazo de hilo pabilo del largo, según el tamaño que desean para la hoja. Luego lo sostienen con una pinza (paso 1), este es el hilo guía y a partir de allí se van tejiendo los nudos cuadrados de macramé. Iremos haciendo nudos cuadrados a la derecha y a la izquierda. En la foto, podemos ver un nudo a la derecha. Para eso, se pone el hilo anudador por debajo del hilo guía (paso 2), luego, el otro hilo se pone por la argolla del hilo (paso 3) y por esa argolla se pasan las puntas del hilo anudador (paso 4) y se ajustan formando así el nudo (paso 5). Así, sucesivamente a lo largo del hilo guía. Lo siguiente será recortar las puntas de todos los hilos que hemos anudado, peinamos los hilos de cada lado y luego los recortamos dándole forma de hoja.
In these photographs, I share with you the step-by-step to weave the leaves in macramé.
The first step is to cut a piece of pabilo thread of the length, according to the size you want for the leaf. Then you hold it with a clamp (step 1), this is the guide thread and from there you weave the square macramé knots. We will be making square knots to the right and to the left. In the photo, we can see a knot on the right. For that, the knotting thread is put under the guide thread (step 2), then, the other thread is put through the ring of the thread (step 3), and through that ring, the ends of the knotting thread are passed (step 4) and they are adjusted forming the knot (step 5). This way, successively along the guide thread. The next step is to trim the ends of all the threads that we have knotted, comb the threads on each side and then trim them in the shape of a leaf.
Si no lo ven muy claro, en youtube pueden conseguir tutoriales que explican muy bien cómo hacer estos nudos en macramé, y luego la práctica nos dará la habilidad para hacerlos cada vez mejor.
If you do not see it very clear, on youtube you can get tutorials that explain very well how to make these knots in macramé, and then the practice will give us the ability to make them better and better.
Así de hermosas quedan las hojas tejidas en macramé.
This is how beautiful the macramé woven leaves look.
Luego, nos dedicamos a decorar la rama con todos los abalorios que hayamos dispuesto. Lo primero fue hacer una tira con pita que servirá para guindar la rama. Enrollé las esquinas con la misma pita para darle un buen acabado.
Then, we decorate the branch with all the beads that we have arranged. The first thing was to make a strip with pita that will serve to hang the branch. I rolled the corners with the same pita to give it a nice finish.
Seguimos con la decoración. Yo usé unas florecitas de fieltro, botones, unas mariquitas de masa flexible y, por supuesto, las protagonistas: mis hojas de macramé.
We continue with the decoration. I used some felt flowers, buttons, flexible dough ladybugs and, of course, the protagonists: my macramé leaves.
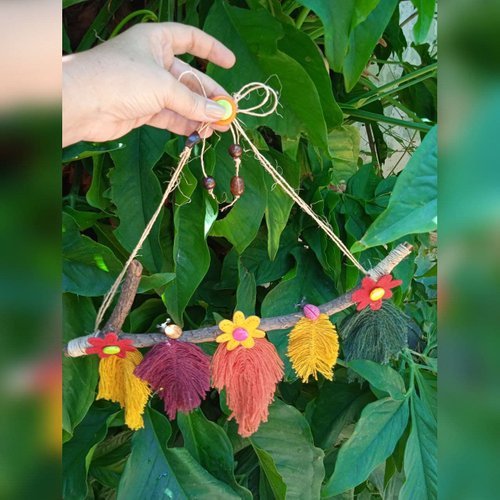
¡Listo!
Me encantó el resultado de este detalle para el jardín, rústico y colorido.
Ready!
I loved the result of this detail for the garden, rustic and colorful.
Las fotos que ilustran esta publicación son de mi archivo personal. Fuente separador. El banner es mi diseño en Canva.
The photos illustrating this publication are from my personal archive. Separator source The banner is my design in Canva.

Congratulations @aurodivys! You have completed the following achievement on the Hive blockchain and have been rewarded with new badge(s) :
Your next payout target is 12000 HP.
The unit is Hive Power equivalent because your rewards can be split into HP and HBD
You can view your badges on your board and compare yourself to others in the Ranking
If you no longer want to receive notifications, reply to this comment with the word
STOPCheck out the last post from @hivebuzz:
The rewards earned on this comment will go directly to the person sharing the post on Twitter as long as they are registered with @poshtoken. Sign up at https://hiveposh.com.
Un abrazoTe quedo bellisimo amiga @aurodivys
Gracias, mi querida Mafa. Aprecio mucho tu comentario y tu visita. Un abrazo.
Te ha quedado muy bonito este adorno para el jardín, y que estupendo que con esa ramita que encontraste hayas podido realizar esta tierna manualidad.
¡Gracias, Eu! En cuanto la vi no dudé en tomarla para hacer algo con ella y ya ves, un detalle para el jardín que disfruté mucho haciéndolo. Gracias por tu visita, un abrazo.
Hola amiga querida @aurodivys, te repito lo que escuché de tu dulce voz, esa emoción que se apodera de ti cuando lees tus publicaciones es el reflejo de tu esfuerzo, ese tiempo valioso que dedicas a cada manualidad. Felicitaciones. Dios te bendiga abundantemente siempre. Siempre aportas hermosas ideas para que decoremos nuestros espacios.
¡Amén, amiga! Te he contado cuánto disfruto hacerlas y compartirlas en esta hermosa blockchain. Muchas gracias por tu apoyo y valoración. Un abrazo.
Wow, This is really amazing.
Nice work @aurodivys. 🥂👏🏻
Thanks you!
Okay, Okay, Thank you.
No me lo vas a creer pero justo ayer me salió en Pinterest unas piezas con este estilo de hojita, pero en colores neutros o muy pálidos; no estaba segura sobre si lo de pasar el cepillo realmente funciona o era photoshop, pero viendo tus fotos compruebo que el resultad sí es lindo!. Qué diferente y precioso se ven con colores brillantes o7o great job @aurodivys 💖
Holaa, cariño, en estos días estaba pensando en que no te había visto por ahí. ¿Cómo estás? Sí, es un detalle que está en tendencia y son realmente bellas esas hojas. Me funcionó peinar los hilos con ese peine de dientes pegaditos, es un trabajito, pero el resultado es genial. Un abrazote y espero ver pronto las cosas lindas que haces.
Hola que buena idea para el jardin gracias por compartir tu paso a paso amiga
Muchas gracias, @valleyesmin