Español:
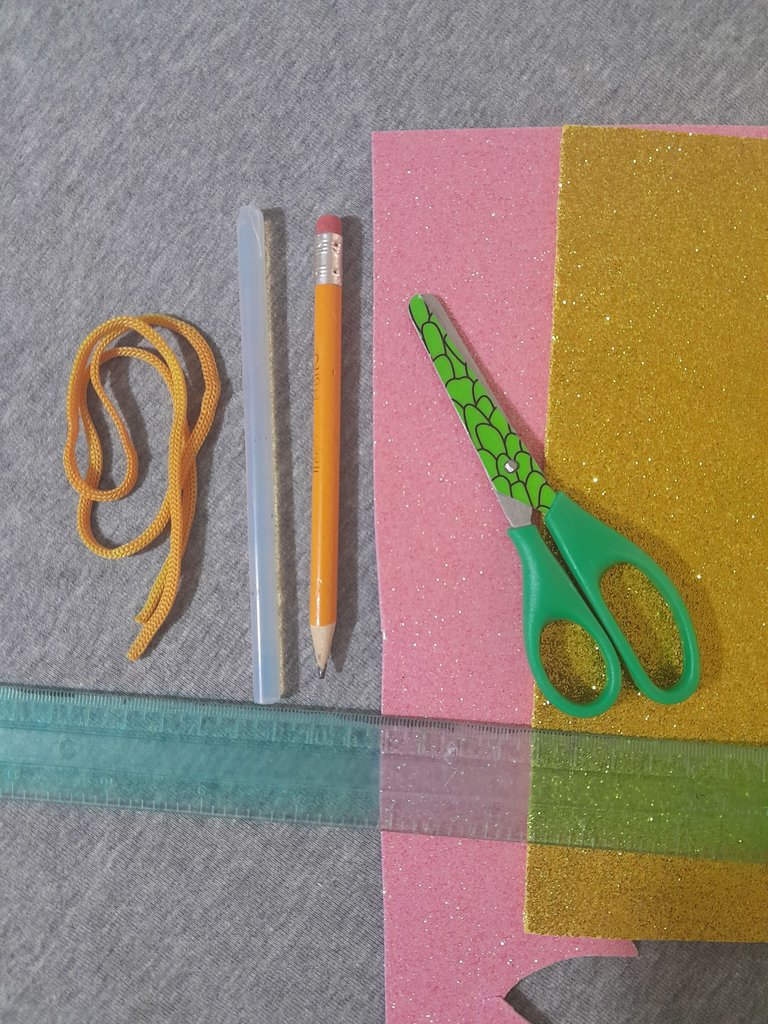
Materiales:
- Foami escarchado de 2 colores diferentes, el de tu preferencia.
- 1 cuerdita o cinta.
- Silicon en barra.
- Tijera.
- Lápiz.
- Regla.
English:
Materials:
- Frosted Foami of 2 different colors, the one of your choice.
- 1 string or ribbon.
- Silicon stick.
- Scissors.
- Pencil.
- Ruler

Español:
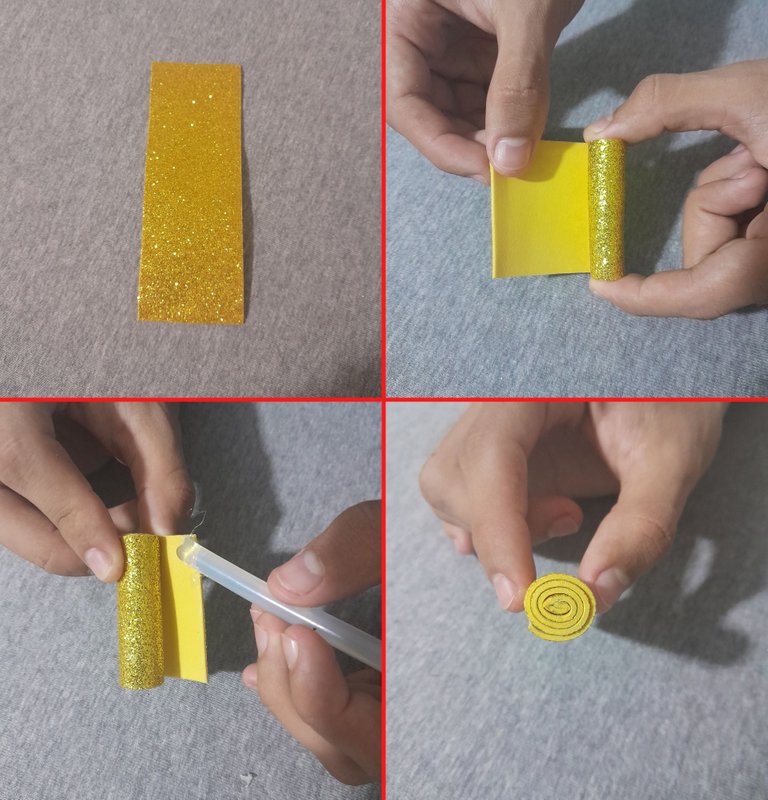
Paso 1:
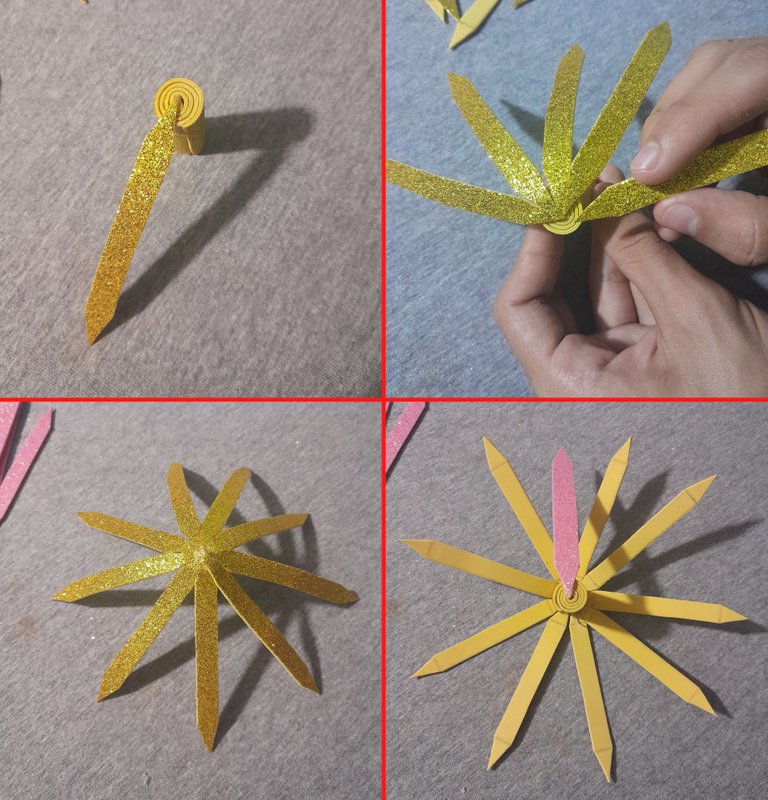
- Marco y corto una tira de foami de color dorado de 15 x 5 cm, le coloco silicon caliente y comienzo a enrollar, al terminar de enrollar le vuelvo a colocar silicon, para que quede bien pegado, quedando en forma de un tubo.
English:
Step 1:
- I mark and cut a strip of gold colored foami of 15 x 5 cm, I put hot silicone and start to roll it, when I finish rolling I put silicone again, so that it is well glued, remaining in the form of a tube.
Español:
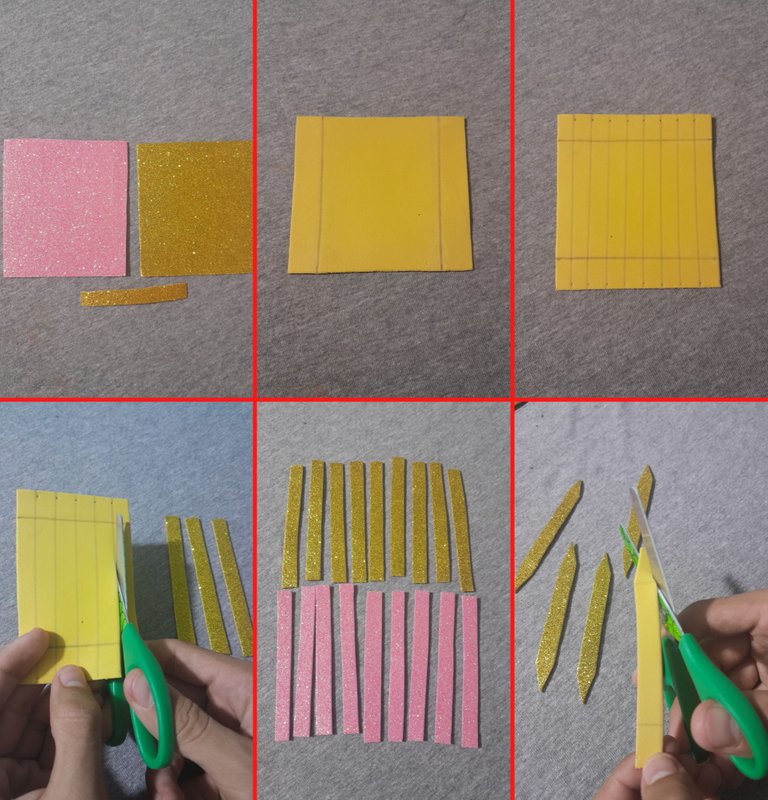
Paso 2:
- Ahora marco y recorto 2 cuadrados de 10 x 9 cm de foami de los dos colores, yo utilice dorado y rosado. También se recorta una tira pequeña de 1 cm de ancho por 8 cm de largo, ahora se va hacer con los dos foami cuadrados el mismo procedimiento por ambos lados de los 9 cm marco una linea a una altura de 1 cm y medio de forma horizontal, luego se marca 8 lineas verticales quedando 9 espacios de 1 cm cada uno. Después recorto las tiras de 1 cm, luego continuo recortando, a la atura de donde esta la marca dos piquetas de los dos lados.
English:
Step 2:
- Now I mark and cut 2 squares of 10 x 9 cm of foami of the two colors, I used gold and pink. Also cut a small strip of 1 cm wide by 8 cm long, now I will do with the two square foami the same procedure on both sides of the 9 cm I mark a line at a height of 1 cm and a half horizontally, then I mark 8 vertical lines leaving 9 spaces of 1 cm each. Then I cut the strips of 1 cm, then I continue cutting, at the height of where the mark is two pegs on both sides.
Español:
Paso 3:
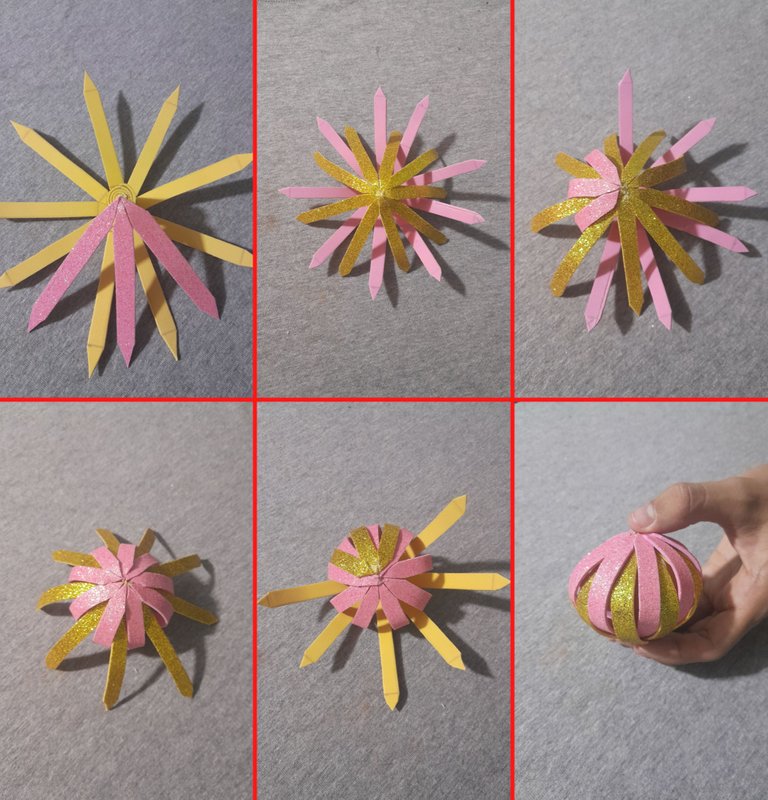
- Aquí tomo el tubo que ya tengo enrollado y comienzo a pegar con el silicon caliente las tiras del foami dorado en la parte del centro del tubo hasta pegar las 9 tiras, luego volteamos el tubo y realizamos el mismo proceso.
- Continuamos pegando las tiras rosada, tomando en cuenta que queden entre metidas en el medio de las doradas, ahora seguimos pegando las otras puntas que están sueltas al otro lado las doradas encima de las rosada y viceversas, formando una esfera.
English:
Step 3:
- Here I take the tube that I have already rolled and I start gluing with the hot silicone the golden foami strips in the center of the tube until we glue the 9 strips, then we turn the tube over and do the same process.
- We continue gluing the pink strips, taking into account that they are stuck in the middle of the golden ones, now we continue gluing the other ends that are loose on the other side, the golden ones on top of the pink ones and vice versa, forming a sphere.
Español:
Paso 4:
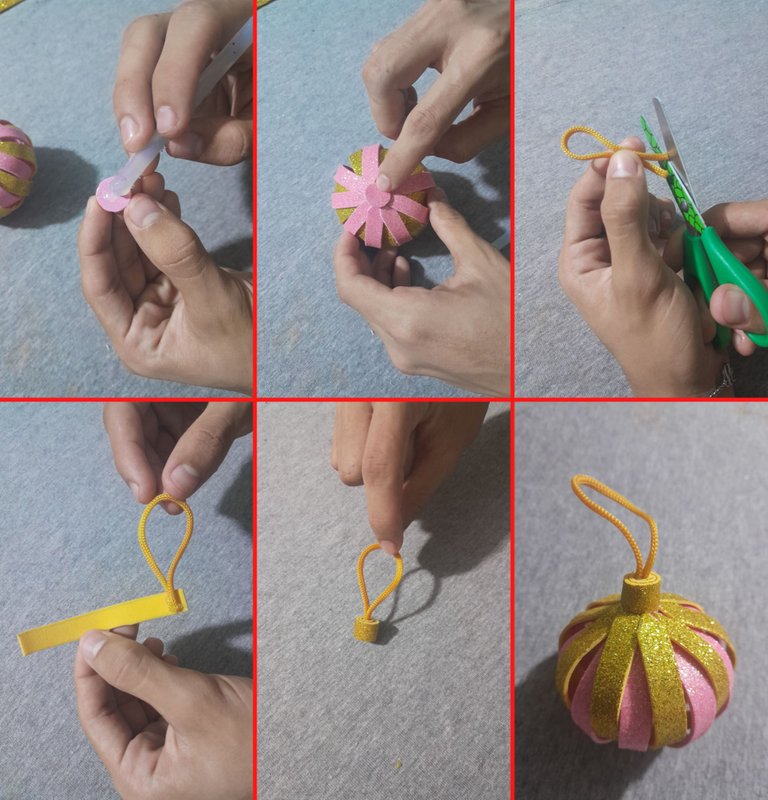
- Luego recortamos un círculo pequeño del foami rosado y lo pegamos en la parte de abajo de la esfera, ahora cortamos la cuerda a un tamaño correspondiente y pegamos las dos puntas en la tira de 1 x 8 cm la enrollamos y procedo a pegarla en la parte superio de la esfera. quedando un lindo adorno para el arbolito.
English:
Step 4:
- Then we cut out a small circle from the pink foami and glue it on the bottom of the sphere, now we cut the rope to a corresponding size and glue the two ends on the strip of 1 x 8 cm, roll it up and proceed to glue it on the top of the sphere, leaving a nice ornament for the tree.
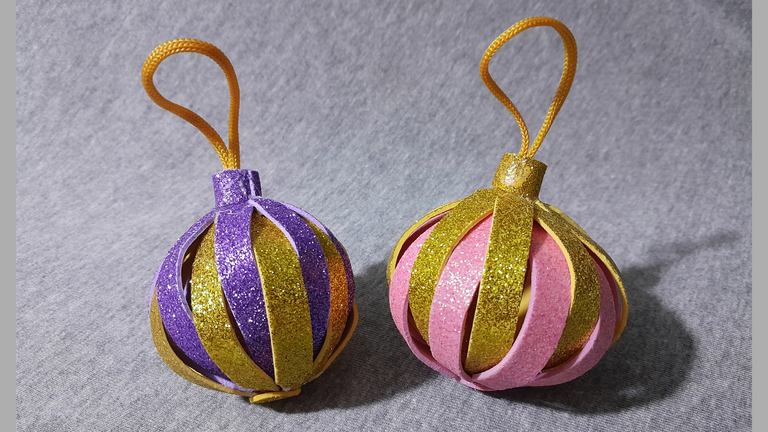
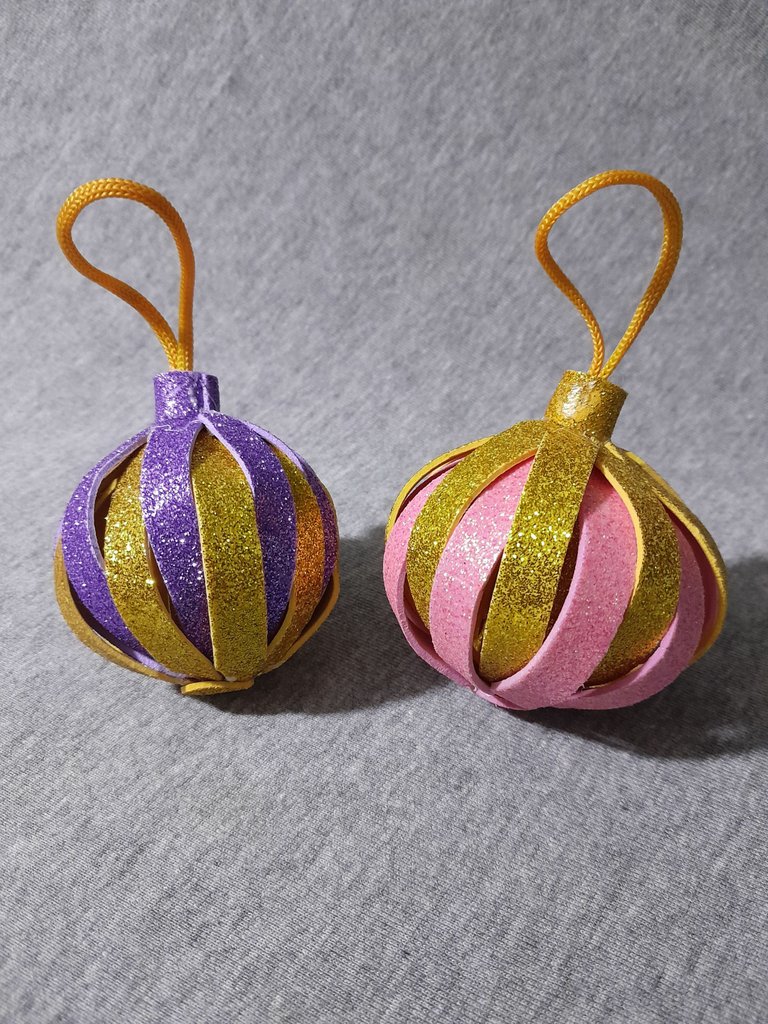
Este es el resultado final, espero les haya gustado, saludos y bendiciones para todos.
This is the final result, I hope you liked it, greetings and blessings to all.


Todas las fotos son de mi autoria y editadas con Canva.
Traductor: DeepL Traslate.
All photos are my own and edited with Canva. Translator: DeepL Traslate.
Traductor: DeepL Traslate.
All photos are my own and edited with Canva. Translator: DeepL Traslate.
Has sido votado por
PROYECTO ENLACE
'Conectando Ideas y Comunidades'
PROYECTO ENLACE es un proyecto de curación de habla hispana enfocado en recompensar contenido de calidad y apoyar autores en su proceso de crecimiento en HIVE.
Creemos y apostamos por el futuro de esta gran plataforma, y estamos muy emocionados de poder hacerla crecer junto a esta comunidad. Así que te invitamos a usar nuestra etiqueta ENLACE y estar atento a todas las actividades que tenemos preparadas y que estaremos publicando en breve.
¿QUIERES AUTOMATIZAR TUS GANANCIAS DE CURACIÓN? SE PARTE DEL PROYECTO ENLACE APOYANDO A NUESTRO TRAIL EN HIVE.VOTE INGRESA AQUÍ PARA CONOCER LOS DETALLES.
¿QUIERES INVERTIR ENLACE? DESCUBRE COMO HACERLO Y GENERAR INGRESOS DE FORMA SEMANAL MEDIANTE TU DELEGACIÓN DE HP AQUÍ TE EXPLICAMOS COMO.
Te invitamos a participar en nuestro servidor de Discord: https://discord.gg/3S9y7BbWfS
Atentamente
EQUIPO ENLACE 2022
The rewards earned on this comment will go directly to the people( @tere.alv ) sharing the post on Twitter as long as they are registered with @poshtoken. Sign up at https://hiveposh.com.
Me gustó mucho este proyecto para decorar el árbol de navidad. El paso a paso que nos compartes está muy bien explicado me gustó mucho. Gracias por compartir.
!LADY
You have already used the number of tips you had for the day. Please try again tomorrow or buy more LOH tokens to send more tips.
Gracias por el apoyo, saludo.
Gracias que bueno que te haya gustado, saludo que tengas un feliz día.
Gracias que bueno que te haya gustado, saludo que tengas un feliz día.
Thank you for sharing this post on HIVE!
Your content got selected by our fellow curator semarekha & you just received a little thank you upvote from us for your great work! Your post will be featured in one of our recurring compilations which are aiming to offer you a stage to widen your audience within the DIY scene of Hive. Stay creative & HIVE ON!
Please vote for our hive witness <3
Que bonitas te quedaron esas esferas, muy originales y diferentes a las que comúnmente tenemos en nuestros arbolitos, me encanto el diseño y la forma que tienen, hiciste un buen trabajo 😄
Se ven lindos estos adornos.