

Buenos días querida familia de #HiveDiy, espero que todos estén muy bien y que esta semana compartamos las más grandiosas ideas que tengamos en nuestra cabeza. Yo no sé ustedes pero siempre he pensado que no puedo dejar de inventar y más bien me falta tiempo para crear cosas lindas para mostrar.
Muchas veces me acuesto y solo vienen ideas y más ideas a mi mente, tanto, que muchas veces mi voluntad no me hace caso y hace que mi cuerpo se levante a diseñar, a buscar ideas, a comprobar hipótesis.
Mi familia a veces me dice que estoy loca, pero yo digo, si las manualidades son parte de la locura entonces ¡que feliz es estar loca!

Mi locura de hoy

Hace unos días mi amiga Milagros me pidió el favor de que diseñáramos un gorro o birrete de graduación para la sesión de fotos de su hija Yengreí quien pronto estará graduándose de bachiller. Mi amiga ha sido muy buena amiga y vecina y por eso se merece lo mejor.
Lo más bonito es que nuestros hijos estudiaron juntos y este año los vamos a ver graduarse y cumplir una meta más en sus vidas.
Por eso, apenas ella me pidió eso no pude dormir, comencé a buscar los que está en tendencia este año y encontré un dato muy curioso que me gustaría compartir con ustedes y es que las lentejuelas están de vuelta. Pensé que era algo extinto que ya nadie las usaba, pero al ir estos días a las tiendas de telas "El castillo" pude constatar que los brillos y las lentejuelas llegaron para revolucionar la moda por un buen rato.


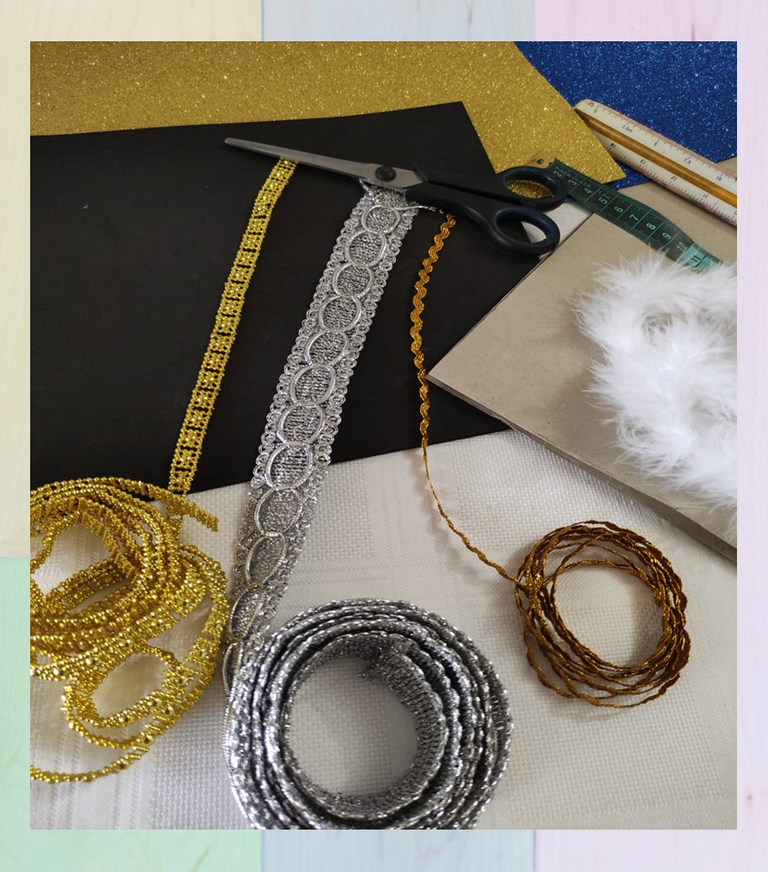
- cartón kilo
- foami escarchado dorado, azul y negro
- lentejuelas para combinar, blanca, azul.
- encajes
- 1,50 cm de marabú
- silicón liquido


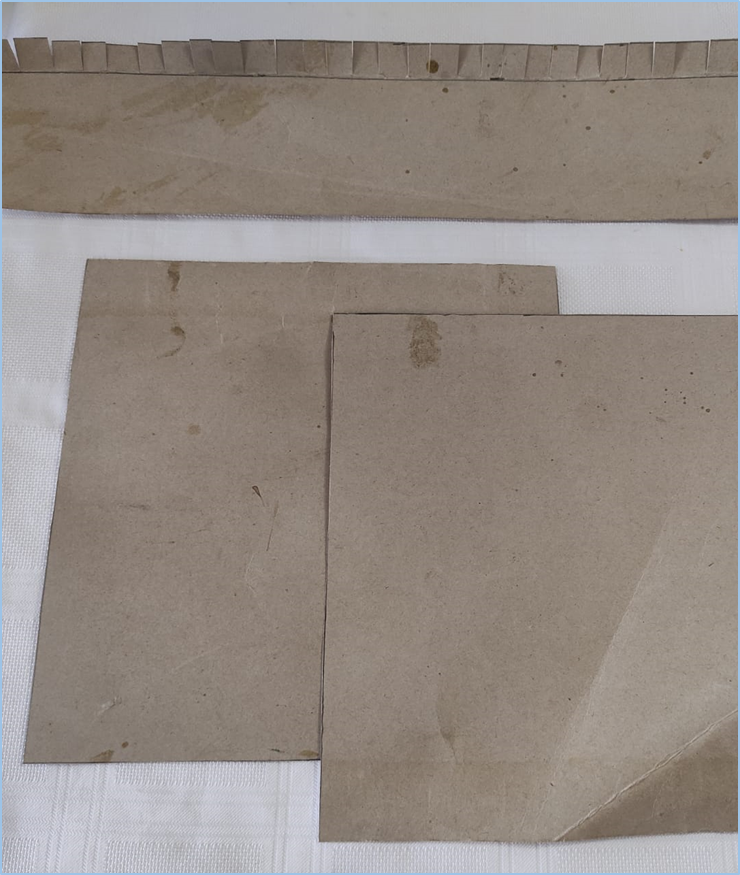
Primer paso:
Cortamos dos cuadrado de 33x33 centímetros en cartón kilo. También cortamos una tira de 12+2 de ancho por 60+2 de largo.
Dos centímetros de cada lado serán utilizados como pestaña para pegar y así armar el armazón o cuerpo del birrete.
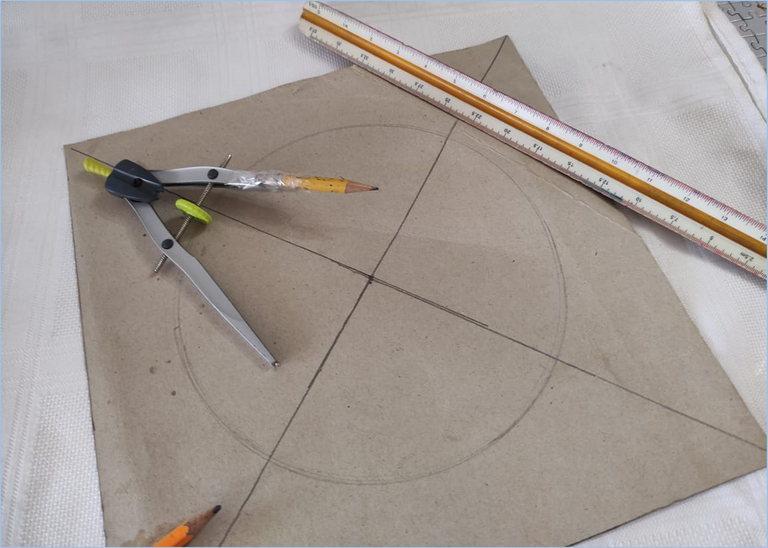
- Cortamos los cuadros y los pegamos, esto hará que el gorro tenga más firmeza. Con la ayuda de una regla le sacamos la mitad midiendo de esquina a esquina. Luego con la ayuda de un compás calculamos el área de la circunferencia que equivale a 60 centímetros y marcamos con lápiz.
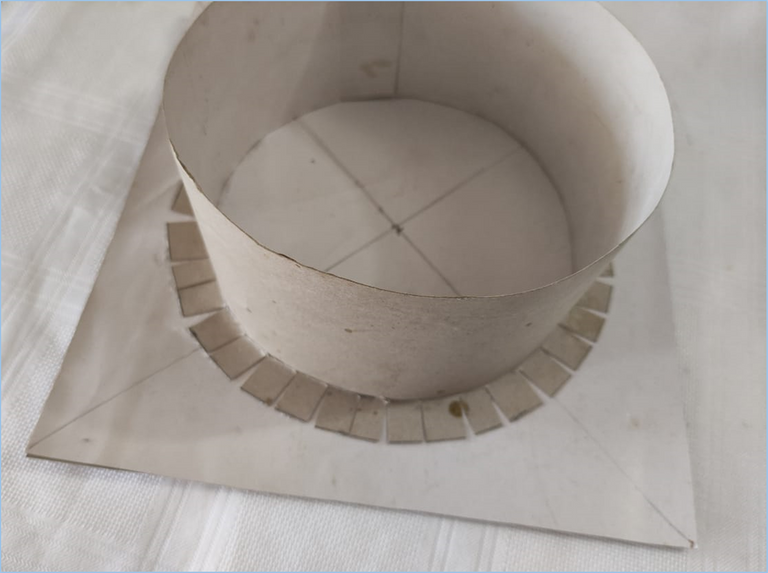
- Ahora contamos una pestaña a lo largo de 2 centímetros; pegamos la tira a lo ancho y dejamos exactamente 60 centímetros para pegar en el cuadrado. Dejamos secar y pasamos al siguiente paso.
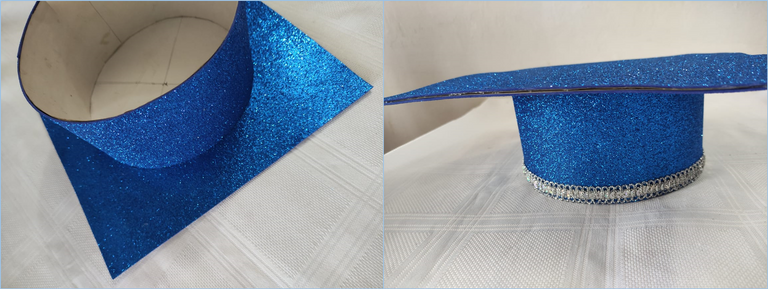
Cortamos dos cuadros en foami azul de 33 centímetros y la tira de 60x12. En uno de los cuadramos vamos a sacar la misma medida de circunferencia del cráneo y cortamos con una hojilla o exacto. Luego pegamos y dejamos secar.

Paso 2:
Esta parte es sin duda para mí la mas difícil, como les dije en una oportunidad no soy experta en esta materia de trabajar con foami, pero hago el intento.
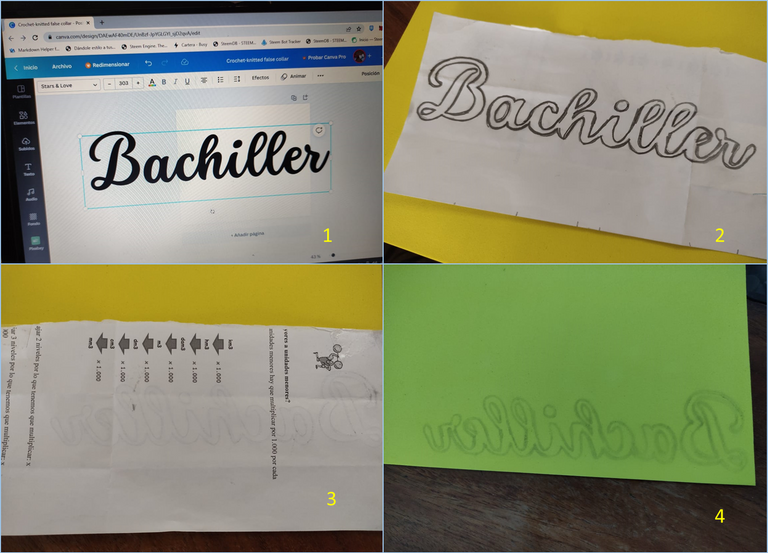
Para sacar la palabra he utilizado un patrón que he sacado de la página canva, utilizando el tipo de letra Star&love. Lo lleve al tamaño deseado y copie en una hoja.
Luego marqué esa palabra varias veces con lápiz y tal como se ve en la imagen pegué esa hoja al reverso del foami dorado. Oprimí con algo de fuerza sobre el papel teniendo mucho cuidado que no se moviera de lugar.
Al levantar el papel queda marcada la palabra y comenzamos a cortar. Primero lo hice en el foami dorado y luego con el foami negro sacamos la forma ampliando medio centímetro del contorno.
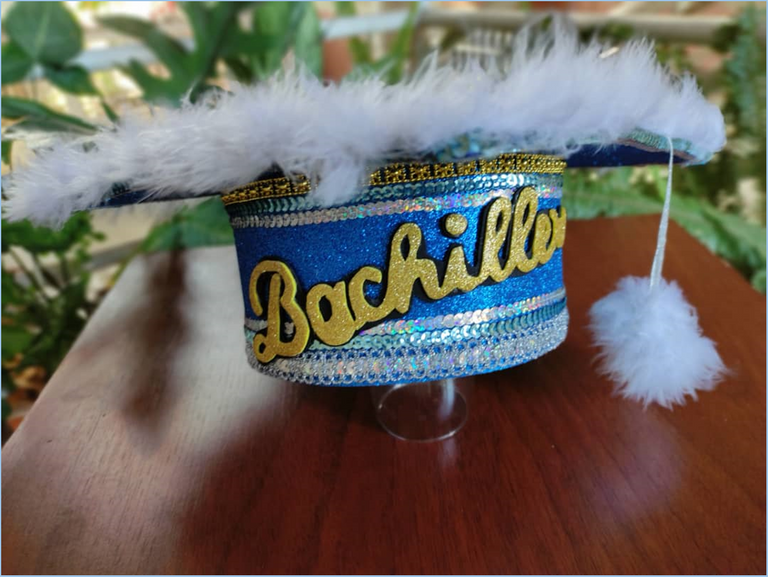
Por últimos solo nos queda comenzar a pegar la palabra y adornar con todo lo que se te ocurra, cuidando los detalles, la combinación para que quede prolijo.

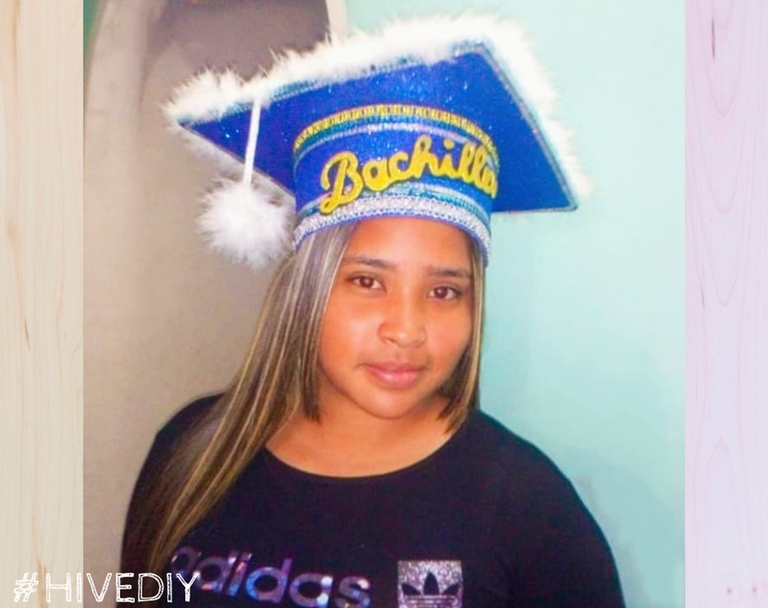
Les presento a Yengrei, ella es una buena niña, inteligente y muy educada. En su casa quedaron encantados con su birrete de celebración y yo más por haberles sacado unas cuantas sonrisas.
Estoy agradecida con la vida por darme estas locuras que aunque no se hacer a la perfección trato, investigo y realizado para brindar felicidad.
Espero que les haya gustado este birrete que se han puesto muy de moda en los colegios para celebrar y dejar como recuerdo de graduación de nuestros hijos.
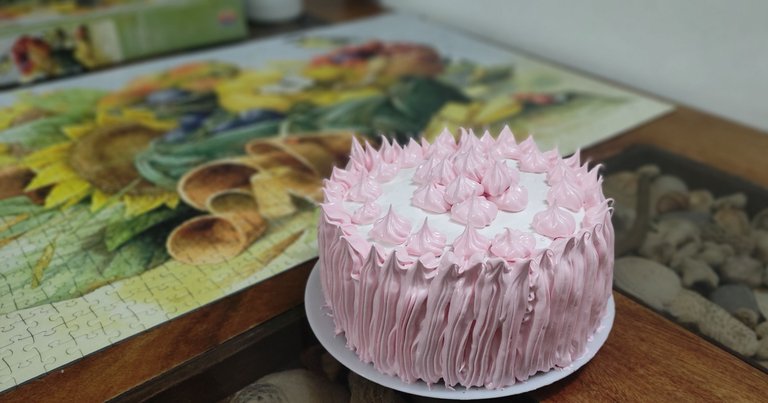
Antes de despedirme me gustaría mostrarles que Yengrei también le gusta hacer cosas ricas con sus manos y hace poco me sorprendió con un lindo pastel de cumpleaños, estos detalles son los que hacen que uno realmente hacen que uno se sienta querido. Espero que dentro de poco se registre en Hive y venga a trabajar a nuestra comunidad porque tiene mucho talento.


Good morning dear #HiveDiy family, I hope everyone is doing great and that this week we share the greatest ideas we have in our head. I don't know about you but I've always thought that I can't stop inventing and rather lack the time to create cute things to show off.
Many times I go to bed and only ideas and more ideas come to my mind, so much so, that many times my will ignores me and makes my body get up to design, to look for ideas, to test hypotheses.
My family sometimes tells me that I'm crazy, but I say, if crafts are part of the madness then how happy I am to be crazy!


A few days ago my friend Milagros asked me the favor of designing a graduation cap or cap for the photo shoot of her daughter Yengreí who will soon be graduating from high school. My friend has been a very good friend and neighbor and for that she deserves the best.
The most beautiful thing is that our children studied together and this year we are going to see them graduate and accomplish one more goal in their lives.
So, as soon as she asked me that I could not sleep, I started looking for what is trending this year and I found a very curious fact that I would like to share with you and that is that sequins are back. I thought it was something extinct that no one used them anymore, but going these days to the fabric stores "The Castle" I could see that the glitter and sequins came to revolutionize fashion for a while.


kilo cardboard
gold, blue and black frosted foami
sequins to match, white, blue
encajes
1,50 cm of marabu
liquid silicon


First step:
We cut two 33x33 centimeter squares out of kilo cardboard. We also cut a strip 12+2 wide by 60+2 long.
Two centimeters on each side will be used as tabs to glue and thus assemble the frame or body of the biretta.

Cut the squares and glue them together, this will make the cap firmer. Con la ayuda de una regla le sacamos la mitad midiendo de esquina a esquina.
Then with the help of a compass we calculate the area of the circumference which is equivalent to 60 centimeters and mark it with a pencil.

- Now we count a tab 2 centimeters long; we glue the strip across the width and leave exactly 60 centimeters to glue on the square.
Let it dry and move on to the next step.

We cut two squares in blue foami of 33 centimeters and the strip of 60x12. In one of the squares we are going to take the same measure of circumference of the skull and cut with a blade or exact. Then we glue and let dry


Step two:
This part is undoubtedly for me the most difficult, as I told you in an opportunity I am not an expert in this matter of working with foami, but I make the attempt.
To draw the word I used a pattern that I took from the canva page, using the Star&love font. I took it to the desired size and copied it on a sheet of paper.
Then I marked that word several times with pencil and as you can see in the image I glued that sheet to the back of the gold foami. I pressed with some force on the paper being very careful not to move it from its place.
When the paper is lifted, the word is marked and we start cutting. First I did it on the gold foami and then with the black foami we cut out the shape enlarging half a centimeter of the contour.

Finally we just have to start gluing the word and decorate with everything you can think of, taking care of the details, the combination to make it neat.


Meet Yengrei, she is a good girl, smart and very polite. At home they were delighted with her celebration cap and I was even more delighted to have brought a few smiles to their faces.
I am grateful to life for giving me these crazy things that even though I don't know how to do them perfectly, I try, research and make them to bring happiness.
I hope you liked this biretta that have become very fashionable in schools to celebrate and leave as a souvenir of graduation of our children.
Before I say goodbye I would like to show you that Yengrei also likes to make nice things with her hands and recently surprised me with a nice birthday cake, these details are the ones that really make you feel loved. I hope that soon she will register in Hive and come to work in our community because she has a lot of talent.

The rewards earned on this comment will go directly to the person sharing the post on Twitter as long as they are registered with @poshtoken. Sign up at https://hiveposh.com.
Te quedo muy hermoso amiga, imagino la chica quedo feliz 😄
Hola Yoli, gracias. Si mis amigas quedaron felices, ellas valoran mucho lo que uno hace, porque saben que no es fácil hacer estas cosas. es decir, que hay que dedicarle tiempo.
Expectacular amiga💯👍 a tu amiga quedará encantada con el birrete que le hiciste; la combinación de los colores hace que se vea precioso. Ten por seguro que la fotos quedarán hermosas. Felicitaciones y Bendecido día amiga.
Ya le hicieron la primera sesión de fotos y el encargado no les dejo tomar ni una foto con el uniforme y el birrete, solo les tomó la foto y los sacó. muy grosero, tendré que esperar al día de la graduación para ver como le queda con el uniforme.
La ventaja es que ya no hay necesidad de alquilar estos implementos y queda como un bello recuerdo para la familia. Hermoso trabajo!
esa es la idea, aquí me han traído tambien birretes que han pasado de hermano a hermano, solo lo que hago es retocar los detalles.
Te quedó realmente muy hermoso y original que lindo detalle tu amiga me imagino quedó fascinada
Así es yraima, quedó tan agradecida que el día de mi cumpleaños me esperó con una torta. jejejej. mas riiiica.
@carolinacardoza que bueno amiga que lindo detalle de su parte 🤗🌹❤️
Me encantan los detalles, quedó genial, esa chica es seguro que resaltó con este diseño que creaste.
Saludos amiga querida.
Un abrazo
Un abrazo Luisa, muchas gracias por tu apoyo.
Wow😍😍
Quedo hermoso, supongo que tu amiga quedo maravillada y encantada.. Saludos!
Si, la sonrisa era de oreja a oreja cuando se lo entregué. la verdad es un trabajo bonito y lo mas costoso es el marabú.
Precioso amiga no es tan dificil lo que hay es qye tener paciencia ja ja, pero lo que se hace con amor queda bello, hasta provoca estudiar y hacerme el mio ja ja
Tu te puedes hacer uno para graduarte de doctora en el arte de criar hijos preciosos.. jjejeje