
English
Hiii, friends of the HiveDiy community, how are you today? I hope you are doing great!
I wonder what I can do with a red pen and a red color?
Previously, I have drawn using these two materials, which are among the few I have. However, what matters is the use we make of the materials, no matter how much or how little.
I don't consider myself a good drawer, but let's see what can be achieved today, so here we go!
Materials
- Sheet of paper (whatever you want, I used a recycled sheet).
- Any kind of pencil (I use the same one I use for writing).
- Red pencil.
- A saturated red pencil.
- Eraser.
- Pencil sharpener.
 |  |
|---|
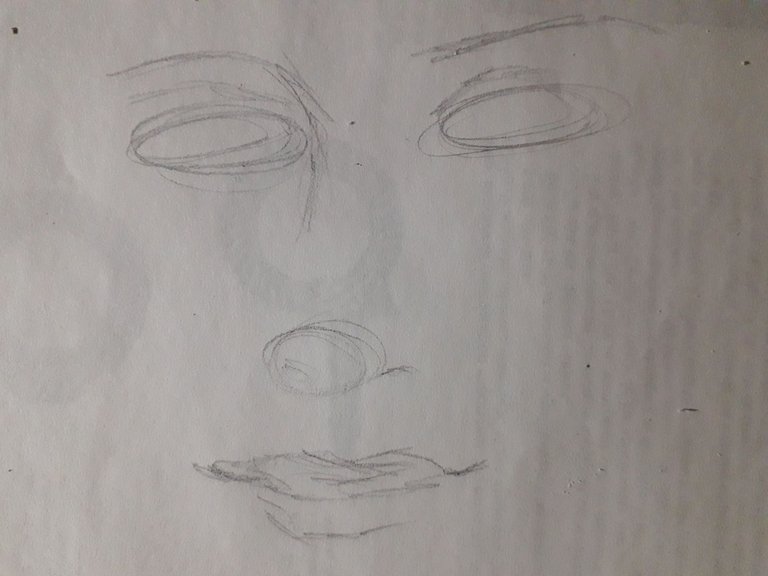
First I made the basic shape of the elements of the face: eyebrows, eyes, nose, and mouth.
The eyebrows I made as two slanted lines only; the eyes I simplified them as ovals. For the base of the nose I used a circle and for the septum a line. The lips are a bit more complicated, especially the upper lip, so I didn't simplify it as such; I just gave the general shape of slightly elongated lips, as it is what happens when smiling, as well as making them look thinner because of this “stretching.”
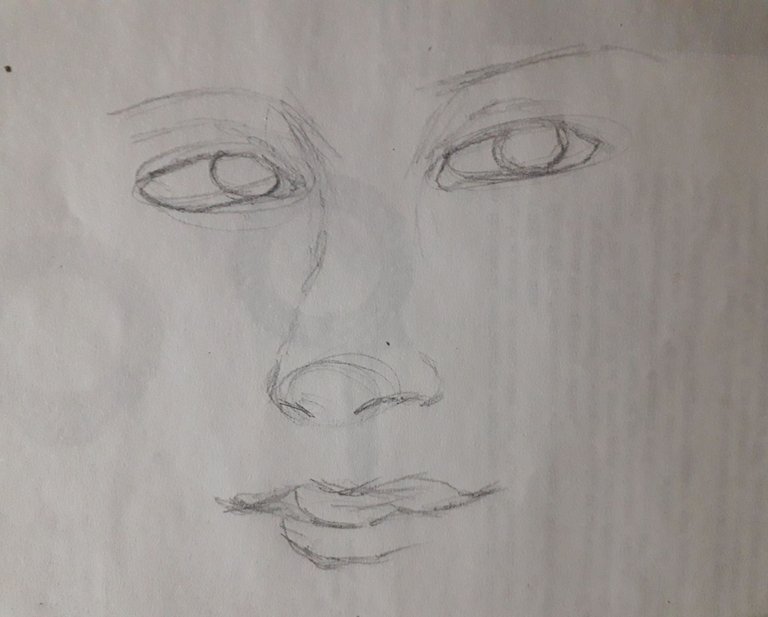
The next thing was to define, now, each element, giving it its basic shape. For example, I shaped the eyes and drew the irises; I finished shaping the septum of the nose and drew the nostrils; and I finished shaping the lips.
 |  |
|---|

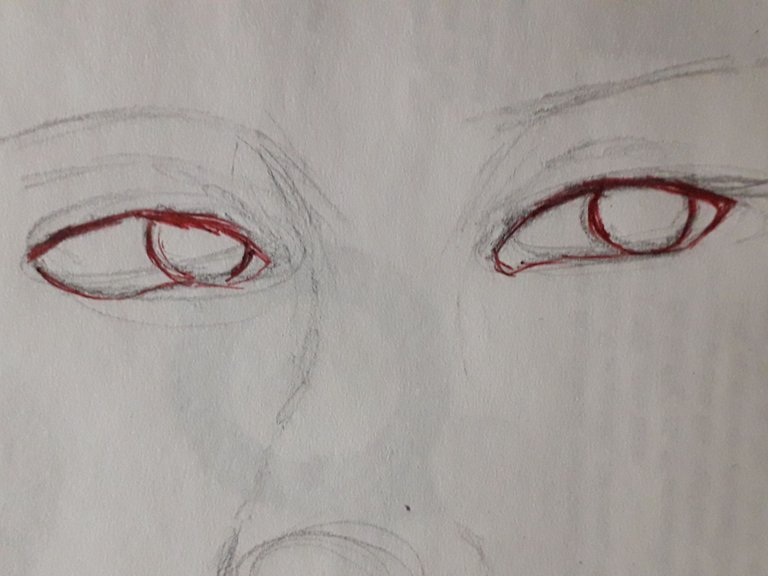
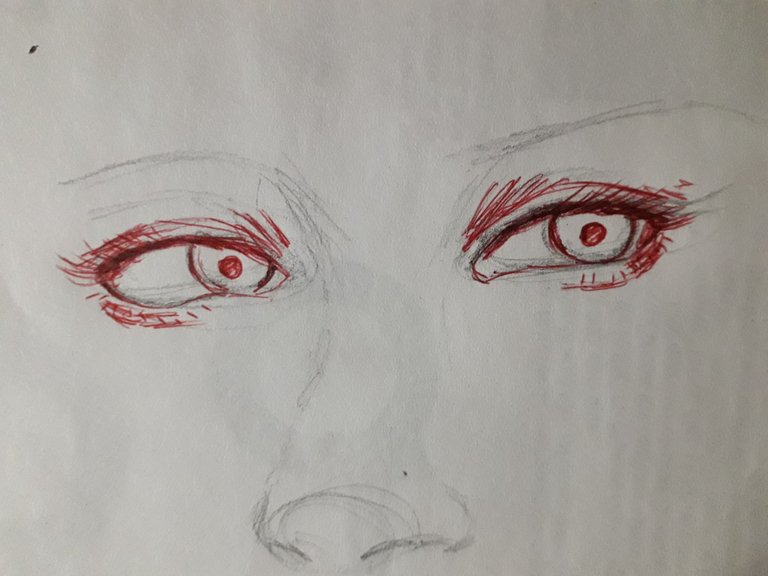
Now, with the red pen, I outlined the shape of the eye and the iris. Next, I began to give small details such as the crease of the upper and lower eyelid, as well as a light shadow in the crease of the upper eyelid and small eyelashes on the lower eyelid.
Lastly, I gave quick elongated strokes a few times, to draw each eyebrow. And with small circular strokes, I colored the irises.
 |  |
|---|
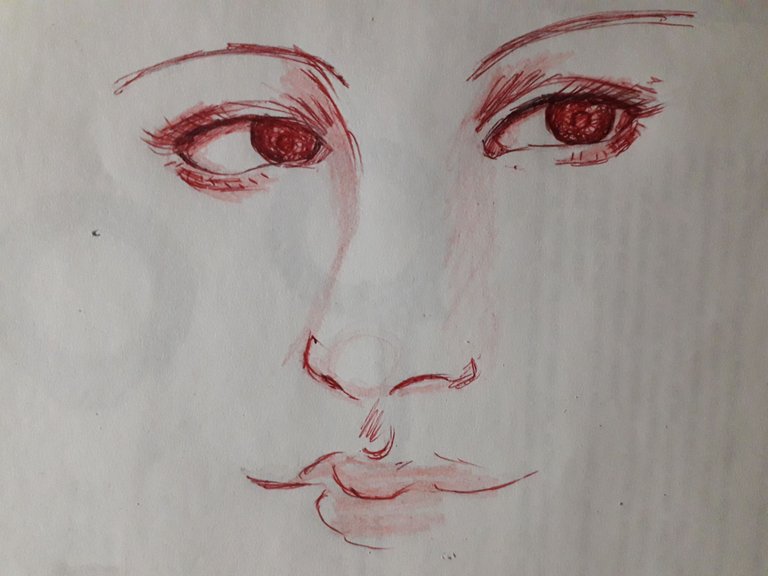
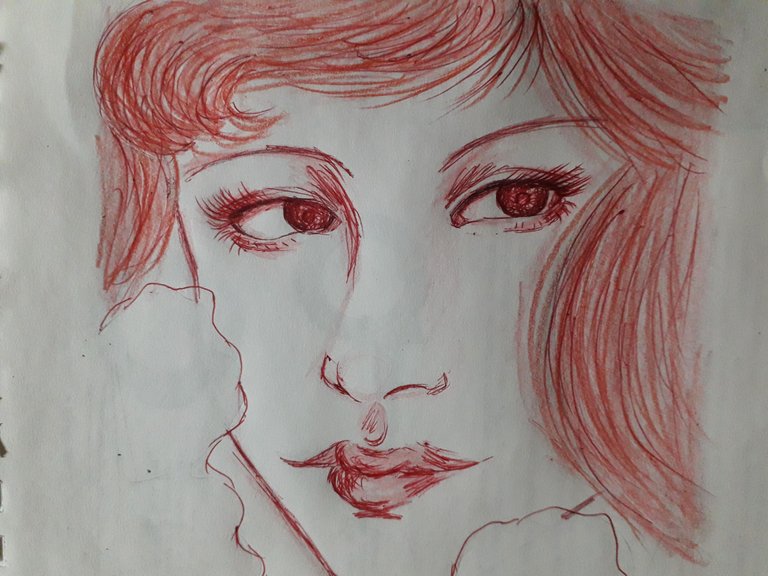
I continued outlining the nose and mouth, with somewhat quick and not so clean strokes, because, to be honest, I like it when my drawings look a bit “dirty,” that is, when the line is not perfect.
Then, I started to give shadows using a colored pencil and passing it softly, because I didn't want it to pigment excessively. After all, I wanted the red pencil to be the one that attracted the most attention.
I gave shadows between the nose and eyes and on one side of the septum. I also colored the lips softly, with circular strokes, to preserve that idea of “volume.”

Here you can see a little better the areas where I colored with the colored pencil. The shadows “inside” the eye are important, as they are being projected on the upper eyelid and are the ones that give a little more depth to the look.

With the red pencil, I made some strokes on the lips, to add more intense shadows. And with this, the face as such is ready.
 |  |
|---|
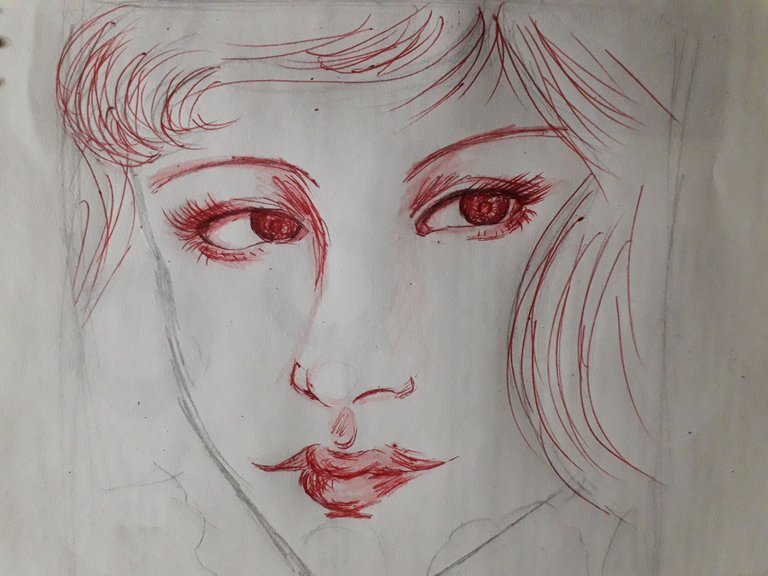
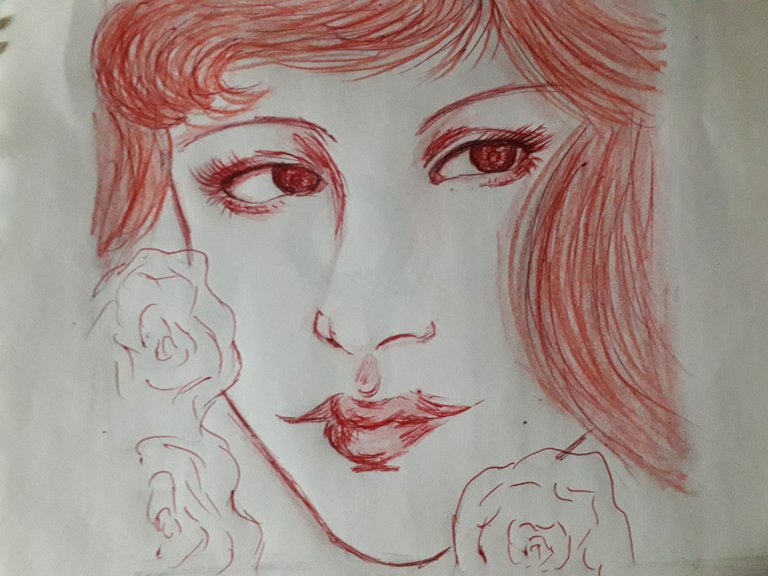
With the pencil, I sketched the outline of the face and the shape and direction of her hair. I also softly sketched the roses around her face. I don't know how to draw roses, and it shows, but the important thing is that you get the idea; I traced them in wavy shapes.
Then, with the pencil, I began to make quick, long strokes, which were intended to reflect the direction and style of her hair. I added some tousled baby hairs on her forehead with a single quick stroke.
 |  |
|---|
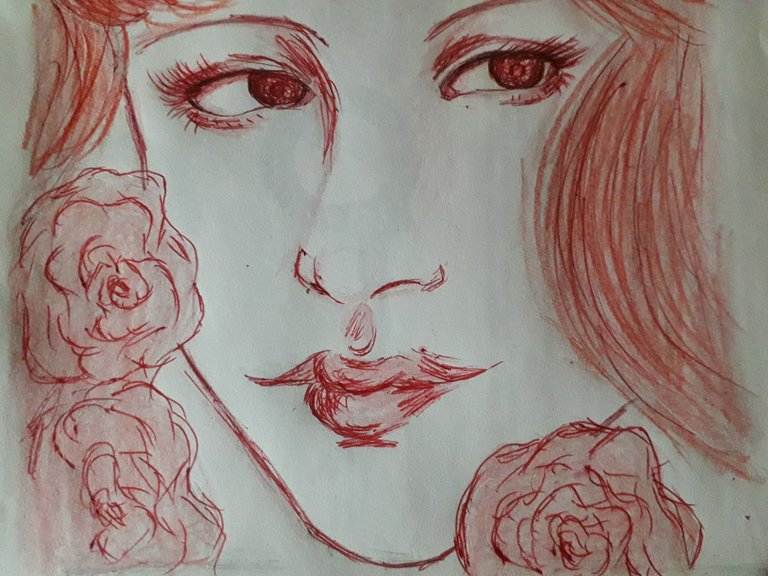
Little by little, I gave color to the hair, with strokes that followed the orientation of the hairstyle. I wasn't sure how to draw hair in this specific drawing, but I decided to draw the locks very marked to give the idea of smooth and silky hair, but above all, free. I hope I succeeded.
 |  |
|---|
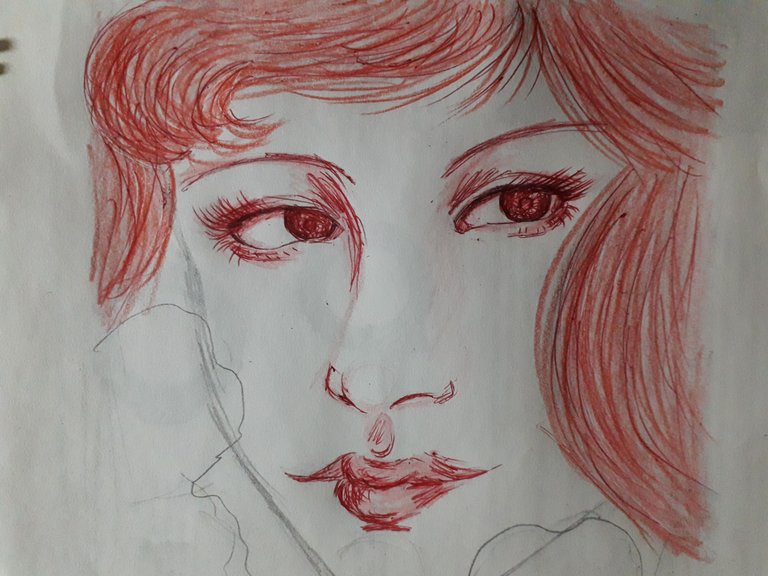
With the pencil, I began by outlining the roses. Then, I began by making free, wavy strokes in sections that closed to the center, just like the sets of petals that make up a rose.
 |  |
|---|
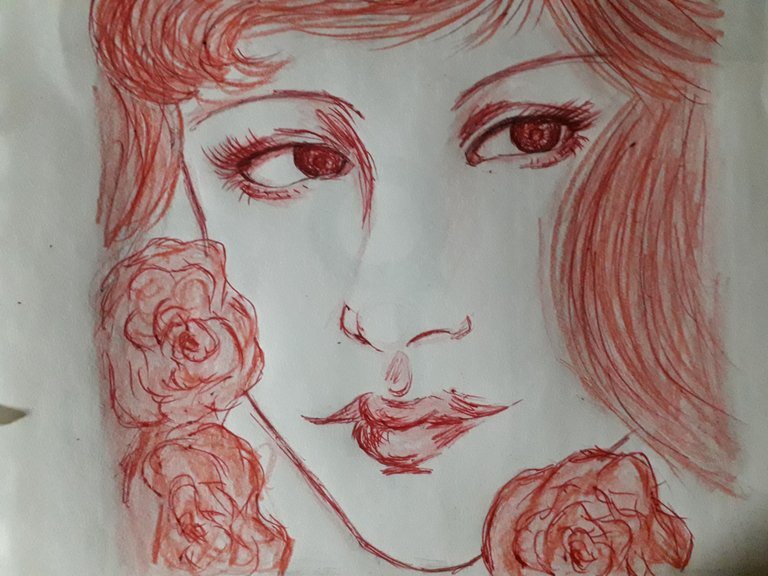
Next, I gently colored the entire rose. Then, with the pencil, I highlighted some areas to add shadow. And finally, I painted with intensity in other random areas of the rose to give depth.
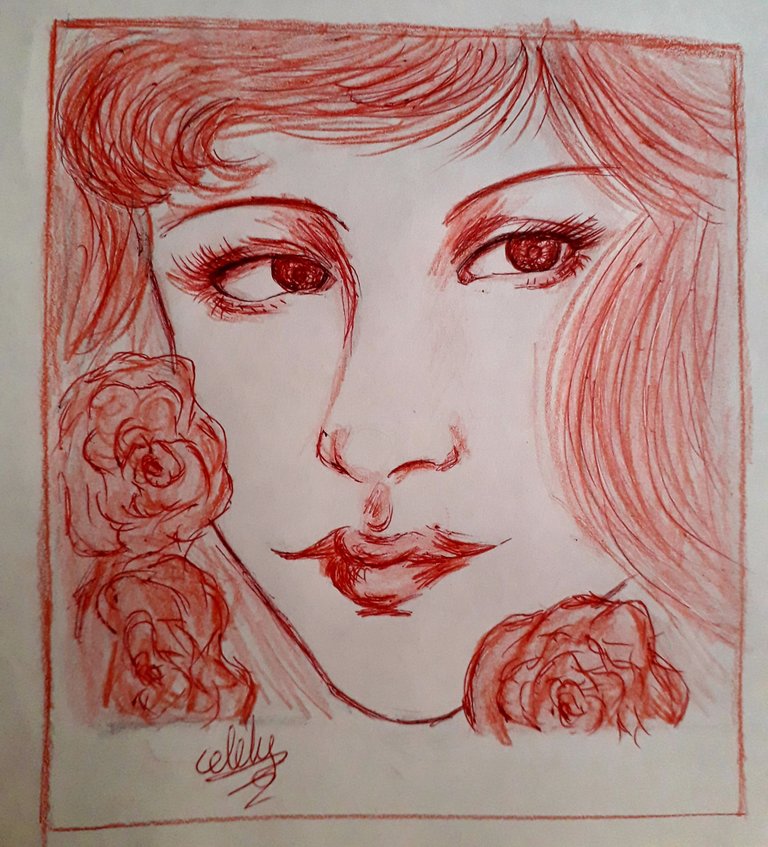
Finally, I colored red the empty white part between the face and the grazes. I also went over certain areas with the red pencil to make them more intense, as you can see.
And that's it.
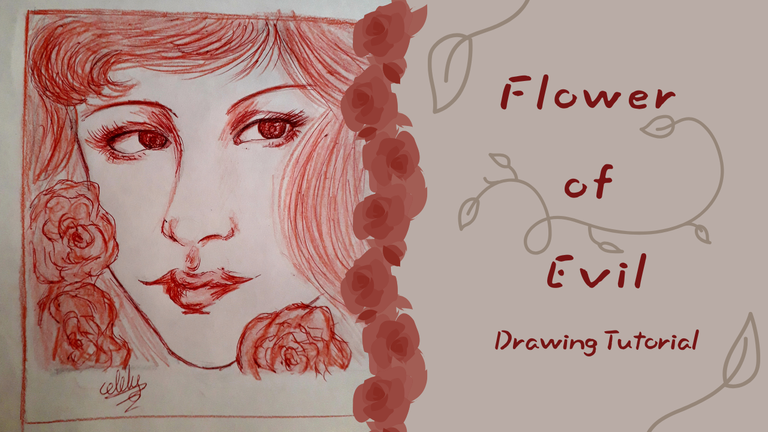
Obviously, I did this drawing based on my favorite Junji Ito's character, also combining my love for roses; I feel that they would suit him very well. Just like roses, which have thorns, Tomie has a dangerous beauty… But in the end, roses end up being cut by selfish people who want to admire their beauty, even if it's only for a while before they die. Sorry, I love Tomie; she next to Souichi is my favorite character. By the way, I recently watched Junji Ito Maniac and Junji Ito Collection, and I was left wanting to do a review. I need to do it, but I'm embarrassed, hehe.
Anyway, I hope the influence of Junji Ito's art on my drawing is noticeable. I really admire him, and I hope someday to be, even a little, as good at drawing as he is.
Hope you liked my drawing, which, by the way, I named it that way because a Vocaloid song came to my mind. I'm a mess, haha.
Without anything else to add… Take care, drink water, and don't forget to smile. Love you! See you in the next post, bye!
Español
Holiii, amigos de la comunidad de HiveDiy, ¿cómo se encuentran el día de hoy?, ¡espero que muy bien!
¿Me pregunto qué podré hacer con un lapicero rojo y un color rojo?
Anteriormente, he dibujado utilizando estos dos materiales, que son de los pocos que tengo. Sin embargo, lo que importa es el uso que le damos a los materiales, no importa que sea mucho o poco.
No me considero una buena dibujante, pero veamos que se puede lograr hoy, ¡así que vamos allá!
Materiales
- Hoja de papel (cual quieras, yo usé una hoja reciclada).
- Lapiz del que sea (yo uso el mismo que utilizo para escribir).
- Lapicero rojo.
- Un lapiz de color rojo saturado.
- Borrador.
- Sacapuntas.
| |
|---|
Primero hice la forma básica de los elementos del rostro: cejas, ojos, nariz y boca.
Las cejas las hice como dos líneas inclinadas únicamente, los ojos los simplifiqué como óvalos. Para la base de la nariz utilicé un círculo y para el tabique una línea. Los labios sí son un poco más complicados, sobre todo el labio superior, por lo que nos lo simplifiqué como tal, solo di la forma general de unos labios un poco alargados, pues es lo que sucede al sonreír, al igual que se ven más finos por este “estiramiento”.
Lo siguiente fue definir, ahora sí, cada elemento, dándole su forma básica. Por ejemplo, le di forma a los ojos y dibujé los iris, terminé de darle forma al tabique de la nariz y dibujé las fosas nasales, y terminé de darle forma a los labios.
| |
|---|
Ahora, con el lapicero rojo, delineé la forma del ojo y el iris. Acto seguido, comencé a dar pequeños detalles como el pliegue del parpado superior e inferior, así como una ligera sombra en el pliegue del parpado superior y pequeñas pestañas en el parpado inferior.
Por último, di trazos alargados y rápidos, algunas veces para dibujar cada ceja. Y con trazos circulares pequeños, di color a los iris.
| |
|---|
Continué delineando la nariz y boca, con trazos algo rápidos y no tan limpios, porque, para ser honesta, me gusta cuando mis dibujos se ven un poco “sucios”, es decir, cuando el trazo no es perfecto.
Luego, comencé a dar sombras utilizando un lápiz de color, y pasándolo suavemente, pues no quería que pigmentara en exceso. Después de todo, quería que el lapicero rojo fuera el que más llamara la atención.
Di sombras entre la nariz y los ojos y a un lado del tabique. También di color a los labios, suavemente, con trazos circulares para conservar esa idea de “volumen”.
Acá se pueden apreciar un poco mejor las zonas donde coloreé con el lápiz de color. Las sombras “dentro” del ojo son importantes, pues están siendo proyectadas por el párpado superior y son las que dan un poco más de profundidad a la mirada.
Con el lapicero rojo, di algunos trazos en los labios, para añadir sombras más intensas. Y con esto, ya estaría listo lo que es el rostro como tal.
| |
|---|
Con el lápiz, hice un boceto del contorno del rostro y de la forma y dirección de su cabello. También bosquejé suavemente las rosas que están alrededor de su cara. No sé dibujar rosas, y se nota, pero lo importante es que se entiende la idea; las tracé con formas onduladas.
Luego, con el lapicero, empecé a dar trazos rápidos y largos, que pretendían reflejar la dirección y peinado de su cabello. Añadí algunos baby hairs despeinados en su frente, con un solo trazo rápido.
| |
|---|
Poco a poco, fui dando color al cabello, con trazos que fueron siguiendo la orientación del peinado. No estaba muy segura de cómo dibujar cabello en este dibujo en específico, pero decidí dibujar los mechones muy marcados para, además, dar esa idea de cabello liso y sedoso, pero sobre todo, libre. Espero haberlo logrado.
| |
|---|
Con el lapicero, comencé por delinear las rosas. Luego, comencé por dar trazos libres y ondulados en secciones, que se iban cerrando hasta el centro, tal como los conjuntos de pétalos que constituyen una rosa.
| |
|---|
Lo siguiente fue dar color suavemente a toda la rosa. Luego, con el lapicero, remarqué algunas zonas para aportar sombra. Y, finalmente, pinté con intensidad en otras zonas, al azar, de la rosa para dar profundidad.
Por último, coloreé de rojo la parte vacía blanca entre el rostro y las rozas. También repasé ciertas zonas con el lápiz de color rojo para hacerlas más intensas, como pueden ver.
Y ya estaría.
Obviamente, este dibujo lo hice basado en mi personaje favorito de Junji Ito, juntando también mi amor por las rosas; siento que le pegarían muy bien. Tal como las rosas, que tienen espinas, Tomie tiene una belleza peligrosa… Pero al final, las rosas terminan siendo cortadas por gente egoísta que quiere admirar su belleza, aunque sea solo por un tiempo antes de que mueran. Lo siento, me encanta Tomie, ella junto a Souichi es mi personaje favorito. Por cierto, hace poco me vi Junji Ito Maniac y Junji Ito collection, y quedé con ganas de hacer una reseña. Necesito hacerlo, pero me da vergüenza, jiji.
En fin, espero que se note la influencia del arte de Junji Ito en mi dibujo. Realmente lo admiro y espero algún día ser, aunque sea un poquito, tan buena en el dibujo como él.
Espero que les haya gustado mi dibujo, el cual, por cierto, nombré así porque se me vino una canción de Vocaloid a la mente. Soy un desastre, jajaja.
Sin nada más que añadir… Cuídense, tomen agua, y no se olviden de sonreír. ¡Se les quiere! Nos vemos en el próximo post, ¡chau!
Credits | Créditos
- English translation DeepL (sorry for any mistakes, English is my second language)
- Traducción al inglés DeepL (lo siento por cualquier error, el inglés es mi segundo idioma.)
- Dividers drew by me, cover and banners made in Canva
- Separadores dibujados por mí, portada y banners hechos en Canva
- Photos used in the post were taken by me, using a Samsung Galaxy J6
- Las fotos usadas en el post fueron tomadas por mí, usando un Samsung Galaxy J6
Posted Using INLEO
This is a masterpiece and we are blown away by your drawing. Excellent job friend and keep up the good work.
selected by @ibbtammy
Thank you very much! I'm flattered by that comment, haha, it's nice to know that my art is appreciated. Thank you so much for the support as well. 💗
your drawing skills are amazing👍 the result is very beautiful and of course looks neat
Thank you very much, glad to hear that! 💋✨
This is so beautiful and the effort you put into drawing this is wond6, nicely done and great work
Thank you, I am truly flattered. Blessings. 🩷✨